Home » Hobbies and Crafts
Svetlana Shevtsova 11/21/2019
32491 Views
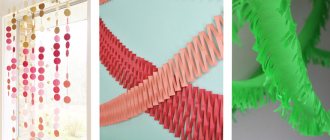
It is not so difficult to transform the interior of your own home if you use your imagination and apply a little patience. A DIY paper garland is one of the most common decorative options.
The theme of its performance can be different, depending on the occasion: Birthday, New Year, Halloween, Easter and so on. Garlands can enliven the surrounding space, creating a festive mood.
Therefore, let's move from words to action and get down to creativity, guided by the proposed master classes.
DIY snowflake garland
Make a beautiful paper snowflake garland to decorate your mantel.
Cut the paper into thin strips. You will need 12 strips for each snowflake. Then fold it in half twice. Glue the strips together and turn them over. Now attach 2 more strips. Note that the middle strip is “down” and the two sides are “up”. Now turn so that the 3 lanes are side by side
“Weave” one strip to the right of the center, top, bottom and repeat. Apply a little glue to the tops of the outer strips. Repeat on the left side of the center stripe. Notice the square basket in the center. Now make "loops" at the corners. The back of the left strip is glued to the "front" of the strip on the right side. Do this for all 4 corners. The “central” lane will not be used at this stage.
Now repeat all the above steps with the next 6 strips of paper.
Connect them together
Note the alignment, the loops on the top are on top of the flat strips on the bottom
It is important. You will need to attach the loop from the top to the flat strip from the bottom using glue
Apply a little glue to the end of the flat strip and carefully tuck it inside the loop. Glue all the flat strips to the loop on top until they are all connected into a paper snowflake as shown in the photo. When all the snowflakes are completely ready, simply “string” them on the twine, tying knots to prevent them from slipping. This is how easy it is to make this simple garland of paper snowflakes with your own hands. Read the full instructions on the website
You will need to attach the loop from the top to the flat strip from the bottom using glue. Apply a little glue to the end of the flat strip and carefully tuck it inside the loop. Glue all the flat strips to the loop on top until they are all connected into a paper snowflake as shown in the photo. When all the snowflakes are completely ready, simply “string” them on the twine, tying knots to prevent them from slipping. This is how easy it is to make this simple garland of paper snowflakes with your own hands. Read the full instructions on the website.
Photo source: www.theothersideofneutral.com/blogtheothersideofneutral/diy-3d-paper-snowflake-garland-tutorial
Flashlights
An old LED garland looks boring until you put origami paper lanterns on it. They are easy to make with your own hands, based on the diagram of the popular “Water Bomb”. For flashlights, you should only use single-sided kami paper, or even better, washi paper, since it is thin, transmits light well, and is incredibly durable. A garland made of such material will cost more, but will last for many years.
The optimal square size for a flashlight with a standard diode is 12x12 cm. Then the walls of the paper lamp will not come into contact with the light bulb and heat up. Too large “bombs” look disproportionate.
Step-by-step instruction:
- Bend the square diagonally.
- We get a triangle.
- We open it and fold it in the other direction, using previously unused corners.
- Return the workpiece to its original position. And bend it in half, marking two central axes.
- We place a square with all the fold lines of one of the sides facing us. We fold the right extreme point towards the center.
- We repeat the action on the left. We get the basic figure “Double Triangle”.
- Raise the lower right corner to the top point of the figure. We do the same with the left one.
- Repeat steps 7 and 8 for the reverse side.
- Fold the side corners of the top layer towards the center. Turn the flashlight over and repeat the last step.
- We find a hole in the upper part of the “Bomb”. We blow into it.
- The figure straightens from the air, gaining volume. Carefully insert the LED light bulb into the hole. Use hot glue to glue the paper shade to its base.
Now the lanterns can be lit:
And this is a more complex model for experienced origamists:
Maple leaf using origami technique
The maple leaf is the most popular plant element. It is made both quite realistic and simpler. The Japanese, who invented origami, believe that you can make anything from a simple square of paper - in this case, a maple leaf for decoration.
Tools, materials
To create a composition from origami leaves, you will need paper (white, colored) cut into squares. You also need a ruler (for ease of bending) and PVA glue. For decoration they use “gifts of nature”, beads, small stickers, watercolor or gouache paints, ground coffee, threads, pieces of fabric, felt, small buttons, doll eyes, etc.
Decoration
Ready-made origami is decorated in different ways - most often, veins and spots are drawn with a thin brush, and smooth transitions from color to color are created. It is permissible to color the squares in advance. If there are toy stamps, they are also used for decoration. You can grease the tips of the leaves with glue, then sprinkle with ground coffee, poppy seeds, lupine seeds, nail glitter, etc.
Sometimes funny faces are drawn on the leaves, cut out from old magazines, and hats, arms and legs, mustaches and beards are made. Products made from crumpled craft paper, newspaper, and sheet music look beautiful.
Felt garlands
Felt – this fabric is now very popular for making crafts. Felt garlands are no exception. The fabric is very easy to use, it is soft and does not wrinkle, it lends itself well to stitching by machine and by hand.
#1 New Year's garland made of felt without threads. Master class on making
The easiest option for a felt garland to make would be circles of different shapes. Of course, a garland made of felt of different colors will look more beautiful. Different circles can simply be strung on a common rope. But it will look much more interesting if you layer mugs of different shapes and colors one to one. This will add some flair. The circles need to be sewn to each other.
#2 Felt garland: circles of different shapes
Confetti garland. To make such a garland you need multi-colored felt in the shape of squares and rectangles of different sizes. They need to be sewn to one rope at a distance of approximately 1-2 cm from each other. The result will be the effect of scattered colorful confetti. Will decorate any room.
Intertwined felt garland. You need to make 2 strips of felt 1-2 meters long (depending on the size of the room you want to decorate) and 1 cm wide. Then you need to sew the second one to the beginning of one of the strips. The second felt tape needs to be wrapped around the first, which remains motionless. This is a ready-made garland that does not need a common rope on which to string it. It looks quite unusual.
#3 Simple DIY felt garland: quick and easy
Good command of a sewing machine will help you create entire compositional garlands. From felt you can sew small figurines of deer, Santa Claus, a team, a Christmas tree or fireplace mittens.
#4 Felt garland for the New Year: making Christmas trees with your own hands
Felt lanterns are perfect for a child's room. Cut out ovals from yellow felt that resemble light bulbs in an electric garland. For fun, you can use threads to make eyes and a smile - the children will be happy.
#5 New Year's garland of flowers: make your own decorations
A garland with large felt Christmas tree balls will decorate an elegant Christmas tree no worse than glass toys. The size depends on the height of the tree. Beads, beads and even buttons are suitable for decorating such fabric balls.
You may be interested in:
Stars
The origami “star” garland is universal and suitable not only for the New Year - any holiday or party will benefit from such decor. It can also be used as a permanent interior decoration in loft or shabby chic style. In this case, ordinary office paper is replaced with printed craft paper, which is not only stronger and easier to maintain, but also looks much more impressive.
A three-dimensional star is formed on the basis of a flat pentagon. The size of the original square must be at least 21 cm. In this case, the diameter of the star will be 12 cm.
You will need paper with a density of 130 g/m². If the value is lower, the product will bend; if it is higher, it will not be possible to fold it neatly. The process of making a festive origami star is described in detail in the video tutorial:
We make as many stars as needed:
We begin to assemble the garland. We successively thread the decorative cord through the rays, making holes for it on the bend.
The “star” garland on the windows looks impressive. Depending on the shape of the opening, it is fixed horizontally or vertically.
From candy wrappers
If you have a lot of paper candy wrappers, you can find a very nice use for them.
Instructions:
- Cut the candy wrappers into even squares or circles. In the end, these parts can be from 2 to 6, depending on the diameter of the garland that you want to make. For convenience, we recommend making a template.
- Place these circles on a small thread, threading it through the middle. This will make it possible to create fluffy tinsel from ordinary candy wrappers.
You can also make a garland as follows:
- To begin, twist the tubes from the cut-out squares.
- To prevent them from unwinding, put them on a thin ribbon, threading it through the middle.
In the end, you will be pleased with the result; the tinsel will be very fluffy. As soon as you stop holding the tightly rolled tube, its edges will unfold and form fluffiness. To prevent the tubes from coming off, twist a small knot of ribbon at both ends of the thread.
Original wire star
Thanks to a very simple technique, such whimsical and delicate stars are obtained. Using the same principle, you can make not only Christmas tree decorations, but even funny holiday jewelry. Braid a thicker frame with thin wire or use an improvised machine, as in the photo.
Photo: irenastyle.ru
How to make a Christmas tree from candies with your own hands: 10 beautiful and easy ideas
Construction of a drawing of gloves
The value of the dimensional attribute Palm circumference divided by 8.
19.2:8 = 2.4 cm.
Draw five vertical lines about 20 cm long with an interval of 2.4 cm. Draw a horizontal line approximately in the middle (to mark the finger lengths).
On the little finger area, move 1 cm down from the horizontal and draw another horizontal line here (the base of the little finger on the hand is lower than the other fingers).
From the horizontal lines, plot the resulting finger length values upward. Draw horizontal lines through the resulting points and divide them in half.
Create rounded lines for your fingertips.
Draw a hole for the thumb; to do this, along the 0/1 line, move 5 cm down from the horizontal (Аmpon). From the resulting point, set aside another 5 cm (the length of the muscle tubercle at the base of the thumb).
Set aside 0.5 cm inward from the right outer line and line 2/3.
From a point on the 0/1 line, 5 cm away from the horizontal, set aside 2 cm upward. From the resulting point, set aside 1.1 cm horizontally to the left and right (if your palm is wide, you can set aside a larger value). Make the top section of the hole for the thumb.
From the resulting horizontal line, move 1 cm upward along the 0/1 line. Through this point (on the 0/1 line) draw a line 2.1 cm long from the upper left point - a slot for the thumb (if you have a large hand, the line may be longer). Draw line segments c and d.
From the mark corresponding to the lower point of the hole for the thumb (from the lower point of the muscle tuberosity), place the Rebras (corresponding to the length of the glove). Connect the bottom point of the thumb hole with points 0.5 cm away from the vertical lines.
The following materials are cut out (for one glove):
- 1 piece with thumb hole;
- 1 piece without thumb hole - for the upper part of the glove.
Drawing a thumb drawing
Draw mutually perpendicular vertical and horizontal lines. Vertically from the intersection point, put the length of the thumb up, down - the length of the muscle tubercle at the base of the thumb.
Horizontally set aside from the vertical line to the left and right the value of the circumference of the thumb plus 1 cm.
From the top point of the vertical line, set aside 1 cm to the left and right and draw rounded lines for the fingertip. Draw a smooth line (see drawing) on the lower section of the part for the thumb through the bottom point of the drawing.
The length of the line should be the circumference of the thumb hole plus 2.1 cm.
From the horizontal line, set aside 2.1 cm (b) upward along the outer contour of the part to determine the location of the segment d/c.
Along a horizontal line, set aside 1.5 cm to the left from the right side of the outer contour of the part.
From the end point of segment b (2.1 cm up the outer contour of the part from the horizontal) towards a point 1.5 cm away from the outer contour of the part, draw a segment 2.2 cm long.
Middle finger parts
Draw the middle parts for the fingers in accordance with the drawing. The base line of the fingers is equal to the width of the fingers in the glove drawing (2.4 cm).
All middle parts for the fingers, shown in the drawing once at a time, are cut out of the material (for one glove).
Idea 6. Felt garland
Although felt is not a natural material, crafts made from it are the most autumnal. Today we invite you to make a simple garland from felt leaves.
Materials:
- Several sheets of felt in fall colors;
- Leg-split;
- Scissors;
- Glue;
- Thick threads with a needle;
- Pencil.
Instructions:
Step 1: Download and print the leaf templates (see downloadable template below), then cut them out and outline them.
Step 2. Cut out the blanks.
Step 3. Sew the veins by hand using large stitches.
Step 4. Now, maintaining equal intervals, hang the leaves on the twine. To do this, wrap the tail of each leaf around the twine and secure with glue. If you wish, you can sew on the details. Woo-ala, the autumn felt garland is ready!
Using the principles of this simple master class, you can create a variety of garlands with decorations in the form of acorns, pine cones, pumpkins, etc. The following selection of photos shows some examples of autumn felt garlands.
Felt Halloween Banner
Create panels, appliqués or other non-voluminous crafts. Place leaves or flowers between the pages of the book at a distance of about 3 mm from each other and move them to other pages every day (also maintaining an interval of 3 mm). Within a week, the paper will absorb all the moisture from the plants, and you will be able to use them for creativity.
Method 2. If your craft does not involve the use of flat leaves, then you can dry them by simply collecting them in a bunch and hanging them upside down in a dry but ventilated area. At the same time, keep in mind that the leaves will lose their color completely in the sun, but will retain their color in the shade.
Method 3. This method is suitable for drying and preserving the color of leaves and cornflowers. Blot fresh, just picked leaves/cornflowers with a napkin if they are wet. Place each sheet between two layers of wax paper, and place a paper towel on top of the resulting “sandwich.” Preheat your iron and make sure the steam setting is off. Using pressure, iron the paper towel for 2-5 minutes
Turn the sandwich over and pat it again through the paper towel, then carefully remove the wax paper
To prevent dried leaves and flowers from breaking, they must be dipped in a solution of water and PVA glue, diluted in a ratio of 4:1, and then left to dry.
Materials for work
Most ideas can be realized by collecting scrap materials around the house. Here is a basic list of what you will need:
- Colored paper of different weights. If you are interested in decoupage, then decoupage sheets are also a great help; you can use wrapping paper;
- Cardboard;
- Glue or glue gun;
- Double-sided tape;
- Stapler;
- Scissors;
- Rope, ribbons, twine;
- Ruler or tape measure;
- Simple pencil;
- A printer.
Advice! If it is not possible to print the template, you can always display it on the computer screen in the desired size and redraw it by pressing good old tracing paper to the monitor screen. This trick often works with a regular sheet of printing paper.
Be sure to prepare a good mood and a little patience!
How to prepare and dry leaves and other gifts of autumn
Autumn gives us a lot of materials for creativity. These include leaves of various colors, chestnuts, dried flowers, acorns, and a decorative miniature pumpkin.
But, before you start making souvenirs from them, you need to properly prepare them, namely dry them and, if necessary, coat them with varnish or paint.
If you make a craft from unprepared raw materials, it will be a short-lived product.
As soon as the material dries on its own, the souvenir will lose its shape and will have to be thrown away. And besides this, half-raw leaves can simply rot or become moldy.
So let's start by drying out our autumn finds.
Let's prepare the leaves for the herbarium as follows:
1 way:
Place them between the book sheets and place them back on the shelf, pressing them tightly with other books to the side. In about a week to a week and a half, the leaves will be suitable for crafts.
This method is the best, since the natural color of the leaves does not change and then they do not break for a long time.
Method 2:
This method is good if you don’t have the strength to withstand a week and a half and want to get to work quickly. Place the sheet between two white sheets of paper and iron with an iron set to the lowest setting.
In this case, the yellow and red leaves retain their color, but the green ones may darken and become an ugly, brown shade.
We dry chestnuts, acorns and decorative pumpkins.
1 way:
Dry outdoors in the shade. It will be necessary to wait quite a long time before these materials acquire the dryness we need.
Sometimes this process takes a month. This is especially true for decorative pumpkins, which make wonderful DIY autumn crafts.
You will see for yourself when the moment of readiness for the gifts of autumn comes. Acorns and chestnuts will become lighter, and the pumpkin will become like a rattle, as the cavity inside will dry out and shrink, and dry seeds will beat against the walls.
Method 2:
We use the oven for this. It needs to be set at a temperature of up to 60C and dried until tender, stirring occasionally.
The main thing is not to rush and do not put on high heat, as the fruits will simply cook and become completely unusable.
Drying dried flowers
There is only one way and it takes a long time. Flowers need to be strung on a thread threaded through the stems and hung in a dry place, with the flower stems facing down.
Drying in a book or with an iron will not work, as the shape will be lost and they will become flat. After the dried flowers are completely dry, they need to be covered with a layer of hairspray. It will give them the desired density and will not allow them to crumble at the slightest touch.
Well, now, let's move on to specific master classes and examples.
In each subsection you will find step-by-step manufacturing technology and a list of necessary materials for each type of souvenir.
Colorful fall inspiration
Elsie from A Beautiful Mess made this gorgeous fall wreath. A gold yarn base runs through each leaf, making this decoration fun and whimsical. Use floss instead of yarn to speed up and make the sewing process easier.
A natural garland perfectly conveys the beauty of fallen leaves. For ease of installation and to ensure long exposure, you can use artificial foliage instead of natural foliage. Then you won't have to worry about the leaves wilting and the structure collapsing.
Thu (of The Flair Exchange) presents typographic art installations in her garlands symbolizing fallen leaves. Another hint of autumn is the correctly chosen copper shade of the letters.
If you want to get a more festive mood, we recommend an alternative color scheme, primarily a combination of orange, red, and yellow.
Cristina from Remodelando la Casa created a one-of-a-kind garland. The designer used a technique of remaking an item in such a way that the resulting sample becomes more expensive and better than the original version.
The former wooden wreath received a second life in the form of a wooden garland. When reworking old furnishings this way, even small touches like a new coat of paint can update your project.
Bring the charm of fall colors with a colorful wreath of fall harvest fruits. Afke from Afke at Happy House turns physalis flowers into mini jack-o'-lanterns.
Rose of Adore Prep decided to showcase her personal memories when decorating her home for fall. Shiny cards with photographs pasted on them, depicting the exciting moments of the author's life, are strung on twine mixed with leaves cut out of cardboard in autumn colors. Bring this garland into winter by replacing the gold and leaves with blues, whites and snowflakes!
Instead of using leaves to make fall garlands, Kristen of Ella Claire Inspired uses old pine cones for her decorating exercises.
Ribbons as a decoration complete the formation of this charming project. To add a rustic touch, jute is used as an element of connection and suspension, imitating frayed burlap.
Ray from Armommy took a multimedia approach when designing her garland. Felt balls strung on two-color twine are easy to make. Large letters are made from old books.
Making garlands is not difficult, you won’t spend even a day on it! But the role of these decorative elements is invaluable, because they can bring the enchanting colors and aromas of autumn into your home!
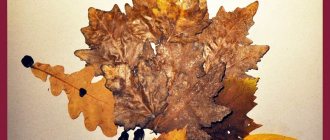
The simplest and at the same time very interesting product would be a garland of
dry leaves
, which will transform the interior of your home for a long time. You can make this decoration yourself or together with your child. We will find the main material for the craft in the nearest forest or park. So, we need:
- leaves of various shapes and sizes;
- needle and thread;
- transparent glue or varnish;
- scissors;
- paper clips and pins, or tape.
First of all, you need to dry the collected leaves. Let's place them between sheets of old newspapers, putting something heavy on top as a press. A slightly heated iron will help speed up the drying process. If you want a garland
has served as long as possible, then use a brush to cover the leaves with a thin layer of varnish or transparent glue.
We carefully pierce the dried leaves with a sewing needle with a thread threaded into it (the punctures should be made at the cutting, so that the leaf hangs with the tip down). Try to alternate colors so that our leaf garland
It turned out bright and expressive. We tie small loops at the ends of the thread for fastening - and the craft is ready!
You can place the decoration in a window or doorway, as well as on the wall of your apartment, securing it with nails, buttons or ordinary tape. If desired, you can make a curtain for the window from several garlands.
The garland will delight you with its magical tints of color for a long time!
What can be decorated with voluminous stars?
Star decor is relevant not only on New Year's Eve, but also for other celebrations. For example, a star-themed party, birthdays, anniversaries, etc. Often, voluminous stars are used for everyday interiors.
They are placed on the fireplace, under the ceiling, as a mini-lamp that can be placed on a chest of drawers. You can decorate both the corridor and the living room with voluminous stars. The most important thing is that they correspond to the general style and are made in the right colors.
for the new year
Making Christmas garlands is fun and exciting! To make a beautiful and original garland you will need small candle lamps, narrow tinsel and a couple of jars of paint - special for glass or regular acrylic. The light bulbs are dipped one at a time in paint and dried on a cardboard stand (the bases can be wrapped in cling film to prevent them from getting dirty). Then the light bulbs are glued to the tinsel in a chaotic manner, and the unusual Christmas tree garland is ready!
Making another Christmas tree garland is also not too difficult - the main thing is to stock up on a template. For printing, you can use colored paper at once, or you can make one general template and copy it onto paper of any color. Printed or redrawn templates must be cut as shown in the diagram and strung on bright twine.
Printable template (click on image to enlarge):
A garland made of felt balls looks very cozy and very Christmas-like. You can do it together with your child - you just need help. In order to make such an interior decoration, you will need felt balls. No, not even that - A LOT of felt balls.
Making them is quite simple - take some wool for felting in your palm, wet it under the tap, and then lightly roll it into a ball. Add foam or soap and continue rolling. When the ball starts to form, you need to apply a little effort.
If the wool is acting up, try changing the water temperature several times - after a couple of changes from cold to hot water and back, the fibers begin to fall off. The future ball must be thoroughly rinsed from soap. The ball is ready when it becomes hard.
Make a lot of these balls - they can be the same color (then it is better to take a contrasting thread for stringing) or different shades, and then just string them on a thread and a needle, and your cozy winter decor is ready. By the way, you can decorate a Christmas wreath on a door or a New Year tree with these balls.
Well, I’ve infected you with my handicraft enthusiasm and you already want to make all kinds of garlands from flowers, felt balls, flags and other things? Then it's time to see what other decors are available.
A DIY festive garland for a wedding can be not only solemn, but also very cute - like this country-style flower garland.
Use your imagination - use the materials you have at hand. These can be scraps of colored paper and scrap sheets, scraps of beautiful fabric and thick film, beads and buttons, sequins and feathers, old light bulbs and even small wooden clothespins - holiday decor can be made from literally anything!
The simplest and at the same time very interesting product would be a garland of
dry leaves
, which will transform the interior of your home for a long time. You can make this decoration yourself or together with your child. We will find the main material for the craft in the nearest forest or park. So, we need:
- leaves of various shapes and sizes;
- needle and thread;
- transparent glue or varnish;
- scissors;
- paper clips and pins, or tape.
First of all, you need to dry the collected leaves. Let's place them between sheets of old newspapers, putting something heavy on top as a press. A slightly heated iron will help speed up the drying process. If you want a garland
has served as long as possible, then use a brush to cover the leaves with a thin layer of varnish or transparent glue.
We carefully pierce the dried leaves with a sewing needle with a thread threaded into it (the punctures should be made at the cutting, so that the leaf hangs with the tip down). Try to alternate colors so that our leaf garland
It turned out bright and expressive. We tie small loops at the ends of the thread for fastening - and the craft is ready!
You can place the decoration in a window or doorway, as well as on the wall of your apartment, securing it with nails, buttons or ordinary tape. If desired, you can make a curtain for the window from several garlands.
The garland will delight you with its magical tints of color for a long time!
Methods of attaching a garland
Secure it so that after the holiday there are no sloppy marks left on the walls and ceiling. To do this, use the following materials:
- Silicone hooks with suction cups. Their advantage is a large selection of colors for maximum camouflage on a wall or ceiling.
- Transparent tape. They can be used to glue a light garland onto a smooth window sill, door, or tile. Use small pieces and then remove them with hot air from a hair dryer.
- Push pins. With their help you can attach light decorations to embossed matte wallpaper.
- Double sided tape. It holds the garland tightly, and after its removal there are almost no traces left on the surface. Small glue marks can be removed using alcohol-based products.
Use a hammer and nails to install heavy Christmas decorations.
Corrugated paper
Corrugated or “cigarette” paper is a very beneficial material for any “plant” crafts. It exists in a wide range of colors, but for leaves it is best to use green, yellow, red, burgundy.
How to make a rose leaf from corrugated paper:
- for work you will need corrugated paper, a simple pencil, a ruler, quick-drying glue or a glue gun, floral wire, scissors, pliers;
- Three squares with a side of five cm are cut from a single roll;
- each square is cut in half diagonally;
- cut a piece eight cm long from the floral wire with pliers;
- a strip of glue no more than one mm wide is applied to the wide side of the triangle;
- the triangle is attached to the wire, then the second one, but so that the wire is not visible, and the corrugation goes from the middle to the top of the future sheet;
- excess glue is carefully removed, the edges of the paper are trimmed so that a slightly rounded shape emerges;
- for realism, the edges of the product are painted with wax crayons, pencils, and small fringe is also cut along the edges, one or two mm deep, and slightly straightened;
- to get a characteristic trefoil, you need to make three identical leaves or make the two side ones slightly smaller than the central one;
- a strip of one cm wide and 20 cm long is cut from a roll of corrugated paper;
- the leaves on the wires are folded together, the paper strip is coated with glue, and wound on a “stem” consisting of three wires;
- the sheet plates are straightened to the sides and slightly bent to give a realistic look.
Paper crafts on the theme “Autumn” for kindergarten
Autumn leaves
Autumn leaves made from paper are a simple idea for a children's craft for a preschooler. Leaves can be cut out of colored paper using stencils, or folded according to a pattern. Simple applications and garlands are made from autumn paper leaves. In kindergartens, autumn leaves are used to decorate group windows.
To make a beautiful, bright applique, you need to add foliage from different trees: birch, maple, oak, etc. Foliage is very easy to make using stencils of the right sizes.
Leaf Patterns:
Tree
Making a tree from colored paper and cardboard will appeal not only to children, but also to adults. One of the simplest options is a tree in the shape of a palm. This application can be done together with children of kindergarten age. Here you can show your imagination and choose the color scheme that the baby considers most pleasant for himself.
What materials will be required for manufacturing:
- corrugated paper;
- cardboard;
- regular colored sheets;
- scissors;
- glue.
Manufacturing instructions
- Prepare the base of the craft - the trunk. To do this, the child will need to trace his hand on a piece of brown construction paper.
- Prepare the foliage. For a more interesting and vibrant result, cut paper of two colors into small pieces and crumple it into an accordion.
- Glue the tree trunk onto a blank sheet of paper.
- Then we glue two-color foliage in a chaotic manner to form a crown.
- Then we glue the sheet along with the tree onto a larger cardboard. A handmade tree can be placed in a frame and decorate the interior of a nursery or any other room.
Corrugated paper tree applique
Pumpkin
Pumpkin is the most popular choice when Halloween competitions are coming up.
To make it, you need to take colored sheets of yellow or bright orange. Draw stripes on them every 1.5-2 centimeters. The length of these strips should be different. Their length is shortened by half a centimeter every two strips.
Each two strips are fastened to each other with glue or a stapler and fixed to the middle. When all the stripes are connected into a pumpkin, you need to fix a green leaf on top. It can be cut out using a stencil.
Craft paper pumpkin
fly agaric
Fly agaric is another bright and interesting craft for kindergarten.
There is nothing complicated about making them. After the example, the child can easily make a whole mushroom meadow. It is recommended to use toilet paper rolls as a base, as such mushrooms will be stable. If you don’t have any bushings in stock, you can simply make tubes out of cardboard, thoroughly coating it with glue.
Paper crafts in the form of fly agaric mushrooms turn out to be very elegant and interesting. After preparing the bushings, you need to cover the mushroom stems with plain white paper. Cut a strip approximately 3-5 centimeters wide from a blank sheet of paper. You need to make cuts on it, imitating fringe. Then fix the fringe on the mushroom stem with glue.
After this you need to make a cone or hat from red paper. There is no need to glue the cone, as it should stick well. The white circles on the hat are made of cotton wool. Small circles are rolled out of it, rolled into glue and fixed on the cap. If you don’t have cotton wool on hand, use white paper mugs.
Several of these mushrooms can be placed on a sheet of cardboard or the inside of a box lid, and the bottom can be lined with dried leaves. This autumn paper craft will take pride of place at a craft exhibition in kindergarten.
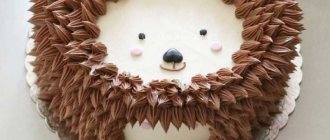
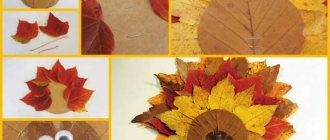
Hedgehog
A children's craft in the shape of a hedgehog can be made in a variety of variations. You can make a hanging animal with your child and hang it in the children's room.
Manufacturing technology:
- Cut out the silhouette of a hedgehog using a stencil, or use any other template.
- It is better to use cardboard for the silhouette of the animal.
- In the middle of the silhouette we glue several colored dried autumn leaves. To make them as bright as possible, you can pre-paint them with oil paints.
- The paws are made from beads and pieces of cardboard. They are attached to the body with ropes.
Paper hedgehog
Where to begin
Modern offers of options and patterns for paper garlands are almost impossible to describe, the choice is so rich and varied. Having decided to take up this exciting craft and decorate your home with paper garlands, we perform a certain sequence of actions:
- Let’s get acquainted with a general short list of paper garlands that are easy to make even for a beginner;
- Having chosen the option you like, we proceed to a theoretical acquaintance with this technique;
- if the selected version of the paper garland requires it, remove the required template;
- We prepare everything necessary for the work, according to the description.
Autumn crafts for kindergarten from pine cones
You can make a charming forest hedgehog from salt dough and fir cones. To make it you will need a fir cone, which is then disassembled into individual scales. These scales decorate the hedgehog's body. The body itself is molded from salted dough.
If you want to make a large hedgehog, then you can use a plastic bottle as a base. We color the top part of the bottle with a black marker - this is the future face of the hedgehog. Glue the fabric to the bottle, leaving the painted part free. We glue the cones onto the fabric, trying to position them as closely as possible to each other.
When the entire surface with the fabric is covered with cones, all that remains is to glue paper eyes and ears to the hedgehog. We attach apples, nuts, mountain ash and twigs to the back of the hedgehog. Autumn hedgehog made from cones - ready!
Look at the video on how to make a hedgehog from cones using a bottle and plasticine:
You can make a charming squirrel with an acorn from a pine cone and felt. Squirrels with acorns are real symbols of autumn.
You can make a proud autumn deer from a pine cone, twigs and an acorn. The parts of the craft are attached to each other using plasticine.
From natural materials you can make a very beautiful autumn craft “nest with birds”. We weave a nest from thin twigs. We weave leaves into the bottom, covering the gaps between the branches. From cones, chestnuts and leaves we make a bird family - a mother and two little chicks. All parts of the craft are attached with glue. We glue the birds' eyes and beaks and place them in the nest. A nest with birds made from natural materials - ready!
Using the same technique, you can make topiary from leaves.
You can make a very cozy one out of cones.
Interior decor with autumn garlands – Crafts Fair
Content
It's leaf fall outside today. An extraordinary number of shades. And today, on a walk with my youngest daughter, I started fantasizing about what I could do with her on an autumn theme... While she is only one year old, it’s too early to pick up scissors, but I wanted to make a small selection for the future. Of course, there are a great many options for autumn decor, but I wanted to focus on garlands. Enjoy watching!
Look how cute this garland is made from regular colored paper. And I especially like the vertical threads that complement the garland from below, giving it movement.
Paper clips don’t even spoil this autumn still life