The cosmetics organizer is designed to become a lifesaver for women. When there is a place for every tool and everything is stored in one place.
Today we will make our own organizer and chest of drawers for cosmetics from scrap materials. Often this is cardboard or a box. Of course, in such organizers you can store not only cosmetics, but all sorts of small items or bathroom accessories and office supplies.
Organizer for cosmetics
What is a cosmetics organizer
Organizers are designed for compact and ergonomic use of things. They can be made from different materials and textures:
- Made from cardboard of different thicknesses
- Boxes
- Wood or plywood
- Fabrics.
Dressers and organizers have many compartments of different lengths and depths. A wonderful thing for organizing order in the apartment. Of course, you can buy a ready-made organizer, for example, a cute box made of plywood will cost seven thousand rubles, and one made of fabric will cost a thousand.
Stool box: drawings and description
This is a carpentry product of a more complex level of manufacture than a simple box. For a stool on which you can sit or stand, a durable frame is built from a bar. The interior space is used to store tools.
You will need:
- board 20 mm thick;
- block 50x50;
- plywood 8-10 mm;
- wood glue;
- cutting tool;
- screwdriver or drill;
- block, fine sandpaper or sander;
- hinges, handles, lock.
First prepare a drawing with dimensions
Now you need to assemble the stool:
- Trim the blanks to size.
- Connect the bars with tongue-and-groove fastenings and dowels.
- Cut out the bottom and sides from plywood.
- Sand all the details.
- Lubricate the contacting surfaces with glue.
- Insert dowels and connect the elements, remove excess lei
- Tighten with clamps for 24 hours.
Aging in clamps
While the glue is setting, a seat is made from the board. The parts are polished and the edges are rounded. Glued to the frame and connected with an “oblique” screw.
The sides and bottom are fixed to the stool. The opening part is secured with overhead hinges. To prevent the lid from opening spontaneously, install a latch. The functional box-stool is ready.
DIY cosmetics organizer
But it won’t be difficult for needlewomen to make it themselves, with their magic hands. Before you start, you need to determine the desired size of the organizer so that all your cosmetics fit in and have their place. We come up with what our organizer will look like and begin to outline it schematically, signing the dimensions.
Cut out all the parts from scrub cardboard.
We prepare napkins for gluing parts.
We coat all the parts with PVA glue and stick on napkins, covering the corners well.
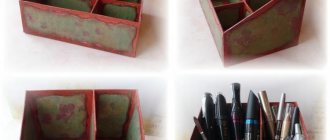
Let's start assembling the organizer.
We glue the two sides and the back wall to the base.
We decorate all seams and joints with tape and braid.
Glue two horizontal dividers inside.
The organizer is ready to use.
A simple idea for a stationery
An original organizer can be made from cardboard sleeves. The step-by-step lesson in this article will help with this. For work you will need: thick cylinders, corrugations of different colors, scissors, glue, ruler.
- First you need to measure the length and circumference of the insert.
- We make strips of the same size from multi-colored corrugated sheets.
- We cover the base with paper blanks.
- To make everything look organized, draw a cloud on a clean piece of cardboard. Cut along the contour.
- Glue all the prepared parts onto it.
- We come up with various flowers from colored sheets and decorate the composition.
Organizer out of the box
Decide what you will store, whether you need space for lipstick, the amount of creams. And after that, start drawing.
Usually the back wall is made higher than the front.
Measure out all the partitions; you can use round holders for pencils; for this, take a paper towel tube. You can glue it using PVA glue or hot glue (heat gun).
Glue all the parts to the base.
You can make a small supply of lipsticks.
It is better to putty all the cracks and front sides of the partitions.
We cover the entire product with white acrylic paint to protect the organizer from moisture.
Then we paint the organizer in the desired color.
You can use a stencil to decorate the organizer.
Print the pattern you like and cut along the outline. For durability and ease of use, it can be laminated or covered with tape on both sides.
Let's draw a picture. To do this, press the stencil and apply paint with a sponge. Make sure that the stencil does not move.
After all the paint has dried, turn the box over and decorate the bottom. Apply glue and seal with cardboard, paper, fabric.
The result is a very compact organizer.
Juice bag organizer
A very simple way to make an organizer with your own hands using juice cans.
You will need 6 juice boxes of different sizes, self-adhesive paper and plain paper or napkins.
Bag organizer
Cut the longest bag in half lengthwise. For small bags, cut off the bottom at the same height.
We mark the height of the second level and cut off the top of the smallest boxes; in the example there are three of them.
We do the third level like the second.
We assemble the organizer without gluing.
We cover the insides of the organizer with paper or napkins.
We connect all the parts, you can use a heat gun or double-sided tape.
To avoid noticeable irregularities and transitions, we cover the boxes with masking tape.
We decorate the front part with self-adhesive paper. Glue all levels together.
Organizer made of cardboard and box
We measure the box and cut out an even number of partitions equal to the length and height of the box.
For partitions, you can use a joining system by inserting partitions into grooves.
To do this, we make markings according to your drawing and cut them out. And we insert the partitions into the grooves of each other.
We assembled the partitions and inserted them into the box. If everything is smooth and everything fits in, then we disassemble the structure and begin decorating.
We glue all the parts, including the sides.
You can use wrapping paper, self-adhesive film, napkins, or print the desired design on a printer.
Tool Chest Ideas
In the hands of a true craftsman, any thing that has outlived its useful life can become a useful and functional device. Various ideas that are implemented from improvised means arouse interest and become an impetus for one’s own creativity:
- A tool box made from cable ducts and sofa springs is an economical lightweight device for storing small accessories.
- Plastic canisters are record holders for generating various ideas. If you cut out a window in the upper part, such a container can be used to store screws, nails, drills and anything else that may be useful in your work.
- A shopping cart, if obtained legally, can be transformed into a convenient Tool-box through some transformations. It is enough to arrange compartments or shelves, and the handle and wheels are already there.
- Old "diplomacy" bags are strong and durable, and reliable locks have worked properly for more than 20 years. Inside the case you can arrange small pockets for storing small items, and the suitcase itself can easily withstand the weight of a drill or screwdriver.
Chest of drawers for cosmetics
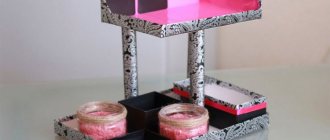
A chest of drawers for cosmetics allows you to hide all your products from prying eyes and add zest to the interior. You can make an open shelf on top of the chest of drawers by gluing another box onto the lid.
Chest of drawers for cosmetics
Read also: How long to charge 1000 mah batteries
For a regular chest of drawers, you will need three identical boxes.
We decorate them and come up with handles. You can use regular buttons.
In order to sew them on, you need to use an awl to make two holes in the middle of the front side of the box.
After this, we measure the height and width of the boxes and cut out the back wall with a lid and two sides from cardboard.
We also decorate them.
In order for the drawers in the chest of drawers to move out well, you need to make guides on the sides. To do this, you can take ordinary corners from a children's construction set, or bend them at an angle and glue the cardboard, or cut out such corners from thin metal and bend them. There are a lot of variations here.
The sides can be glued with double-sided tape.
We measure and glue the bottom of the chest of drawers.
When building the sides and tops, allow an allowance of a couple of centimeters so that the drawers fit better.
All cuts on the front part must be covered with paper or putty.
And the final stage was decorating the outer walls of the chest of drawers with colored printed paper.
Design
For manual production, you can limit yourself to a simple design or “swing” at a more complex option. This will depend on the functions assigned to the organizer, as well as on the type of stored devices and materials:
- A simple box with a handle is often used for carpentry, construction or painting tools. It is easy to make, quite versatile and easy to carry.
- Case - a suitcase-type design, closed with a lid with a lock. In such an organizer you can keep small tools, fragile devices, and consumables.
- A container with a lid is a very popular option. The internal space is organized according to the needs of the user. Large tools are placed on the bottom, and containers for storing “small things” are installed on top. They can be either fixed or removable.
- Folding accordions. When folded they are very compact, and when unfolded they provide a complete overview of everything that is inside.
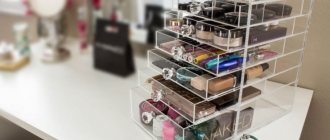
- With retractable compartments - they are a cabinet-type structure. Each compartment is separate, all items are neatly folded and do not come into contact with each other.
- On wheels - a convenient modification of any heavy organizer. The problem of carrying it over long distances disappears by itself. For professional craftsmen or teams performing a wide range of work, this is a significant help.
- A box stool is a functional option that can be used as a seating area or a small work surface.
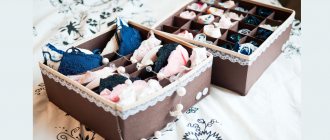
Fabric cosmetics organizer
Organizers made of fabric come in different configurations. For example, in the form of pockets. You will need thickened fabric, decor and threads.
Fabric organizer
Several pockets are sewn onto the base. If you sew ribbons to the base, the organizer can be tied to a vertical surface or simply hung on a nail.
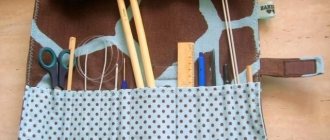
Or an organizer in the form of a tube. To do this, loops of different lengths are sewn onto the fabric. Into which brushes and the necessary tubes are inserted. You can replace the loops with shallow pockets. You can store cosmetics rolled up, in the form of a tube.
Cut the top and bottom of the tray to the size you choose
After removing the template from the workpiece, cut it to the final size on the table saw. Before working on the rest of the organizer, glue several pieces together to create wide enough pieces. For the bottom support of the organizer tray, use a large 6mm deep tray for both the tray and some stationery holders later. Glue one part into another and wait until it dries completely.
They stopped expressing their opinions: signs of a decline in the morale of subordinates
The tongue can lie, but not the body: how a leader can improve communication skills
Plan your day: how to cope with anxiety when returning to work in the office
Now you should cut the tray assembly to the desired size, leaving approximately 6 mm of material on both sides. Also cut a notch on the two front corners to cover the rounded ends.
Organizer made of wood or plywood
To create such an organizer you need a screwdriver, a base and a saw or a machine for cutting out parts. The parts are cut out according to the drawing, and all sections are sanded.
And they are assembled using a screwdriver into a single structure. Decorate with paint or decoupage technique.
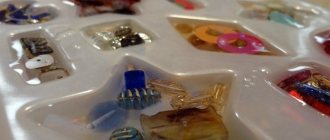
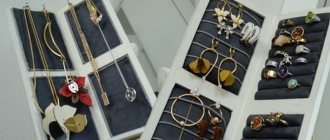
You can also make an unusual organizer by drilling holes in plywood for brushes.
Tags
Organizer from The history of the organizer began on its own. Organizer from Organizer fromVariety of organizers creating organizers Wall organizer Organizer for Organizer forVariety of organizers than a wooden plate.beams wooden shelves.a wooden box Wooden bars resistance to wooden bars.tree branches with your ownInterior trees Wooden made of wood wood with your own hands with your own hands at hand and Hand movements should with your own hands Pencils
clockhousetabletopneeddecorhandcraftsmendrawersdresserssimplegoodsarticlesandshelveslightscalendarblanksstepsiteboxeslayoutfabricvideotableselementsaftercosmeticslowerweightlistgluetotalcuttingdecorationplatesmedalscarddesigngluedoorfilesdeliverytoyssidephotophotoframesrublescotchonlycardboardreadmodels
Organizer ideas
To make organizers, it is advisable to choose the right shades of fabric or paper so that the whole composition looks harmonious.
Organizers can be multi-level and of different heights.
It is very convenient when the storage place has open containers and drawers.
Glue all the resulting parts together
Once the profile of the side panels is complete, sand all the pieces using 220 grit paper and glue them together. After the glue has dried (it will take overnight), apply a finish to the body - this can be mineral oil, stain or clear varnish.
Put Ethics First: What to Do When You Have a Very Flirty Coworker
Chat with friends: what to do after your salary to make you want to work more
Location matters: why some people can't find work
Video on how to make a cosmetics organizer with your own hands
Last year I started acquiring precision computing instruments and decided to build a box in which I could store them. Being pressed for time, I decided that instead of working with my hands, I would cut all the parts using a laser.
These instructions are for assembling a very durable DIY plywood toolbox, consisting of 9 compartments. Pull-out shelves are designed in such a way that they are locked in the drawer and cannot be pulled out completely, so you won’t be able to pull out and drop a shelf with an expensive tool, damaging it.
A lock can be built in to secure the drawers or to lock the top compartment. This tool organizer has withstood a year of rough handling as it moves between my apartment and a local workshop.
Cutting tools
The tool is selected depending on the purpose of sawing. The table shows the main devices that effectively cope with the set goals.
Table 1. Tools for cutting plywood.
| Name | Description |
Hand saw | Not the most convenient and time-consuming option. When working with timber, you have to exert maximum physical effort. Since plywood is highly durable, the saw does not always produce a straight cut line. It is used primarily for cutting one plate into equal parts. The cut is rough and requires additional sanding. |
Hand jigsaw | One of the most acceptable devices. Makes it possible to create a large number of parts, regardless of the degree of complexity. If you have basic carpentry skills, a jigsaw allows you to get a neat cut. But this process is energy-consuming. |
| Circular Saw | Ideal for cutting regular and laminated plywood. The output is rectangular slices of ideal shape. A tool with small teeth is preferable. The rate of disk rotation should be low, the sharpening angle should be positive, and the pressure on the plate should be minimal. At a negative angle and high speed, wood can burn. During operation of the tool, the following pattern is observed: as the size of the disk increases, the likelihood of chipping increases. It is not advisable to saw a thick panel with small teeth. This may result in the disc getting pinched. |
| Electric jigsaw | The ideal cutting tool. It is advisable to use small files. Hand movements should be smooth and press firmly. At the end of the process, the ends are treated with abrasive sandpaper. Preferably, tools marked “clean cut”. |