It is important for every woman or girl to have personal space in the house. And if she is the owner of jewelry, then the place where they are stored can become a beautiful decor for the bedroom or any other corner of the family hearth.
So, how to store jewelry? The answer is simple - an organizer is a place to store jewelry. You can do this thing yourself.
Let's figure out how to create a jewelry organizer with your own hands.
DIY jewelry accessories
In this case, the old tray is used as a basis,
to which spools of thread are attached for hanging necklaces, bracelets or beads.
In addition, you can use small boxes (for example, from an old box) or jars for jewelry that is not hung:
rings, earrings and other items.
Screw hooks or screws were also used
All this, as a rule, can be found in the house by rummaging through old things.
The tools used were pliers.
1.
First we take screw hooks or screws, which should first be bent into a hook.
2.
The hook-shaped screw can easily be screwed into the tray by hand as shown in the picture. But first you need to put spools of thread on the hooks.
3.
Then we place small boxes at the bottom of our main tray.
4.
tags
from scrap materials on the boxes and near the hooks
In principle, the organizer is ready. However, for a beautiful look of the finished product, we recommend using the following instructions:
You will need: glue, scissors, fabric and cardboard.
1. Paint
wooden tray with spray paint. For a special beauty that gives the surface a solid and smooth look, you can apply a primer.
2.
Cut pieces of cardboard to fit your small boxes.
3.
Take a piece of fabric and cut it to a size that is approximately
1 cm larger than the size of the cardboard pieces.
4.
Place the fabric face down and place your piece of cardboard in the middle.
5.
Wrap a piece of cardboard in fabric and
glue it around the edges.
6.
Then place the resulting product on the box. Pre-apply glue to the bottom of the box. For better bonding, place some weight on the bonding surface.
7.
Do the same procedure with all small boxes.
8.
Tags for boxes can be made from patterned paper. The approach to making such tags will depend only on your imagination.
9.
We recommend gluing small boxes onto a soft material so that the paint does not come off if you want to dismantle them.
10.
Just as we did the upholstery of small boxes, we do the upholstery in the main patch. The fabric can be of a wide variety of colors, including burlap.
Design ideas
Do you think that pasta is the most original material for decorating boxes? Nothing happened! The most unexpected materials can be used as decor, if, of course, you know how to work with them!
What do you think is there, under the decoupage napkin, that creates such an interesting texture a la crocodile skin? You won't believe it: a run-of-the-mill eggshell!
Are there any old newspapers left? And we’ll put them into action, for the benefit of hand-made:
And from glossy magazine pages you can make an interesting braid. An ordinary jute thread, but what a look! However, burlap is in no way inferior to it.
Yes, and different-sized buttons, clasps and other accessories from outdated clothing can be put to good use!
How to make an organizer from a window frame
If you have an old window frame lying around somewhere in your closet ,
Now is the time to take advantage of our tips for making an organizer from a window frame.
Necessary materials:
- Old wooden frame.
- Fabric or decorative paper.
- Screw hooks (or curved screws).
- Old door handles.
- Reiki.
- 2 - 4 hooks for attaching the structure to the wall (can be purchased at the store).
- Cardboard.
- Dowels (can be purchased at the store).
Required tools:
- Scissors.
- A glue gun (you can also use a glue brush).
- Brush.
- Hammer.
- Drill or screwdriver.
- Pliers.
- Sandpaper.
- Pencil.
- Saw (small, maybe a jigsaw).
- Small nails.
- Pliers.
1.
First, let's clean our frame of debris and paint.
It is also necessary to remove any remaining glass and nails. We do this using pliers.
2.
Next, sand the frame with sandpaper. If you want the organizer to be in white or light colors, you will first need to whitewash the frame with white paint.
3.
Now find out how your decorations will be placed on the future organizer in order to know how to install fastenings on them. To do this, you can simply carefully lay everything out on the table.
4.
Now you can create decorative walls using our organizer. To do this, take cardboard, previously cut with scissors to the required size, and attach it to the back side of the decorative paper or fabric.
5.
We glue the fabric and cardboard around the edges.
6.
Next, we prepare the slats according to the dimensions of our frame. To do this, we apply a piece of the slats to the frame and mark with a pencil where to saw off.
7.
Now we glue our decorative slats to the main frame.
8.
After the glue has dried, hammer the nails into the slats for better fastening.
9.
Now you can add more glue to better fix the entire structure.
10.
We screw in the screw hooks, having previously marked the screwing points with a pencil. You can screw it in by hand or using pliers.
11.
We also mark with a pencil the places for hanging jewelry and install door handles there. This can be done using a drill. Much will depend on the shape of your door handles.
12.
Drill a hole in the wall with a drill.
13.
We drive dowels into the resulting holes.
13.
Next, we install hooks to secure the structure and hang the finished product on the wall.
Option 2
This is another option for an organizer made from a window frame. Here, instead of hooks and handles, wire mesh was used.
The mesh on the back of the frame can be secured using small nails.
Plaster hand
The idea for creating this unusual jewelry stand was borrowed from showroom interiors.
Making a plaster stand with your own hands is easy. It is enough to follow a certain sequence of actions:
- Prepare the necessary material: dry gypsum powder (1kg), thick rubber glove, wooden board and pencil, furniture stapler, drill and jigsaw.
- Having measured the wrist of the glove, trace it on a wooden plank and then cut out a hole of the appropriate diameter. The edges of the workpiece must be cleaned.
- A rubber glove is threaded into the prepared hole of a wooden board and secured at the edges with a furniture stapler.
- Dry gypsum powder is mixed with water until it becomes thick sour cream. The resulting mixture is carefully poured into a rubber glove.
Related article: 7 secrets for organizing storage in the hallway
Important: you must ensure that the plaster fills the glove evenly, without gaps or air bubbles.
- The glove is left for forty-eight hours until the plaster hardens completely.
- After the plaster has dried, the rubber glove is cut. The jewelry stand is ready.
Organizer from a board
Here's a wonderful, stylish hanger for hanging jewelry you can make from an ordinary old board.
You will need:
- A piece of an old board.
- Handles from old doors and drawers (you can buy them, for example, at a flea market).
- Hooks for wall mounting.
- Dowels.
You will also need tools:
- Drill.
- Pencil.
- Ruler.
1.
Measure with a ruler and mark the places for the handles with a pencil.
Gift box-bag
What do you need
- Thick paper;
- ruler;
- pencil;
- scissors;
- disk;
- glue;
- yarn or ribbon.
How to do
Fold the wide side of the sheet, moving 5 cm from the edge. Fold the resulting strip and cut off the remaining paper along the edge. Bend it back once.
Make one mark at the top and bottom, stepping back 5 cm from the narrow edge. Fold the edge along these marks, then fold the entire piece like an accordion.
Unfold the paper completely and make cuts along one wide edge of the sheet to a horizontal line. Cut off the narrow part, folded into an accordion, at the top and bottom. It should remain in the middle.
On the other wide side, mark the middle of the resulting squares with a pencil. Take a disk or some other round object and connect the center marked points of the squares with the corners opposite.
Fold the paper along semicircular lines. Glue the box together as shown in the video. Punch holes at the top, thread yarn or ribbon through them and tighten the bag.
Organizer from a hanger
Do you know how you can use a wooden clothes hanger?
You can make an amazing jewelry organizer out of it.
You just need to pre-drill small holes in the base of the hanger, where you can then insert the hooks. After this you will receive an extremely practical organizer.
Such a product can be hung almost anywhere and even taken with you to the bathroom or other fitting room. This organizer is capable of storing necklaces, bracelets and even rings. A simpler organizer could hardly be found.
Gift box-chest
What do you need
- Sample;
- thick paper;
- scissors;
- stationery knife;
- glue.
How to do
Print the template, cut along the solid lines and cut along the bottom dotted lines. Fold the shape along the remaining dotted lines. Glue it together as shown in the video. Connect the top pieces and thread them through the holes to close the chest.
You can leave the box as is or cover it in the middle with paper of a different color and decorate it with a bow.
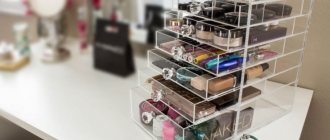
Storage Organizer
This organizer is simple
in production. It is suitable for storing small items such as glasses, keys, jewelry and others.
You will need:
- A piece of plywood.
- Thin board.
- Dye.
- Textile.
- Decorative hooks (can be purchased at the store).
- Nails.
- Screws.
- Wire.
- 2 tin cans.
- Decorative paper.
- Tray.
- A piece of any fur.
Tools:
- Brush.
- Saw.
- Screwdriver.
1.
First you need to decide on the sizes. Make sure that all sides of the future organizer are even.
2.
We paint the plywood.
3.
Next, we try on the boards along the edges of our plywood. We cut boards to the size of plywood. The angle should be 45 degrees.
4.
We paint the resulting boards.
5.
Next, on the back you need to install a mount for hanging on the wall. In this case, screws and wire were used. The screws can be tightened with a screwdriver.
6.
Now let's take care of our banks. Let's paint them inside first. You can use spray paint for this.
7.
Then we paint the outside. In this case we used two different paints.
8.
Now we will apply our decorative paper using glue. Additionally, patterned napkins can be attached as decoration.
9.
In addition, we built a small organizer inside a larger organizer using small slats and chicken wire.
10.
We install decorative hooks to our organizer.
11.
You can also place a stand for hoops on the chest of drawers, next to the wall organizer. The stand in the photo was previously a mug stand. We simply repainted it to match our light style.
12.
Now let's secure the fur in our tray as shown in the photo.
13.
Finally, the last part of our all-in-one organizer is a box for larger items like scarves and belts. In this case, a plastic laundry tray is taken, to which you can stick decorative paper or fabric.
All is ready. Let's see what we got.
An easy way to create an earring box
A homemade casket with an unusual decorative design is a great idea for a gift for a birthday, March 8, New Year, wedding anniversary or Valentine's Day. A DIY jewelry box in tandem with a new ring or silk scarf can make the fair sex of any age category happy. To create a spacious chest, you can use various improvised materials and discarded household items that can turn into an impressively designed organizer for jewelry.
To decorate products made from cardboard, foam plastic, plastic and any other materials, you can use fabric or beautiful paper napkins with picturesque illustrations. A DIY jewelry box should be spacious and easy to use. Before you start looking for ideas for creating a chest, you need to decide on the accessories that you plan to store in it.
To accommodate numerous earrings, a box with many compartments for convenient placement is ideal. A great idea would be to use a CD stand as the base for a DIY jewelry box. Step-by-step execution consists of sequentially performing several stages:
- Along the edge of the CD, it is necessary to make many holes at equidistant distances with an awl.
- At the top of the stand holder, fix the disk with the holes for the earrings using a glue gun.
- To decorate the cover of the stand, you can use openwork lace or a cover made of beautiful fabric - velor, jacquard, silk, velvet or satin.
To decorate jewelry boxes with your own hands, the photo ideas presented in the expert selections of our online magazine will help you choose the best execution technique: decoupage, painting or carving. Various publications contain a treasure trove of original ideas for creating stylish and functional interior items that can give the appearance of a home unique features. Handmade jewelry boxes allow you to independently choose the basic size for the future product, taking into account the desired volume and number of compartments. For example, a large-capacity box is needed to store hairpins, clips, and hairpins, while a small chest .
Organizer for small items
If you have a wonderful game "Jenga",
but most of the sticks have already been lost, then don’t despair. The remaining sticks will certainly be put to good use.
You can use an analogue of “Jenga sticks”. It all depends on your imagination.
So let's get started. All you need:
- Dye.
- Glue (in this case for gluing wood).
- Sticks.
- Acrylic paint.
- Sponge.
- Adhesive tape.
- Wax paper.
- Nails.
- Hammer.
- Pencil.
1.
Start by laying out wax paper on your work area. It will protect our workplace from damage, from paint and glue stains.
2.
Lay the entire structure together to immediately decide on its appearance.
3.
Apply adhesive tape to prepare the sticks for painting. The tape will block the areas we don't want to paint.
4.
We paint with a foam sponge.
5.
Allow the paint to dry for at least one hour, after which you can remove the adhesive tape.
6.
Glue the sticks together as shown in the picture. Don't skip the sides of the sticks that need to be coated with glue beforehand.
7.
Let the glue dry for at least 5 hours.
8.
Next, mark with a pencil the places where we will nail the nails.
9.
We nail the nails for the best mounting of the organizer.
10.
We install the entire structure in its place. All is ready. Now you can hang your favorite jewelry.
Internal arrangement of the device
Having decided how to make a watch box, it is worth thinking about the internal arrangement of the case. The work is as follows:
- First you need to cover the inside of the lid with fabric. Usually velvet is used for this. This type of textile protects the watch and strap from microscopic damage.
- It is worth considering a watch holder. The simplest option would be to cover the inside with velvet. For the watch, sew a pillow from the same textile. It is important that the soft element has the same girth as the watch strap.
- If space allows, you can create a department where you can store a napkin for wiping the dial and other accessories.
Additional features of decorating the interior depend on the preferences and skills of the master.
Jewelry stand: ring organizer
If you have a problem storing rings,
then we suggest creating a simple organizer with your own hands.
You will need:
- A piece of foam rubber (you can take an old washcloth).
- Flat jar (for example, from sprat).
- Decorative material.
- Ruler.
- Marker.
- Knife.
- Scissors.
1.
Mark on the foam rubber with a ruler and a marker the places for the rims of the rings.
2.
Using a knife, cut the grooves in the marked places.
3.
Using a knife, place the decorative material into the grooves.
4.
We cut off excess material with scissors.
A reliable organizer for storing rings is ready.
In a picture or mirror frame
Frames from broken mirrors or damaged paintings often remain around the household. Don't rush to throw them away!
The frames will make a beautiful organizer for jewelry.
— you need to prepare a fabric that will become a jewelry holder. For example - lace, cut into strips along the width of the picture;
- using staples or buttons, the material is attached horizontally to the frame, along the inside. Between the strips make a step of up to 150 mm.
The lace organizer looks elegant and will serve for small jewelry.
Jewelry organizer
The basis of this organizer is a wooden frame, which was purchased in the stationery department of the store.
You will need:
- Dye.
- Rope.
- Brush.
- Screws (in this case hook screws are used).
- Varnish.
1.
First, we coat the product with paint and varnish. The color depends on your imagination.
2.
Then we place our screws. If you are screwing in hook screws, you need to be careful not to screw in such a screw too close to the door, otherwise it will not close well.
3.
All you need to do now is hang the earrings.
Polygonal gift box
What do you need
- Thick paper;
- compass;
- ruler;
- pencil;
- scissors;
- glue;
- bow.
How to do
Draw two circles with a diameter of 5 cm on paper. Without changing the pitch of the compass, make six marks on the circles at an equal distance from each other. Connect these marks with straight lines inside each circle.
Draw lines on the outside of each corner as shown in the video. For one figure they should be 4 cm long, and for the other - 2 cm. Connect these lines so that you get six rectangles. To the right of each of them, draw a small detail with a beveled top.
Cut out the shapes along the lines. Using scissors, draw along the sides of the polygon inside the circle and along the line of the piece with the beveled top. Bend the shapes along the marked lines and glue each of them. Place a lid on the box and decorate it with a bow.
For such a craft, you can make a voluminous lid. It looks very original. By the way, the box itself in this video is made using a different, more intricate technique:
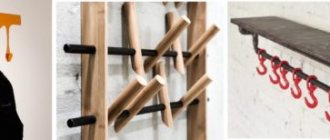
Wall organizer
Such a stylish and practical organizer can be made from an ordinary rake.
You will need:
- Rake. They can be purchased at various stores or you can take old ones, if available. The main thing is that they are intact and not rusty.
- Saw.
- Pliers.
- Sandpaper.
- Spray paint.
- Scourge rope.
- Dowel.
- Drill.
1.
We saw off the iron base of the rake from the wooden handle.
2.
We also saw off the iron rim at the base. For convenience, you can use pliers.
3.
Now our iron base needs to be prepared for painting. Using sandpaper, remove all roughness and old paint.
4.
Let's start painting. We select the color scheme to suit our taste. In this case, two layers of gray paint and four layers of white were applied.
5.
We use twine to make a decorative winding and an additional holder for earrings.
6.
Drill a hole in the wall.
7.
We drive in the dowel.
8.
We install our ready-made organizer on the wall.
Watch stand
When buying an expensive watch, you immediately need to look for an additional accessory to go with it. A watch stand will be required for proper storage.
The holder keeps the watch intact, allows it to easily take the desired shape and not be scratched. As a rule, they are divided into several types:
The holders are made of glass and metal, which is why neutral and calm shades are used, for example, gray, black and white. Watch owners prefer glass holders and forms without unnecessary details - they easily fit into any interior and room design. When choosing a stand you need to pay attention to:
For any watch, even a self-winding one, you can make a stand yourself. All you need is a little inspiration, a set of tools and a desire to create.
Refers to the decorative type of holders and decorates any interior. Required:
Such a holder will not only please the eye and make the room more comfortable, but will also hold watches, hairpins, bracelets and brooches.
If you have several bottles, a wooden box lying around the house, or a large number of old unnecessary things, then they can easily be used to create decorative masterpieces. Materials can be recycled to create a space in a romantic, Provençal, bohemian or even Scandinavian style. What is necessary:
The box needs to be processed and cleared of debris. Then decorate with patterns or special markings on the outside. To do this, use black paint and a small brush. Cover it with varnish and leave to dry for 2-3 hours. Make two holes on one side - a rope will be threaded through them. Next, place the bottle on the glue inside. It is advisable to place them close to each other so that there is free space. While the glue dries, you can place the beautiful holder on the wall.
The peculiarity of this supply is that it can be used on the wall and even on the table. You can attach any wrist watches and bracelets to the bottles.
The holder can be made from almost any thing or tool - clothespins, hangers, branches or bottles, the main thing is to show a little imagination, and then you will get a unique addition to the watch.
Watch the watch box with your own hands in the video below.
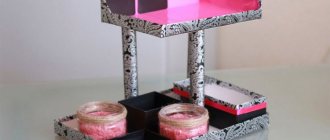
Hanging organizer for small items and jewelry
This organizer was based on an old tray,
bought at a flea market. You can, of course, use any suitable product.
You will need:
- Wooden tray.
- Glue.
- Clothespins.
- Wooden slats.
- Decorative screw-in hooks.
- Decorative rings.
- Nails.
- Hammer.
- Dye.
- Sealant.
- Varnish.
- Dowels.
1.
We start by sealing all the cracks and damage. Minor damage can be glued. Otherwise, we nail and glue the wooden slats.
2.
In this case, a retro style was used. First, we cover our tray with sealant.
3.
When the sealant dries, cracks will form. This is how our style is created. Next we cover it with a layer of paint.
4.
Then cover with another layer of sealant.
5.
Next we apply another layer of paint.
6.
After everything has dried, apply varnish to the product.
7.
Now we install decorative rings and hooks, as shown in the photographs. Of course, you can come up with your own original design.
8.
All that remains is to hang our organizer on the wall. To do this, we will use dowels and hooks pre-installed on the back of the organizer.
Jewelry tree
A jewelry stand like this can become an interesting art object.
How to make a jewelry tree with your own hands:
- Choose a vase and dry branches.
- The branches are cleared of bark, sanded with sandpaper and painted if desired.
- After the paint has dried, the branches are placed in the vase in random order.
Bead organizer
Simple and convenient is the basic principle used to create this organizer.
You will need:
- The board is about 1 m long and 10 cm high.
- Wooden cylinders (champagne or wine corks can be used).
- Dye.
- Sandpaper.
- Glue.
- Brush.
- Dowels.
- Fastenings.
1.
First, let's sand our board and cylinders (if necessary) with sandpaper.
2.
We paint our cylinders. In order not to make a mistake with the color, you can first apply paint to the paper. Use the color you like best. We do not apply paint to places that will be glued.
3.
We paint the board.
4.
We glue our cylinders.
5.
We install fastenings to the finished organizer.
6.
We install dowels.
7.
We hang the organizer using dowels.
Variable ways to create original caskets
A stylish modern organizer or travel bag can be made from different items:
- cardboard candy boxes;
- coffee or tea cans;
- spools of cable, wires or tape;
- baguettes and cornices;
- frames for mirrors or paintings;
- bamboo napkins;
- postcards;
- plastic bottles;
- CDs;
- wooden blanks made from parts of outdated furniture.
Waste household items can be reused as home treasuries for storing jewelry. They can be made not only in the traditional round or rectangular shape, but also visually resemble a basket with a lid, a barrel, a pyramid or a Rubik's cube. The more plastic and softer the material from which the decoration item is made, the easier it is to give it a fancy shape.
Thick paper and plastic, which can be easily modified when exposed to a fire source, are excellent for this purpose. Even from thick fabric you can make a textile box if you starch the fabric well and cover it with a solid and stable structure of the required shape. If you want to create an exclusive jewelry organizer, there will certainly be things in your home that can instantly be turned into an original jewelry box.
Home organizer
Using simple operations we will transform a table leg
in a beautiful organizer.
You will need:
- Table leg (you can buy either new or at the flea market).
- Footrest.
- Reiki.
- Drill.
- Reiki.
- Brush.
- Glossy paint.
- Primer.
- Sandpaper.
1.
Drill holes in the leg for the slats using a drill.
2.
Sand all parts with sandpaper.
3.
Apply a layer of primer (except for gluing areas).
4.
Apply two layers of paint (except for gluing areas).
5.
Glue the stand and slats together.
The home organizer is ready.
A variety of methods for decorating containers for storing accessories
A DIY jewelry box, decorated using the decoupage technique, will look original in the interior of a home decorated in any design style. Napkin arts and crafts allow you to transform boxes of various shapes using thematic images characteristic of a certain stylistic direction:
- in a Provençal interior, boxes with floral prints or drawings with French landmarks will look great; in a vintage bedroom, on a console table, a chest decorated with black and white photographs of ancestors will look impressive;
- Organizers depicting legendary personalities of the 20th century - Madonna, the Rolling Stones, Ernesto Che Guevara and other cult figures - will organically blend into the colorful interior to create a pop art style living room.
- In a romantic-style interior, the ideal complement to the background picture will be boxes depicting musical notes or couples in love.
Papier-mâché, craquelure, macrame, quilling, beading and tatting techniques are effective methods for creating decorations for boxes in the form of flowers, trees, butterflies, birds and other figures that embody the predominance of natural motifs in the interior.
An original DIY jewelry box is a great idea for creating an original gift for the fair sex, who will appreciate the functionality and aesthetics of an exclusive box. At the Westwing shopping club you can buy stylish organizers, boxes and other decorative items that can radically change the look of your home.
Home organizer
Organizer made from a baguette frame
very simple and practical.
You will need:
- Baguette picture frame.
- Paints or fabric (whichever you prefer).
- Nails.
- Hammer.
1.
In this project, several design options for the organizer were used:
- Decorate the front part of the baguette frame to your taste.
- Glue your favorite fabric onto the front of the baguette frame.
2.
We nail the nails to hang our decorations.
The organizer is ready. It can be installed on a chest of drawers, dressing table or other furniture. In addition, this convenient organizer can be hung on the wall using a loop and a nail.
General recommendations for choosing a watch box
Proper watch storage is the key to long-term operation without breakdowns. To prevent the item from fading or accumulating dust, it is necessary to use a special storage case. A mechanical watch box is simply necessary, as it includes a winding function. This will prevent it from heating or cooling while stored on the chest of drawers.
Not every case, box or box will be ideal for storing a certain type of mechanism. It is worth considering some nuances regarding the choice:
- Depending on the price and status of the watch, you should choose a storage box. Boxes can be plastic, metal, wood, plywood or chipboard.
- In accordance with the operating characteristics and way of life, it is worth choosing a locking mechanism. If the box will be used at home, then a lock is not required. For transportation you need to choose something with a lock.
- You need to carefully select an item whose internal arrangement will ideally match the watch model. This will protect them from damage.
A homemade watch box will do. The main thing is to properly arrange the internal and external parts of the body.
Elegant organizer
A simple piece of plywood
can become not only a convenient organizer, but also a decoration for your home.
You will need:
- A square-shaped board (it can be chipboard, fibreboard or other wood material).
- Small nails.
- Hammer.
- The fabric is larger than the board.
- Wall mount.
- Decorative nails.
1.
First, let's nail the fabric to the board. Fold the fabric over the back side and nail it with small nails.
2.
We nail (usually these nails are simply pressed in with your fingers) decorative nails. Remember to leave a few millimeters of space between decorative nails so that the decorations do not mix with each other.
3.
We install the mount on the back of our “picture” and then hang it on the wall.
The organizer is ready.
Universal option: advantages and disadvantages
The most versatile option for making a container is wood. Boxes have their advantages and disadvantages compared to other materials. Let's look at them:
- This material has an aesthetically attractive appearance.
- There are many processing and decoration options.
- The material is completely environmentally friendly and affordable.
- The surface is easily damaged as a result of mechanical stress.
- This case requires careful care and periodic restoration.
- The cost of the material can be quite high.
The quality of operation can be affected by the thickness of the tree and its species.
Use a picture frame for decoration
Buy a regular picture frame at a flea market or in cheap shops, but instead of a picture, insert a piece of cork board into it. Screw small metal hooks or push pins into the board for hanging decorations, and then attach the frame to the wall.
The frame can be easily adapted for hanging decorations
You can hang earrings and chains on the lace attached to the picture frame
Make a wire tree for storage
To “grow” this tree organizer, you need 15-20 pieces of dense wire about 60 cm long. Lay the wire on the surface and place a large flat stone in the center. Braid each piece of wire around the rock to create "roots" or a base for the tree to stand on, then form a trunk by twisting each piece of wire together, and then twist a few wires separately to make branches on which to hang your decorations.
Wire tree jewelry stand
Use strong branches or driftwood for the organizer
Don't pass by beautiful branches that will make an excellent stand. You can even make a conventional bouquet or tree from them. Let the branches dry completely, then strip them and varnish them. Place such a “bouquet” in a vase or secure it on a special base and feel free to hang your jewelry and costume jewelry on the branches.
A tree branch in skillful hands will serve as an excellent organizer for beads and bracelets.
Branches can make an excellent jewelry stand.
Give an old box a second life
Take a small old nightstand drawer and sand it down to give it a vintage look, or you can decorate it to your liking. Turn the drawer on its side and attach the bottom to the wall so it looks like a bookshelf. Inside and at the bottom of the box you can nail small hooks or stretch several strands of fishing line on which the decorations will be hung.
A box from an old desk is quite capable of serving as an organizer.