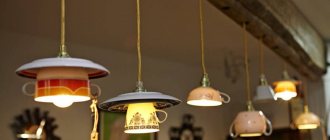
Every year we buy new decorations for the Christmas tree, occasionally we update the garlands... And now - a bunch of New Year's decorations have already accumulated, which it would be a pity to throw away and seem to have nowhere to hang on the tree... If you also have a transparent glass vase, then you can make one out of everything this New Year's lamp.
Materials:
- Glass transparent vase (small aquarium)
- Garland
- Christmas decorations
- Mushura
- If available, branches from an artificial Christmas tree
I saw the idea for a lamp made from a vase somewhere on the Internet. And then I just remembered...
Wash and wipe the vase dry.
Put some tinsel on the bottom
Lay the end of the garland in a circle
Let's start putting away the toys.
It would look more original if the toys were laid out in layers, i.e. in the first layer - identical ones, in the second - different toys, but also identical. Or put fir branches as the second layer, and toys again as the third.
Unfortunately, I didn’t have any branches - a piece of the top of the tree cut off can’t be counted - so I had to limit myself to tinsel and toys
We also place a garland in a circle on the layer of toys and decorate it a little with tinsel on top. My tinsel is long - so I cut off very short pieces - about five centimeters
The main thing: Do not compact the layers!!! We place it loosely so that there is air circulation.
Fill the vase almost to the very top. The garland is completely placed in the vase - only the switch for the flashing modes of the light bulbs remains outside. We place it on the back side of the lamp.
Decorate the top with the last layer of tinsel and close the switch
Put it in a suitable place and get in the pre-holiday mood!
And this is how it shines in the dark
PS. After the publication of the article, many questions arose about the fire hazard of such a structure. I deliberately kept the lamp on for about 6 hours. During this time there were no signs of overheating. There is quite a lot of empty space in the lamp - it is decorated with tinsel - so there is good air circulation there.
Again, the answer is logical: A garland on an artificial Christmas tree doesn’t scare you, does it? But she lies right on the Christmas tree branches, also in contact with toys and hung with tinsel? In addition, now you can safely buy LED garlands that do not heat up at all and do not pose a danger.
Thanks to a variety of handmade ideas, today anyone can make an original lighting fixture for their home with their own hands. Moreover, you can use a wide variety of materials for this that are simply lying around you. This article will talk about how to make a lamp from a Christmas tree garland.
In the process of making such a lamp, the main thing is to have a good imagination, as well as the desire to do something for the home, family and friends with your own hands.
I want a holiday
We all love New Year. And one of its integral attributes is the Christmas tree garland. It will be an excellent light source for a wide variety of lighting fixtures. Guided by various master classes, you can make different types of lamps from a Christmas tree garland and additional materials (discs, threads, etc.):
- ceiling-
- wall-
- desktop-
- floor.
Lamp option
At the same time, the lamp, depending on your wishes, can be made in different designs. This lamp has a number of advantages:
- gives a soft glow -
- creates a festive mood -
- easy to construct with your own hands -
- You can use both Christmas tree garlands and solar-powered lighting models -
Note! Garlands that run on solar batteries have appeared on sale relatively recently, so few people know about them yet.
- possibility of using available materials - disks, Christmas tree decorations, etc. -
- With the help of a garland you can make almost any type of lighting fixture yourself.
The resulting lamp can also be used as a night light in a children's room. Here it can be stylized as “fairytale” clouds, flowers, trees, etc.
Stylized sconce
When creating lighting fixtures from garlands and additional materials, you can use any patterns and designs. It all depends on what you can find in your home.
Master class on making felt garlands for the New Year
Everyone's favorite felt can also be useful. Handicrafts love it because it is not expensive and unpretentious to work with, just like foamiran.
Well, take leaves of different colors.
Also prepare glue and decorative things, rhinestones, etc.
Cut out any New Year's toys, you can take the same shapes, you can take different ones.
Decorate the samples as you wish.
Use your imagination or find something similar on the Internet.
You can also make a craft from stars and circles and use a sewing machine to fasten all the parts together.
It is also quite easy to create a banner from Christmas trees or triangles that will imitate spruce trees.
And tinsel will only emphasize the winter theme and festive mood.
Using strips (each should be 5 cm long and 0.5 cm wide), create the lightest and simplest garland together with schoolchildren or students for a street Christmas tree, just tie these strips to a thread.
What are we looking for?
You can make a similar lamp using a garland with or without solar batteries using the following materials:
- Christmas tree garland. Even 15-20 light bulbs will be enough. Instead, you can use a solar-powered light source -
- a couple of discs (CD or DVD) -
- glue-
- additional materials for decorating a homemade product.
Set of materials
During the manufacturing process, in addition to the materials described above, you will only need a glue gun to carefully apply glue in the right places. As you can see, all this can almost always be found at home. Therefore, it will be possible to make such a lamp almost for nothing.
Safety regulations
Despite the fact that garlands made from LED lamps are considered one of the safest, care must be taken when using them. This will help avoid unusual situations that could lead to electric shock and its negative consequences.
To prevent this from happening, you must follow a few simple rules:
All garlands used for decoration should be located high above the ground or floor. If you neglect this rule, you may accidentally tear the jewelry and receive an electric shock.
In addition, such a precaution will protect small children and pets from contact with a potentially dangerous object. When using the garland outdoors, you need to tighten the wires well and make sure that they do not sag. Failure to comply with this condition may result in the electrical appliance falling into a puddle.
In addition, you can simply get caught on the wire and fall. It is recommended to use wires that are not too thin, as there is a possibility of rapid wear or chafing from external factors. It is imperative to check the garland for functionality. Only after this can it be hung on the New Year tree or any piece of furniture. It is prohibited to connect several garlands to one outlet at the same time. This may cause overheating and failure. You cannot leave home and leave the garland on. Such carelessness can lead to fire and other unforeseen situations. When decorating a holiday tree, you need to check the insulating layer of the wiring. If it has even minimal defects, then it is better to refuse such a garland. Otherwise, you can provoke the appearance of a spark, which will lead to a rapid ignition of the Christmas tree. If any emergency occurs, you must immediately turn off the power to the luminous decoration.
A garland of LED lamps is a wonderful decoration option for the entire apartment. They can be placed not only indoors, but also outside, which ensures maximum effect from observation from the outside. With proper manufacturing and compliance with safety precautions, you can reduce the risk of an unusual situation and avoid negative consequences. A well-made garland will delight all people and give them a festive atmosphere.
Work algorithm
The lighting device that we are considering in this article will always have a garland (Christmas tree or solar-powered) at its core. So, the lamp can be made as follows:
Disc frame
- You can use any geometric shape as a frame. It can be a cube, pentagon, etc. -
- a geometric figure can be easily formed with your own hands from disks. To make the disks into the shape we need, they should be glued together using glue -
- Apply glue to the disk and immediately apply another one to it. We wait for the glue to dry and continue to build up the figure using discs -
Note! one side of the figure does not need to be glued. Through this side we will place a light source inside the lighting fixture.
- After the figure is ready, a garland (solar-powered or regular) should be placed inside it. When using a regular garland, the plug and control box should be placed in the window formed by the articulation of the discs. It is also possible to insert several light bulbs into the holes and joints available in the figure -
Finished lamp
- When installing, the light bulbs must completely fill the existing hole. This will help achieve the desired lighting effect -
- after this, the remaining part of the garland must be evenly distributed over the entire surface of the geometric figure formed from the disks -
- several light bulbs need to be left in order to thread them into the last edge, which is attached to the figure after placing the light source inside it.
To make it more convenient and safer to work with a geometric figure when placing it inside a light source, all joints can be treated with insulating tape or tape. After completing the assembly of the lighting fixture, all joints can be additionally treated with sealant. This way you will achieve greater strength in the structure you made with your own hands.
Main causes of malfunctions
The microcircuit, which is the main working element, rarely burns out. The most common breakdowns include:
- Poor contact on the wires.
- One of the LEDs is broken.
- Problems with the capacitor.
- The resistor has burnt out.
- Problems with the diode bridge or thyristors.
Poor soldering
If the LED section does not work, you need to check the board contacts
If the garland stops working, first of all the quality of the connections of the supply and outgoing wires is checked. If the contact is weak, the device will not receive voltage. This problem is common in cheap Chinese garlands. They are made using thin strands that break easily at the joints.
To ensure a reliable connection, the contact points must be filled with a thick layer of hot-melt adhesive.
LED burned out
Ringing the wires of the garland with a multimeter
In the garland, the LEDs are connected in series. If one element burns out, the entire chain will stop working. The circuit must be repaired by replacing the non-functioning component. To identify a broken light bulb, you will need a multimeter. Thin needles need to be tied to the ends of the probes with a thread to check the diodes. The tip should protrude 5-8 mm. The top needs to be wrapped with a thick layer of electrical tape.
First of all, the garland must be disconnected from the electrical network. The test begins with the last diode, since it is to it that the power wire from the control unit is directly routed.
Chaotic blinking light bulbs
When blinking randomly, the problem lies in the electrolytic capacitor
When the garland is turned on, a situation may occur where the diodes light up chaotically with different brightnesses. This flickering is not related to operating modes and factory effect, but is caused precisely by problems in the garland itself.
The probable reason for this effect is a breakdown of the electrolytic capacitor. It may swell, and this will be clearly visible to the naked eye. A broken component must be replaced with a similar one. The capacitance value is indicated on the element body.
If replacing the capacitor did not help, the resistor may have burned out. To check it you will need a tester. From the marking you need to find out the nominal resistance, and then compare it with the measured value. If the parameters do not match, the resistor must be replaced with a new one. After replacement, the lights should stop flashing.
Part of the garland does not light up
Checking the board by reconnecting the wires
The failure of one of the channels can be caused by two reasons. These problems are associated with circuit components - breakdown of a thyristor or diode. To check, you need to separate one wire from the non-working channel and connect it to the adjacent one, which is known to be working. If it also does not work, the fault is with the thyristor or diode. They need to be checked with a multimeter and replaced with new ones.
Low light
The LEDs on a particular channel may be dim compared to the others. This is not related to the operation of the controller circuit; testing the components will also not yield results. The most likely cause is the wires. They need to be inspected for breaks and kinks. After finding the problem area, you need to take a soldering iron, disassemble the wires and install new sections. The contact point must be reliably insulated using heat shrink tubing.
Final stage
The last stage, namely the installation of the lamp, varies depending on where and how it will be placed. You can install it with your own hands like this:
Ceiling lamp
- Using durable decorative ropes, the lamp can be attached to the ceiling or wall. In the first case, the resulting lighting fixture can be hung on a ceiling hook, and in the second, you can use the base from a wall sconce.
- if you want to make a table lamp or a small night light, then here you can use another disk as a pedestal. In this case, the figure of the lamp must be installed edge-on on a kind of pedestal. This will give it more stability. The lighting fixture should be glued to the stand using glue. At the same time, make sure that the control box and plug are at the bottom and hidden from view by decorative elements or the lamp itself.
It should be noted that this is a rather complex option for creating a lamp; there is a simpler solution.
Idea No. 5 – How to decorate the street?
If you want to make an outdoor diode garland for the garden, we recommend using this master class. First, prepare all of the following materials:
- multi-colored diodes, 10 mm in diameter;
- lithium 3-volt batteries;
- thin tape;
- magnets, 13 mm in diameter and 30 mm thick;
- epoxy adhesive.
Next, you need to attach the diode legs to the battery using glue. The anode (long leg) is attached to the positive pole, and the cathode, respectively, to the side with the “-” sign. When the glue has set, additionally wrap the glowing diode with the battery with tape.
Attach a magnet to the positive pole of the lithium battery and also wrap it with tape several times. Do this with 10-20 light bulbs, then secure them in convenient places on the street, for example, on the facade of the house using magnets. Thus, you can assemble an outdoor electric garland from LEDs yourself. However, this design does not have a switch, and over time the battery will run out, which is not very convenient; to prevent this from happening, you can add a miniature switch to the circuit break.
That's all the master classes we wanted to demonstrate. We hope that now you know how to make a garland of light bulbs and diodes with your own hands, because... The photos, videos and diagrams provided were pretty clear!
It will be interesting to read:
- How to organize lighting in a private yard
- How to repair a garland
- How to make a spotlight with your own hands
Simpler doesn't mean worse
This method involves using the most ordinary plastic bottle as a base. It can be of any shape and size. In addition to this, you will need the following materials:
- garland of the size you need, number of bulbs and colors -
- a can of white paint -
- glue. It's better to use superglue
- tulle.
Forming holes
From your tool kit you should have a soldering iron with a sharp tip and a construction knife. Making a lamp includes several simple operations:
- make marks on a plastic bottle -
- We pass over them with a soldering iron, thus forming regular, neat holes. If it doesn’t work like that, then replace the soldering iron with a drill.
- We remove the unevenness of the hole with a construction knife -
- paint the bottle with white paint. We paint in several layers to achieve a uniform color -
- We place a garland with tulle inside the base and connect it. The wire is routed through one hole. Place a lid on top of the bottle. This will allow the lighting fixture to be moved freely around the house.
Finished lamp
There is another fairly simple way. We simply place our light source in a glass vase/jar, alternating it with various decorative materials. For example, these could be plastic Christmas tree decorations. And, in fact, that’s all, the lamp is ready. A DIY garland lamp can have a non-standard and unusual look. A wide variety of materials are suitable for such a lighting device: soft toys, beads and buttons, glass pebbles, etc. Properly selected materials will allow you to create a unique play of light and shadows from the lamp in any room of the house.
Making an original bio-fireplace on your own
Do you remember catching fireflies as a child? Even from a distance, these tiny creatures look magical, and if you still manage to catch a couple of them in a jar... Agree, there is something magical about the miniature lights sparkling from behind the glass.
Now you hardly have time for these cute children's fun. And the season, to put it mildly, is not very conducive. But you can enjoy the magical light from behind the glass at any time. To do this, you don’t have to look for any special lamp - it’s easy to make it yourself.
Today you will learn how to make a beautiful New Year's lamp from a garland in a jar, bottle, vase or other glass container. We have selected 46 photos of the most beautiful examples and will tell you in detail how to do this.
You don't need to be a handmade artist to create this beauty. The technology is simple enough that even a beginner can master it. The materials you will also need are the simplest: a glass container of your choice and a New Year's garland.
Important Notes:
1. It is better to give preference to an LED garland - it does not heat up, and, accordingly, is safer for a closed container.
2. Some options do not include a power cable outlet. So look for a short, battery-powered garland.
__________________________
Let's start the creative process
There is nothing complicated in the process of creating decorations for the New Year's holiday:
- First, place the garland in a glass vessel. We do this beautifully by filling the empty space with Christmas tree balls, cones, beads, fabric, and so on.
- To make the lamp look even more attractive, decorate its outside by attaching a beautiful stencil and spraying it with spray paint. However, if there is no paint in the can, take white gouache and a brush and spray the container, running your finger along the bristles in the direction from the lamp towards you - splashes of paint will fly onto the glass and dry, imitating grains of snow.
Once all the accessories are in place, you can plug in the garland and enjoy.
Garland lamp in a jar
The best part about this idea is that you probably already have at least one item you need. The jar does not have to be beautiful in itself, although interesting models with embossed walls or colored glass are welcome. So, clear out the stacks of cans in your pantry—the New Year’s magic is about to begin!
Materials and tools:
a glass jar with a neck wide enough for your palm to fit freely (preferably with a small margin), transparent silicone-based glue, a short garland with batteries.
How to make a lamp in a jar with your own hands:
1. Wash the jar thoroughly and remove the labels. Dry.
2. Apply the garland to the outer wall to outline the intended outline. When you are ready, apply glue to the necessary parts of the garland and fix it inside the jar.
Ready! Now you have your own “winter firefly trap”. This lamp looks especially impressive in the twilight.
Such lamps look great on their own - for example, in the middle of a table. But, if you want a particularly New Year's mood, place the jars on a tray with other seasonal decor: pine cones, fir branches. Artificial snow will ideally complement the composition. Cover the edges of the jar with it or pour it inside - it will turn out no worse than souvenir snow globes.
__________________________
Typical frequently asked questions from readers
On the Chinese garland, two of the four channels stopped working. The lights rang, everything is normal. As I understand it, the fault is in the control board itself. Is there a way to repair it yourself or do you need to buy a new garland?
Everything the Chinese have done can, theoretically, be repaired. Most likely, the diagram of your garland control board is similar to the one shown in the figure.
Since two of the four lines are working, there is a high probability that two control thyristors (VS1-VS4) have failed. All you need to do is check the thyristors and replace the burned out ones. You can read about how thyristors are diagnosed in the article:
Light garland under the serving hood
Their main difference is the ability to give special significance to what is hidden under glass. Just imagine: an ordinary garland will look like a museum exhibit!
For this idea, you can simply put the garland inside, turning the cap over, or glue it, as in the previous paragraph - in this case, the composition will look even more impressive.
The most sophisticated option will be with miniature light bulbs in the shape of flowers - if you manage to find such a garland, it will be just wonderful. The cap can not only be placed on a table or chest of drawers, but also built into a New Year’s composition, as in the photo.
__________________________
How to make a lampshade from threads or yarn
Everything is very simple and shown in detail in the photo. For the lampshade you will need:
- threads or yarn,
- PVA glue (colorless craft glue) or gelatin soaked in water
- form.
An inflatable ball is ideal as a shape (if you want a round lampshade). If you need a lampshade of a different shape, you will have to be smart and find a suitable item. Next, simply saturate the threads or yarn with glue/gelatin and carefully and evenly wrap them around the form.
Let the entire structure dry thoroughly, release the air from the ball, and remove it. Insert the shade into your new lampshade and...you can update your interior!
An interesting DIY craft for the home: we make a lampshade from napkins using exactly the same principle.
[my_custom_ad_shortcode6]
Decorative lamp made of garland and glass vase
Who said that vases are only suitable for flowers? A simple transparent vase without decoration is an excellent basis for any composition. Especially New Year's - behind the glass the bright lights will look simply magical.
This idea is especially good for its practicality: it does not require gluing or “modifying” the vessel, and after the holidays you will be able to use the vase for its intended purpose again.
Everything here is extremely simple: find a suitable glass vase or flowerpot and beautifully arrange the garland inside. The garland can either fill the entire vase or hang beautifully along the edges if the vase is tall. The composition can be supplemented with any suitable filler: pine cones, fir branches, artificial snow...
Do you want to stay in touch with us every day? Welcome to our Planet of Inspiration VKontakte! Take a look, scroll through! Like? Join and get inspired every day!
__________________________
Lanterns for shaped candles + garlands
Lanterns occupy a special place in winter decor. There is something fabulously romantic about its outlines - especially in our time, when many people use flashlights. But this is not a reason to throw such a wonderful item into the closet! Bring out old garden lanterns from the depths of your closet or buy them from IKEA to feel like a Christmas fairy with a magical lantern.
Making a lantern magical is not at all difficult: just place the garland beautifully inside, as in the point about vases. Do you want a special touch? Glue the garland to the walls so that it takes an interesting shape (see point 1). The lantern itself can also be decorated with a bright bow or a New Year's wreath made of pine needles.
__________________________
Decorative lamp from a bottle
And this is, perhaps, the most interesting lamp from the garland: in a bottle. It is somewhat more difficult to manufacture than previous options, but the impression more than makes up for all the inconvenience. Just imagine: tiny lights, white or multi-colored, flickering through dark glass... Wine bottles are best suited, but cognac and liqueur bottles look no less impressive.
Materials and tools:
empty glass bottle, drill, glass drill bit (~ 1.25 cm), electrical tape, short garland (preferably battery-powered, not powered).
Precautions: For safety, wear gloves and safety glasses in case the bottle breaks. For the same reason, keep a few spare bottles on hand.
How to make a decorative lamp from a bottle with your own hands:
1. Wash the bottle thoroughly, removing the label, and wipe dry.
2. Mark the place for drilling (3-5 cm from the bottom edge of the bottle) with electrical tape. It is necessary so that the drill does not slip during the process.
3. Secure the bottle (for example, between wooden spacers) and start drilling. Avoid pressing too hard to avoid damaging the glass! Drilling a hole takes about half an hour.
4. Rinse the bottle thoroughly so that no glass chips remain on the walls, and dry. To prevent injury, cover the edges of the hole with sealant.
5. Now let's place the garland. Gradually lower it into the opening of the bottle so that the switch (and power cord, if any) remains outside.
Once it's done, congratulations! You have an exquisite decoration for your table or living room interior.
You can use any bottles, both regular and colored glass. Frosted glass and/or covered with artificial snow will look especially festive. This lamp will look equally good in any color variations, but we recommend playing with contrasts. Light glass + multi-colored garland, dark glass + garland with yellow lights, composition of bottles of different sizes...
For aesthetes, we offer this option: bottles made of colored glass, and inside there is a garland, large decorative filler and grape leaves. Incredibly elegant!
To make a New Year's lamp from a garland with your own hands, you do not need the education of a designer or graphic designer, just a great desire to create something interesting and original for your home. The manufacturing technology is simple, as are the materials. There is no need to wait for New Year or Christmas, such a lantern can be made at any time.
Electrical circuit calculation
For example, you use a pair of AA batteries to connect, which supply 3 V to the electrical circuit of the garland. For such a voltage, it is advantageous to use a parallel connection of LEDs. For example, a model will be installed that consumes 0.02 A, with a current supplied from the source of 1 A. To calculate the maximum allowable quantity for the load, you need: 1/0.02 = 50 pcs.
Based on this, you can install no more than 50 LEDs in a garland; if the distance between them is 5 cm, then the total length will be: 50 * 5 = 250 cm.
If you need to make it longer or install more bulbs to increase power, you must use a different power supply. For a series electrical circuit, the calculation is made according to the same principle, only based on the magnitude of the applied voltage.
Ways to create New Year's lights from garlands
There are many ways to make lamps, where New Year's lights play an important role. Supplements include vases, jars, various kinds of bottles, glasses, music discs, and branches. The main thing is that all the necessary materials are available in every home. And both a novice master and a child can make this beauty.
From New Year's garlands in a glass bottle or jar
In order to make a lamp from a garland, you will need a glass jar, a garland and hot glue. A container made of colored glass, large in size and with a relief looks better. The only condition is a wide neck so that the palm can easily pass through.
Work plan:
- Remove the labels from the jar, wash it well and dry it.
- Lay the garland in the shape you need, simultaneously fixing it to the wall with hot glue.
This lamp looks great on its own or in a composition with fir branches, pine cones, and decorative snow. Place the decor on a tray around the jar and place fake snow inside. Use battery-powered LED lights (they are safe).
Making a lamp from a bottle is a little more difficult, but the finished product is worth the effort. To make a lamp you will need the following:
- garland-
- wine bottle (it’s better to prepare several at once, as it may not work the first time) -
- drill-
- insulating tape.
Let's get started:
- Remove the stickers, wash the selected bottle and wipe dry.
- Step back 4 cm from the bottom and stick a strip of electrical tape in the place where you will drill. This is necessary to ensure that the drill does not slip during the process.
- Fix the bottle in one position and start drilling without pressing too hard, otherwise it will crack. The whole job will take about 20 minutes.
- Rinse the bottle and seal the edges of the hole with sealant.
- Place the garland, leaving the switch outside.
Bottles are suitable for both colored glass and transparent. You can play with color: put a yellow or white garland in a dark bottle, and multi-colored or bright lights in a transparent bottle. A composition made from containers of different sizes and shapes looks advantageous.
In this product, the garland can be either with a power cable or with batteries.
From CDs and garlands
A colorful and original hand-made lamp made from garlands and discs will find a place among the New Year's decor, and on this holiday there can never be too many decorations. Materials you will need:
- disks-
- electric garland-
- hot glue gun.
Manufacturing step by step:
- We put the first disk on the table. This is the bottom of the future lamp.
- We hot glue the second one to it, at such an angle that 5 disks fit around the base.
- We attach the garland to the disks, inserting small lanterns into each hole. Fix with glue.
- We do the work again: we glue the disks, where the first element is the base and alternately 5 more pieces in a circle.
- We also attach lights to the second part, inserting them into each disk.
- Glue both parts together by pulling the cord with the switch outward at a convenient location.
Install the resulting lamp on the floor, on a table, on a hill - it will look beautiful and festive everywhere.
From plastic packaging and garland
This lamp can be a decoration not only on New Year’s Eve, but also become a bright accent of the interior in everyday life.
What do you need:
- plastic bottles-
- white tablet 30×40 cm-
- hot melt adhesive
- New Year's lights-
- awl.
Any plastic bottles (15 pcs) are suitable for decoration. You choose the color yourself: you want one color or multi-colored. The main thing is that their bottom is not flat, but in the shape of a flower.
Let's start making the lamp:
- Separate the bottom and cut out a flower along the contour. There should be only 15 pieces.
- Make a hole in the center of each flower. This can be done with a hot awl or knife.
- On a tablet (you can buy it at any art store or make it yourself), mark the places where the lantern flowers will be located and make holes.
- On the back of the tablet, starting from the top edge, insert a garland light into each hole, bring it to the front side and put a plastic flower on each light.
- Secure each flower with glue.
The finished lamp can be leaned against the wall or hung as a panel. Here, an LED garland that does not heat up is preferable.
New Year's house made of garland and corrugated cardboard
A lamp in the shape of a house will become a beautiful element in a nursery. It will create a New Year's mood and can serve as a night light.
You will need:
- corrugated cardboard
- cardboard-
- PVA glue-
- stationery knife-
- acrylic paint-
- battery-powered garland.
Work progress step by step:
- Cut out the silhouette of a house from corrugated cardboard.
- Mark the location of the light bulbs on this part with a knife. To make the holes round, roll a pencil into them.
- Make a frame from the same cardboard, glued together from several identical parts to create the desired depth.
- Glue the resulting frame onto the first part. The result should be a flat house with a side.
- To prevent the wavy lines of corrugated cardboard from being visible, cut strips of thin cardboard of the required width and glue them with PVA.
- Paint your piece white.
- All that remains is to insert multi-colored light bulbs into the holes, starting from the top. Secure the wires with tape.
A decoration in the form of a branch with a garland will become a non-standard decor for the holiday table and can replace the traditional New Year tree.
Materials:
- branch-
- vase-
- garland-
- glue gun -
- cones-
- white acrylic paint.
Insert the branch of the desired size into the vase of pinecones. The next step is to glue the white painted pine cones in the order you want. There is not enough glowing garland. Wrap it around the branches. The original decoration is ready.
If you use a glowing branch as a Christmas tree, you can insert it into a bucket filled with sand or soil. Decorate the soil with pine cones and Christmas tree decorations, and insert the bucket into a wicker basket. Place bright gift boxes around a stylized Christmas tree and hang glass balls.
Stars
On the eve of the new year, 2022, I really want to make crafts with my own hands! Creating paper garlands is the most interesting and exciting activity. Why not make stars, because they look incredible? The work will require a minimum of time, and the result will please you. It’s best to involve the whole family in the master class; the kids will happily start cutting and gluing.
What you will need:
- needle;
- double-sided colored paper;
- scissors;
- a thread.
How to do the job:
Take colored paper and cut out squares.
We bend the parts in half and cut them.
From each edge we bend one corner to the strip, we get a triangle.
We bend the resulting part in half inward.
We unfold the workpiece, you should get a line for the height of the figure. Step-by-step photos will help the needlewoman understand the main nuances.
Bend sharp corners towards the center.
We denote the resulting triangle with creases. We also bend it in half and fix the height.
We straighten the ends of the large triangle and bend it to the height of the smaller figure.
We make 5 blanks in the same way. We insert the elements one into the other with the bent side up.
We press down the finished structure, loosen it slightly, and connect the ends.
We thread the needle and collect the stars.
The result is a spectacular, bright garland. It is unlikely that you will be able to purchase a similar one in a store. Therefore, don’t be lazy, it’s time to get to work. After all, there is less and less time left before the holiday, and there is still a lot to do.