How to sew a shoulder pad
The shoulder pad is a very convenient device, with the help of which the process of taking measurements becomes easier and more convenient, and we also get more accurate measurements. For those who already have sewing skills, we recommend making a shoulder pad that will last a long time. And for those who don’t know how to sew yet, but strive to do so, we recommend a simpler overlay to get started. So, option number 1. Device for taking measurements “Shoulder pad” -
Recommended fabric for the shoulder pad: thin calico, chintz, cotton. Width from 70cm. Fabric consumption - 30cm. Bias binding - 1.2 m.
In order to make it convenient to use and the device to last a long time, we recommend sewing a double shoulder pad, with a top and bottom layer. Cut out two front pieces and two back pieces. It is necessary to cut so that paired parts are mirror images of each other. Don't forget to decate the fabric before cutting.
: Shoulders
Show 4 more images
Shoulders are pieces of armor that protect the shoulders. I've never seen armor with raised arms, but it seems logical that you'd want to maintain that range of motion. So I decided to make the shoulder pads flatter than on my template and simply attached them to the edge of the shoulder, allowing them to fold back as I raised my arms.
This was the most difficult shape I have ever tried to make. To test the fit, I first made a paper model and found that a pair of nearly symmetrical pointed oval shapes worked well if I added a dart to the back. Really just look at the photos. To attach one piece to the other, I again used the V-notch technique. And I made the dart the same way as the bib - by cutting off half the layers of cardboard.
Attaching the front and back pieces required a fair amount of force to hold them in shape. I glued the flaps together one at a time and let the glue cool completely before moving on to the next one. It took a while, but I was rewarded with a really durable design - the shoulder pads took a lot of beating and came out of battle looking as fresh as when they were made!
DIY PVC shoulder pad
Let's get down to business right away. Start by roughly constructing your pattern using construction paper and tape. Just apply it to your shoulder and make cuts in the places where you think they should be. Then secure with tape.
Very soon you will be faced with the fact that it is extremely inconvenient for you to remove the future pattern from your shoulder every time. So find some alternative. In my case, the model for the shoulder was an orange bush.
Thus, slowly but surely build the pattern. Also try to roughly estimate the length of your arm so as not to get lost in proportions.
Your task is to make a pattern for the base of the shoulder pad. You can see an example of the final result in the photo above. Try to approach the modeling process as carefully as possible. Constantly try on the “paper shoulder pad”, move your arm, turn around. To prevent it from flying off, attach it with a piece of double-sided tape or a pin. Your goal is to ultimately ensure that the shoulder pad moves with your shoulder and does not become deformed.
If you are confident in the result, then disassemble the pattern into flat elements (cutting the tape here and there). Transfer to foam paper and cut out parts. Then glue them together at the seams. The base is ready. Then attach the base to the shoulder and continue modeling the details of the shoulder pad and then transfer the patterns onto the foam paper.
When we made the cylindrical thing at the top, it turned out that the diameter of the tape was perfect for our needs. That's what we used.
We take the tape and transfer its circumference to the foam paper. Then we make another smaller circle. We glue one on top of the other, and then glue the resulting sandwich onto the shoulder pad. It should not fit tightly. It should touch the center of the shoulder pad. Secure it well in this place. Mark a circle on the shoulder pad where the edges of the future round thing will go down.
Now we need to fill in the voids around the edges. We carefully cover the edges with tape, then use a scalpel to cut out a “pattern” from the tape in a circle. We transfer it to foam paper and glue the final part to the desired location.
Now it's time for trial and error. Since we didn’t know how the top of the shoulder pad would behave, or what its pattern should look like in general, we simply made it “by eye,” attached a paper model to the shoulder pad, and tried it out. If something goes wrong, you can always cut off the excess or, on the contrary, glue in the missing one.
Once you are satisfied with the shape, transfer to foam paper. A hairdryer will help you a lot in shaping the foam paper. When heated, it holds its shape well. But it is important not to melt the material.
We are halfway to success. Get inspired and don't give up!
Let's move on to the bracer. Here for the pattern you will need to add volume to the arm. Just cover it with crumpled newspaper or just wrap your hand with tape if you don’t mind it. The main thing is not to overtighten, otherwise it is dangerous for your health.
After adding volume, using the usual technique, we remove the pattern and transfer it to foam paper. Cut it out, glue it.
Let's add details. After all, there are never enough of them, right? I think you're already tired of listening to me talk about the same technique, so I'll shorten the tutorial at this point. Focus on the art you are crafting from, using the same technique, form patterns and cut out parts from foam paper until you are satisfied with the final shape.
Also, do not forget to measure the shoulder pad and bracer from time to time and move your hand in them. Your ultimate goal is to ensure that nothing becomes deformed during movement, bends as little as possible, and generally sits freely and comfortably.
These are the patterns I came up with. Yours will most likely be different, but for clarity you can try using them.
It's time for painting. First prime the surface of the foam paper. To make the primer adhere better, you can lightly sand it with fine-grained sandpaper before applying.
Well, after the primer has dried, paint as you please. Since painting is a completely different story.
Good luck in crafting, your editors
Author: Do you know the author? Source: Do you know the source? Date of publication: 23 Dec 2015 Tags: armor, patterns, craft, shoulder pad, PVC,
Source
Making shoulder pads: Milanese with puff and Gothic stylization
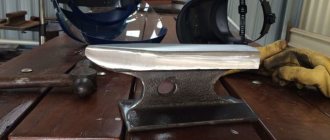
Greetings! From my previous article, you can guess without much hesitation that I am interested in the Middle Ages. I didn't stop at the helmet and decided to create shoulder pads. Well, let's get started.
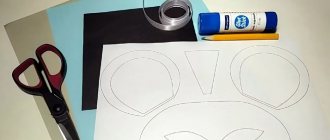
From cardboard we cut out such a strange figure about 40 cm long. (It can be longer) And then we cut it closer to the center as shown in the photo.
Using these cuts we fold the figure into something like a shoulder pad. The “petals” lie overlapping and are secured with staplers.
Trim the jagged edge.
You can glue or staple (which is the best option) the puff to the shoulder pad itself.
Cut a lot of A4 sheets into rectangles like this. It took me about 20 sheets.
After that, start gluing the shoulder pad. To save PVA glue, you can dilute it with water 1 to 1. (Important: on the first layers of paper, be sure to tilt the shoulder pad buff by 45°. When these layers dry, continue gluing the shoulder pad further.) As you can see, the product has been transformed. I cut off the buff. It has become elongated towards the top and gradually narrows towards the edges. Now it is one piece with the shoulder pad. We can also see that I shaped the shoulder pad by smoothly cutting off the edge that meets the neck.
We cut the second edge of the shoulder pad (the one that was formed due to the lining of the “petals”) with “teeth” as shown in the photo.
Alas, photos of the making of the second shoulder pad have not survived. In essence, everything is the same, only the buff is much smaller, like the shoulder pad itself.
In order for the shoulder pads to sit comfortably on the shoulders, I used black straps 2.5 centimeters wide, as well as plastic carabiners. You can buy them at any sewing store. It is worth noting that you need to buy adjusting carabiners (with teeth).
We attach the straps from the inside of the shoulder pad so that one goes under the arm, and the second goes along the back to the second shoulder pad.
How to make a shoulder pad for taking measurements
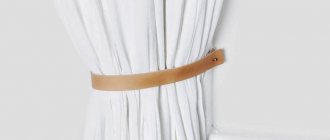
A shoulder pad is a device that helps to accurately take balance measurements, measure the width of the shoulder, assess the degree of inclination of the shoulders and the size of the neckline.
I haven’t seen any ready-made shoulder pads for sale, so I’ll have to make them myself. To do this you will need:
- A piece of dense, but not stiff, fabric of medium thickness. It can be suit or light coat fabric, shape-resistant knitwear, denim...
- Centimeter tape 1.5 m long
- Velcro tape (Velcro) 5 cm
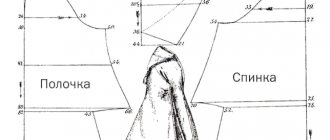
You can cut out the details of the shoulder pad using ready-made patterns for the back and front to fit a typical figure. For figures of sizes 42-50, it is recommended to use patterns of size 48, for figures of size 52 and larger - patterns of size 60.
You can cut out the shoulder pad parts according to the dimensions shown in the figure and table.
| Figure size | A1, cm (width of back and front neck) | A2, cm (back neck depth) | A3, cm (front neck depth) | A4, cm (shoulder width) | A5, cm (back length) | A6, cm (front length) |
| 40…44 | 7,0 | 2,3 | 8,0 | 13,0 | 18 | 12 |
| 46…54 | 7,5 | 2,5 | 8,5 | 13,5 | 18 | 12 |
| 56…62 | 8,0 | 2,7 | 9,0 | 14,0 | 18 | 12 |
| 64… | 8,5 | 3,0 | 9,5 | 14,5 | 18 | 12 |
To use the shoulder pad for figures with different degrees of shoulder slope, each shoulder pad piece is cut out of two parts.
The connectors allow you to position the middle of the back and shoulder pad parallel to the middle of the back and chest of the figure, maintain the horizontal and vertical direction of the mesh lines of the neck of the shoulder pad and correctly determine the parameters of the neck.
The cut line runs 1cm from the top of the shoulder seam.
The shoulder pad sections are overcast or edged, so add seam allowance only for the shoulder seam and along the edges of the cuts.
When taking measurements, the shoulder pad is put on the right side of the figure, so when cutting the pattern, we lay it out so that the shoulder pad is on the right half of the figure.
Overcast the cuts, fold the edges of the cuts and secure them with a stitch, stitch the shoulder seam and press it.
In the photo, the neckline is overcast, but this is not necessary. If the neckline is edged, there is no need to overcast it. If the braid will be sewn along the neckline, then we will sew it.
For masters of custom tailoring. The shoulder pad can be used to determine the size of the client's neckline. To do this, draw horizontal and vertical lines for the width and depth of the neckline of the back and front. Then sew stitches in a contrasting color along them.
In theory, the sizes of these lines should correspond to the neck sizes from the table for making shoulder pad patterns.
But even if there are small deviations, it’s not scary. Measure the actual dimensions and write them down (you can even write them down on the shoulder pad itself). These values will allow you to determine the size of the neck for a specific figure, reducing or increasing the initial parameters of the neck by the required amount.
You can also measure the length of the shoulder seam and remember or write down this value. This will help in determining the shoulder width measurements for a specific figure.
Finish the neckline: edge or stitch the braid to form ties 30..35 cm long.
Cut the measuring tape into two parts, remove the metal tips. Attach the beginning of the ribbons to the top point of the shoulder seam. The ribbons can be trimmed, leaving no more than 60cm. These tapes are used to measure the length of the back and the length of the front to the waist.
At the end of the cuts, sew pieces of Velcro
The presence of slits and velcro fasteners allows you to change the inclination of the shoulder seam of the shoulder pad in accordance with the degree of inclination of the figure’s shoulders.
The shoulder pad is ready. I'll tell you how to use it next time.
DO YOU THINK THIS WOULD BE USEFUL FOR YOUR FRIENDS? SHARE WITH THEM ON SOCIAL NETWORKS!
-Mounts-
In order for the shoulder pads to sit comfortably on the shoulders, I used black straps 2.5 centimeters wide, as well as plastic carabiners. You can buy them at any sewing store. It is worth noting that you need to buy adjusting carabiners (with teeth).
We attach the straps from the inside of the shoulder pad so that one goes under the arm, and the second goes along the back to the second shoulder pad.
By the way, here's your second shoulder pad. That pointed bend came out somehow by accident. But I really like it.
The fastening of the belts themselves occurs by sewing the belt to the shoulder pad through the holes made.
Don't focus on sloppiness. All this will not be visible.
Put on the shoulder pads, tighten the straps as you feel comfortable. If everything suits you, you can start cladding.
Buy advertising Disable
DIY Viking armor - how to make a knight’s costume (armor, shoulder pad and helmet) from cardboard
I made this DIY knight costume for protection in cardboard battle tournaments. I'll tell you how to make armor from cardboard.
As a reference, and to determine the correct names of Viking armor pieces, I used the following sources:
: Final adjustment
Show 3 more imagesAt this stage you will need a reliable squire. Tape the front and back of the cuirass and see if the shoulders fit well. If necessary, bend them further. Now customize the armor to suit you. Glue the shoulders carefully - you may need to climb in and out of them a couple of times before they fit over your body. Try bringing your hands together in front of you. I had to cut about 3cm off each side of the armhole before I was comfortable enough to hold the cardboard tube sword with both hands.
Once the cuirass is laid over your body, secure both sides and shoulders on both sides with duct tape. If you can, glue them from the inside.
Then have the squire attach the pauldrons to the shoulders, about halfway up the shoulder strap. Remember that the dart goes at the back and closer to the neck. Use duct tape on the top and bottom and secure the shoulder pads with strips of tape along the edges (i.e. just put a lot of tape there).
I also had to cut shoulder-shaped curves around the edges of the helmet where the cuirass stuck out just above my shoulders. And a bandana, or a balaclava, or just a head covering is useful for keeping your hair clean and also gives it a nice medieval look.