When empty glass bottles have accumulated, you should not immediately take them to a glass container collection point, or even throw them away.
You can make a real work of art and a useful thing .
For example, it’s easy to use bottles to create a beautiful glass, chandelier or flower vase.
Summer residents and owners of private houses can use them to build fences and flower beds.
There are so many options for where you can put your empty glass bottles. Most of them are quite simple and do not require much effort or special skills .
In this article we will talk about what you can make from glass bottles with your own hands.
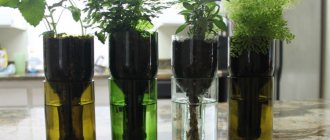
Vase and flower pot
A wine and champagne bottle can be turned into an excellent flower vase.
How to make it? Let's proceed as follows:
- Cover with acrylic or regular white paint in several layers.
- If desired, glue some beautiful thin fabric or lace to the glass container.
That's all, nothing complicated. The beautiful vase is ready.
You can also create something like a flower pot .
For this:
- Using a glass cutter, we divide our glass containers in two.
- We seal the upper part with a cork, turn it over and insert it into the lower part of the bottle.
- We pour the soil onto the mesh and we can plant our plant.
Exterior
Planting original DIY crafts can decorate not only the interior of your home, but also the exterior.
Hanging terrarium
Transparent bottles made of any glass are perfect for a home terrarium or flowerpot for living plants. Such a hanging flowerbed creates the impression and feeling that the bottle grew from plants, and not vice versa. It’s very simple to make; you need to cut off a small part of the bottle and plant a plant inside on the ground. They can also be not only hanging, but also tabletop or wall-mounted.
Bird feeders
Feeders can be made from upside down bottles. Fill the bottles with food or grain, after securing it in a wooden structure, turn it upside down, and place a glass or saucer underneath. Some of the food will be poured into a glass or saucer. As soon as the birds peck at the food, it will gradually be added. Such feeders can be safely hung on trees and they will decorate your site.
Bird feeders on a wooden mount
Stylish bottle bird feeder
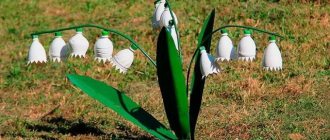
"Music of the winds" from bottles
These bells are made from a colored glass bottle, first cut into several pieces. In the largest part and the rest of the small ones, it is necessary to make holes for the wire with decorating material, which will connect all the cut parts of the bottle to each other.
This thing will look fabulous in your summer garden.
Chandelier and lamp
It’s easy to create an “antique” handmade chandelier from glass wine bottles. Here you will have to tinker a bit.
We can’t do without a cutter, a glass cutter, a lamp with a long wire and several light bulbs:
- We take three bottles and dry them.
- We put on protective gloves and a mask, fix our container in the cutter and begin to operate the glass cutter. During cutting, be sure to rotate the glass container so that the cut is as straight as possible.
- Alternately pour cold and hot water onto the container. This will help to detach the bottom part.
- Place the top part on the sandpaper and scroll for a couple of minutes to even out the edges.
- We begin to tinker with the lamp - we unscrew it with a screwdriver in order to “get” the wires with individual light bulbs.
- Then we insert the wires into the neck and assemble the lamp.
The chandelier is almost ready. To make it even more unusual, you can wind it with wire .
It’s easy to make lampshades from a beer bottle.
Just like with a chandelier, you need to cut off the bottom and then screw the neck into the lamp socket.
To make the lampshades look stylish, they can be painted with acrylic .
Do-it-yourself starch vagina
Jerk off into such a vagina is especially pleasant, since the consistency of starch gives the penis delicate and specific sensations. To do this, you need to take a glass with high sides, pour 150-200 grams of starch into it, add a little water, and a little more starch and water as needed, until a thick paste is formed.
Play this game!
Next, the glass is placed in the microwave to turn on the standard operating mode for 1 minute. After this, the mass should thicken, but not turn into cement. Using any available tool, such as a spoon, ladle or pen, you need to make a recess inside, where the penis will actually be placed later.
It is important that the recess is not much wider than the diameter of the penis, otherwise it will dangle uselessly, but not narrow, otherwise the organ will not fit into the vagina. Now the glass with starch is placed in the refrigerator for 1-1.5 hours. After this, the structure can be used for its intended purpose; to do this, oil or lubricant is poured inside, after which a glass of starch is placed on the penis.
Candlestick
A candlestick is romance and comfort.
Making it from glass containers
is not difficult :
- We cut the container evenly.
- Take a piece of paraffin and melt it in a water bath.
- We put a piece of wick in the neck, fix it there with dry paraffin, and then fill it with melted paraffin.
- We leave it untouched for a couple of hours until it dries, then we attach it to the wall, and we can light candles and immerse ourselves in the romance of a bottle.
How to care for an oral masturbator
Since masturbators are made from premium materials, you will need to take care of these amazing sex toys. Oral masturbators, usually made from cyberskin, should only be used with water-based lubricants. Other lubricants, such as silicone-based lube, can damage your masturbator, causing the material to break down or making it sticky and less soft. After you've had an orgasm, be sure to thoroughly clean the masturbator—inside and out—with warm, soapy water or sex toy cleaner before putting it away. Ideally, you'll dry it as best you can, but also leave it out in the open air to dry out the nooks and crannies you couldn't reach.
Candles
Champagne and wine bottles make excellent scented candles:
- Pour several bags of decorative balls into the container.
- We pour fuel for the burner into it. It should be liquid and alcohol based.
- Pour in a little essential oil (maximum 10-15 drops).
- We attach something to the neck to fix the wick. A regular ring of the right size will do just fine for this.
Now all that remains is to insert the candle, light the wick and enjoy the view and aroma.
Christmas tree and toys
Using a champagne bottle, you can make a New Year tree that will decorate the interior of your apartment during the holidays.
To do this you will need:
- champagne bottle;
- green satin ribbon 2.5 cm wide, 9-10 m long;
- green satin ribbon 5 cm wide, 1 m long;
- red satin ribbon 5 cm and 1.5 cm wide;
- silver brocade linen 2.5 cm wide for decoration;
- scissors;
- 1 sheet of plain white A4 paper;
- scotch;
- candle;
- matches;
- heat gun.
Next we proceed in the following order :
- Wrap the bottle in paper. The height along the width of the sheet will be approximately up to the beginning of the narrowing of the bottle. Secure with tape.
- Make cuts on top until the bottle expands, lay them carefully, securing them together with tape.
- Cover the wide part of the bottle with five-centimeter tape (we also glue it to the paper base with hot glue), and then glue it in several rows until the narrow part of the bottle begins.
- We cut sections from a thin green ribbon: the first is about 18 cm, and the next ones with a slight increase, as necessary. First glue them to the paper into the bottles. We let the ends of the tape overlap at an angle.
- Now let's start creating Christmas tree branches. To do this, we cut 10 cm sections, there are a lot of them and the quantity depends on the size of the bottle (about 7 rows of 10 pieces each). To prevent the ribbon from fraying, the edges can be sealed on a candle.
- Glue the first row of branches, retreating 2 cm from the edge of the bottle. Attach the second and all subsequent rows in a checkerboard pattern, retreating up 2 cm each time.
- Cover the area where the top row is glued with a silver brocade ribbon and decorate.
If there are a lot of bottles collected for the New Year, you can use another way to make a New Year tree:
- We place the first glass container round tier on the floor.
- We place a thick round cardboard or thin plastic tray on the bottles. The diameter of such a stand should be slightly smaller than the diameter of the bottle tier.
- We put the second tier. And so on.
You see, it’s nothing complicated, but the Christmas tree looks grandiose.
to create interesting, funny figures from small glass bottles .
A light bulb or plasticine can serve as the “head” for such a figure. We attach it with superglue, and then paint or draw a face with a pencil or acrylic.
An airplane is another toy that can be easily made from glass containers.
But it is still better to use plastic for this, so that there is no danger that the child will get hurt.
Crafts for the cottage and garden
Old and unnecessary plastic bottles in the garden and country house are a real find! They can be used to make not only decor, but also quite functional and useful little things. Here are just a few ideas!
Decoration of flower beds
First of all, unnecessary plastic is perfect for fencing your favorite flower beds. If you have accumulated a lot of identical bottles of the same size, their finest hour has come. Just fill them with sand and bury them in the ground around the flowerbed like a picket fence, and then paint them in your favorite bright colors.
Bottles of different sizes and shapes can be used to make beautiful tropical flowers. In addition to them, you will need regular glue, scissors, an awl, thick strong thread, wire, paints, beads and various little things for decoration.
Cut off the neck of the bottle, then cut and form petals. Regular heating will give you an interesting rounded shape: melt the edges of the candle and form flowers by bending and folding. A thick wire is suitable for the stem, and a thin wire is suitable for the stamens. A large bead will make an excellent core, after which it is enough to assemble the flower together.
Photo: texnotoys.ru
Photo: dizainlandshafta.ru
Photo: culture.ru Photo: svoyabesedka.ru
Garden figurines
Almost any garden figures can be made from plastic bottles: from your favorite gnomes to tall tropical palm trees. Palm trees are the easiest to work with: just take brown and green bottles, cut off the lower parts and string them on top of each other.
It's easy to make cute pigs from large five-liter bottles and several disposable glasses. All you need to do is glue on the ears and tail and draw a face. Peacocks, rabbits, flamingos and other animals look impressive. And the main advantage is that the whole family and children can create such entertaining crafts.
Photo: mir-ogorodnikov.ru Photo: mirlandshaft.ru Photo: mirstrojka.ru
Photo: cemicvet.mediasole.ru Photo: greenwhite.su
Photo: skolkogramm.ru Photo: skolkogramm.ru
Green wall
You can also make a real living green wall from plastic bottles - in fact, they are used as flowerpots. On one side of the bottle, cut a large rectangular hole, and on the opposite side, punch several holes with an awl for drainage. Fill the soil inside, plant grass or flowers there - and repeat until you have collected the required number of flowerpots.
Connect them together using a strong cord, sisal or other hangers. You will get an impromptu “curtain”, which you just need to attach to the base. And if there are too many bottles, attach them directly to the wall or fence in any random order at your discretion.
Photo: joindiaspora.com
Photo: get-loads.ru Photo: whoispro.ru Photo: pinterest.fr Photo: vosadu-li-vogorode.ru Photo: decoratorist.com Photo: thorablog.com
Photo: pinterest.ca Photo: elena-3-14.livejournal.com
Photo: novamett.ru
Bird feeders
Making a feeder from plastic bottles is as easy as shelling pears, and bottles of any size and shape will work for this. Cut a large hole on one or both sides so that the birds can get to the grain. Finish the edges with a file or emery to avoid sharp corners and burrs.
Attach a stone or other weighting material to the bottom - and the lightweight plastic will not constantly turn over in the wind. Attach the feeder to a wall, fence, or simply hang it from a tree, pour grain inside and wait for the first feathered guests!
Photo: waysi.ru Photo: moy-karapuzik.ru Photo: diycraftsy.com
Photo: ogorod.ru Photo: tr.pinterest.com Photo: pol-master.com
Path made from plastic bottle caps
An interesting and unusual option is a path made from bottle caps that have already been used. Laying them couldn’t be easier – in fact, they are simply pressed into pre-leveled soil. Of course, this will take time, because there are many lids and they are small, but the whimsical mosaic will certainly delight you and your household!
Photo: podelunchik.ru Photo: paper-land.ru
Photo: hammer-shop.ru Photo: idea-5.ru
DIY crafts from coffee beans: 10 beautiful ideas (photos)
Decor
With the help of an ordinary glass bottle you can transform the interior of your home beyond recognition .
Containers of a non-standard shape, standing several in a row or assembled together, will decorate a dining or coffee table.
Bottles of different colors, displayed in a row on the kitchen windowsill, will add an unusual note to the ordinary design of the environment.
All this in itself complements the apartment interior. However, there is a great variety of DIY bottle decoration.
You can pour salt colored with crayons inside. It looks unusual and elegant.
Another way to decorate an empty bottle is to cover it with twine or burlap . If desired, you can also use beads and other decorative elements.
You can decorate a glass bottle using decoupage and acrylic paints. Here a limitless field opens up for the flight of your imagination.
In this way you can create beautiful vases, dishes for bulk products and candlesticks.
Ways to decorate wedding glasses
Decorating wedding glasses with your own hands using rhinestones is a wonderful decorative option.
You will need small rhinestones: they will make the glass sparkle with bright reflections and shimmer. From the outside it will look very impressive. If the bride's dress also has rhinestones, the wedding attributes will complement each other. Rhinestones can be single-colored, the same size, or different. You can decorate with multi-colored rhinestones. You can use them to create a fantasy design, or specific shapes (a heart, a dove, rings), or simply arrange a shiny scattering on a glass.
Lace gives special tenderness and elegance to glasses. At the same time, you don’t need any super skills or expensive materials. Buy a beautiful, openwork lace and wrap it around a glass. Secure it all with glue.
The lace can be gathered into a “skirt”, which will make the glass even prettier. The look can be completed with a satin or silk bow, which is also attached to the leg with glue. The lace should be quite fluffy and durable; it should keep its shape and not “fall off”.
You can take the same silk ribbon, wrap it in a spiral around the stem of the glass and secure it at the top with an artificial rose. A couple of small rhinestones on rose petals - and the glass is decorated.
Take a small decorative flower as a basis. Glue it in the center of the glass, using acrylic paints on the stem and leaves. Glue halves of mother-of-pearl beads over the entire area of the glass. It looks very gentle and elegant. Beads can be placed in a row along the edge of the glass, you can put a heart in the middle or the first letters of your names with them.
This is perhaps the most romantic way to decorate glasses. True, fresh flowers can only decorate them for one evening, and worries about their freshness and durability may not leave you... but nevertheless it is very beautiful!
It is more practical to buy delicate artificial flowers and fix them on the glass with glue and ribbons.
A dark crimson rose looks great on the groom’s glass and a fuchsia rose on the bride’s glass. For romantic brides and grooms who value simplicity and naturalness, decor with daisies or forget-me-nots is suitable. Wildflowers on a glass are also suitable for young newlyweds.
Engraving
If you want to decorate glasses this way, you will have to turn to specialists. But write the inscriptions on the glasses yourself: they can contain declarations of love, oaths of allegiance and affectionate words that you call each other. The glasses can also have family logos, paintings, and portraits of the newlyweds. Complete this decor with a thin soft pink silk ribbon wrapped around the leg.
Try to merge the engraving into one image with the same ribbons or beads. By itself, it will only be visible to you and guests sitting close to you.
Decorating glasses with paints is a praiseworthy idea. As the main material you will need acrylic paints. The surface of the glass must be degreased with alcohol or acetone. Print out the design you like and transfer it to the glass. Next, the most important thing is to paint the glass. Let the paint dry (12&minus24 hours). You can fix the result using regular glass varnish. After this, you can start adding additional decor: rhinestones, beads, ribbons, sequins.
On the Internet you can find a lot of interesting patterns that will not be difficult to transfer to glass. Such glasses will become a real treasure for your family.
Remember that decorating wedding glasses with your own hands will not require serious expenses. You can make a bow from a satin or lace ribbon and secure it to the stem of the glass. Attach rhinestones or pearl beads to the bow using glue. You can make a rose out of tape and attach it to the glass.
The ribbons may be the same colors or may differ. For example, the groom has noble beige, the bride has soft pink. But if the colors are different, then the material and width of the tape should be the same.
Decorating glasses using mastic or polymer clay
It is very easy to sculpt flowers and leaves of the desired size from polymer clay. While the clay is still at the modeling stage, “try on” flowers and leaves to the glass, control the process, and adjust the design. Once all the parts are ready, they need to be baked. If the leaves are smaller than the flowers, bake them separately. You can read how long to bake the clay from the instructions on the package.
After baking, it is necessary to level the bases of the flowers and leaves. A wide nail file is suitable for this. At the end of the work, the parts need to be varnished. All that remains is to fix the polymer clay elements on the glass. Complete the design with the same rhinestones and beads. You can paint on the stems with acrylic paint.
Such work only seems painstaking, it will captivate you and, perhaps, you will acquire a new, interesting hobby.
Terrarium
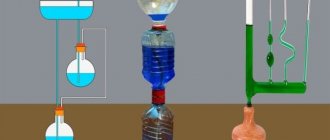
Almost any glass bottles are great for creating various original flower beds, including a home terrarium.
It can be made hanging. Then it will seem as if the bottle is part of a flower that grows with him.
Making a terrarium is not difficult. You just need to cut a little glass along the bottle, add soil and plant a plant in it.
Gelatin vagina
Another interesting way to make an artificial vagina is to use gelatin. Take 3 packets of this product, mix with 150 ml of water and bring to a homogeneous consistency. After leaving the mixture to infuse, the gelatin crystals should swell, the mixture is placed in an iron bowl and put on fire.
After heating the liquid, pour it back into the glass and wait until the gelatin hardens a little. Now two fingers are immersed in it, making a round hole inside. A man must find an object that is similar in shape and diameter to his penis. They need to enlarge the hole in the gelatin. When the gelatin has completely hardened, the penis is lubricated and inserted inside.
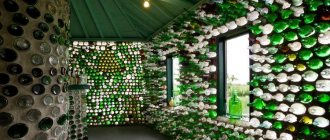
Glass bottle house
Another use for empty glass containers, which at first glance seems impossible, is the construction of bottles, including an entire house. After all, if you think about it, such a structure is not only environmentally friendly, but also cheap.
In addition, glass is a durable and strong material , and thanks to the cavities in the bottles, the house will have a favorable temperature regime.
Of course, such construction is possible if you have a very large number of bottles and time to build the walls yourself.
The bottles are laid out horizontally, similar to laying bricks. Considering that the bottles have a smooth surface, to increase the strength of their adhesion to the cement mortar, it is recommended to lay a polymer mesh every 2-3 rows.
The walls of the bottles should not touch each other. As the height of the wall increases, the thickness of the mortar is gradually reduced .
It is important to note that it is better to make the foundation in the traditional way - from concrete or brick, and starting from the first floor, use bottles. You can also try the tire foundation , which we talked about here.
A house made of such material will not collect dirt and dust on the walls, and inside it, thanks to the transparency of the walls, will be incredibly beautiful.
Crafts for home
Unnecessary plastic bottles can be used not only in the countryside. Even at home, they will be very useful, because they are an excellent affordable basis for any creativity. Let's share the options!
Lamps and lampshades
From several plastic bottles, a store-bought frame for a lamp and a dozen ties, you can make a very unusual and impressive lampshade for a chandelier. Remove the caps from the bottles, cut off the bottom and cut them into different curved strips 10-20 mm thick. Bend them in different directions, intertwine them and form fancy petals.
Insert the neck of the bottle into the frame and tighten it with a tie - you will need about a dozen of these “flowers”. The more magnificent and abstract your “hedgehog” turns out, the better. Make sure that the plastic lampshade does not come into direct contact with the incandescent lamp, otherwise it will melt!
You can also create an impressive night light by wrapping a simple frame made from a cut bottle with a thick sheet of paper or cardboard with decorative slits and petals. And the top of the five-liter bottle is an almost ready-made lampshade for a table lamp, which can be simply painted and decorated.
Photo: petlamp.org
Photo: etsy.com Photo: jonway-motor.ru
Photo: tr.pinterest.com
Photo: lenstroylandshaft.ru Photo: zapivo.net Photo: sveklon.ru
Photo: pinterest.com.mx
Pots and vases for flowers
Making a flowerpot from a plastic bottle is as easy as shelling pears - just cut off the top and punch drainage holes at the bottom. And after that, paint, cover with fabric, wrap with threads or decorate the pot with any other available materials.
A flowerpot on a leg, reminiscent of a glass, looks interesting: for it you will need not the lower, but the upper part of the bottle. The rest of the mechanism is the same, only for stability you need to glue a wide and stable stand to the lid.
Plastic bottles will also make a good improvised greenhouse for seedlings on the windowsill. The “lid” from the upper half protects sensitive sprouts from unfavorable external conditions.
Photo: elot.ru Photo: valenteshop.ru
Photo: pinterest.ru Photo: sianzeng.com
Photo: vk.com Photo: interiordecor.gr
Photo: doityourzelf.com Photo: 33-podelki.ru
Photo: fb.ru
Photo: thedaddest.com
Candlesticks
When creating candlesticks from plastic bottles, you can completely give free rein to your imagination. There is only one limitation - the plastic should not come into contact with open fire. Therefore, you will not be able to make something like a lamp - it will deform very quickly from the heat.
But small candlesticks look great under tall, long candles! To do this, you will need the cut off top of the bottle without a cap, silicone glue and materials for decoration. Make a textured design from glue, use acrylic paints, glitter, beads, ribbons and bows for decoration.
To make the candlestick more stable, you can glue the bottle to the stand and fill it with cereal. Or cover the bottom evenly around the perimeter with large beads - it will turn out very romantic! The candle is inserted directly into the open neck - and the plastic bottle candle holder is ready for use!
Photo: flixni.com
Photo: modernplace.ru Photo: knittochka.ru
Photo: allorakitchen.com Photo: dom-and-sad.ru Photo: pinterest.co.uk
Stands and organizers
To make a tall organizer stand for small items, take several plastic bottles and a cardboard base from paper towels. Cut the lower parts to the level of the shelves with sides and glue them to the base at different heights around the perimeter.
If you need a pencil case, lunch box or other closing container, take two bottles of the same diameter, a glue gun and a regular zipper. Cut the bottoms to the desired size and glue a zipper to them around the perimeter - it will connect the two parts.
To make an unusual gift wrap, cut off the bottom of a plastic bottle and cut it into four parts to the middle - you will get some kind of petals. Place a gift or candy inside and fold the edges, securing them with clear glue, tape or ribbons.
Photo: ideihaioase.wordpress.com Photo: slummysinglemummy.com
Photo: vk.com Photo: id.europeanwriterstour.com Photo: vsesamodelki.ru
Photo: amazinginteriordesign.com
Decorative figures
In addition to large garden figures, you can make many cute little things from plastic bottles. For example, make a beautiful bunny with paws and ears for storing sweets. Or hide a miniature boat in a bottle using half a cork and a toothpick.
You can cut out the cute cats together with their ears and store stationery items in them. Glue on wings and eyes with a paper feather skirt and you get an owl. And if you cover a plastic bottle with pine cones and draw a face, you will get an amazing autumn hedgehog with a cap nose.
Photo: jonway-motor.ru
Photo: steamgifts.com Photo: jonway-motor.ru
Photo: setelanbayi.blogspot.com Photo: yeinjee.com Photo: sk.pinterest.com
Photo: mastersamodelok.ru Photo: tytmaster.ru Photo: iglasm.ru
How to make a paper rocket: 10 step-by-step diagrams
Fences and flower beds
A flowerbed made from glass containers looks very original. But you'll have to sweat a little.
We warn you - you need a lot of glass containers:
- The basis of our flower bed will be car tires. The lower part of this base is filled with cement mortar.
- Place the first row with the necks towards the center. We do the same with the rest of the rows, but gradually we shift the bottles so that they are laid diagonally vertically. All voids must be filled with cement.
- We fix the necks of the very last row from above with the same cement.
Now we add soil and create our unusual flower bed.
From glass containers it is easy to create a fence that separates the garden from narrow paths or one plant from another:
- We dig a ditch.
- We place the bottles next to each other.
- We compact the soil around them.
bottle fence
A fence made of glass containers - what could be more unusual?
We create this wonder like this:
- We dig longer wooden poles into the ground.
- We make holes in the bottle bottoms. They should be 1 cm wider than the pole.
- We put the bottles on the poles and secure them with a strap on top.
For the fence, it is better to use containers with different colors and shapes - this way everything will look even better and more interesting, as in the photo:
Practice and what you need for it
So, there should be a lot of lubricant, more than you use during sex, in order to simulate mucous membranes. Take the lubricant and pour it out, it should be all covered.
Additionally, pour more onto your gloved hand.
What are you doing. I'll show you the basic movements now. Now I’m telling you how to move your hands, I’ll tell you how to create an illusion later, and then how to lead to this.
Look, you have a ring, it imitates lips.
And look, there is such a grip.
Furniture
Bottles are quite suitable for creating shelves . We make holes in the boards and connect them with bottles.
You can hang coats and hats on glass containers .
It will look great as a hanger:
- Take a container with a neck as long as possible.
- We cut at the desired angle.
- Glue the neck to the base nailed to the wall.
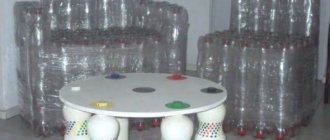
To make a table from glass containers, we drill holes in the board that will serve as a tabletop for necks of the required diameter. We insert our bottles into them.
Glass containers even make a good chaise lounge.
We glue the beer bottles to the metal frame with industrial glue and we can relax.
Tags
about Sex Sex Reading Doctor sexologist of the highest level I work as a sexologist for more in sexual life. Doctor sexologist of the highest level I work as a sexologist for pain in sexual life. get sexual release diversify your sex life. make a masturbator your own expensive masturbator do not make a masturbator at home
analtoysfemalemen's ballswomenresponsevaginalvibratorsbecomemostcommentsattachmentscouplesyourselfviewusingpaperstimulantsstimulationpleasuresitesjust putplacevibrationerotic plugstowelsinstructionsrollringsock
Winter New Year decoupage
Decoupage is the creation of a beautiful composition from glued paper with interesting images on the surface.
We will “decoupe” the bottles in the New Year’s style like this:
- Take a special napkin with your favorite image on the theme of the New Year holidays. We cut out the picture and glue it to the glass container with PVA. For bottles you need to use a three-layer napkin.
- Apply droplets of glue to the top of the glass container with a pistol.
- Take a sheet of paper and wrap it around where the napkin is glued. Secure the sheet with tape. We do this so that our New Year's plot does not get splashed with paint.
- Spray some spray paint on the top.
- Remove the sheet of paper.
All is ready.
How to cut a bottle at home?
You can trim the bottle yourself, cut off the neck or bottom in several ways:
- Use a special glass cutter or machine designed specifically for working with glass bottles.
- Use heating with boiling water or flame.
- Use a burning thread or nichrome wire.
To cut the bottle crosswise, you can use the most ordinary thread . Just soak it in alcohol.
You need to do everything like this:
- Wrap the cut area with a thick layer of thread.
- We put on gloves and safety glasses. We wet the resulting winding in alcohol and ignite.
- Let it burn for a minute, and at the same time twist the bottle 2-3 times around its axis. At the same time, hold the glass container horizontally.
- Simmer and place in cold water.
All. Due to the sudden change in temperature, one part of the bottle separated from the other. the cut with sandpaper .
Cutting a bottle lengthwise is a little more difficult, and it is advisable to use a special glass cutter for this purpose.
It may not work out right away. You need to be patient and the work will go like clockwork.
If you need to make a hole in a bottle, a drill and a diamond glass drill bit will help you. You can purchase it in specialized departments of stores. When drilling, be careful so that the smallest fragments do not injure you.
Security measures
Although working with glass bottles is considered safe, precautions must be taken. When cutting glass, it can break into small pieces and cause injury to your hands or eyes. Before cutting glass products, you need to prepare:
- gloves;
- protective glasses;
- tight-fitting clothing.
It is especially important to reliably protect your eyes when working with glass! Getting glass dust or small particles into your eyes will significantly harm your health!
At the end of the cutting process, you should thoroughly wash your hands and face, and thoroughly clean and wash your clothes.