Magnetic mass for welding is a special device that provides reliable fixation on metal surfaces. This allows you to comfortably perform welding work on complex surfaces where the use of classic alligator clips is impossible. There are many design options that depend on the work conditions. The structure of this device is not particularly complicated. For this reason, some craftsmen prefer to use homemade magnets for welding.
Clamp types
The grounding terminal for the welding machine can be magnetic or in the form of a clothespin, clamp, or centralizer. Let's look at the main varieties.
"Crocodile" ("clothespin")
This type of clamp is used in most electric welding machines. Attaches directly to the workpiece. Among the advantages of an alligator leather clip it is worth highlighting:
- reliable fastening to the surface of the product;
- the ability to attach a wide range of geometric shapes to parts;
- quick attachment/detachment;
- Ease of use;
- low connection resistance;
- wide opening angle.
The disadvantages of clothespins are as follows:
- it is not always possible to attach the “crocodile” directly to the part (for example, to a large diameter pipe);
- The weak point of the mechanism is the spring, which does not have the maximum level of strength.
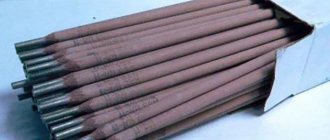
Alligator clips are most often found in 200 A, 300 A, 500 A versions. Professional welders will need modifications for 400-500 amps.
Magnetic welding compound
This type of terminal is also often used by welding professionals. Advantages of magnetic locking:
- fastening to any surface, in particular to pipes;
- excellent option for hard-to-reach places;
- simple design;
- ability to withstand voltage surges without exhaustion;
- significant contact area.
Disadvantages of magnetic devices:
- unreliability of fastening in the case of a small contact area with the part;
- incompatibility with workpieces made of non-ferrous metals;
- the need for periodic cleaning;
- demagnetization due to overheating.
It is worth remembering that the magnetic mass clamp for the welding machine heats up when attached to a dirty surface.
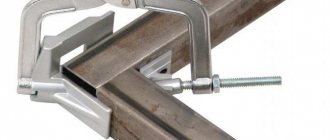
Clamp
This is a screw mechanism. Features less frequent use than the two types of ground terminals listed above. Among the advantages of clamps:
- reliable fastening;
- Smooth current transmission due to excellent contact with the workpiece.
The disadvantages of clamps include a complex mechanism and cluttered design.
Magnetic mass for welding
What is remarkable about such a homemade product for a welder is that it is very useful and effective in work. For example, very often, in addition to poor contact, there is simply nothing to catch on with the mass of the cable, well, there are no protrusions or edges. The magnetic mass will allow you to do this with ease, even to a flat metal surface.
To make such a device, you will need to prepare:
- A round magnet from a large speaker. It is very important that the magnet has metal coins. Such magnets are found in speakers, old TVs and other radio equipment;
- Long bolt, three washers and two nuts. Everything should be the same diameter;
- You will also need such running tools as: a grinder, a screwdriver, pliers, possibly a drill to drill a hole in a metal coin.
So, let's look at the process of manufacturing magnetic mass for a welding machine along with the website.
General recommendations for selection
When choosing a grounding clamp, consider the following nuances:
- Optimal weight of the connected wire. Otherwise, the welding mass clamp may come off at the most inopportune moment.
- The maximum current supplied by the welder. If the terminal is designed for a lower current than the welding machine, depletion of the contact area is guaranteed.
- Clamp opening angle. The larger it is, the wider the scope of application, since thanks to it it will be possible to attach the mass to products of different sizes.
- Spring reliability. If compression is provided by a spring, the properties of this element must ensure reliable grip of the workpiece.
Also pay attention to the popularity of the brand. Buy products only from trusted manufacturers to avoid counterfeiting.
DIY mass
Make your own ground clamp. To do this, take a magnet, two magnetic washers, a bolt and a nut. Then perform the following steps: 1) drill a hole in the washer with a diameter close to the size of the bolt head - this will be a contact washer; 2) grind the top of the bolt to the thickness of the washer; 3) boil and clean up what happened; 4) pass the bolt through the magnet and cover the latter with the remaining washer; 5) secure the end of the cable to the rod; 6) tighten everything with a nut. Spending some time on a DIY terminal can save you a lot of money.
Weight per welding machine plus or minus
There are welding machines that use alternating current, and there are inverter machines that operate exclusively on direct current. Inverters have two output connectors: “plus” and “minus”. In one, a wire with a holder is connected, in the other, a grounding wire with a clamp. In this case, the connection order can be changed to achieve different results during the welding process.
Straight polarity
To operate in this mode, you need to connect the wire with the holder and the electrode to the “minus”, and the ground to the “plus”. With direct polarity, the workpiece receives a higher temperature, and not the electrode itself. Thanks to this, you can boil the very root of the seam. Welding thick metal is also better.
Reverse polarity
For such welding, the cable with an electrical holder and electrode is connected to the “plus”, and the grounding of the welding machine is connected to the “minus”. In this mode, the highest temperature will be on the electrode, not on the workpiece. Moreover, in this case, the temperature at the tip of the electrode will be almost a thousand degrees lower than when soldering in straight polarity mode. This allows you to weld thin metals with minimal risk of burns.
Manufacturing
To make the simplest homemade magnetic mass you will need:
- Magnet from an old speaker (choose a medium-sized magnet, large ones are inconvenient, small ones do not hold well)
- Drilling machine or drill
- Furniture bolt and tap for it
- Hammer, chisel
To begin, take your already disassembled speaker and use a hammer and chisel to remove the magnet.
Source notperfect.ru
After tearing off the magnet, do not rush to disassemble it into its components.
As a rule, it is located in a special case, in which it is protected from impact and, by inserting a bolt, it easily turns into a convenient magnetic mass with something like a handle (bolt thread).
Attach a wire from the welding mass to the bolt, in this case the current passes through the magnet, and when working for such a long time, the magnet begins to heat up. When heated, it begins to burst.
To prevent this, take a magnet and use a drilling machine to drill a through hole in a plate with a diameter of 7 millimeters, pouring oil and removing chips from the hole.
Next, use a tap to tap the threads under the bolt.
Having done this, it turns out that the ground wire is connected to the bolt, current passes through it and is transmitted directly to the plate, bypassing the magnet. In this case, the magnet will not heat up and, accordingly, will not burst.
As you can see, the manufacturing process is very simple.
Next, simply clamp the bolt from the ground wire with a crocodile or attach the wire to the bolt itself and test your homemade magnetic ground from an old speaker.
Source notperfect.ru
The magnetic mass is ready with your own hands.
I recommend the following video, where the author clearly shows how to assemble a homemade magnetic mass:
Magnetic terminal design
The device consists of two blocks:
- A holder to which the welding machine cable is connected.
- Magnetic group with constant or adjustable pressure on the surface. Professional models are equipped with a switch.
You can buy magnetic mass or make it yourself. Both parts are rigidly fastened together. The main parameters of magnetic solder leads include:
- Dimensions and weight. Models from different manufacturers weigh from 0.85 to 1.2 kg with a diameter of 5 to 6 cm.
- The clamping force can range from 2 to 50 kg.
- The current strength that a magnetic mass can withstand. Compact models up to 200 A, professional models up to 500 A.
Magnetic contact design
The device itself consists of two parts.
- Contact. This is the point where the ground cable is secured to the holder.
- Magnet. Can be of various shapes and sizes.
These two parts are connected to each other by a fastener. The weight of the magnetic mass for welding will depend on its size. For example, a magnetic welding clamp from ESAB weighs about 850 grams.
The main thing in this design is simplicity, which ensures reliable operation and uninterrupted operation.
Design of magnetic contact and its characteristics
It consists of two nodes:
- Cable holder. The grounding cable of the welding equipment is connected to it using a bolted connection.
- Magnetic installation. The size of the magnet depends on the design features. Some models are equipped with a mechanism that regulates the pressure of the magnet on the working surface. Professional devices have switches.
The parts are connected to each other by a rigid support. The main features of the devices are:
- Dimensions and weight. This depends on the manufacturer and the specific model. Average weight 1-1.2 kg.
- The force of attraction to the surface. It varies from 2 to 50 kg.
- Welding current strength. The maximum value of the parameter is measured in amperes. For entry-level models, it does not exceed 200 A. An advanced device is capable of operating at 400-500 A.
- Execution type. Special corner clamps with gap adjustment are made.
Safety regulations prohibit connecting a cable without a special cable lug, which is secured with bolts.
Types of magnetic squares
Welding magnets can vary in both shape and operating principle:
- The clamp is a flexible square with adjustable angles. An excellent tool for making parts of any complexity.
- Single bend for fixed angle permanent magnet welding.
- Removable soldering magnets are an excellent technical solution for ease of use: after soldering, you can turn off their action, the supports “detach” themselves, which allows you to remove the clamps without effort or deformation.
- Universal magnetic welding angles with several standard angles are another excellent technological solution for performing a variety of jobs of varying complexity.
- Teams with different strengths. It is clear that for fastening massive parts, powerful clamps are needed, and for small work that requires jewelry precision, they must be compact both in size and in terms of attractive force.
- Three-dimensional and tetrahedral squares with cylinders and heat-resistant ferrite magnets for working in difficult temperature conditions and with parts of different sizes and weights.
Advantages and disadvantages
Electric welding is the most common method of joining metal products. The integrity of the electrical circuit depends on the quality of the future connection.
Therefore, the invention of the device in question aroused serious interest among specialists.
The popularity of magnetic mass for welding is due to the following advantages:
- A secure fit will allow the welder to concentrate on the job without the distraction of adjusting the clamp.
- The working mechanism is a permanent or disconnected magnet. Subject to the operating conditions, it can be used for an unlimited time.
- No consumables are required to use the stand.
- Even compact models have sufficient contact surface for secure closure.
- The device is resistant to sudden voltage changes or temperature changes.
- The magnet can be attached to any place to create a comfortable connection environment.
Despite the large number of advantages, there are a number of disadvantages:
- Before use, it is necessary to prepare the surface. The procedure involves removing dirt and foreign particles.
- Cannot be attached to small parts, such as a circle with a small cross-section.
- You cannot work with non-ferrous metals, as they are not magnetized.
How to make magnetic mass
The work of making magnetic mass for welding begins with separating the round magnet from the speaker. Depending on its design, you will have to use a screwdriver or a grinder. However, it is very important that the metal coins on both sides of the magnet remain intact and unharmed.
After the magnet is removed, you need to drill a through hole in the center. Again, there may already be a hole if the magnet was bolted to the speaker housing. In any case, after this it is necessary to thoroughly sand the surface of the metal coins of the magnet on both sides. Otherwise, even the slightest protrusions on them will prevent the magnetic mass of the welding machine from clinging to the surface of the workpiece being welded.
At the final stage of making a homemade product, you need to insert a bolt into the hole of the magnet, attach the mass from the welding machine to it, and tighten everything with nuts and washers. This completes the production of the magnetic mass for welding.
Thus, in just an hour or two, you can make an effective device that will be very useful when performing welding work. The magnetic mass for the welding machine has sufficient pressure, it does not heat up during the welding process, and it can be attached even to a completely flat area of a metal workpiece.
Share on social networks
Magnet or clip
Typically, welding machines are equipped with a piece cable with a clamp-type holder. At first glance, this is convenient; such a device can be securely attached to almost any surface (foil, metal tiles, etc.).
But there are situations when it is not possible to install such a mass on one product or, more often, it burns out. A good alternative would be the magnetic contact of the welding cable.
What are its advantages over a standard clothespin clip?
- This is the ability to provide contact with almost any surface without any problems.
- The simple design is almost forever in use and will not break, since there are no springs or mechanisms.
- Such a mass perfectly withstands voltage and load changes, as a result of which it does not burn out.
- The large contact area ensures reliable closure.
But this type of sensory attack also has its drawbacks. The main disadvantage is that the magnetic mass for welding will not be installed well on small parts, for example, a beam or a stiffener. The second negative property will be the impossibility of fastening to welded parts made of non-ferrous metals: aluminum, copper and others. In addition, over time, the magnet becomes contaminated with metal shavings and will need to be cleaned periodically.
Without taking into account the last two factors, this is a fairly affordable device that you can even make with your own hands without additional costs.
Main stages of work
The first step will be to make a stationary part of the magnetic mass.
To do this, we cut off two pieces of thick metal and cut grooves on the inside into which we install four magnets in the form of cubes. The magnets used are neodymium.
Next, cut two pieces of aluminum. We drill holes in them. One of the blanks needs to be threaded. We also drill coaxial holes in steel blanks. We connect all the parts using bolts.
At the next stage, we begin to manufacture the moving part of the homemade product. Temporarily fix neodymium magnets between two pieces of square rod.
We cut out a part from aluminum with a groove for magnets. We drill holes in it. We insert the magnets inside the part and secure them with threaded fasteners. Remove the square rods.
Now we will need to make a magnetic mass housing. For this we will use four aluminum blanks.
We drill mounting holes in them, and then connect them using bolts. We also fix the fixed part with magnets with bolts.
Next, we cut out the upper part of the body from aluminum. We drill a hole in it for the wing bolt and four more mounting holes. Then we install the moving part with magnets and the handle.
Homemade magnetic mass for welding is ready. We attach the welding cable, and you can use it.
The operating principle of this device can be seen in the photo below. By turning the knob you can change the operating mode from on to off, and vice versa.
In general, we have an ordinary magnetic mass. Compact and lightweight, with a powerful magnet.
But, unlike the classic versions, there is no need to make any effort to tear the magnet off the metal.
How to use?
The technology for using the device is not complicated. The first step is to connect the welding cable, after which the installation begins.
Most devices have switches that activate the magnetic field. At rest, the magnet will not be attracted to the surface.
One person is required for commissioning. After contact with the countertop, you need to activate the device. Once these steps are completed, the gripper enters operating mode.
When finished, perform the previous steps in reverse order. Do not attempt to separate the switched-on device from the part; many models are resistant to peeling. This may also damage the latch.
Upon completion of work, you should immediately clean the contact surface of the magnet from metal shavings, as this negatively affects the force of attraction.
Introduction
First, let’s define what a magnetic welding cable contact is. This is a kind of auxiliary device.
It is attached to the required area of metal to be joined, based on its magnetizing properties. This contributes to the formation of a closed electrical circuit, without which manual electric arc welding cannot be performed.
Magnetic welding clamps are used by welders with any experience. Some craftsmen make a special magnetic mass with their own hands. For more details, see our video at the end of the article.
Setting up the device
The quality of welding depends on the correct settings of the welding inverter, especially regarding the correct choice of electrodes. You should also consider:
- seam depth;
- location of the seam in space (vertical or horizontal);
- brand or type of metal being welded;
- metal thickness and so on
You should know that corresponding electrodes are made for each type of metal. Electrodes with a diameter of up to 5 mm can be used with inverters. But for each thickness of the equipment it is necessary to select the strength of the appropriate welding current. To properly set up your welding machine, use the table below.
Advantages and disadvantages
If you compare the magnetic clamp and standard clamps, you can highlight the following advantages:
- Reliability of fixation allows welding without being distracted by adjusting the weight;
- Magnetic grounding tolerates voltage and temperature fluctuations without consequences.
- The design has no moving parts that could break. Therefore, with proper use, life is not limited.
- The magnetic clip is convenient for working in hard-to-reach places and on curved surfaces where it is impossible to attach a clothespin. For example, welding large diameter pipes. Even in compact models, the metal contact area is sufficient to create reliable electrical contact.
The disadvantages include:
- The need to clean the mounting area. On a dirty surface, the magnetic lead heats up when soldering due to poor contact with the metal.
- Unreliable fixation on round parts of small diameter. For example, on reinforcing bars.
- Impossibility of fixing on non-ferrous metals that are inert to the magnetic field.
What's happened?
This device is mounted on the working plane of the workpiece . Thanks to the active magnetic field, a strong fastening is achieved, creating a closed electrical circuit - the main condition for the formation of an electric welding arc.
The tool is especially popular among novice welders - it will take a few minutes to familiarize yourself with the principles of the work. Experienced specialists use magnetic mass for welding machines for critical work - welding large-diameter pipes or connecting load-bearing units made of profile materials.
Pros and cons of magnetic mass
As with any product, magnetic welding compound has both positive and negative sides. Let's talk about them from my point of view.
Positive:
- Just use
- Versatility of use
- Operation duration
- No mass heating due to hermetic installation
- convenient to use, for example, when installing where there is nothing to attach a clothespin to... At heights, etc.
Negative:
- Cost (compared to clothespin)
- Constant contamination of the magnet area with chips, scale and other metal debris
- The need to clean the magnetization area based on contact density
- Welding near a magnetic mass is practically impossible due to the effect of the magnetic field on the electric arc.
- The main disadvantage is that it is impossible to fully use it when working with non-ferrous metals (if you simply put the conductive part of the mass on the non-ferrous metal.)
Well, what can you do? everything has pros and cons... The point is whether the pros can become more significant than the cons in your case.
About magnetic mass
Magnetic mass is a kind of clamp used when working with a welding machine with large objects; it is widely used in welding.
It consists of the magnet itself, a metal plate that is in contact with the metal, a bolt or other place where the welding mass was attached and a handle.
The principle of operation is simple: from welding it is fed to a wire, which transfers it to the nozzle through a bolt to the plate, which comes into contact with the welding object and transmits current to it, and the magnet holds the entire nozzle.
Installation and connection of the unit
To use your inverter efficiently and safely, you must first properly prepare it for operation. This process is carried out in several stages. The first task is to install and connect the unit. Installation of the inverter must be carried out according to certain rules:
- the unit must be positioned so that it is at a distance of at least 2 m from walls or objects;
- the device must be grounded;
- the welding location must be chosen so that it is away from flammable objects;
- It is recommended to cook on a free area or on a metal table.
The inverter can be connected both to a home network (220 V) and to a 380 V network, which is usually used in production. If you plan to use the unit away from electrical networks, it can be connected to a generator, diesel or gasoline.
Electrical connection
Connecting a welding machine to a household electrical outlet often causes problems. The reason for their occurrence may be old wiring or insufficient diameter of its wires. Typically, the wiring is designed for a current of up to 16 A. And since all switched on devices in the house can exceed this value, for safety reasons, circuit breakers (circuit breakers) are installed. Therefore, when connecting, you need to know the power of the welding machine so that it does not activate the machine.
Connecting the inverter to the home network
It is also worth paying attention to network drawdown. If, when the inverter is turned on, there is a decrease in the voltage in the network, this indicates an insufficient cable cross-section. In this case, it is necessary to measure to what values the voltage drops. If it falls below the minimum with which the inverter can operate (specified in the instructions), it is impossible to connect the device to this network.
Using an extension cord
The network cable connected to the inverter meets all power requirements and does not create connection problems. But if its length is not enough, it is necessary to select an extension cord with a wire cross-section of at least 2.5 mm2 and a length of no more than 20 meters. These extension cord parameters will be sufficient to operate the inverter with a current of up to 150 A.
It should be remembered that when connecting the device to the network through the holder, the remainder should not be wound, since when the unit is turned on, it will turn into an inductor. As a result, the conductors overheat and the extension cord fails.
Connection to generator
In cases where the device cannot be connected to the network, it can be connected to a generator that runs on either gasoline or diesel fuel. The most common are gasoline power plants. But not all of them are suitable for connecting welding machines. For the inverter to work effectively, the generator must have a power of at least 5 kilowatts and provide a stable output voltage. Overvoltages can damage the welding machine.
You should also consider what diameter of electrodes you will be working with. For example, if the electrode diameter is 3 mm, then an operating current of approximately 120 A will be required at an arc voltage of 40 V. If we calculate the power of the welding inverter (120 x 40 = 4800), we obtain a value of 4.8 kW. Since this will be an energy consumption, a power plant capable of delivering only 5 kW will operate at the limit of its capacity, which will significantly reduce its lifespan. Therefore, a generator must be selected with a certain power reserve, approximately 20-30% more than that consumed by the inverter.
Features of using magnetic mass
Before using the device, connect the cable to it in accordance with safety regulations. Do not connect the ground without a lug with a bolt hole. This requirement also applies to the welding machine.
Factory models are equipped with a knob to turn the magnetic field on/off. In the default position, the mass will not be attracted to the metal. In advanced models, the same handle is used to adjust the clamping force.
To activate the magnetic field, a mass is applied to the workpiece and the handle is rotated. After disconnecting, proceed in reverse order. Attempts to quickly move the device to another location while it is active usually end in its being hacked.
Do not install the terminal near the welding site, as the magnet loses its properties when overheated.
Immediately after completion of welding, it is necessary to remove adhering metal particles from the contact surface, which reduce the clamping force.
Rules for servicing the inverter device
Maintenance of an inverter-type welding machine includes the following.
- Visual inspection. It must be carried out every time before and after starting work in order to detect any damage to the insulation of welding cables and power cables. In addition, during an external inspection, the absence of damage to the housing and controls is checked (it is necessary to check the current regulator).
- Internal cleaning of the unit. This is carried out after removing the casing from the device to remove accumulated dust and dirt from all its components. Cleaning is carried out with a jet of compressed air directed at dusty parts.
- Checking and cleaning the device terminals. Power cable connection points should be checked periodically. If oxidation is found on the terminals, remove it with fine sandpaper.
Also avoid exposure to drops of water, water vapor and other liquids that may enter the machine and cause a short circuit in the electrical circuits of the inverter welding machine. If liquid gets into the device, remove the cap and remove all moisture. Dry the inverter electronic board thoroughly with a regular hairdryer.
The direction of electron movement is regulated by polarity by switching the wires to “plus” or “minus”. That is, when working with DC welding, two settings are possible:
- Straight polarity. The negative is connected to the electrode, the negative is connected to the ground terminal. In this case, the current moves from the electrode to the workpiece, and the metal heats up more.
- Reverse polarity. The plus is connected to the electrode, the minus to the ground terminal. The movement of current from minus to plus (from the workpiece to the electrode) creates more intense heating.
Direct and reverse polarity of the connection when welding with an inverter is used depending on the work and the quality of the materials. With alternating current, the type of connection is not important, but with direct current, you can change the polarity manually.
Recommendations on how to extend the life of an alligator clip
The main design feature of such a welded mass is a spring, which ensures quick attachment to the metal. This is also the Achilles heel of the device.
Understanding the operating principle of the “crocodile” mass allows you to extend its service life and not have to give up two or three welding jobs. What is it about. Each clamp has a strip (copper or brass) that transfers contact from one jaw to the other. If you do not monitor its condition and incorrectly connect the mass to the metal, it may deteriorate. A common malfunction: the contact fitting with the wire to one clamping jaw can slip through the spring to the other. As a result, the spring begins to heat up, which leads to a loss of its hardness and elastic properties (in metallurgy, this process is called tempering), aimed at reliably securing the clamp to the surface of the metal product. Because of this, the mass quickly collapses. To maintain working condition, it is necessary to monitor the condition of the strip: it should not touch the metal when connected. The photographs clearly show what we are talking about.
Incorrect contact
Correct contact
Find a crocodile for professional work. What positive aspects does it usually have:
- the design is correct (the strip is recessed so that it cannot be touched)
- quality materials,
- more powerful spring;
- greater girth (sometimes simply irreplaceable).
I take it with a reserve of 400 -500A.
Advantages
Magnetic mass has many advantages. It can quickly be attached to any surface, even curved.
Its design is very simple. It does not deform, so it can be used for years without losing its properties. After all, in essence it is a simple magnet that works thanks to its magnetic field.
Such a terminal does not contain any other devices or parts, and therefore cannot break.
Changes in temperature conditions and voltage surges do not negatively affect the functioning of magnetic clamps. They rarely burn out and can be used in combination with different metals.
They will be especially convenient for cooking in hard-to-reach places or on curved surfaces. The magnetized mass provides a tight fit due to its coverage of a wide surface area.
How to improve the ground terminal?
As a rule, novice welders face this problem. Purchase an inexpensive inverter for manual arc welding at home: for a fence, gate, barn, etc. Such an inverter, which costs 6-10 thousand rubles or more, is equipped with an alligator clip. In addition to other negative aspects of such a clothespin, which were already mentioned above, it most likely has steel jaws coated with a thin layer of galvanized copper (to give the impression that they are copper). It is very easy to check whether it is copper or steel; you just need to bring a magnet. If it is magnetized, it is steel. Food grade stainless steel usually does not magnetize to an uncured state, but that's a different story (see the article "How to Tell What Type of Metal is It").
Why are steel jaws dangerous? They get very hot: steel is a much worse conductor than copper or brass. To prevent this from happening, you can remake a cheap clothespin, which costs 40-50 rubles. (unless, of course, you have copper or brass in your house, such as a plate or pipe, rubber).
What should be done? It is necessary to unscrew the original jaws, which are held on by bolts, and make other jaws from them, as if using a template. It is enough that they represent the Russian letter “P” in cross section. You can easily get good contact with a low-quality clothespin!
Do-it-yourself magnetic clamp for welding
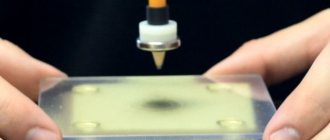
Welders can appreciate the benefit of using a magnetic clamp when working on complex structures where there is simply no place for a regular crocodile clamp to hook. And so you throw the mass onto the metal surface to be processed - and you start welding.
You can buy one from any soldering shop, but will it meet your needs and be as reliable as a custom terminal? Everyone somehow comes up with trident carriers, some make crocodiles in the garage, but few people undertake to invent magnetic masses... In general, do it, and you will have something to brag about to your welding friends!
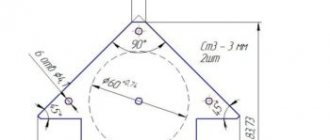
- The terminal itself is cut from a sheet 2 mm and 0.5 mm thick, and the magnet is taken from a non-working column, and a piece of hot-rolled angle 20x20x3 mm is used here as a mounting plate for the cable. All other components: screws, washers, nuts are standard.
- The connection can be made to the grounding cable of the welding machine, replacing the standard “crocodile”, or it is possible to equip this type of grounding separately with a bayonet connector and a cable with a cross-section of 1x16mm.
What is needed to make a homemade device?
- ring magnet;
- copper bolt;
- nuts and washers;
- plexiglass - for making a mounting platform with a handle.
Main stages of work
You will need to make a mounting pad and a handle with finger holes from plexiglass.
If thick plexiglass is not available, thin strips can be used. But first they need to be glued to the desired thickness.
We drill two holes at the installation site: one for installing a magnet and the second for installing a copper bolt (we make an electrode from it).
The homemade product is ready!
It turned out to be cheap, reliable and very practical. Pay attention to this.
Pros of magnetic mass
The first plus: when working with large workpieces, when the crocodile cannot catch on, such a magnetic mass helps out.
The second plus: when working with metal drilling, a heap of metal shavings remains, which is very convenient to collect with such a magnetic mass (so that after assembling the shavings do not bother with them on the magnet, before collecting them, attach a small sheet of paper to the magnet, removing the magnet, the shavings will remain on paper).
Well, let's immediately start making a homemade magnetic mass from old speakers.