Hands from the right place | 04/27/2020
When soldering computer printed circuit boards, there is a danger of expensive circuit failure due to one or two drops of molten tin getting there. Frozen solder particles can cause no less inconvenience. It is advisable to have a device that would promptly remove excess from the soldering area. Such a device is a tin pump.
Destination pump. Removing unnecessary solder
When soldering computer printed circuit boards, there is a danger of expensive circuit failure due to one or two drops of molten tin getting there. Frozen solder particles can cause no less inconvenience. It is advisable to have a device that would promptly remove excess from the soldering area. Such a device is a tin pump.
Principle of operation
Industrial designs of desoldering pumps are vacuum action soldering pumps. They are equipped with a manual drive that works like a regular suction cup.
Desoldering pumps fall into two main categories: suction desoldering pumps and heated air pumps. Suction pumps are used to remove melted solder (and tin), leaving previously soldered terminals disconnected. The second type of desoldering pump pumps air hot enough to melt all the materials around a small surface where molten tin or solder is present. Soldering irons with tin pumps can be used both for soldering directly on site, and for desoldering with subsequent removal of drops of the melt before it solidifies (you can also use tweezers, although this is not so convenient).
Since the soldering process always produces harmful chemicals and fumes, some models of the devices in question are equipped with smoke extractors.
Why clean the soldering iron tip?
An example of a tip in poor condition Regardless of the material of manufacture, the shape of the tool itself and the frequency of use, the device must be cleaned before starting work.
This is done to remove carbon deposits resulting from the decomposition of flux and solder under the influence of high temperatures. A special destructive role is played by the mutual penetration of copper and tin. Surface contamination complicates the work process and reduces its effectiveness. Additional accessories such as a desalination pump can delay this point. But sooner or later, cleaning will have to be done.
Important! Additionally, combustion products affect the quality of consumables. Timely cleaning helps to avoid all these consequences. But it is important to be able to do it correctly.
It doesn’t matter what you’re using – a minimally equipped tool or a home soldering station. Oxides destroy the heater; it is necessary to get rid of them in a timely manner to minimize harm.
How to use a desoldering pump?
Let's look at this using the example of the best desoldering pumps of 2019.
- Model Endineer SS-02. The suction type desoldering pump is equipped with a heat-resistant silicone tip with high flexibility, which is connected to a small vacuum chamber. The presence of a soldering suction cup allows the nozzle to directly contact the soldering iron without the risk of damaging it. At the same time, the nozzle freely envelops the solder joint area. The Teflon tube, cut through the end, forms a secure fit over the molten solder. The tube can be changed periodically using the included repair kit. Allows you to carry out all operations with one hand.
- Model SeaLody. A universal desoldering pump that works on the “three in one” principle: in addition to the manual vacuum suction, there are also two wicks designed to remove solder and flux residues. In the latter case, oxygen-free pure copper wire is used, which ensures high-quality flux removal, especially in hard-to-reach places. Maintains a stable vacuum. The device is equipped with an aluminum frame, which allows it to be operated with one hand.
- Model Greenlee 1700. Equipped with a universal type tip, it operates on the principle of air heating. The clamping is carried out using a spring. To ensure uniform distribution of heat flow over the entire soldering surface, the desoldering pump is equipped with a copper mesh. The durable and rigid body prevents damage to the device in case of accidental contact with the melt. It is easy to control and comes with a spare spring and suction cups, but a replacement tip is not included.
- Model Wick & Desoldering Pump. The device is designed in the form of a gun and is designed to remove solder. Operated with one hand. The desoldering pump is equipped with a highly resistant suction cup and a copper solder braid. After heating the wick and solder, the soldering braid quickly absorbs the molten solder, leaving the work area completely clean. The design includes a non-slip sponge (made of a material with high heat capacity) and a nylon temperature-resistant nozzle.
- Model OMorc Desoldering Wick. The solder suction cup has a frame made of aluminum bronze and creates a high-pressure vacuum that can effectively remove solder from the circuit board. The soldering braid ensures the cleaning of solder residues on the soldering iron tip, which eliminates short circuits, especially in hard-to-reach places. To ensure stability, the suction cup has a plastic base.
How to remove radio components from boards?
Failed electrical appliances do not have to be immediately sent for scrap, because individual electronic components from them can easily be useful for repairing or constructing various homemade products.
The only problem that novice electricians face is how to desolder radio components. Despite its apparent simplicity, this process requires special attention and the use of special devices that greatly simplify the soldering of radio components.
Tools we will need
Many of the tools may already be available to DIY radio enthusiasts. Otherwise, you will have to purchase them or make them yourself from scrap materials.
Therefore, before unsoldering the radio component, get the following devices:
- A soldering iron of the required power and design for heating the contacts of radio components . You can take a ready-made one, or you can make it yourself; the manufacturing process is described in detail in the following article: https:///payalnik-svoimi-rukami.html
- Tweezers or clamp - used for manipulating radio components. Allows you to hold elements with tweezers, fix their position and provide additional heat removal when you try to desolder them.
- Tubular-shaped needles are sold ready-made, but if you don’t have any on hand, they can be replaced with a regular medical syringe needle, the main thing is that the inner diameter fits onto the stem of the radio component. In addition to needles, you can use tubes or sleeves; with their help, heated radio components are separated from the solder.
Rice. 1. Set of soldering needles
- Dismantling braid also acts as an auxiliary tool if you need to desolder those elements that have a large number of legs on the printed circuit board. You can either purchase a ready-made one or make it yourself.
Rice. 2: dismantling braid
- A desoldering pump is a device for removing solder from a mounting location, allowing you to quickly desolder a large number of radio components. Structurally, it includes a vacuum flask, a return spring and a piston driven by it. In addition to purchasing a factory model, you can make a desoldering pump yourself.
Rice. 3. Desoldering pump Inexperienced electricians may argue that so many tools for desoldering radio components will be too many. After all, soldering is performed using a regular soldering iron, but all of the above devices will help you solder the necessary elements quickly and accurately. This is especially true with large volumes of contact pins in the board. Now let's look at the practical application of each of the tools described above.
Methods for removing radio components from boards
Dismantling of radio components can be done using a classic soldering iron, when you apply a heating element to the part to be soldered and pry it off with a metalworking tool. But this technique does not require much explanation, so next we will analyze more complex work and ways to implement it at home.
Hairdryer
A soldering iron is a non-contact version of a soldering iron, which is no less effective at desoldering radio components. The advantages of this method are quite obvious, for example, when dismantling a microcircuit, you do not need to desolder each leg of the microcircuit. It is enough to heat a certain area on the printed circuit board with a stream of air, and all the solder will melt at the same time. Then the radio component is pryed off with a screwdriver or pulled out with tweezers.
The disadvantage of desoldering with a hair dryer is that the parts themselves heat up, which can subsequently lead to their failure. Therefore, if you decide to unsolder microcircuits, capacitors or transistors due to the general heating of the place where they are fixed, be sure to check their functionality after that.
To desolder radio components with a hairdryer, you must perform the following procedure:
How to make a desoldering pump?
A possible alternative to a solder desoldering pump is a thin copper braid that can be used to draw the solder out of the melt. When it hits the braid, it hardens. To do this, use the tip of the tip to press the braid onto the connection that needs to be soldered. The iron melts the solder, which will be drawn into the braid.
To do this, you will have to buy a small coil of copper braid. But you can do without it: strands of copper wire (for example, from a multi-core cable), made in the form of a loop, will reliably remove tin residues from the soldering zone. To remove flux residues, you can use a soldering wick - it is dipped into the flux, and then heated with a soldering iron.
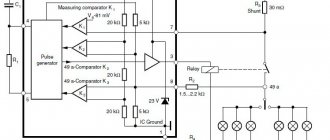
The process of making a desalinizer from a refrigerator compressor
It is necessary to attach a mounting plate to the compressor housing from the refrigerator. You will need to attach a solenoid valve and a junction box to it. To do this, mounting holes are pre-drilled.
The plate is welded to the compressor. It is important not to burn through its housing by welding.
Furniture supports with soft rubber bands are placed on the compressor.
Next, the solenoid valve is installed on the clamp and the junction box is screwed on.
You need to put wires from the compressor and solenoid valve into the box. Then a 12V power supply is placed in it.
Its connection to the valve is made through a relay.
You also need to lay a long wire to move the pressure button to the desalination pump itself. A switch is embedded into the lid of the box to start the compressor from the mains. After placing the wires it closes.
Tubular tip. Option 2
Hello. Today we would like to again touch upon the problem of beautiful and high-quality soldering of parts. All of us, those who are involved in radio engineering, developing all kinds of designs and novice radio amateurs, want to have fast and high-quality soldering. Of course, this can be achieved with a regular soldering iron, but it is much more difficult than with a tubular tip about which DI HALT
I previously wrote on the website that the tip was made by drilling out a standard tip from the ZD-929 station, we decided to abandon this route.
The reasons are simple:
- Requires a special soldering iron or soldering station that supports replaceable tips
- You need to find and buy a suitable sting, which is not always available.
- You need to drill a thin hole, which can sometimes be problematic without a drilling machine - the drill bits easily break and become tightly stuck in the soldering iron tip.
- The sting fades over time, so the previous two points have to be repeated.
The problem was solved in a different way by making a soldering lotion for another device - a heated desoldering pump.
Such a unit costs an average of 150-160 rubles and does not require modernization in itself, but for high-quality soldering of leads, an adapter must be inserted into its spout. It is made from valve parts from a spent lighter. This design uses a copper nozzle from such a lighter (in fact, the lighter is a waste-free donor, but more on that next time).
So, take an old used lighter:
Now, using a screwdriver, remove the entire top. We get approximately the following:
Carefully unscrew the valve. This is done by hand, without any effort - there is an ordinary plastic carving. After this, we disassemble the valve (no additional tools are needed). Just press on the metal rod and it will come out easily. You will see two rubber rings on it: a larger one and a smaller one - carefully remove them. As a result, we get the following “set”:
From this set we only need one copper fitting, having first removed the spring and rubber plug from it.
Basically everything. This tip has a cone shape and due to this it is tightly inserted into the suction hole, there is also a side hole in this nozzle (you can see it in the photo if necessary, it can be enlarged) and a thickening, which prevents this nozzle from falling into the suction itself. In fact, the nozzle is immediately ready for use.
The advantages of this modification of the suction are obvious:
- There is no need to drill or redo anything.
- We work with one suction and with one movement of tweezers it turns into a soldering iron and back.
- The burnt-out nozzle is thrown away without pity and replaced with a similar one.
- Cheap consumables
Alexander Davydov aka Kulibin // Edited by DI HALT
DI HALT:
Not a bad idea, I can only add that the heat pump gets quite hot, so when soldering through the tube you have to be careful so that the coins don’t fly off, or turn on the soldering iron through a dimmer (a thing like this for smoothly turning on the light, sold in a hardware store).
Z.Y.
If you wish, send your materials to me. The most interesting ones will be published on the website.
Thank you. You are amazing! In just a month, we raised the required amount of 500,000 for a hockey rink for the Aistenok orphanage. Of which 125,000+ were from you, EasyElectronics readers. There were even transfers for 25,000+ and just a flow of payments for 251 rubles. This is incredibly cool. The contract is now being concluded and preparations for construction are underway!
And I was stuck for at least three years of monthly work on articles :)))))))))))) Thank you for such a powerful kick.
Tools we will need
Many of the tools may already be available to DIY radio enthusiasts. Otherwise, you will have to purchase them or make them yourself from scrap materials.
Therefore, before unsoldering the radio component, get the following devices:
- A soldering iron of the required power and design for heating the contacts of radio components . You can take a ready-made one, or you can make it yourself; the manufacturing process is described in detail in the following article: https:///payalnik-svoimi-rukami.html
- Tweezers or clamp - used for manipulating radio components. Allows you to hold elements with tweezers, fix their position and provide additional heat removal when you try to desolder them.
- Tubular-shaped needles are sold ready-made, but if you don’t have any on hand, they can be replaced with a regular medical syringe needle, the main thing is that the inner diameter fits onto the stem of the radio component. In addition to needles, you can use tubes or sleeves; with their help, heated radio components are separated from the solder.
Rice. 1. Set of soldering needles
- Dismantling braid also acts as an auxiliary tool if you need to desolder those elements that have a large number of legs on the printed circuit board. You can either purchase a ready-made one or make it yourself.
Rice. 2: dismantling braid
- A desoldering pump is a device for removing solder from a mounting location, allowing you to quickly desolder a large number of radio components. Structurally, it includes a vacuum flask, a return spring and a piston driven by it. In addition to purchasing a factory model, you can make a desoldering pump yourself.
Rice. 3. Desoldering pump Inexperienced electricians may argue that so many tools for desoldering radio components will be too many. After all, soldering is performed using a regular soldering iron, but all of the above devices will help you solder the necessary elements quickly and accurately. This is especially true with large volumes of contact pins in the board. Now let's look at the practical application of each of the tools described above.
Operating principle of solder suction
The need for solder suction arises when it is necessary to dismantle old printed circuit boards assembled from complex elements with many contact legs (microcircuits, in particular).
In such a situation, a soldering iron with a desoldering pump is an acceptable option for a device that allows you to free the part to be dismantled from solder and keep it in working condition.
The need to remove an already sealed microcircuit often arises if it is placed incorrectly in the mounting sockets (installation error).
Combination of functions
When dismantling is carried out, a vacuum zone is created in the area of solder heated to a liquid state, as a result of which tin is pulled out from the soldering zone and the leg of the microcircuit is released.
Thus, a special desoldering iron, often called a suction iron, allows you to correct accidental errors and also reduces the cost of components.
Sometimes, to dismantle microcircuits and other complex parts, special devices are used to suck out liquid solder. They work on the principle of a pump and are made in the form of a metal tube with a piston moving along it.
Due to the good tightness of the channel, a vacuum (vacuum) is created in the space under the piston, pulling the molten solder out of the mounting hole.
In this case, the soldering iron itself is taken in the right hand and all manipulations with it must be consistent with the operation of the suction controlled by the left hand.
With this approach, there is a temptation to combine the capabilities of melting and suction in one tool - a soldering iron. The well-known soldering station works on this principle, in which both of these functions are combined in one device.
However, the cost of such a station with a tin pump is quite high and is not always affordable for many soldering enthusiasts. But you can find a way out of this situation if you try to make a solder suction with your own hands.
Purpose and principle of operation
Removing multi-pin elements from the donor board with one soldering iron is either practically impossible or extremely difficult.
As soon as the solder on one of the terminals is melted, the second one is heated by the soldering iron tip.
During this time, the first leg of the radio element has time to freeze again.
Usually in such cases the soldering iron is replaced with a hairdryer, but in addition to the rather high cost of such equipment, during operation it can overheat the part being removed and the board traces, thereby damaging them.
Having a tin pump on hand, you can immediately remove molten tin from the leg of the radio component, as well as excess applied flux.
Based on the principle of operation, the destin pump can be compared to an ordinary syringe.
The tin itself is absorbed by the tool due to the vacuum (rarefaction) created inside the housing.
The use of a desoldering pump ensures accurate soldering by quickly removing excess consumables.
This tool also allows you to eliminate short circuits between adjacent terminals of discrete radio components or microcircuits.
Components of a homemade device
For making your own suction, ordinary electric soldering irons with an output power sufficient to melt any brand of solder are suitable (65 watts will be quite enough).
To install the suction mechanism, you will need the following components:
- a fairly thick soldering tip;
- copper tube with a diameter of about 6 or 8 millimeters;
- a copper or brass crimp-type tee (it can be removed from a disassembled old refrigerator or bought at a gas station);
- a children's syringe flask made of rubber, which can be purchased at any pharmacy;
- and finally, a suitable size fitting from a bicycle pump (or the tip of a ballpoint pen) and a stopper from a wine bottle.
In addition to all of the above, insulating tape will be required to assemble the solder suction.
Materials:
- refrigerator compressor;
- gas solenoid valve from HBO (or vacuum solenoid valve from AliExpress - https://alii.pub/5obe4k)
- steel plate;
- outer junction box;
- clamp;
- furniture supports – 4 pcs.;
- switch;
- power supply 12V;
- relay 10A 12V ZF900045 or equivalent;
- press button;
- destin pump;
- wires;
- syringe;
- PVC hose.
Assembling the desoldering pump
To obtain the effect of vacuum suction of solder when arranging a tube with a piston, it is necessary to ensure good sealing of the channel, which is achieved by high-quality mating of all connected parts.
Before starting assembly, the soldering iron tip is sawed off and sharpened so that the mixing tee is located as close as possible to its heater.
Further operations are carried out in the following order:
- The copper tube is bent in an arc (as shown in the photo), after which one of its ends is crimped into the tee using a union nut.
- A wine stopper with a rubber bulb mounted at its far end is placed on the other end of the tube.
- And to complete the work, a fitting with a tip from the pump hose is inserted into the lower hole of the tee.
That's it - the assembly of the soldering suction is complete!
In conclusion, we note that the resulting structure is completely dismountable and all its elements can be easily replaced if necessary.
If all the initial components are available, a specialist will need no more than an hour to assemble such a solder suction unit. A relative disadvantage of this design option is the bulkiness of the device, which can be somewhat lightened by using a lower-power soldering iron (40 Watt, for example).
Operating principle of solder suction
Hands from the right place | 04/27/2020
When soldering computer printed circuit boards, there is a danger of expensive circuit failure due to one or two drops of molten tin getting there. Frozen solder particles can cause no less inconvenience. It is advisable to have a device that would promptly remove excess from the soldering area. Such a device is a tin pump.
Destination pump. Removing unnecessary solder
When soldering computer printed circuit boards, there is a danger of expensive circuit failure due to one or two drops of molten tin getting there. Frozen solder particles can cause no less inconvenience. It is advisable to have a device that would promptly remove excess from the soldering area. Such a device is a tin pump.
Principle of operation
Industrial designs of desoldering pumps are vacuum action soldering pumps. They are equipped with a manual drive that works like a regular suction cup. Desoldering pumps fall into two main categories: suction desoldering pumps and heated air pumps. Suction pumps are used to remove melted solder (and tin), leaving previously soldered terminals disconnected. The second type of desoldering pump pumps air hot enough to melt all the materials around a small surface where molten tin or solder is present. Soldering irons with tin pumps can be used both for soldering directly on site, and for desoldering with subsequent removal of drops of the melt before it solidifies (you can also use tweezers, although this is not so convenient).
Since the soldering process always produces harmful chemicals and fumes, some models of the devices in question are equipped with smoke extractors.
How to use a desoldering pump?
Let's look at this using the example of the best desoldering pumps of 2019.
- Model Endineer SS-02. The suction type desoldering pump is equipped with a heat-resistant silicone tip with high flexibility, which is connected to a small vacuum chamber. The presence of a soldering suction cup allows the nozzle to directly contact the soldering iron without the risk of damaging it. At the same time, the nozzle freely envelops the solder joint area. The Teflon tube, cut through the end, forms a secure fit over the molten solder. The tube can be changed periodically using the included repair kit. Allows you to carry out all operations with one hand.
- Model SeaLody. A universal desoldering pump that works on the “three in one” principle: in addition to the manual vacuum suction, there are also two wicks designed to remove solder and flux residues. In the latter case, oxygen-free pure copper wire is used, which ensures high-quality flux removal, especially in hard-to-reach places. Maintains a stable vacuum. The device is equipped with an aluminum frame, which allows it to be operated with one hand.
- Model Greenlee 1700. Equipped with a universal type tip, it operates on the principle of air heating. The clamping is carried out using a spring. To ensure uniform distribution of heat flow over the entire soldering surface, the desoldering pump is equipped with a copper mesh. The durable and rigid body prevents damage to the device in case of accidental contact with the melt. It is easy to control and comes with a spare spring and suction cups, but a replacement tip is not included.
- Model Wick & Desoldering Pump. The device is designed in the form of a gun and is designed to remove solder. Operated with one hand. The desoldering pump is equipped with a highly resistant suction cup and a copper solder braid. After heating the wick and solder, the soldering braid quickly absorbs the molten solder, leaving the work area completely clean. The design includes a non-slip sponge (made of a material with high heat capacity) and a nylon temperature-resistant nozzle.
- Model OMorc Desoldering Wick. The solder suction cup has a frame made of aluminum bronze and creates a high-pressure vacuum that can effectively remove solder from the circuit board. The soldering braid ensures the cleaning of solder residues on the soldering iron tip, which eliminates short circuits, especially in hard-to-reach places. To ensure stability, the suction cup has a plastic base.
How to make a desoldering pump?
A possible alternative to a solder desoldering pump is a thin copper braid that can be used to draw the solder out of the melt. When it hits the braid, it hardens. To do this, use the tip of the tip to press the braid onto the connection that needs to be soldered. The iron melts the solder, which will be drawn into the braid.
To do this, you will have to buy a small coil of copper braid. But you can do without it: strands of copper wire (for example, from a multi-core cable), made in the form of a loop, will reliably remove tin residues from the soldering zone. To remove flux residues, you can use a soldering wick - it is dipped into the flux, and then heated with a soldering iron.
Materials used to cover the tip and their features
Before you start looking at how to clean a soldering iron tip, you should say a few words about what they are made of. The main materials used are:
- Copper. Traditional material with good conductivity. The first soldering iron tips were made from copper. This metal is found both in their core and along the edges. It is still widely used today. A negative property of copper tips is their high wear. This material burns out relatively quickly and can dissolve in solder.
- Nickel. The addition of this metal is used to impart increased strength to finished products. It is resistant to chemical attack, so nickel-plated tips can be used for a long time. But they also have a drawback - a low adhesion rate. Because of this, the nickel tip does not hold solder well. And the soldering itself has to be carried out by supplying the consumables to the processing site, which has been preheated using a tip.
- Silver. The adhesion of this material is beyond praise. But such a coating has low thermal conductivity. Additionally, silver is highly valuable and can be dissolved in solder. Very quickly the coating comes off and exposes the copper base.
- Ceramics. Durable and non-corrosion option. But in terms of heat capacity, a ceramic soldering iron is significantly inferior to a similar copper product.
- Brass. The product is wear-resistant, does not burn, has good thermal conductivity and is little susceptible to oxidation. But it is characterized by reduced resistance to mechanical damage.
For each option, the answer to the question of how to clean a soldering iron will be different. The differences will not always be strong, but they still cannot be ignored.
DIY electric desalination pump
Homemade solder suction.
Author: Alexander Davydov aka Kulibin Published 08/27/2010
Good time of day everyone. We will talk about a homemade tin pump. It all started when the stone came, familiarly bringing with him a photo of a desoldering device and an ancient Soviet 65-watt soldering iron, which he found somewhere in the deep recesses of his apartment or was inherited by him. Don’t let the size and power confuse you; as it turns out, once you get the hang of this monster, it’s quite convenient to use. And it’s quite easy to reduce the power of a soldering iron using conventional rectifier diodes by placing them in series on one of the soldering iron’s network wires. Of course, you can install a ready-made regulator (dimmer), or assemble it, but sometimes at the most necessary moment there are no necessary parts for this, and diodes can practically be torn out from anywhere + they do not heat up during operation, unlike resistors (this is how a diode melted on my Chinese 60 watt soldering iron for several years). Here is the original of the desoldering pump from which I later had to make a clone (a photo of this particular desoldering pump was brought to me by an acquaintance) SH-60 soldering iron, nichrome heater (220V, 40W), with desoldering pump Designed for desoldering components and removing soldering products Supplied with a V-1 tip with desalination pump Weight 330 g
Unfortunately, it is impossible to buy a ready-made copy of this type from us since we have not had a radio shop for a long time. (You can, of course, order it via the Internet) But the price of this soldering iron is quite high. So it was decided to try to create something similar myself, especially since such a thought had been in my mind for a long time. Parts list. Soldering iron 65 watt
Copper pipe 8mm DN (sometimes 6mm) was purchased at a store that sells copper plumbing fixtures (pipes, taps, bends)
Buy a mono tee (crimp) at a copper plumbing store, from refrigerator repair specialists, or at a gas filling station where gas equipment is installed on cars. It was at a gas station that I picked up this Italian tee (or rather, a friend who worked at a gas station simply gave it to me after hearing my story about why I was looking for such a tee.) Tees can be Italian, Belarusian or Chinese, the quality depends on the manufacturer. I got Italian.
Overview of equipment you may need
1. nichrome electric soldering iron with a power of 25W. This is an ordinary household soldering iron, which previously could be found in almost any amateur radio electronics technician. Now they are also common and are quite cheap, about 200 rubles.
You can buy any soldering iron, including Chinese ones, they also last a long time - with constant use, up to 8 years. The simplest soldering iron consists of a tip, which is a copper rod, sharpened at an angle at the end, and a heater spiral. Handle made of wood or heat-resistant plastic.
This is definitely a working tool, which is suitable in 90% of cases for use in domestic conditions, and even in some repair shops it is still used.
2. A 40-80W soldering iron with a tip sharpened to a wedge, reminiscent of a slotted screwdriver, for easy soldering of heavy elements. We do not recommend buying such a soldering iron for your home, although it is cheap. Some people buy it right away by mistake, but then problems arise: some components burn out, traces peel off from printed circuit boards because they overheat. For a home, 25-30W is more than enough.
3. Buy a gas soldering iron. Designed for soldering in the absence of an electrical outlet. The equivalent (if converted into electrical power) is about 100W.
3 in 1 tool:• soldering iron, which is sharpened to a cone, the tip is durable, made not of copper, but of a special heat-resistant alloy. Suitable for garage work, car repairs.• the tip is removable and can be used as a hot air gun (heating up to 600 degrees).
It is quite convenient to use if you need to warm up a heat-shrinkable tube or just a part. Large jobs cannot be performed with a hot air gun, since the air flow and gas pressure are small.
• the nozzle is changed and the tool turns into a good working gas burner with a temperature of 1300 degrees.
Thus, you can solder massive parts or simply heat something up as needed.
4. The latest type of soldering iron that is gaining momentum is the ceramic soldering iron. If someone wants to start right away with the good stuff and not save money, we recommend buying it. Pros: very thin tip, suitable for precision (millimeter) work - soldering connectors on mobile phones, mounting or dismantling SOIC, QFP, PLCC, BGA components, etc.
The ideal option is to have a soldering station attached to it and adjust the temperature from 200 to 480 degrees, adjusting it to the solders and soldering conditions. With its help, you can change parts on motherboards, video cards, and solder large wires. If you want to learn how to solder efficiently over time, we recommend that you start learning by purchasing a soldering station.
Tinning during soldering
Wood in soldering is a more useful thing than it might seem. Preliminary preparation for work is not everything. When soldering for a long time, it is necessary to carry out tinning during the process of use. For this purpose the following means are used:
- Wooden block. Best of all - from a coniferous plant. This wooden block is good because it contains natural rosin. To tinning, put flux and a little solder on it. When the sting loses its adhesion property, it should be rubbed against wood. This will simultaneously allow you to clean and tin the working area of the soldering iron.
- Metal sponge. Flux and solder are spread over its part. When the need arises, a sting is inserted into the sponge. This approach also combines tinning and cleaning.
These options are also a good solution when the question arises of how to clean a soldering iron after soldering. Even if shavings of wire insulation get on the tip due to insufficiently good cleaning of the work area or when interacting with fusible pipes, they allow you to quickly and with tolerable quality take care of the tool so that nothing happens to it while it lies.
Fighting carbon deposits
In order for the tip (and with it the soldering iron) to last a long time and to be in good working order, the tool should be cleaned regularly. It is not recommended to use the edges of containers or sharp objects: there is a high probability of accidental damage. And this can render the heating element unusable.
The same applies to the effort applied. Excessive zeal also leads to damage.
Important! When cleaning the tip from carbon deposits, it is necessary to moderately squeeze the working area.
Second life of the electric tin-suction!
This desoldering pump was purchased at a radio store…. And initially it was used for its intended purpose. Then the nozzle and the sealing ring of this tin pump burned out, which stands inside the handle as a seal to create vacuum thrust for the tin pump piston... After that, the tin pump stopped performing its direct function... But it was a pity to throw it away... And so it gathered dust until I came across the article https://easyelectronics.ru/trubchatoe-zhalo.html.
And so I wanted to make such a sting... Since sometimes you have to solder... But I didn’t have such a sting that I could drill it... Then the idea came to modernize and convert my desoldering pump into a soldering iron with a hollow tip... But how can I do this better?
So, let's start in order.
The desalination pump itself looks like this
The power cord is screwed to the handle of the desalination pump with electrical tape, just to prevent the wire from dangling.
Now remove the duct tape from the desoldering pump handle and unscrew the handle with the piston from the part where the heating element is located.
In the part where the heating element is,
There are also two sealing rings made of thermally resistant rubber and something else.
Over time, these seals failed... Letting air through and not allowing tin to be sucked in normally. Plus, over time, the nozzle of the desoldering pump burned out. Which also negatively affected the operation of this device... For this reason, it could no longer be used for its intended purpose. But at the same time, the heater and the desoldering nozzle were still alive. So, to extend the life of this device... We throw these gaskets out of this device and reassemble it to its original state... We won’t have to redo it much anymore...
Then we take the cheapest empty Chinese lighter,