Types of homemade generators
The circuits of homemade smoke generators may differ slightly, but they are all united by a common device. They include a chamber in which the pyrolysis process occurs, a heating source, a smoke pipeline and a smoke cooling system. The device can be made using available materials.
You can make a smoke generator from a fire extinguisher, an electric stove, or an aquarium compressor.
Let's look at these and other ideas in more detail.
Electric stove smoke generator
If the idea of homemade smoked sausage has just struck you, and you haven’t prepared for it in advance, you can find a simple and quick way: make it from an electric stove. All other parts can be found in a barn or garage: a barrel without a bottom or a piece of tin pipe, a piece of wire mesh, a sheet of plywood and wood chips.
It is better to set up an impromptu smokehouse outside, then at home it will be difficult to get rid of the aromas that will permeate all things.
- Install the tiles in a place that the extension cord can reach.
- A barrel is placed on the electric stove and wood chips are poured into it.
- At 2/3 of the height, the barrel is pierced with two reinforcing pins crosswise, and a mesh is laid on them.
- This is where your products will be hung.
- The top of the barrel is covered with a sheet of plywood or iron. The smokehouse is ready.
All that remains is to adjust the tile to the minimum temperature so that the wood chips smolder, and from time to time add fresh material for pyrolysis into the barrel.
The smoking process with such a device is not very convenient because you need to constantly monitor the situation, raise the barrel to adjust the temperature, and remove food to add wood chips.
Such a device cannot be called a proper smoke generator for cold smoking, but for temporary use the idea is quite suitable.
Generator for smokehouse from fire extinguisher
A great idea for a homemade smoke generator is to use an old fire extinguisher. You need to cut off the top of it, it will then be used as a lid. You don’t even have to remove the lever; it will become a handle. Below the cut, two holes are drilled in the body for air access and smoke exit.
Thus, you will get a generator with a top ejector. The advantage of using a fire extinguisher is that it is sealed and durable, and is the right size.
This home-made cold-smoked smokehouse with a smoke generator can work continuously for 10-12 hours.
Advice! To prevent the added sawdust from being compressed into a dense mass, a spring is suspended inside the container.
How to use an aquarium compressor for a smoke generator
We have already said that you can use a low-power aquarium compressor to operate a small smoke generator. For this purpose, you will need an active compressor, that is, one that is installed outside the aquarium. Submersible aquarium filters are not suitable for smoke generators.
Such a device can easily serve a small smokehouse with a volume of 15-20 liters.
This will ensure a sufficient supply of smoke. It is better if the device is equipped with air supply power adjustment. It is not difficult to connect a compressor for a smoke generator with your own hands: if it has two air outlets, you need to combine the supply into one channel and insert the hose into the air supply fitting in the ejector.
Such a system can operate around the clock; the pump consumes little electricity.
You can go another way: use a fan for a smoke generator. A computer cooler is suitable for this purpose; it will provide the necessary air injection.
Smoke generator stove for smokehouse
For a large-volume smokehouse, you will need a full-fledged oven. It’s easy to make a smoke generator stove for a cold smokehouse with your own hands: it’s a basic potbelly stove with two levels for fuel: the bottom? for firewood and the top one for wood chips. Pellets, firewood are placed in the lower part, or a portable gas stove is placed, which will heat the upper part with sawdust.
From the top part there is a pipe - a smoke duct, from the bottom - a regular hood, like for a stove.
To lower the smoke temperature, the pipeline is cooled by burying it in the ground or making a water “jacket”. To ensure that smoke enters the smokehouse, the pipe is tilted towards the stove.
Advice! Professionals recommend making the chimney pipe not from galvanized steel, but from stainless or black steel.
The simplest smoke generator from an electric stove
If you need smoked meats “right now,” you can use a very simple method: you need an electric stove, a barrel without a bottom or a piece of large-diameter pipe, a wire mesh with a cell of at least 10*10 cm, a sheet of plywood or iron. Also - sawdust and “object of smoking”.
The simplest cold smoked smoke generator can be built using an electric stove and a barrel
This type of cold smoked smokehouse is usually placed outside, in the backyard. We need to clear the patch of vegetation and install an electric stove. Place a metal container on it (which you don’t mind throwing away). Sawdust is poured into the container.
In the upper part of the barrel/pipe, moving 10-5 cm from the top edge, drill four holes. They are located diametrically or opposite each other. We thread pins through them. You can use metal rods, or you can use sticks. The choice depends on the weight of the products being stacked or what is available. The rods themselves can be arranged crosswise or as two parallels, located approximately 1/3 of the diameter of the smokehouse body. We lay a mesh on top of this support, with products attached below. Cover the smokehouse with plywood or a sheet of metal.
We drill holes in the upper part of the barrel and insert grate bars with suspended products into them.
Turn on the tile. After some time, the sawdust begins to smoke. The “working” time on one tab depends on the amount of sawdust poured, but on average it is 3-5 hours. Then you have to put the body aside, add sawdust, and put everything in place. It’s hard, inconvenient and fraught with “accidents”. But the design is very simple, this is a “camping” option that does not involve any amenities.
This is a cold smoked smoke generator assembled
Another disadvantage is that you can adjust the smoke intensity using a mono tile regulator, but doing this in this form is inconvenient - again, you have to move the body. You can get rid of these shortcomings by making a door at the bottom. With its help, it will be possible to regulate the air flow and change sawdust.
Homemade smokehouse from a pipe: how to make
A pipe smokehouse is one of the simplest options that you can easily make yourself.
To do this, just follow the instructions and prepare in advance everything you need for work.
Materials and tools that will be required
For a homemade design you need to prepare:
- steel pipe with a diameter of 10 centimeters;
- plastic corrugation - the length should not exceed three meters, or you can use a metal sleeve;
- a piece of metal tube - up to 40 cm with a diameter of 2.5-4 cm;
- a small compressor - an aquarium compressor will do;
- fitting connection, which will have the same diameter as the smoke duct;
- switch and electrical wires;
- thermometer.
The tools you need to prepare are a welding machine and a grinder. It is advisable to have at least minimal experience working with these tools in order to avoid injury during the generator assembly process and do everything correctly and accurately.
Drawing of a smoke generator from a pipe
To make the assembly process easier, it is worth studying the drawings of a pipe smoke generator.
Below is the simplest and most detailed option.
Drawing of a smoke generator made of a pipe with a lower and upper ejector.
Step by step assembly
You need to use all previously prepared materials to assemble a smoke generator, which will be used for cold smoking, with your own hands from a pipe.
- First of all, the camera is made. As a rule, the average height of a smoke generator is 70-80 centimeters. There should be a lid at the top that can be removed. This is necessary so that you can easily pour fuel inside the device. A small container is made at the bottom where the ash will fall.
- In the simplest versions of the generator, wood chips are poured onto the bottom of the device, which is welded tightly to the edge of the pipe. In this case, the structure is turned over to clean it. There is no ash pan in such a homemade smoke generator.
- There is also another design option. The wood chips are poured onto a grate, which is pre-attached at a certain distance from the bottom of the device. The ash that remains after the fuel burns out will fall through the grate. Typically, the bottom of such devices is removable. You can also add a flapper to clean out the ash pan. This option is considered the most labor-intensive.
- Regardless of the chosen option, a small hole is drilled in the lower part of the homemade generator, the diameter of which will be 5-6 millimeters. A minimum amount of air will enter the device through it so that the sawdust slowly smolders.
- If the hole is larger, it may cause a fire.
- In the upper part of the structure, approximately 7-9 centimeters below the upper edge of the pipe used, another hole is made. With its help, the smoke exhaust pipe will be attached to the smoke generator.
- Next the ejector is assembled. This device is used to suck smoke from the smoke generator and direct it into the chimney. A small diameter tube into which pressure will be supplied from the compressor fits a couple of centimeters into the chimney pipe, which has a larger diameter.
Due to the fact that the air moves slowly, a slight vacuum occurs and smoke from the chamber begins to flow into the chimney.
- After all the most important parts have been connected and secured, you only need to finally assemble the homemade smoke generator and check how efficiently it works.
- Chips must be placed inside the structure. It is enough to use 700-800 grams of fuel. It is best to use sawdust from deciduous or fruit trees, which will make the finished smoked product not only tasty, but also quite aromatic.
- Next, you need to tightly close the lid of the device and install the constructed structure in a certain place next to the wall of the smokehouse. If the smoke generator is free-standing, then you need to attach a hose to the chimney, which will be directed directly into the smokehouse.
- Then the fuel is ignited through a small side hole and the compressor is turned on.
- Now all that remains is to ensure that the sawdust smolders evenly and does not die out from time to time, so that you get tasty and aromatic home-made smoked meats.
User manual
Using a homemade smoke generator is very simple. You need to put fuel in the pipe. It is advisable to first put a spring on the tube, which is located in the upper part of the structure, which will reach right up to the wall. The spring should have a diameter of approximately 2 cm. Due to this, the chips will smolder steadily.
After the body is completely filled with wood chips, it is set on fire at the bottom. It is best to use a gas burner and, if necessary, tilt the generator slightly to the side. After the chips ignite, you need to close the structure with a lid and turn on the compressor.
What can you cook with a smoke generator: Fish Pork Beef Goat meat Chicken Goose Vegetables Mutton Duck Game Eggs Salo
Rules for using a smoke generator
Equipment in this category is suitable for cooking fish, various types of meat, mushrooms, and vegetables. The smoking chamber should be regularly cleaned of dirt. Deciduous wood is suitable for backfilling. Spruce, pine and other conifers are not used to prevent clogging with resins.
At the end of processing, fragrant herbs and a couple of juniper branches are added to obtain special aromatic parameters. It is necessary to clarify the features of smoking of different types of initial food products.
When working with a smoke generator for cold smoking, you must follow the general rules of fire and electrical safety. Do not place the combustion chamber near flammable objects. Check the integrity of the wiring.
If the design has a powerful electric heater, it is connected to the network through a circuit breaker according to a grounded circuit.
Some tips for users
All materials mentioned above are given approximately. If there is no pipe, then you can use an old fire extinguisher, a deep saucepan with thick walls, or, for example, a milk can. The same can be said about sizes. They need to be selected depending on the design and size of the smoking chamber.
Making your own smoke generator for cold smoking at home is not at all difficult.
It is enough to prepare everything in advance and strictly follow the instructions. Cooking delicious smoked meats at home is now quite possible. All you need is a little knowledge, time and the availability of all the necessary materials and tools.
What is a smokehouse smoke generator: basic definitions and problem statement
Cold smoking technology involves long-term exposure of the original products to the smoke of smoldering wood. This process destroys bacteria and blocks decomposition processes. At the same time, this treatment imparts a specific taste and smell.
The limited temperature range (+16°C to +36°C) allows moisture to be removed slowly.
Using a gentle regimen helps preserve structure, healthy vitamins, and fat. Depending on the size of the pieces and other factors, the process may take several days. The information provided will be useful in creating a list of requirements for suitable equipment:
- It is necessary to create a sufficiently large amount of smoke to ensure rapid smoking.
- To maintain optimal temperature conditions, you need to consider a cooling system.
- The duration of the procedure forces the use of autonomous equipment that performs its functions without careful control.
- To reduce costs, consider creating a cold-smoked smokehouse with a smoke generator with your own hands.
Basic safety rules
When assembling a smoke generator, do not forget the basic rules related to safety precautions. Firstly, the place where the smoke generator will be installed should not be flammable, nor should the objects nearby.
Secondly, if you are going to open the surface of the generator with paint, then the latter must be heat-resistant.
When connecting the pump to the power supply, it is important to ensure that the power cable is as far as possible from heating elements.
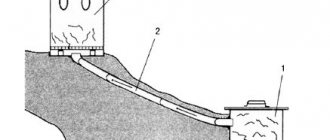
The device of a smoke generator for cold smoking, which you can make yourself
- The figure shows a chamber (1), in which products are placed on hangers for subsequent processing.
- Sawdust (3) is poured into a firebox of a suitable size, made of a sufficiently strong, heat-resistant material.
- The draft adjustment here is organized using a blower (7).
- The compressor (6) supplies fresh air through a flexible hose (5) and pipe (4).
- The container is closed on top with a lid.
- Therefore, the smoke is directed through the connecting tube (2) into the smoking chamber.
Ejector
Experts recommend using the first option. When placing the ejector at the top, you can enjoy the following advantages:
- the volume of the combustion area increases. The likelihood of solid fuel fading is reduced;
- In this option it is easier to ensure slow smoldering. Consequently, you will have to replenish your firewood supply less often;
- The upper location of the ejector with forced air supply creates sufficient thrust. Additional smoke filtration with a backfill layer will be useful;
- lower - contributes to the entry of large particles into the chimney, forcing it to increase its length to reduce the operating temperature in the smoking chamber;
- proximity to a heated area reduces the service life of the pipe and increases the risk of damage to welded joints.
Compressor for smoke generator
This connection of the compressor minimizes the thermal impact on the ejector, which extends the service life of the unit. At the same time, sufficient air flow is ensured to supply smoke to the food processing area.
Smoking chamber
The figure shows an example of a factory smoking chamber. It’s easy to guess that an old refrigerator is quite capable of performing such functions. While maintaining optimal temperature conditions, the components of its structure will not be damaged.
Typical rubber seals will perform their direct functions. Built-in guides and grids are useful for placing food items.
Modernization
The design described above is fully functional. But it has many disadvantages and is not very convenient. Based on the results of its use, modifications and improvements were made.
Adjustable traction
One of the main disadvantages of the described design is poor regulation of combustion intensity. It can be slightly changed by adjusting the compressor performance. An adjustable blower can be added to the design. It can be made according to the gate principle:
- In the lower part of the body (above the place where the stack is attached), weld a piece of round pipe 10-15 cm long.
- Drill two holes that are located exactly opposite one another.
- Take a rod that fits into these holes. Its length is 20 cm greater than the diameter of the pipe.
- Cut a circle from a sheet of metal (2-3 mm thick). Its diameter is slightly smaller than the internal diameter of the pipe.
- Make a “handle” from the rod (bend it).
- Insert a handle into the holes and weld the cut circle.
That's it, the adjustable damper is ready. Turn it, adjust the intensity of air flow, adjusting the intensity of combustion.
Ash pan
Another drawback is that ash spills through the mesh. You can place the smoke generator on a metal plate, but you can make an ash pan. By the way, the gate can be made in an ash pan. This will be more correct, since the air leak can be almost blocked, which cannot be achieved with a damper in the housing - the air enters through the mesh.
The ash pan is made from a piece of pipe with a slightly larger cross-section than the pipe on the body. If you don't have one, you'll have to cook it. The bottom is welded to a piece of pipe, and a thin strip of metal is welded to the body around the perimeter. The body is inserted into the ash pan (the legs are also welded to it).
Condensate collection
When a smoke generator for cold smoking operates, condensation occurs. This makes life difficult, especially if the temperature outside is low. You can solve the problem by making a condensate collector. For this:
- lower the exhaust pipe of the smoke generator downwards,
- at the lowest point we install a container for condensate, welding two pipes to it - one opposite the other;
- on the opposite side the pipe rises again and enters the smoking cabinet.
With this device, a significant part of the condensate ends up in the container. The problem is not so acute.
Self-assembly
There are many factory-made models on sale, but if you have the skills to work with metal, you can make a smoke generator for cold smoking with your own hands according to our drawings.
The production of one of the structures using scrap materials is shown in the video below (Kamchatsky smoke generator):
Fan design
The most common model for DIY creation is a device with a fan. A drawing of a smoke generator for a smokehouse with a fan is shown below.
To make a smoke generator for smoking with your own hands according to the drawing above, you need:
- For the body you need a square 100x100 mm or round ∅100 mm pipe 0.8 m long. Dimensions are approximate.
- A piece of 3/4-1.5″ water pipe with thread and nuts of the appropriate diameter for the chimney. For hot smoking, the length of the chimney is 30-50 cm; for cold smoking, a metal hose is put on the end of the chimney or it is extended to the required length. It is selected empirically.
- Low power electric fan. You can take an aquarium compressor.
- Small diameter rubber and steel tubes. Needed to connect the fan to the case.
To make a smoke generator for a smokehouse, the following procedure is necessary:
- The bottom and lid are made for the body. These parts must have sides that fit tightly onto the pipe and prevent ash from below and smoke from above from escaping.
- In the body itself, just above the sides, several holes ∅6-10 mm are drilled to supply air to the combustion zone. If traction is poor, their number can be increased.
- A hole for the chimney is drilled at a distance of 5 cm from the top. It is secured with two nuts or electric welding.
- On the side opposite the chimney, a hole is drilled for a thin tube through which air is supplied. Inside the housing it should be directed towards the chimney, but not into it. In this case, the air from the fan is mixed with smoke and enters the smoking chamber.
To make a cold smoked smoke generator with your own hands, you can draw drawings with dimensions yourself using the examples above.
This design can be made from other materials, and can also be optionally supplemented with a condensate trap, cooler and other accessories.
Making a smoke generator with your own hands from a can
The body parts of a simple smoke generator for cold smoking can be made with your own hands from a three-liter enameled or stainless steel can.
Important! An aluminum can will burn out immediately, so this material is not suitable.
The walls of this container are thin, so the chimney with the injector is attached to the top, and 3-4 holes ∅6 mm are drilled at a height of 2-3 cm from the bottom for air intake.
A compressor is connected to the injector on one side with a thin rubber or PVC tube, and on the other side a chimney made of a metal corrugated pipe is connected.
The process of making a smoke generator with your own hands from a can
How to make a smoke generator from a gas cylinder
The design of this device resembles a “potbelly stove”.
Step-by-step instructions for creating a smoke generator from a gas cylinder include the following points:
- Release remaining gas.
- Constantly pouring water on the tap, cut it off with a hand saw. If the cylinder contains carbon dioxide or oxygen, then you can use an angle grinder.
- Weld the legs to the cylinder. This is necessary for sustainability.
- Cut two doors with a gas cutter or grinder. One at the bottom, measuring 10x10 cm, will be the blower. The second from the top, the width is 1/3 of the circumference of the cylinder, and the height is its diameter. A grate will be installed through it and wood chips will be loaded.
- Make doors from cut out pieces of walls. Secure them on the hinges.
- At a height of 1-2 cm above the blower, weld 4 M20 nuts inside. The grate is laid on them.
- Make a grate from steel rods ∅10 mm or a steel circle 10 mm thick. Place the grille on the nuts.
- Instead of the cut valve, weld a piece of threaded pipe. Its length is 5-7 cm and diameter is 25-40 mm.
- The ejector is screwed onto the thread. A compressor is connected to it on one side, and a chimney on the other.
Instructions for assembling a smoke generator from a gas cylinder
Design of a smoke generator with a cooler (cooler)
The cold smoking process requires smoke with a temperature of no higher than 50°C, and it comes out of the generator much hotter. To cool it, you can extend the chimney or install a cooler.
The principle of operation of a device with a cooler is based on increasing the time it takes for smoke to move to the smoking chamber. To do this, an additional capacitance is installed between the generator and the camera.
Advice! When the smoke cools, condensate is released from it, so it is necessary to install a condensate collector at the lowest point of the cooler.
Smoke generator with cooler
Do-it-yourself labyrinth-type smoke generator
The main difference between a labyrinth smoke generator is the presence of a container for sawdust. To make such a unit with your own hands, you need a steel mesh or fine-mesh grid:
- a square is cut 50 mm smaller than the base of the unit;
- Strips 5 cm wide are cut from the same mesh;
- paths 4-6 cm wide are marked on the base;
- The strips are secured to the base by electric welding.
The operating diagram is shown in the figure above
Advice! Sawdust should be taken as small as possible, after a circular saw.
Friction smoke generator assembly diagram
Most smoke generating devices operate on the principle of burning wood sawdust and wood chips. But there are devices in which smoke is produced by rubbing a wooden block against a steel pulley.
The pulley is located on the shaft of an electric motor with a power of 2-4 kW and 1400 rpm. It is made of textolite with a steel frame. For cooling, inclined holes are drilled in the PCB.
A wooden block is pressed against the pulley using a clamping device. This device can be weighted, and the force is regulated by its value, or spring-loaded, with an adjusting screw. The amount of smoke depends on the pressing force.
In the path of the smoke, a fine mesh is placed in front of the smoking chamber, to which the negative terminal of the high voltage source is connected, and the positive terminal is connected to the hooks and grate on which the products are attached. Smoke passing through the grate acquires a negative charge and smokes positively charged products faster.
The figure shows the assembly diagram of a friction smoke generator
The figure shows how to properly power a friction smoke generator
The high voltage source is a magneto installed on the engine shaft, or an ignition coil connected to a ~220 V network.
Stainless steel smoke generator
Most smoke producing devices are made of carbon steel. But if you have the skills and materials, then it is better to make a homemade smoke generator for a cold smoked smokehouse from stainless steel.
Such devices have advantages over other materials:
- due to higher heat resistance, a stainless steel firebox burns out more slowly;
- The device is not subject to corrosion due to condensation and precipitation.
The operating diagram of such a unit is shown in the figure below.
Smoke generator for cold smoking with bottom smoke supply
The classic design of a device for producing smoke involves installing an outlet at the top. But the smoke, rising up the apparatus, cools down. It is advisable to make devices intended for hot smoking with a lower ejector, at a height of 50 mm above the grate.
The design and operating principle of such a unit are shown in the figure:
Important! In devices with bottom smoke exhaust, installation of an ejector is mandatory.
Manufacturing of a spiral smoke generator
To cool the smoke, in addition to an additional chamber, a vertical pipe with a screw located in it, or an Archimedes screw, is used:
- the spiral cooler is assembled in a housing made of a pipe ∅100 mm and 500 mm long;
- a pipe with a diameter of 40 mm and a length of 500 mm is used as an axis;
- screw turns are made of steel rings with an outer diameter of 100 mm and an inner diameter of 45 mm;
- the rings are cut on one side, the coils are moved apart and put on the axle;
- all structural elements are secured by electric welding, the auger is placed in the housing;
- Covers are welded to the ends of the body, and a chimney is attached to the sides.
Important! When cooling, condensation is released from the smoke, so a condensate collector is connected to the bottom cover.
Scheme for self-assembly of a spiral smoke generator
Smoke generator with smoke purification
In addition to aromatic substances, the smoke released during the smoldering of sawdust contains resins, soot and other components. They spoil the taste of the finished product, and to improve the quality, the smoke from a proper smoke generator should be passed through a purifier.
This is a pipe with a larger diameter than the chimney. Inside it are steel shavings or metal scourers for washing dishes.
Smoke generator with smoke purification
Smoke generator with condensate collector
As the smoke cools, condensation is released from it. When moisture gets on food, it deteriorates the taste and appearance of smoked meats, so it must be removed from the smoke.
To collect condensate, a tee is installed in the chimney with a discharge into a plastic container. There are two ways to install it:
- Using electric welding. The chimney bends in the middle third and an outlet is welded at the bottom of the bend, onto which a tube is placed to collect condensate.
- Using plumbing tees. If water pipes are used for the chimney, then a tee is screwed onto them with an outlet into the condensate collector. Due to the design, the outlet will be the lower part of the horizontal chimney.
Installed tee for condensate drainage
Smoke generator stove for cold smoking
If you need to install higher productivity, cook a simple stove. It can be made from the same large-diameter pipe or a rectangular body can be welded from metal. Weld the door and make a chimney fixed at an angle. That's all the difficulties. It is also necessary to divide the internal space into two parts using a horizontally fixed metal sheet.
The lower part is larger, the upper part is smaller. A fire is lit below and sawdust is poured onto the sheet. The rest of the process is known.
A pipe is laid from the stove chimney to the smoking cabinet. It should have an upward slope, albeit a small one. In this case, the entrance to the cabinet should be located in the lower part so that the smoke envelops all the products. Therefore, the cabinet is installed on a platform, legs, or pedestal.
To save space, you can install a smoke generator stove under a cabinet by welding a structure from a metal corner.
But with this design, the smoke can be too hot. Additional measures are needed to cool it. An alternative is to find a larger diameter pipe and put it on the main chimney. Install the cooler so that the air flow is directed into the gap between the pipes.
Another option is to make something like a water jacket, receiving hot water while smoking. But where to put it is the question. Although, warm water is always useful in the household.
A smoke generator for cold smoking of this type requires more costs - metal or a thick-walled pipe, plus a chimney. Moreover, it is better not to make a chimney from galvanized steel - zinc is not a metal that is good for health. Asbestos should not be used either. Firstly, it does not remove heat well, and secondly, it is even more harmful than zinc.
Therefore, the choice in this regard is small - order pipes made of black steel or buy stainless steel. Here everyone decides for himself.
Traditional cold smoke smokehouse setup
Construction of various types of smokehouses
Regardless of the type of smoking, the source of smoke is a smoldering fire. When cold smoking, the main thing is that the smoke is cold or warm, but not hot. The maximum temperature is about +40°C. To do this, the fire is lit several meters from the smoking cabinet, and a chimney pipe is laid between them. Passing along this path, the smoke cools to acceptable temperatures.
Installing a chimney is a long process. The smoke path must ensure normal heat removal and must be sealed. To create a chimney, you can use a standard metal chimney (but not galvanized steel), but in order for the smoke to cool better, it is advisable to bury the pipe in the ground. All in all, not an easy task. This is why they prefer to make a hot smoked smokehouse - there are fewer problems - you place a barrel over the fire and smoke...
But there is a simple smoke generator for cold smoking, which will cost literally several thousand. But to work you will need a welding machine and the ability to handle it. Everything else can be bought at the market or at a hardware store. If you have all the components, you can assemble a smoke generator for smoking with your own hands in an hour or two.
Choosing the right one
In addition to understanding how a smoke generator for cold smoking works, it is important to know what technical characteristics it must meet. Here are some measures of proper quality:
- smoke generator performance;
- intensity;
- maximum automation of the smoke generator;
- simplicity;
- transportability of the smoke generator.
The first point in the characteristics of a smoke generator for smoking indicates how much raw material can be processed in the shortest period of time. The higher the performance of the smoke generator, the larger the smoke supply module and the food chamber should be.
Intensity describes how fast and how much smoke can be delivered. A certain line is important here, because with a large amount of it, it may not have time to cool to 25-30°.
The process must take place around the clock without interruption. This means that wood chips will have to be placed in the smoke generator at night. Not everyone wants to get up specifically for this, so it’s worth thinking about whether it’s possible to implement an automatic feeding system based on a timer or volume.
Installers and designers always try to achieve maximum strength and reliability of the structure while keeping it simple. It is simplicity that allows you to reduce repair and production costs. Also, such products usually last longer. This principle should be based on a smoke generator for a smokehouse. Making the device stationary is a personal decision for everyone. But there is no guarantee that the site where the smoke generator is now located will not be in demand for an economic building tomorrow.
The best smoke generator for cold smoking is considered to be one that is easy to move and install in a new location.
Necessary components
There is an option when a homemade hot smoked smokehouse from a refrigerator can be installed in a city apartment. This option, although not complicated, can cause a lot of inconvenience for both you and your neighbors. Therefore, we will not consider it. But installing such a unit on a summer cottage would be the optimal solution. To do this you will need:
- The refrigerator itself.
- Pipe with a diameter of 100 mm and a length of 2-4 meters.
- Electric stove.
- Brick for laying out the hearth.
- Shovel.
- Scotch tape or tape.
- Stainless steel grids and hooks.
Of all the above, the only thing that is difficult to get is a refrigerator if you don’t have one, and not the first one you come across. In order to make a smokehouse from a refrigerator, you need to find an old Soviet unit, which has a steel body and a minimum of plastic and rubber parts.
What do you need
As a rule, after buying a new refrigerator, we don’t throw out the old one, but take it to the dacha, hide it in the garage, or simply put it on the balcony. Meanwhile, on its basis it is very easy to make a productive and, moreover, economical smokehouse. To do this, you will need to buy not so many necessary components and spend about one weekend on assembly.
A unit of this size is equally suitable for both cold and hot smoking. To work you should prepare:
- a metal pipe (an old one from a drain will do) 4 meters or more;
- fire bricks to make the combustion chamber;
- metal sheet for the fireplace cover.
With the same success, you can use an iron container for the firebox of a suitable volume:
- old brew;
- washing machine body;
- cut iron barrel, etc.
Before starting the main work
Preparatory work can be carried out even before taking the refrigerator to the dacha, because, by and large, all you need from it is the body. All mechanisms, tubes, gaskets and other non-steel parts can be removed in the apartment. And it will be easier to drag, and it will be much easier to throw out garbage in the city.
After all the excess has been removed, it is necessary to seal all the resulting holes with tape or tape so that the DIY smokehouse from the refrigerator does not release too much smoke through them.
But you can cut a hole for the pipe and guides for the gratings on site.
Preparing the body
Only the plastic lining is removed from the inside of the refrigerator body; the layer of mineral wool or polystyrene foam does not need to be removed - it will help maintain the desired temperature in the chamber during the cold smoking method. For hot smoking, remove all insulation and seal excess holes in the body with several layers of tape.
To install a smokehouse, drill inside the cabinet:
- additional holes for grates on which smoked products are placed;
- Stainless metal hooks are attached to the ceiling for hanging suspended smoking of products;
- a ventilation hole is drilled in the ceiling, which is needed at the beginning of the kindling;
- in the bottom of the housing there is a hole that matches the size of the hole in the chimney pipe.
Rust, old stains on the walls, and other stains are cleaned with sandpaper, a wire brush and cleaning agents.
Equip the smokehouse:
- old gratings are burned with a torch to remove paint and cleaned with an iron brush;
- grooves are inserted into the additionally drilled holes, onto which skewers or iron meshes are attached in order to place products for smoking on them;
- the pipe is welded to the inlet hole in the bottom of the body;
- install a fan under the ventilation hole;
- A tray is placed at the bottom of the unit to prevent dripping grease from spreading across the floor.
To preserve heat from the outside, the refrigerator is lined with thermal insulation. To observe the process without opening the door, one of the walls is equipped with fireproof glass.
Why do you need a smoke generator?
Cold smoking is a long process, which requires not only equipment, but also a decent supply of firewood and time to maintain. It often lasts from 2 to 7 days, and during this entire period the fire must be constantly maintained in the firebox. it just makes this job easier.
Some factory-made models can work autonomously for days without requiring any attention.
A smoke generator for smoking produces and supplies smoke to the smoking cabinet where the products are located. Pickled meat, poultry or fish come into contact with smoke, after which a whole chain of chemical reactions is activated. Thanks to them, aromatic and very tasty food is obtained.
A smoke generator for a smokehouse is an effective and at the same time structurally simple device. To make it, you can use available materials.
In the cabinet where food is smoked, nothing burns, since the temperature inside is not very high (ranging from +20 to +40 °C). This temperature is precisely a characteristic feature of cold smoking. With the hot method, the smoke temperature is much higher - about 100 degrees.
A smoke generator is a device that produces smoke cooled to room temperature for a long time, often without any supervision from the owner.
What foods can be smoked in a smokehouse with a cylindrical smoke generator?
The main purpose of devices of this type is to ensure the longest possible smoldering of sawdust, so they are used mainly for cold smoking. And you can prepare delicacies from almost any product: meat, fish, sausages, vegetables, cheeses, seafood and even fruits.
The main thing is that you do not have to constantly monitor the process, that is, often open the smoke generator chamber, violating the process technology.
Hiking option
- Take an electric stove, turn it on at full power, place a metal container with fruit wood shavings on the stove.
- You will also need a metal barrel.
- The bottom of the barrel is removed (it has no bottom or lid).
- This barrel is placed above the electric stove (the electric stove stands in the place where the bottom of the container was).
- Holes are drilled in the middle of the barrel (4-6 at one level), a grate is lowered into it (the products for smoking are laid out on it), rods are inserted into the holes, they will hold the grate.
- When the tile heats up, the chips begin to smolder and smoke, and the smoking process begins.
- The barrel is not completely covered tightly with a sheet of plywood or something else.
This is a quick fix option. Such smoking will not be beneficial either for a container for wood chips or for an electric stove. But if you use this method not every day, but once or twice a season, then it is quite a worthy country option.
Small tricks
- Use old Soviet-made refrigerators, they contain very little plastic.
- You can cut a rectangular hole in the refrigerator door and stick heat-resistant glass on it, in this case you can observe the smoking process without opening the door.
- Use well-dried wood chips or sawdust, otherwise excess moisture in them may lead to condensation on the product.
- Do not use softwood wood chips or sawdust as this will cause a bitter taste in your product.
- To save on fuel for the fire, install the smokehouse in an area where there are no drafts.
Industrial smoke generator for cold smoking
The figure shows the operating principle of an industrial smoke generator for cold smoking
An industrial smoke generator is more complex than a household one and is designed for continuous operation.
It consists of a wood hopper, a feeding mechanism, a heating element and other parts.
Industrial units allow you to adjust a large number of parameters:
- temperature in the smokehouse;
- humidity;
- smoke density;
- cooking time.
Features of smoking fish
The main feature of smoking is the fact that the products are brought to readiness without frying in a frying pan. The fish are exposed to temperature for different periods of time depending on the method chosen.
As a result of heating special sawdust of a certain type of wood, it is possible to achieve a variety of taste qualities of the processed products.
Types of smoking
In general, there are two different technologies for smoking fish products:
- Hot processing.
- Cold smoking.
The hot processing method is the most common. It can significantly improve the taste of food, making it very appetizing, soft and juicy. The main difference of this method is the high temperature at which processing occurs.
It usually ranges from 50 to 150 degrees Celsius. The entire procedure, depending on the type of fish product, takes from 20 to 50 minutes. After processing the products get a pleasant golden hue.
Good to know! Cold smoking requires additional processing of raw materials. In particular, the fish is first salted, which lasts approximately 1-2 weeks. The smoking process itself occurs at temperatures up to 30 degrees Celsius and can take up to 3-7 days.
At the same time, the fish is dried, and the smoke from the fire imparts a unique aroma and piquant taste.
This technology is widely used in the production of sausages and fatty fish such as:
- Salmon.
- Salmon.
- Mackerel.
Firewood and sawdust for smoking
Depending on the type of wood, you can give the fish different taste properties. This must be taken into account when preparing to smoke fish.
The most optimal materials for this type of processing are:
- Alder.
- Juniper.
Juniper branches are quite rare; they grow mainly in mountainous areas.
Therefore, you can also use such types of wood as:
- Beech.
- Oak.
- Ash.
- Maple.
- Hazel.
- Branches of fruit trees (apple, pear, plum)
All of the above materials impart unique rich aromas.
It is under no circumstances recommended to use coniferous wood for smoking. They contain a large number of different resins, which will give the fish a bitter taste and can also ruin the smokehouse.
Some connoisseurs use several types of wood when preparing the process, thus achieving unique taste qualities.
Before use, the bark must be removed from the tree, then the wood is crushed to the state of chips with a particle size of 20-30 millimeters. Particles of this size provide optimal performance for the operation of the smokehouse.
How it works
A smokehouse with a smoke generator, built with your own hands, is very mobile and compact. When not in use, it can be stored in a garage, basement, or even a closet. This depends on what is used as a smokehouse. You can use any metal box of suitable size for the camera. If there is no ready-made one, then you can make it yourself without any problems.
The box sizes vary, depending on the volume of product you will be smoking.
For home smoking, the optimal dimensions are 1.0 / 0.6 / 0.6 m (H / W / D). The top of the box is closed with a lid with a built-in thermometer and several small (0.3 -0.5 mm) holes to create traction. The upper part of the smokehouse in working condition should be above the smoke generator - this creates additional natural draft, and even when the fan stops, smoke will enter the chamber without delay.
Now you need to assemble everything:
- We install the generator on a fireproof base - a metal table, a concrete slab or floor, ceramic tiles. This must be done for fire safety reasons. In addition to the fact that the smoke generator gets quite hot, pieces of burning wood chips may fall out of it.
- We load approximately 0.5 - 1 liter of dry wood chips, sawdust, shavings of deciduous trees into the smoke generator (coniferous trees are not used for smoking) and close it tightly with a lid.
- We connect the compressor pipe and connect the chimney to the smoking chamber.
- We ignite the fuel through the side hole.
- Turn on the fan.
- The smoking process has begun. The tee with the fan acts as an injector. A vacuum is created in the chimney pipe, which causes smoke to be drawn in from the generator, and a rather noticeable air-smoke flow is directed towards the smoking cabinet. At the same time, an influx of air into the firebox from the outside is formed, through the side openings in the smoke generator. The combustion is self-sustaining and no human intervention is required.
Selection of raw materials for smoking
The best choice when determining raw materials for smoking would be logs and shavings:
- fruit trees: apple trees, pears, cherries;
- hard deciduous trees: oak, beech, alder.
Before using sawdust and wood chips, make sure the material is clean so that there are no extraneous unpleasant odors.
A homemade smokehouse from a refrigerator with your own hands is a reliable and affordable method of providing a large family with smoking products. A little effort, desire and creativity will give new life to an old refrigerator and diversify the dishes on the holiday table. Please be patient to get the best results!
Tips and tricks
As already mentioned, the cold smoking process is quite lengthy. You will have to periodically maintain its continuity for several hours. Therefore, starting this operation because of a few fish or a small piece of lard is absolutely not profitable. Prepare enough food to fill your smokehouse made from an old refrigerator at least halfway. In this case, it does not matter at all that pork sausage, a piece of bear meat, deer ribs, chicken half-carcasses and a couple of three-kilogram bream will be smoked at the same time. This will not affect the taste.
But what will definitely affect the taste of your delicacies is the shavings. Ordinary spruce or pine, impregnated with resin, will give such bitterness that it will be impossible to eat. Birch or aspen are also not suitable. But shavings or small twigs of apple, pear, and plum will add a delicious aroma. And if you put a few twigs of cherry or alder along with them, then the appearance of the products will become such that just looking at them will simply revolt your appetite.
And one last piece of advice. A refrigerator standing even in the corner of a garden or summer cottage looks somewhat ridiculous. But no one forbids somehow decorating it or changing the appearance of the resulting smokehouse in some other way. And then you will have not only the unit you need in your household, but also a rather stylish and appropriate piece of furniture. But this is also not the last thing.
General recommendations
For a homemade smokehouse, it is best to use older refrigerators, since older designs contain much less plastic and more metal.
When cold smoking, the best color is given by cherry and alder, the aroma is apple, pear, plum, cherry. In order to save fuel, it is best to place the smokehouse in a quiet place, without drafts.
Homemade smokehouses of this kind are also made from cabinets or greenhouses into which a chimney is launched.
A smokehouse from an old refrigerator is a fairly simple and economical option for an excellent smokehouse that will last a long time and delight you with delicious smoked meats. One of the important advantages is also the low manufacturing costs.
Thus, you can make an excellent home smokehouse and eat healthy meat and fish from your own production, rather than buying products that are often smoked using the artificial smoking method.
Watch the video in which the user demonstrates in detail how to make a smokehouse from a refrigerator with your own hands:
Useful tips
Having built your own smokehouse, do not rush to use it right away: it is important to study the cooking recipe. Larger products require higher temperatures and vice versa; always note the start time of smoking; follow safety precautions. Adhering to these principles, the dishes will always be tasty, and the smokehouse will last a long time.
Let's move on to the insides
By and large, the cold smoked smokehouse is ready. All that remains is to equip it from the inside. Depending on what types of products you are going to smoke, you should make grates to place pieces of meat or lard, and hooks to hang fish or sausages.
It would also be a good idea to make a removable tray where excess fat will drain. It will be much more convenient and easier to wash it.
If all this is done, the products are prepared, the fire starts in the firebox, and shavings or sticks from fruit trees are ready, then the cold smoked smokehouse is ready for use. All that remains is to wait for the coals to appear, add specially prepared shavings or branches to them and close them so that they smolder.
Wood burning
This smokehouse is generally constructed in the same way as the one previously described. The only difference is that a hole is cut in the bottom of the refrigerator for the pipe to enter. The latter is laid at an angle in a ditch dug in the ground to create normal traction. The soil will allow you to thoroughly cool the smoke coming out of the firebox, which is completely hidden in the pit. Its walls are constructed from refractory bricks or the previously mentioned metal containers. The distance between the hearth and the smoking chamber should be at least 2 meters.
The smoking process looks like this:
- light a fire in the firebox;
- wait for coals to form;
- a steel sheet with sawdust is placed on them;
- the firebox is closed with a lid;
- The refrigerator is filled with prepared foods.
Design Features
In order not to make mistakes in the process of making a smokehouse with your own hands from a refrigerator, you need to decide what technology you plan to use to smoke products with its help: cold or hot smoking, since the difference in technology makes some differences in the design of the device.
Also, when making a smokehouse from a refrigerator with your own hands, you need to decide: it will be used indoors or outdoors, which also makes certain differences in the design.
Connection of the smokehouse with the firebox
Having installed the smoking unit, they dig a groove to the future firebox. The combustion container is buried in the ground, and a pipe is laid along the groove to it, which is connected to the smokehouse. There should be a 15-20 cm layer of earth above the chimney to naturally cool the smoke.
Reference! Cold smoked products are safer for the body. Nutritionists do not prohibit their use, since the white smoke that is formed at a low temperature does not emit carcinogens.
Hot smoking device
There are two ways to enjoy homemade smokehouse food from the refrigerator, one of which can even be used indoors.
Smoking outdoors will require you, in addition to a refrigerator, to have a smoke generator, which can also be made from improvised materials. We recommend using an old thick-walled frying pan with a lid for this. It is necessary to make several holes in the bottom of the frying pan, and insert an armored hose from half a meter to a meter long into the lid, which, through a flange, cuts into the refrigerator chamber in the place where the compressor was previously located.
We recommend: Insulation and interior finishing of balconies and loggias
At the bottom of the refrigerator, processed in exactly the same way as for preparing cold-type smoked meats, electric heaters with a power of 1000 to 1200 W (can be from an unnecessary heater) are installed, capable of maintaining a temperature of about 60-80 degrees inside a closed refrigerator.
Instead of a heating element, you can take a burner from an electric stove.
Making delicacies using the hot method is simple and quick: place the products on old shelves or hang them inside the refrigerator, pour fruit sawdust into an improvised smoke generator and place it on a constant heat source (fire, gas or electric stove), turn on the heating elements. After a few hours (depending on the product being prepared), the hot smoked delicacies are ready.
Those who often make smoked fish with their own hands recommend drying it first. For this purpose, a hole is made in the upper part of the refrigerator, onto which an old kitchen hood is installed, and a fan is placed in the chamber itself. It is recommended to dry the fish until the crust dries. If you do not plan to smoke the fish or do not consider it necessary to pre-dry it, you can skip this step.
Hot smoking
- Heating devices or devices (for example, an electric oven with various types of heating elements).
- A special container with a thick bottom and a lid for heating wood.
- Lattices and hooks for laying out and hanging edible ingredients.
- Pipe for chimney.
- Fasteners that will fix the door in the closed position.
- Tray for collecting fat.
In both cases, you cannot do without a working tool. Here we will provide a small list, based on which you can prepare for the upcoming processing. So, to successfully complete the task, you may need: screwdrivers, an angle grinder, a pry bar, a drill, metal scissors, self-tapping screws, bolts, nuts, and, of course, garbage bags.
Cold smoking
To ensure the technology of preparing dishes using this method requires:
- refrigerator (preference is given to Soviet models without plastic filling inside);
- refractory bricks for fireboxes;
- pipe 4 - 5 meters long, 100 -150 mm in diameter;
- iron firebox cover;
- grates and hooks for laying out or hanging processed products;
- corner pipe element for comfortable connection of a structure located at a slope to the surface;
- tray for collecting fat;
- exhaust fan.
To make a smokehouse from a refrigerator yourself for use in the yard, you need to decide on the installation location. The design feature depends on this. If the terrain allows, the structure is installed on a slope without additional manipulations. It is important that the refrigerator converted into a smokehouse is installed above the smoke generator (furnace). If the place is flat, then a hole is dug under the firebox, or the smoking cabinet is installed on a stand.
Contents of the refrigerator compartment
The refrigerator compartment should have racks and hanging hooks used for arranging and hanging food.
There should be a tray at the bottom into which the fat will drain. In this case, you need to make sure that it does not interfere with the flow of smoke into the chamber.
Let's consider all the components:
- Firebox. The fire pit should be in a depression. Thanks to this, the pipe will be cooled naturally by the earth, which will protect it from excessive heating and will quickly cool the smoke moving through the pipe.
Please note: the firebox does not require pouring a foundation. It will be enough to lay bricks or a sheet of steel on the bottom.
For hot smoking, the firebox must be placed as close to the chamber as possible.
Good to know: during hot smoking, sawdust is placed on the bottom of the chamber, preferably fruit sawdust, which provides a pleasant aroma of the product.
- Chimney pipe. The pipe is removed from the pit and must be connected to the chamber. The connection point is where the compressor used to be, the location of which depends on the model of the refrigerator. The chimney can be secured with fittings or cut into the lower part of the refrigerator body. The second case is more effective, since the smoke comes from below and saturates all the products as much as possible.
- Location. It is recommended to install a smokehouse from a refrigerator, regardless of the type of smoking, at a difference of 0.5 m, i.e. the chamber should be higher and the firebox slightly lower. This will ensure that smoke quickly rises and enters the chamber from the fireplace.
Some tips for use
If you need to smoke a small amount of food, it is better to place it on the bottom shelf of the refrigerator. In this case, a reflector (any piece of tin) is attached to the top, speeding up the cooking process, which can significantly save wood chips.
To give the smokehouse an aesthetic appearance, you can remove the back wall of the refrigerator and replace it with heat-resistant glass. Through it you can observe the process. You can also run a wire with a thermocouple into the rear compartment, covered with a shield, which will allow you to regulate the temperature during smoking.
Our step-by-step instructions, drawings and recommendations will help you make a smokehouse with a smoke generator. This cabinet made from a walk-in refrigerator looks very stylish and original.
To summarize, it is obvious that making a captilla for personal use is very simple. It is not necessary to spend large sums of money on a ready-made device - just apply a little imagination to the old units at hand.
Homemade products are always the most delicious. And preparing smoked delicacies is an excellent reason to get together with a group and get out of town at any time of the year. An undeniable advantage is also that during the assembly of the smokehouse it will be possible to free up space from unnecessary old equipment, giving it a second chance at life.