- September 14, 2019
- Leisure
- Daria Kosareva
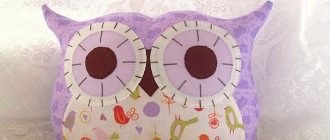
Adorable sock cats are very easy to create with your own hands. With all the variety of toys, the ones that are especially pleasing are those that are made by hand. The material needed for sewing is very simple and always at hand. And such a cute sock cat can become not only a child’s favorite pastime, but also an interior decoration. Such toys look original and stylish.
Ideas for cats made from socks
If you decide to sew a toy for a child under 1 year old, then it is better to simply draw the eyes, mouth and antennae or embroider them with thick threads. For such children, the toy can be filled with cereal. This sock cat with cereal will be an excellent exercise machine for developing fine motor skills. for fine motor skills.
How to put on your cat's nails
You should put false nails on your cat after the claws have been trimmed. If separation of the stratum corneum is observed, then it is necessary to trim the surface with a file.
How to properly glue a cat's nails
The following instructions will help you glue your cat’s nails correctly:
- prepare 5 silicone caps from the package;
- apply a small amount of glue into the cavity of the nozzle (no more than 1/3 of the volume);
- disinfect the claws on the cat’s paw with an antiseptic;
- Having pressed on the crumb, extend the claw and place the cap on it, gently pressing it on all sides;
- similarly glue attachments to all the pet’s claws;
- when the anti-scratch for the cat is glued, the animal should be held so that the glue sets, and after 10-15 minutes the cat with false nails can be released;
- Glue from the owner's fingers can be removed with nail polish remover.
If the pet is mischievous and breaks out, then you can attract an assistant and wrap the cat in a blanket for the procedure.
Anti-scratch for cats: instructions on how to use
There are no special instructions for using anti-scratch pads for cats; the animal simply wears them until they either rip them off or they fall off along with the renewal of the nail. If your pet chews and eats the cover, it’s okay. It will come out naturally without damaging the walls of the stomach and intestines.
Anti-scratch glue
Glue is included with the cases. A non-toxic product is used to attach silicone tips. In rare cases, the glue used to attach false nails can cause an allergy in your cat.
How to remove anti-scratch pads from a cat's claws
You can remove scratch guards from your cat’s claws when the stratum corneum of the claw grows back. In this case, the nozzle disappears on its own. This happens after about 1-2 months, depending on the intensity of the natural processes of claw regrowth in the cat.
If you need to remove them a little earlier, then you need to carefully trim the tip of the cover and pull it off.
What you need to make a cat from socks
- If you are making a cat from socks for an older child or as a gift for mom, then it is better to use synthetic padding or cotton wool as a filler.
- To make a cat you will need 2 small socks. The brighter the socks, the more fun the kitten will be. You can take terry socks, then the cat will turn out fluffy. The size of the cat depends on the size of the socks. In the video, a cat is made from socks for a 14cm leg.
- You also need scissors, a needle, thread, eyes, antennae, a mouth, chalk or a felt-tip pen with which you will draw the pattern.
Why do you need shoes?
Owners put boots on their pets for the following reasons:
- Protection from chemical reagents on the roads of megacities.
- To prevent damage to dogs' paws from debris, broken glass, hot or too cold asphalt.
- To protect furniture and apartment walls from your pet's claws when they are not using a designated scratching area.
It is especially important for parents with small children to wear cat shoes. Since a baby can pull an animal’s tail or whiskers, and the pet may not like it, boots help protect the child from scratches from the animal.
It is better to buy slippers for your cat than to trim his claws or have them surgically removed; it is safer. Breeds such as Sphynxes and Devons, which do not have fur for warmth, need additional protection from the cold. These boots will help protect your animal from freezing in the winter or prevent burns when stepping on a hot surface.
Advantages and disadvantages
It will be easier for the animal to get used to such attributes if you put socks on it first.
The main advantage that boots provide for an animal is the protection of its paws from external influences. Thus, the owner does not have to worry about preserving the health of the pet. One of the disadvantages is the difficulty of putting on shoes, since it is not typical for an animal to like clothes and shoes. At first, you won’t be able to get dogs or cats to calmly put on slippers; they will try to take them off. To overcome this reaction, you must initially teach them to wear socks at home, and then go outside in them. Sometimes you won’t be able to do this, you have to come to terms with it and not torment your friend.
How to choose?
Main parameters for selection:
- seasonality;
- waterproof;
- naturalness of the material;
- hypoallergenic.
The animal's paws must be properly secured with boots.
The owner chooses the appearance of the shoes according to his taste, but for the animal it is important how functional they are. Veterinarians say that the sole of the boot should have treads so that when walking the kitten or dog does not slip or move apart. The most convenient fixation is laces or Velcro. They should fit snugly against the paw, but not pinch it. So that the animal does not lose it, but also cannot remove it. The material must be durable, otherwise it will be of no use.
How to sew a cat from socks with your own hands
- Place your toes with your heels facing up. Draw a pattern on them (we drew with a felt-tip pen)
Pattern - cat made from socks - Cut along the lines. So, from the first sock you should get two hats and a cat's face. And from the second - the body and tail.
- Now we sew the cat and stuff it with stuffing. DIY cat made from socks is ready
Take two socks
Cut the parts along the marked lines
We stuff the cat's head with stuffing and sew up the hole.
Stuff the body with stuffing, sew up the hole
All details are ready. Sew the head and tail to the body
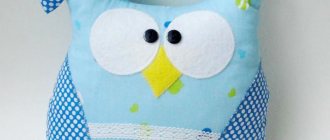
Ready cat from a sock
Hats for cats
The sock kitten is ready
Tumbler cat
The simplest and fastest scheme. This cat can be sewn in just half an hour.
To do this, you will need one sock, which you don’t even need to cut. Just shape it with your hands, compacting the padding polyester and stuffing it inside.
Sew up the elastic and draw a face. To better hold its shape, you can tie a ribbon or a beautiful collar around the toy’s neck.
Your child will definitely make this cat himself, and will love him more than all other toys.
Safety regulations
Natural materials must be washed and dried thoroughly before use, and toys with food must be stored in a dry place - pasta and cereals are afraid of moisture. The bags must be sewn or tied in such a way that the baby cannot, under any circumstances, reach their contents.
Also visit the articles
Here you will find 4 simple master classes, and 3 of them do not even require sewing! Very simple and funny toys made from socks that both babies and older children will appreciate.
Cute cats made of fabric. We made them scented - we added essential oils. Go to the article and get free patterns and master classes.
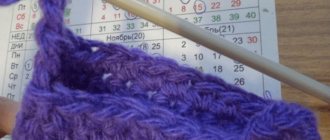
We knit socks for a pet
We will knit socks from cotton threads in 2 folds, crochet number 2 - 2.5, and we will also need beads (any kind) to design the laces.
I knitted these socks for a Yorkie puppy. They just started going outside to avoid hurting their paws.
.
We start knitting from the sole. We knit the first 3 rows according to this pattern.
We cast on 7 air loops and tie them in a circle, you get 13sc. Next we knit in a spiral. In the 2nd row we add another 7 sc - in the end we get 20 sc. In the 3rd row we add another 6 sc - in the end we get 26 sc.
In the 4th row - add 1 sc on the toe and on the heel, you get - 28 sc. And knit another 3-4 rows without increases or decreases - 28 sc.