Owl
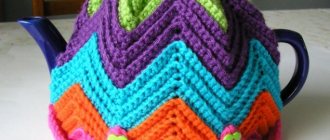
In the photo above we see a rug in the shape of an owl. It knits quite simply. We needed “Grass” yarn for the base of the rug, white, black and brown yarn to make the rug look like an owl, that is, for finishing. And a hook, or rather, two hooks, No. 4 and No. 9: with one they knitted the eyes, beak and wings, with the second - the rug itself.
First, with crochet number 9 we knit a circle with double crochets. We tie ears on it in the same way as in the description below. That’s it, we don’t use “Grass” anymore.
Eyes
Separately, we knit the eyes with white yarn in single crochets, and another row of single crochets with black yarn.
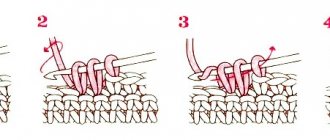
We knit the black pupils on top. I did this: insert the hook into the center of the eye from the front side, leaving the skein on the wrong side. We pick up the black thread, pull it out to the length of one row, insert the hook from top to bottom, pull out the black thread, ch. *Insert the hook into the middle of the eye again, pull out the black thread, move the hook behind the first white row, pull out the thread, ch, ch along the circle* and so on 6 times, connecting loop. We bring the thread to the wrong side, fasten it, and cut it.
You can embroider the eyes differently. To make a sleeping owl , you need to embroider eyelashes along the lower white part of the eye.
owl eyes can be like this
The beak and wings are triangles connected with single crochets. We knit, starting with 3 sc from one loop, adding one loop on each side in each row to the desired length.
Necessary materials
Patterns and descriptions of crocheting an owl can be found on websites, and you can also find ideas for creating products on the Internet. When the final result and the sequence of work have been thought out, it is necessary to prepare the necessary materials. If the product is small in size, then it is quite possible to create a toy from leftover yarn.
https://youtube.com/watch?v=sfWqjHmrhcc
Necessary materials:
- Yarn of different colors used in knitting. For small elements, it is recommended to use the thinnest thread, then the product will be easier to knit and it will turn out more neat.
- A crochet hook suitable for the selected yarn. Different parts of the toy may require several hooks of different sizes.
- Decorative elements: eyes, beak, tassels, ribbons or cords for decorating seams.
- Materials for stuffing, for example, holofiber or synthetic winterizer.
After the materials are prepared, you can begin knitting.
Aunt Owl.
You will need: gray, white, black, brown yarn. Hook No. 4.
Description. We knit a circle with single crochets. We start with 6 columns from the amigurumi ring. We will knit in a spiral. In the first row, from each loop we knit 2 single crochets (sc). In the next one in one. Then *2 sc in each loop, 2 sc from 1 loop*, and so on. So we knit 7 rows. We close the row with a connecting column. The result was a bun.
We knit ears.
We cast on 5 air loops (ch) instead of a double crochet stitch (ss3n), in the same loop we knit a double crochet stitch (ss2n), in each next loop: dc2n, dc, dc, dc, ps (half-dc), sc. Next we knit the second ear in the reverse order: mon, dc, dc, dc, dc2n, dc2n, dc3n.
Cut the thread. Here you can leave the tip of the thread the same length as the tassels or a little longer, then you can cut it.
Tassels on the ears.
Take a long thread and insert it into a gypsy needle. We make about 10 long stitches (you can use a ruler) in one loop at the tip of the ear. We wrap it several times around the tassel, secure it with a knot and cut the thread. We cut the loops and trim the tassels evenly.
Eyes.
There will be 2 identical parts. We knit 6 sc into the amigurumi ring. We will knit in rows, not in spirals. That is, we will close each row with a connecting loop. We will immediately hide the tip of the thread by placing it inside the loops. In the second row from each loop we make 2 sc.
In the third - *1 sc, 2 sc from one loop*
Fourth row - *2 sc, 2 sc from one loop*. Connecting post. Cut the thread longer and then use it to sew the eye to the body.
The pupils can be made from half beads (glued with glue) or, like ours, embroidered. To do this, take a needle and thread and tie a knot. We insert it from the wrong side to the front side, wind the thread around the needle about 10 turns and pull the needle out. Sew on the resulting structure. We tie a knot from the inside out.
Wings
Each wing consists of 7 parts of different lengths.
We insert the hook into the edge of the body approximately at the level where the eye ends. We hide the end of the thread again as we work. Knit 6 ch, then sc in the next loop. Then ch 9, sc, ch 12, sc, ch 20, sc, ch 12, sc, ch 9, sc, ch 6, sc. One wing is ready. We also knit the second wing.
We embroider the beak and paws using stitches using a needle and thread in the form of triangles. To make the owl more elegant, we embroider its feathers in the form of white spots with stitches or glue half beads, at your discretion.
What are baby sling beads for?
• Only the mother who lives on Mars has never heard of baby slings. For many mothers, babywearing beads fall into the category of irreplaceable things: they help out in line, where for some reason there are no children's toys, they help during teething.
Bright baby slings
• You can buy baby sling beads, or you can make them yourself. A child will surely like a craft made with soul, even though it will not be done professionally. And a young mother will be able to discover her creativity thanks to a seemingly simple activity: tying beads or covering wooden blanks with bright fabric. You can not only give free rein to your imagination by creating babywearing beads, but also show your care. • We suggest setting aside a few hours of valuable time for a young mother and making a craft useful for the full development of the baby. Pleasant to the touch decoration will be a real find for the modern mother. • Bright beads on a durable ribbon, in addition to intellectual fun, also provide an aesthetic environment from the very first days.
Baby slings made in a marine theme
By devoting several evenings to tying beads, you will get a practical thing that will become indispensable for you when feeding, when your baby needs your attention. This bright accessory will solve several problems at once:
- Baby slings are used to entertain babies when it is not possible to pay enough attention to the baby. For example, waiting in line at a clinic or on public transport.
- A bright decoration is a great way to keep your baby's hands busy while breastfeeding. Instead of pinching mom and playing with her hair (which isn't always fun), baby can simply play with the beads.
- Baby sling beads are used by the baby as a massager for the gums during the teething period. Baby slings promote the development of fine motor skills of the baby's hands and have a positive effect on the development of communication, coordination and sensory skills.
Babywearing beads perform two important functions: fun for the baby and decoration for the young mother.
Knitting owl. Here's some inspiration for you!
Hat with owls. Knitted with knitting needles.
The hat is knitted from the bottom up. The eyes and beak are sewn on top of the finished product.
First, rib *knit 1, purl 1* 5 rows. Then we knit the owls in stockinette stitch, and around there will be a pattern in which knits and purls alternate, shifting by 1 stitch in each row.
We knit the “Owl” pattern according to the pattern. The pattern is very simple. Circular knitting pattern. The number of owls is at your discretion.
If you need a taller hat, knit several rows, alternating knit and purl stitches, like between owls.
We will decrease loops through a row in six places. The pimpochka is knitted with a hollow cord.
Another very simple hat with an owl.
This hat is knitted from the bottom up. You can knit in the round, or you can sew a back seam. First, 3-5 rows of the front stitch (lapel), then we move to the purl stitch, knitting the “Owl” pattern according to the pattern.
Cast off all stitches in one row. Sew. Make tassels at the ends of the seam.
Toy “Baby Owl” - how to crochet: master class, video
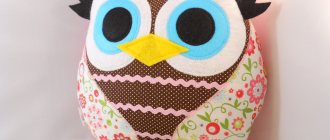
Toy “Baby Owl”
Any child will love this toy. The baby owl is very cute and easy to crochet. Here is the master class:
Instructions:
- Start with the body. Cast on 6 stitches.
- Make 6 increments.
- Repeat the increase 6 times and 1 stitch.
- Repeat point 3 3 more times, increasing the previous row in multiple steps by 1 stitch.
- 10 rows in columns bn.
Then make the eyes:
- The first 3 steps are like the torso.
- 6 times increase and 2 columns bn.
- Decrease, 2 columns bn - 6 times.
Do the same for the second eye.
- Similar to the previous one.
- Turn it inside out and stitch it.
Embroider the beak. The owl is ready. Look how knitting such an owlet is described in the magazine:
Toy “Baby Owl”
Watch the video to see how else you can tie a baby owlet:
Owl
How to knit ears? And the ears are an integral part of the head. Having knitted the last row (36 st.b.n.), we install a fastening for the mobility of the head, stuff it and sew it up. The seam is made across the entire head, corners are formed at the edges of the seam, these will be the ears. It is enough just to stitch, stepping back from the tip of the corner about 2-3 cm.
How is the tail knitted? Everything is simple with him too. We begin to knit the tail at the hole formed in the body, between the 15th and 16th rows. The first 2 rows are knitted in the round, then we stuff the body to the desired density, fold the tail hole in half, and knit the 3rd row over the edge, thus closing the hole. Next, row 4 according to the pattern is an imitation of feathers.
To make your head spin. We use a mount, 2 discs and a cotter pin, as for teddy bears. For the large owl, I cut out disks from cardboard. You can also use a homemade fastening: 2 buttons, 2 disks made of cardboard (thick), tie it together with a strong thread, or you can use a hairpin.
Features of the national assembly
Something interesting was discovered after assembly. Compare Russian and English versions of the instructions:
RUS:
squeeze out the parts as you assemble (1, 2, 3.),
ENG:
squeeze out
all the parts
, and then assemble, relying on the photo of the finished owl and the instructions.
Go crazy! And they also say “stupid Americans”