How to make a chocolate bow. Photo
There are a wide variety of options for making different decorations for cakes. Today we suggest you stop at one of the most beautiful ones and make an elegant chocolate bow according to today’s master class.
To make a chocolate bow you will need:
White and dark chocolate bar;
Baking paper;
Scissors, ruler.
Chocolate bow for cake step by step:
The first step is to cut strips of parchment paper (Image 2). Their width and length will depend on the final size of the bow. The shorter the length of the strip, the better the loop will keep its shape. The number of such stripes will also depend on the size of the bow, so you need to focus on the diameter of the cake you are decorating.
In this case, the length of the stripes is 18-20 centimeters, large stripes are 3 centimeters wide and small stripes are 1.5 centimeters wide. You will need about seven large strips, and about eight small strips (photo 3).
Melt the dark and white chocolate separately in a double boiler. Once the chocolate has melted, place the strip on parchment paper (Image 4).
Apply "liquid" chocolate along the strip (photo 5). You can use a brush to distribute the chocolate, but it is much more convenient to use a long kitchen spatula - in this case the chocolate will lie in a more even layer (photo 6).
Then lift the strip up - you get a smooth chocolate ribbon. Place the hardened chocolate residue left outside the strip in a container with melted chocolate for transfer (photo 7).
Before the chocolate hardens, fold the strip into a loop, securing the ends together. This will place the chocolate inside the loop. Let it set for about 10-15 minutes. As a result, you will get larger loops from dark chocolate (photo 8).
And also to fill the middle of the bow with smaller loops. By analogy, make loops from white chocolate, to which you can also add pink, blue or yellow food coloring (photo 9).
To make beautiful openwork ribbons for a bow, you need to cut out strips from parchment paper and cut them in the manner shown in photo 10. Then put a little melted chocolate into a culinary syringe and apply it to the strip in the form of a chocolate mesh. All actions must be performed on parchment paper (photo 11). Quickly lift the strip up and leave it until the chocolate hardens (Pic 12).
After the chocolate loops and strips with chocolate mesh have hardened, you need to carefully remove the baking paper from them (photo 13).
Think in advance about how to form the bow and in what order you need to fold the loops (photo 14). Start forming the bow by placing ribbons with a chocolate mesh crosswise (photo 15). Apply melted and slightly cooled chocolate to the middle (photo 16).
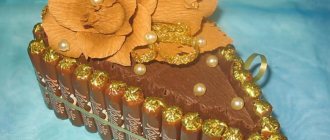
Next, lay out large loops, alternating black with white, and securing them to the chocolate (photo 17). After laying out all the large loops, the bow will look like in photo 18. Add small loops in the same way. You also need to secure the top with melted chocolate (a small drop) (photo 19). Let the chocolate harden completely (photo 20).
The chocolate bow for the cake is ready and can be safely transferred to the cake!
We thank Yulia Mishchenko for the master class
You can decorate the cake in different ways: with fruits, berries, dried flowers, whipped cream, edible beads, sugar mastic... What can you say about decorating with an original, voluminous and exceptionally beautiful chocolate bow? It is able to decorate absolutely any pastry, and it is so unusual that everyone who sees this miracle begins to demand that the secret be revealed! Don't give away your secrets. After all, great magicians keep the technique of their miracles secret.
To work you will need:
- chocolate (white or black - the final color of the bow depends on this; chocolate can be mixed);
- container;
- plastic bottle and scissors;
- napkins;
- culinary brush;
- clothespins.
Let's start creating a masterpiece!
1. Melt the chocolate.
2. While it is cooling, cut out oblong strips from a plastic bottle - these are the blanks for each turn of our future bow. If you have several bottles in stock, cut out as many strips as possible of the width and length you need - this will make things go much faster.
Using a pastry brush (or any other convenient method), apply a not very thick layer of melted chocolate onto the plastic workpiece. Lay down napkins to avoid staining the work surface.
3. While the chocolate has not hardened, carefully roll up the workpiece and pinch the edges (the plastic should remain outside).
4. Cool. Carefully remove the plastic from the chocolate curl.
5. We repeat the procedure as often as we want the bow to be voluminous (minimum 8 pieces).
6. Hold the edges of the chocolate curls in your hands so that they warm up a little. “Glue” them together and decorate the cake.
Also, using a pastry bag, you can make openwork stripes and curls:
Look at the wonderful bows that decorate these cakes:
I've been using this recipe for a long time and it always turns out great. I will share this recipe with you. Today we will decorate the cake with a chocolate bow.
To make the bow we need one bar of dark chocolate.
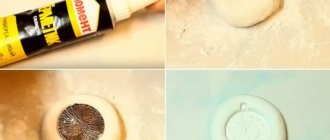
Hard file for paper. Paper clips. And of course a refrigerator, or best of all a freezer. So the first thing you need to do is prepare a file for paper. cut into strips. The width is approximately 3-4 cm, and the length is best no more than ten centimeters, tested by experience. We prepared strips from a file and a paper clip. Now you need to melt the chocolate bar. You can use a very simple method by melting chocolate in the microwave, but I prefer to melt chocolate in a water bath.
This way I can control the melting of the tiles and not overdo it. We melted the chocolate and now I’m scooping it out with a teaspoon.
per strip from the file
.
Then I secure the edges with a paper clip.
So that your hands don't get dirty. You can wear gloves, but as experience has shown, it is not very convenient to work in them. At your own discretion. We spread the plates and put them on a plate or board, which will be convenient to put in the freezer.
Now we put the cake bow blanks in the freezer. I leave it overnight, but you can leave it for 2 hours and they will be ready. After the cooling time has passed, we proceed to decorate the cake with a chocolate bow. We take the preparations out of the freezer. I’ll say right away that the work is not easy and you need to be careful everywhere. We remove the paper clips very carefully from the blanks. Then you need to remove the file. Accuracy also requires speed, since chocolate melts very quickly upon contact with your hands and also becomes deformed, which we do not need at all. We freed our preparations and now decorate the cake.
Place one petal at a time, then on top and finally in the middle. You can secure these petals using the same chocolate. Melt some chocolate or take the leftovers; it is advisable to fix it with melted chocolate very carefully, as the petals may become deformed. Fix only the ends inside. Honestly, I try to fix the petals of the bow by deepening them a little into the cream.
That's it and now our bow is ready. Small decoration with additional chocolate. This is what a beautiful cake looks like.
HOW TO MAKE A CHOCOLATE BOW TO DECORATE A CAKE
Recently, it has become very fashionable among housewives to decorate sweet dishes with additional decor. Cakes and pastries have ceased to be just sweets and have moved into the category of masterpieces. In many ways, the work of chefs is simplified by multi-colored mastic, but openwork details make the cakes more delicate. Today we will learn how to make a chocolate bow!
To make a bow you will need: a scarf of ready-made chocolate, a very thick file, a stick or spatula, a plastic bowl, a large bowl, napkins and ordinary clothespins.
Cake bow: job description
Pour water into a bowl and put it on fire. While the water is heating up, place the chocolate bar, divided into tiles, into a plastic tray. Constantly stir the chocolate and melt it until liquid. Then cool the chocolate so that it is not hot.
A file or very thick nylon is useful for shaping chocolate. From this material you need to cut strips of the same size as the “petals” of the bow should be. Place the piece on a regular napkin (so as not to stain the table) and apply warm chocolate to one side of the “petal” with a thin brush or whisk. There should be no gaps in the chocolate layer.
Turn the piece of chocolate and bring its ends together. At the same time, the chocolate part is fixed inside. One of the ends should give way a little - this will make it easier in future work. Place the dough in the refrigerator for 5 minutes.
If 5 minutes have already passed, you can remove the workpiece from the refrigerator. Carefully remove the clothespin and unbend the file. It is convenient to unbend, holding on to the side that protrudes a little more. So, before us is a ready-made “petal” of a bow. Using the same scheme, we make the remaining parts of the bow - as many as planned. For a voluminous bow you will need from 7 to 10 chocolate “petals”.
It’s okay if the parts of the bow differ in size from each other. You can even specially make them on different blanks: wider and narrower.
This is approximately how you need to arrange the parts of the bow on the cake: we form the first row from five “petals”, the second from three, and the top from one. It is advisable to glue the elements together using melted chocolate (not hot, but warm).
The chocolate bow for the cake is ready! It’s very easy to make one, try it! In addition, we offer you other ideas for decorating cakes. The bow can be made not from solid parts, but from these lattice parts:
By applying chocolate to the file using a culinary syringe, you can build the following decorative mesh:
You can decorate the finished cake around the edges with a similar mesh.
Well, you can add a mesh to the chocolate bow.
By the way, a white bow (made from white chocolate) would look lovely on a chocolate cake!
Well, such spirals are generally the height of skill! They are made by twisting a strip of file onto a base cone.
Ready-made bows can also be decorated with other edible material - for example, golden dye.
Here are other ideas for decorating cakes in a similar way:
It is very important for a woman to be needed. And who could be more needed than a mother? But it happens that becoming a mother is not always possible; an ovulation test can help with this; it will make it easier to determine the date of conception. Also, using ovulation, you can even plan the sex of the child.
From a variety of cake decorations, choose one of the most beautiful - this elegant chocolate bow! Of course, making it requires culinary skills - this chocolate master class will teach you that.
How to create a festive mood?
A beautifully packaged gift with original decoration always creates a festive mood, no matter whether you give it or whether such a gift was given to you. It is a beautiful bow, which can be called a classic decoration technique, that “warms up” the imagination, making you tremble in anticipation of a surprise. The originality of this decoration lies in its versatility, since a bow from ribbons can be made of different shapes or sizes, and today’s market offers a wide range of colors, from plain to complex patterns. Such decorations can give the souvenir more solemnity. Initially, you need to pack the surprise in gift paper, how to do this, read the article: “How to wrap a gift in paper”, but we will teach you how to make a bow from a ribbon, the main thing is to be patient and not quit work after the first failure, because the culprit will have a wonderful grateful smile The celebration you are attending deserves a little effort.
Ingredients
To make a sweet decoration for a cake, take:
- chocolate;
- parchment paper;
- ruler;
- scissors;
- clothespins;
- pastry spatula;
- cream injector.
An important condition for creating decoration is to use only high-quality chocolate. The product must be based on cocoa butter, and not its cheap analogue.
Many housewives prefer a cheap chocolate bar not only because of savings, but also because cocoa butter substitutes make the structure of the product more fluid and pliable for processing. But when using cheap tiles, the bow turns out dull, ugly, and its taste leaves much to be desired.
To prepare a chocolate bow, use any chocolate: bitter, milk, white. If desired, you can mix chocolate mass of different colors so that the details of the decoration turn out variegated, with beautiful stains. If you are using a white dessert, you can add any food coloring to it when melted.
Instead of parchment, you can use thick file sheets.
How to make a voluminous bow from ribbon to decorate a gift?
To get a truly voluminous bow, you need to give preference to cuts made of hard material. Having selected the ribbon, do the following:
- Having decided on the size of the bow (the longer the loops, the larger the bow), you need to make loops from the ribbon in 5-9 folds, placing them one on top of the other.
- Smooth out the resulting loops and carefully trim the edges, as shown in the photo below. You should end up with almost triangles around the edges.
- Take the loops by the middle and spread them to the sides so that the cut out parts are in the center.
- Secure the narrowest central part. You can do this:
- the same ribbon;
- sew with thread;
- fasten with a stapler;
- twist with wire.
- Straighten the resulting half-loops, give them volume and the beautiful bow is ready!
How to make a lush bow from ribbon? Video lesson
https://youtube.com/watch?v=kGQc4PSsxbY
What you need to know about chocolate
How to store and melt correctly
Chocolate has a long shelf life, but it should be kept tightly closed, away from strong-smelling foods, and protected from light and moisture. Storage temperature - 12°C to 20°C
.
Before you start decorating the cake, in most cases the chocolate is crushed and heated. For heating, you can use a microwave oven, a water or steam bath, or an oven heated to 50–100° C. In all cases, it is necessary to stir the chocolate frequently.
Attention! When heating, chocolate must be protected from steam and drops of water, otherwise it will curdle.
Tempering
Cocoa butter is very capricious. It contains fats, the crystals of which melt at different temperatures. If chocolate is not melted correctly, it may become coated, melt quickly in your hands, or become too thick. In tempering (targeted recrystallization), chocolate is successively heated, cooled and stirred, resulting in chocolate that melts in the mouth but remains hard and crisp at room temperature. For tempering, you should use high-quality chocolate.
Confectionery chocolate (glaze) does not require tempering, as it does not contain cocoa butter.
Professional confectioners use a marble board and special thermometers for tempering. The easiest way to temper chocolate at home is to use a microwave:
- Chop the chocolate and place in the microwave.
- Turn on the oven at maximum power.
- Remove and stir the chocolate every 15 seconds until almost completely melted, small lumps should remain.
- Remove the chocolate and stir until completely smooth.
Correctly tempered chocolate, applied in a thin layer on parchment, hardens within 3 minutes at a temperature of 20° C indoors.
If the chocolate thickens too quickly, excess crystallization has occurred. Add a little melted untempered chocolate to this chocolate and mix.
Simple DIY cornet
Confectionery bags are used to pipe chocolate patterns; disposable polyethylene options are especially convenient. If you don’t have them, you can roll up paper cornets yourself. To do this, cut out a square from parchment and divide it into 2 triangles diagonally. The resulting right triangle is folded into a cone, combining the sharp corners with the right one. The corner is bent outward to secure the cornet. The corner at the bottom is cut off only when the cornet is already filled with chocolate
.
It’s easy to fold a parchment cornet
The bag or cornet is filled with melted chocolate. It is convenient to fill the cornet if you put it in a tall glass.
You can also replace pastry bags with a transparent paper file or a thick plastic milk bag.
How to make a simple bow from ribbon to decorate a gift?
You can make a strict version for a “male” present. It will look great both on the packaging and on a bottle of an expensive strong drink. You can read more about souvenirs for a men’s holiday in the article: “What to give a man.” Let's get started:
- Cut a piece of wide ribbon of the required size, roll it up, and glue the edges with glue. It should look like a ring.
- Flatten the resulting ring.
- Hide the joint under the same, but thinner cut.
- Carefully glue the edges and the simple decoration is ready.
Fashionable finishing
If from all of the above, you have not found the answer to the question of how to decorate a car for a wedding with your own hands, then for dessert there are still several methods that do not require skill and are suitable when the wedding has already begun.
Tulle decor
Decorating with tulle is a new fashionable trend in car decoration. There are a great many options for how to transform a car using material. For example, slightly raise the edge of the material, making it look like a veil, or drape the entire hood with tulle. A huge bow tied from fabric looks impressive. You can make a decoration in the form of a bow on the same day on which the wedding ceremony is scheduled, since this is the easiest way to decorate. In any form, tulle as a wedding fabric looks great.
How to make a ribbon bow - a classic option
The classic version of the decoration is very simple to make, and at the same time creates an excellent frame for any gift.
With such a bow, a book, a box of chocolates or a service, as well as ordinary wildflowers will look great. This classic is performed according to the following steps:
- Take a long ribbon and fold it into two loops, as in the photo below. There should be one addition in each hand.
- Place the loop on the left at the back, crossing the two folds. It turns out to be a circle at the bottom.
- Pull the right loop through the formed circle and pull it off. The middle should be in the middle.
- Straighten the loops - the beautiful bow is ready! If necessary, you can cut the lower ends to the desired shape (oblique, triangle, etc.).
Video tutorial: how to tie a bow from a classic style ribbon to decorate a gift?
https://youtube.com/watch?v=kGQc4PSsxbY
What kind of chocolate can you use to decorate a cake at home?
Only those products that contain cocoa butter have the right to be called chocolate.
. The main components of chocolate also include cocoa mass and sugar. They also produce unsweetened chocolate, which contains 99% cocoa.
Real milk, white and dark chocolate must contain cocoa butter
The following types of chocolate are used when decorating cakes:
- bitter (dark) – contains at least 40–55% cocoa;
- dairy - contains at least 25% cocoa and dairy products;
- white - contains at least 20% cocoa butter, but does not contain cocoa liquor or powder.
Professional confectioners use chocolate, which is produced in blocks and dragees (drops). Chocolate bars can also be used for decoration at home.
Cocoa powder can also be used for decoration, but it should be of high quality; poor powder can squeak on the teeth.
Photo gallery: forms of chocolate suitable for decoration
Chocolate in the form of dragees is convenient for melting Chocolate in blocks is often used by professional confectioners Chocolate bars can be used for decoration at home
In addition to real chocolate, you can find confectionery chocolate (glaze) in stores, in which cocoa butter is replaced with vegetable fats. It is produced in bars or in the form of chocolate figures.
Confectionery chocolate is significantly inferior in taste to real chocolate, but, on the other hand, it is less capricious and can be used for applications, patterns, and glazes.
How to make a Dior bow from ribbon to decorate souvenirs?
The Dior bow is used not only to decorate gifts. With its help, unforgettable decors are created for parties, weddings and other celebrations. By the way, take note of the rules of behavior at the table at such celebrations. They are described in the article: “Rules of etiquette at the table.”
To make such a bow, you need to follow these steps:
- Prepare four cuts of different lengths.
- Roll each of them into a circle and secure with thread or glue.
- Stack the circles incrementally one on top of the other.
- Tie the resulting structure of ribbons in the center, inserting the binding tape into the upper (smallest) circle, as in the photo below.
- Fasten the structure.
Painting on icing with liquid white chocolate
Drawings on glaze using a toothpick or bamboo stick have already become a classic. A pattern is applied to dark chocolate glaze with white melted chocolate, and to light glaze - with bitter or milk chocolate. You need to apply the chocolate while the glaze is still liquid.
.
An easy way to create a design on a cake is to cover it with chocolate frosting and then create a design on top using white chocolate.
You can also apply the design to a cake covered with cream if the cream has a soft consistency.
Options:
- Cobweb. Chocolate is applied to the glaze in a spiral from the center. Draw lines from the center to the edges.
- Chevrons. Chocolate is applied to the glaze in parallel strips. Draw lines perpendicular to the stripes in both directions.
- Hearts. Chocolate is applied to the glaze in small circles in a straight line or in a spiral. Draw a line through all the circles in one direction.
- Marble. Chocolate of different colors is applied to the glaze using chaotic movements. Mix the glaze using circular motions to create a marbled effect.
Photo gallery: options for applying patterns to glaze
To draw a web, the stick moves from the center to the edges. Drawing a pattern in the form of chevrons involves moving the stick alternately to the left and from left to right. Hearts are obtained by moving the stick along the center of round drops of melted chocolate. The marble effect is formed by a free, chaotic movement of the stick.
How to make a ribbon bow on a fork?
Do you believe that you can tie a beautiful bow on a fork? No? Then let's learn, we suggest trying out two options for making such a decoration.
Option No1
Let's try to solve the following equation: Ribbon + Fork = Original bow. To solve, you need to do the following:
- Cut a narrow ribbon of the desired size. For ease of use, it should be at least 18 cm.
- Conditionally divide it into long and short sides. The short side will not be used.
- Pass the long part between the 2-3 teeth of the fork you are using.
- And bring its end up between these same teeth.
- After these steps you should get a small loop. Don't tighten it yet.
- Thread the remainder of the long end through the loop inward again.
- Pull this end out and tighten the knot.
- Trim the long ends as needed and singe them with matches or a lighter.
This cute decor is ideal for small boxes with jewelry and watches. By the way, you can also do it yourself. How? Read the article: “How to make a box out of paper.”
Option No2
To get a beautiful bow in the form of a lush flower, you need to use two different ribbons:
- thin;
- wide nylon.
Execution steps:
- Insert a narrow ribbon transversely into the center of the fork. You will need it almost at the end of the work.
- Use a wide piece of nylon to braid the teeth of the fork, as shown in the photo below.
- Use a thin ribbon to tighten the bindings and tie them.
- Remove the workpiece and straighten it.
- Scorch the edges with fire.
The decoration is delicate. It will ideally complement any souvenir intended for the fair half of humanity.
Video lesson: how to make a ribbon bow on a fork
Decoration options for car handles
Accessories on the handles can be a complement to the main composition of car decorations or act as an independent bright accent.
Various door design options are possible.
Bows and boutonnieres
These can be simply bows in the classical sense, or complemented with appliqués, beads and other accessories. Mini copies of a large bow decorated on the hood or trunk will look impressive on the handles. If you decorate the bow with flowers, you will get a boutonniere for the car handles.
Ribbons
Ribbons blowing in the wind, selected in accordance with the main wedding style, can also be an excellent decoration. Everything ingenious is simple! Ribbons, like bows, can be interestingly decorated or even turned into garlands.
This decoration is a combination of a bow and long ribbons coming from it.
Balloons
Balloons are an eternal element in decorating anything, however, they are very boring and not very practical. Balls can burst in the cold and from any unexpected mechanical impact. To make a truly beautiful ensemble for a wedding car out of balloons, you need a highly professional approach.
Pompoms
Pom-poms are a great alternative to balloons; they are just as bright and voluminous, but they don’t burst or fly away! They can be made from paper, thread or fabric. Paper pom poms are the cheapest option, however, you need to be careful with them as they will not survive the rain.
Flower arrangements
Flowers are perhaps one of the most beautiful and trendy options for decorating a car. On door handles there can be either single, but bright and lush flowers, or whole bouquets. Artificial flowers are often used. Floral masterpieces made from fresh flowers are worthy of the highest praise, but they are short-lived and may not survive until the end of the wedding events; they need to be replaced by something more universal.
Pendants from various themed items
You can hang beautiful pendants in the form of hearts, doves or any other wedding symbols on the doors.
Of the variety of jewelry options, most are not particularly difficult to make with your own hands, so all that remains is to make your choice and watch a suitable master class.
Photo ideas for decorating gifts with bows
Diagonally
You can tie the packaging with ribbon diagonally. This strapping option is suitable for square and rectangular packages with high walls.
Algorithm of actions:
- Throw the ribbon over the top left corner of the box.
- On the left side, leave a free hanging edge 15 cm long.
- The free part of the tape should be left at the opposite corner of the box.
- Transfer the ribbon from the left side to the upper right corner of the box.
- Place the remaining edge behind the top right corner of the box and bring it to the bottom right corner. To prevent the tape from slipping, you need to hold it with your hand.
- Place tape around the bottom corner of the package on the right side. Pass it under the bottom corner of the package, on the left side.
- The resulting loops should fit well around the corners of the box.
- Pull the tape to the top corner on the left side.
How to tie a box with ribbon diagonally
- Pull the edges of the tape to the middle of the upper corner of the package, on the left side. Trim the ends so that they are the same length.
- Cross the ends and tie them into a knot. The left tip needs to be thrown over the right one, and then passed under it. Pull the ribbons in different directions.
- Tie a classic bow.
- Trim off excess tape.
For beauty, you can cut off the corners of the ends at an angle using curly scissors.
How to beautifully give symbolic gifts?
When you plan to give symbolic gifts, you need to think about how to do it beautifully. Whatever you come up with to give the opanent, it must be presented in an original way, which means making an original packaging. This is what we will do.
- If people are creative, they will appreciate a gift with this design.
- If you give a bottle of strong drink, make clothes out of ribbons for her. Here are some ideas.
- When decorating a box of chocolates, a ribbon decoration might look like this.
Bright ideas
If the wedding is far from the traditional genre, then you can decorate the car with brighter materials. For example, make a decoration from artificial flowers. To do this, you need to take plastic daisies, detach them from the stems and attach them to the machine. This is not difficult to do; the buds are easily attached to tape or tape. If on your wedding day you offer to help guests decorate their car beautifully, you can use real flowers instead of synthetic ones. A car decorated not only with daisies, but also with toy butterflies will look harmonious. You will get a whole field meadow.
Master classes: how to make original gifts from ribbons for any occasion?
Going to visit friends, acquaintances, or colleagues without a significant reason, such as a birthday, housewarming or christening, involves giving a symbolic gift that you can easily make with your own hands from ribbons.
Video master class of an original flower made from rapeseed tape
Step-by-step master class on a ribbon bow tie
An unusual themed gift, can be made in the form of a bow tie. To do this, you need to prepare:
- main black satin ribbon 5 cm wide;
- organza ribbon 4 cm wide;
- narrow ribbon for ties;
- threads with a needle;
- scissors;
- candle or lighter;
- transparent glue.
The work steps are performed as follows:
- Cut 26 cm from the prepared ribbons.
- Place them one on top of the other and singe the edges.
- Fold the singed edges towards the center, as shown in the photo.
- Using a needle and thread, pull the bow together in the middle, securing the edges.
- It turns out to be such a preparation.
- Prepare a thin ribbon for ties and seams.
- Coat with glue and glue to the workpiece.
- This makes such an original gift.
Video master class on how to make an original hairpin
Step-by-step master class on a brooch-bow made from rapeseed ribbons
A souvenir in the form of a brooch-bow will be appreciated by representatives of the fair half of humanity, regardless of age. To make it you need to prepare:
- rapeseed ribbons in two contrasting colors;
- brooch pin;
- stone, large bead or other decor;
- scissors;
- needle and thread;
- a candle or lighter for scorching the edges;
- transparent glue.
Working on a brooch contains the following stages:
- Cut the ribbons and roll them as for a strict bow. Glue the edges. The blanks must be of different sizes.
- Fold the blanks into a beautiful bow (here you can improvise as you wish) and sew with a needle and thread. In our version, this is a multi-layered bow with long edges at the bottom.
- Glue the decor (pebble or bead) and a brooch pin.
Simple, original, and looks like a million. The best of jewelry that any woman will love.
Star bows on hair elastic
Elastic bands are a necessary accessory in every girl's wardrobe. All fashionistas dream of all kinds of beautiful rubber bands. And the sense of beauty and the ability to appreciate beauty is laid down in childhood. Girls learn to dress beautifully and choose the right accessories. And loving and caring mothers can help with this. You can create beautiful rubber bands for your beloved daughter with your own hands. They are easy and quick to make.
We thread a ribbon through the middle of the template. The length of the tape is 52 cm for a star diameter of 6.5 cm. For a diameter of 5.5 cm, the length of the tape is approximately 43 cm. The assembly principle is the same for both diameters. I show the example of 6.5 cm.
The tip of the lace ribbon is on one side, and we will work on the other, turn it over and begin to go around each corner in turn with the ribbon. The main thing is consistency, if you do it in a chaotic order, you won’t get the stars! The sequence is clearly reflected in the photographs. Watch and follow step by step...
When finished, stitch the middle with thread to secure it.
We do the same with the grosgrain ribbon.
The only thing is that after cutting, the ends of the grosgrain ribbon must be scorched with a lighter so that they do not unravel; a convenient way to scorch the ends is to fold the star blank in half.
From lace we also make a blank star 5.5 cm in diameter. We sew a suitable center to it. We sewed the middle to 5.5, and placed a rep star with a diameter of 6.5 at the bottom.
Next, we place and sew lace 6.5 in diameter under the bottom. We should have lace with a diameter of 5.5 cm at the very top, a grosgrain ribbon with a diameter of 6.5 cm in the middle, and lace with a diameter of 6.5 cm at the very bottom. Then we sew on the elastic and glue it with a strip of tape.
Now all our rubber bands are ready.
Using the same principle, you can assemble bows from a narrow organza ribbon. Only these bows I placed in loops on top and made them more magnificent from 4 layers.