Today, almost everything can be purchased ready-made. However, there are still people who are interested in the time-tested experience of their grandfathers. So I decided to find out for myself whether it is possible to make sealant with my own hands at home. After all, there were times when the counters were not bursting with a variety of building materials. And tightness has always been necessary. This is what my search led to.
Source glotr.uz
Materials for making molds
At the very beginning, you need to understand what you can make molds from yourself. The most popular material is silicone-based sealant.
It has many advantages - these are:
- Reusable;
- Sold at any hardware store;
- The shape is clear;
- Dries quickly.
Some needlewomen do not make the mold from pure sealant, but dilute it with starch, the proportion is 1:1. Since some types of silicone are sticky and difficult to work with. The mixture needs to be mixed well, you should get a thick consistency, and then start making the product.
You can also make molds from polymer clay. This material is easy to use, ideal for beginner craftswomen.
Its consistency is plastic and viscous, and takes the shape of any object well. Dries quickly and can be used repeatedly.
Silicone groups and application
Silicone products are widely used in everyday life - as a sealant, sealant, and fixing material. Due to its moisture resistance, silicone is popular for finishing tile seams, joints and crevices. Housewives use silicone molds for cooking, baking mats, and are fond of making crafts from silicone.
Homemade silicone mold
To understand how to make silicone yourself, let’s delve a little deeper into the intricacies of the composition. Silicone is a polymer substance based on silicon and oxygen molecules.
There are 3 main groups of silicones:
- liquids – lubricants, oils, shock absorption liquids;
- elastomers - sealant, rubber, rubber;
- resins - in combination with other polymers (silicone/alkyds, silicone/polyesters) are used in compositions for applying waterproof coatings.
They have an impressive list of advantages:
- no toxicity;
- the ability not to lose properties when exposed to high and low temperatures;
- lack of reactions upon contact with chemicals;
- non-flammability.
Sealant molds
Silicone products are not difficult to make, the main thing is to follow the instructions on how to make molds correctly.
For work you will need the following materials:
- A sheet of A4 paper;
- Glycerol;
- Cling film;
- Scissors;
- Solvent;
- Item for imprint;
- Dishes for the mixture;
- Silicone sealant.
Operating procedure:
- On paper you need to trace the outline of the object on which the mold will be made.
- Then cling film is applied to the image.
- Place 100 ml of silicone sealant in a glass container and add 10 drops of glycerin.
- The components need to be mixed, and then pour 3 ml of white spirit into the bottom.
- Using a wooden or metal stick, mix the mixture well until you get a homogeneous mass.
- The object from which the mold is made must be lubricated with oil.
- This is necessary so that you can later separate it from the product.
- The resulting mixture must be poured out and wait for the material to dry.
- Drying time varies from 2 to 4 days, it depends on the silicone itself.
When the product is ready, you can separate the item with a needle if it is small in size.
The appearance of the form is corrected with scissors, as there is always excess material left.
In the photo of beautiful molds that you made yourself, you can see that they are original and remarkable in appearance.
Recipes from the past
One of the options is called “Mendeleev putty”, which especially attracted my attention. It is believed that the author of the recipe is the great scientist himself. There are two options here. The basic composition of one serving includes:
- rosin – 100 grams;
- wax – 25 gr.;
- iron oxide – 40 g.
The fourth ingredient can be drying oil in an amount of 1-2 ml. Or it is replaced with a double portion of flaxseed oil. But then the dose of oxidized metal is reduced to 35 grams.
Prepare the sealant in melted wax. It is important to prepare a clean melt without sediment or foam. After adding rosin, the mass is heated to 150-200 degrees Celsius. A sign that such a composition is ready is the absence of a distinctive odor characteristic of turpentine. Next you need to fill in the hot metal and pour in the plasticizer. By the way, its volume can be doubled to increase plasticity.
Source ebayimg.com
The prepared mass is packaged in metal forms and left to harden. When you need to use the putty for its intended purpose, part of the workpiece is melted. A good result comes out. This product is suitable for gluing glass, metal or wooden objects, and sealing joints.
As far as I remember, my grandfather had a simpler method. He made decoy bands for spinning rods. Based on my memories, I found this recipe:
- liquid glass – 1 part;
- ethyl alcohol – 1 part;
- children's gouache - a few drops are enough;
- sand – cleaned and washed to remove dirt and dust;
- Potato starch is a thickener.
First, the liquids are mixed, then the dye, filler and hardener are added. The mass thickens quickly, so the blanks should be at hand and lubricated with Vaseline (that’s what my grandfather did). Then he applied the viscous mixture to the template and left it for a day under a canopy outside.
Source: thegadgetflow.com
There is another simple option: glycerin and gelatin in equal proportions. It is enough to mix them and heat them on steam without boiling to get a quick-hardening sealant. But he is afraid of overheating. But after hardening, it can be revived in warmth and used again.
Precautions when working with silicone
Silicone sealant is not toxic, but when components are added, especially solvent, the mixture emits harmful fumes. They are not safe for humans, so all work is done with gloves.
Experienced needlewomen recommend pouring the mold on the balcony or with an open window so that the fumes quickly evaporate.
Sealant for PVC windows for external use. Peculiarities
Window sealant is a plastic, self-hardening mixture. The main component of the composition is a special polymer that interacts with air and tightly seals cracks and cracks.
When installing metal-plastic windows, white sealant is most often used. It is not visible at the junction of structural elements, which gives the light opening a finished look.
The use of plastic material allows us to solve the following problems:
- Window noise and waterproofing.
- Protection against temperature changes.
- Aesthetic design of PVC elements.
Sealant for windows of any type has good adhesion to all types of building materials and does not deteriorate under atmospheric influence for a long time.
Window sealant is a paste-like mixture. It is plastic and contains various components. An important feature of such compositions is their ability to harden after application to the surface. In this way, a special layer is formed that is moisture-resistant and airtight.
Window sealant is a plastic mass containing polymers. After application to the surface, the mass gradually hardens. The result is a layer that acts as a barrier to the penetration of air and moisture. Applying sealant allows you to get rid of drafts, increase the tightness of the structure and its ability to retain heat.
Window putties are produced in special containers that differ in volume. The compositions of various sealants differ significantly, but one component remains unchanged - the solvent. When applied to a work surface, the material begins to harden quickly.
Polymer clay molds
Making molds with your own hands from polymer clay is a real pleasure. The material is able to convey all the small details of an object, since its consistency allows the relief of the product to be fully reflected.
If it does not have sufficient plasticity, then you need to lubricate your hands with rich cream and knead the clay. Then it will acquire the viscosity required for work.
For work you will need the following materials:
- Needle;
- Baking tray;
- Rolling pin;
- Stationery knife;
- Ceramic tile or plate.
The clay must be kneaded well and then placed on a plate. The selected item must be pressed into the material so that the relief is imprinted. At the end, you can walk over the product with a rolling pin.
Using a needle, the object is separated from the mold, and a stationery knife allows you to remove all excess material. When this procedure is completed, the clay can be sent to the oven.
The baking temperature and time depend on the manufacturer; all data is available on the packaging.
The procedure is not complicated, the main thing is to do everything gradually and carefully. If difficulties arise, you can watch a master class on how to make molds with your own hands.
Making silicone molds
Silicone molds are presented in stores in a large assortment, and yet it is not always possible to choose the appropriate option. Many craftsmen prefer to prepare molds themselves in order to reduce costs and get the product they really need. You can create forms in different ways, including using silicone sealant.
Materials and tools
To make molds, you need to prepare the following devices and consumables:
- catalyst - 2.5 mg (white spirit solvent is suitable),
- good quality silicone sealant - 100 ml,
- acrylic paint - the required amount,
- glycerin - 10 drops,
- a plastic cup,
- spoon and pipette,
- container,
- sand,
- blank for mold,
- vegetable oil or soap,
- brush.
Mixing ingredients
First you need to combine all the liquid components together. Place sealant in a plastic cup, add glycerin and paint using a pipette. Mix the mixture well and add white spirit. Then mix the composition until it becomes homogeneous.
Mold casting
After combining all these components, a composition is obtained that is well suited for casting any shape. Adding a solvent allows you to reduce the rate of silicone hardening and have time to perform further necessary actions with it.
The order of subsequent work is as follows:
- take any container or other container without holes,
- place in a container a model of the future shape, which was previously sculpted from plaster, polymer clay, plasticine or other available means (usually they paste over a suitable product with such materials, then carefully remove the convex master model),
- fill the workpiece with sand to accurately calculate the amount of silicone solution required,
- pour sand, lubricate the master model with oil or soap, secure it in a container,
- apply silicone to the mold, carefully working out the smallest bends of the relief, let the material dry,
- after 5-10 minutes, fill in the remaining silicone,
- after 8-10 hours, detach the finished mold from the master model.
Using sealant - second method
There is another way to make molds from silicone, however, with its help they are less elegant, and small details are not always clearly visible. In its pure form, the sealant is quite sticky, so you need to add potato or corn starch to it. The proportions must be chosen so that the end result is a thick “dough”. The sealant should be placed in a disposable glass, adding starch little by little and preparing the mass.
After kneading the dough, you need to take a master model, grease it with cream or oil, then stick it with silicone. Leave the workpiece for a day, then detach it from the base. Another option is to press the master model into the dough ball, carefully align the edges, and after a couple of minutes remove the product.
An interesting way to create mold
This method of making molds is rarely used, but some needlewomen use only this option.
- You will need silicone sealant and potato starch, which are mixed.
- You need to work in rubber or medical gloves.
- The two components are laid out in a plastic and glass container.
- They need to be mixed well with a stick until you get a mass that resembles the consistency of dough.
- The resulting mass must be divided into two parts. One should be larger than the other.
- A larger ball needs to be rolled out with a rolling pin so that the thickness is half a centimeter.
- An object for imprinting is placed on top, which has a clear relief.
- After this it is covered with the remaining mass. It turns out to be a kind of pie.
The form should dry within 2 days, and then you can separate the form from the print object.
Preparation of potting mixture
To begin, prepare a mixture of approximately equal amounts of gelatin and glycerin. It is most convenient to purchase gelatin in 20 g bags, and glycerin in 25 ml bottles - in this case, the components can be mixed without weighing. The mixture is then heated. It is best to do this in a water bath so that the mass becomes uniform and does not burn.
There is also a “lazy” way of heating - in the microwave. The mixture is heated at 10-second intervals, periodically adding a little glycerin (approximately 30% of the original amount). The fact is that with this type of heating the mass turns out to be too thick and does not mix well. The finished mixture can be placed in any jar and stored, and after adding glycerin, melt it again.
A simple version of sculpting petals
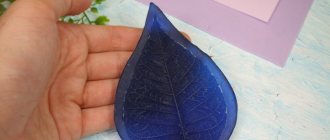
Craftswomen always need petals in large quantities. To simplify this process a little, you can make a special mold.
- According to the instructions, polymer clay is prepared, then it is divided into several small parts.
- A complex figure is created from the mass, the lower part thickens, it should look like a drop.
- And at the top you need to extend a small leg. The clay is then pressed firmly against the surface to make the workpiece flat.
- Using a toothpick, draw longitudinal stripes. They can be of different lengths, interrupted and twisted.
- Afterwards, you can send the product to the oven to dry completely.
With the help of such products you can create beautiful bouquets of petals.
Creating shapes is a fun and rewarding process. A person independently makes unique models.
When it is difficult to come up with a figure, you can look at photographs of other needlewomen and choose some of their ideas on how to make molds. They allow any fantasies to creep into life and create real masterpieces.
Do-it-yourself sealant for outdoor work
As a rule, this is a putty that firmly fixes the glass in the frame. It is prepared using the methods described below.
Linseed oil and construction chalk
In addition to fixing glass, this mixture can even partially restore wooden structures, seal large cracks and small corner chips. To prepare, you will need linseed oil (ordinary one used in the kitchen will do) and chalk.
Cooking sequence:
- First, grind the chalk. The most convenient way is to wrap a piece of chalk in a thick material and tap it with a heavy, hard object.
- The resulting chalk flour is mixed with linseed oil in a ratio of 4 to 1 (4 parts dry powder and 1 part liquid).
- The result should be a mixture similar in consistency to dough. Check readiness by rolling the putty into a small ball - if it blurs, add more chalk powder.
- The mastic will have a yellowish tint, which is good for varnished wood. If desired, you can change the color by adding dye.
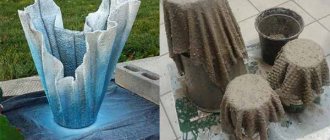
Photos of homemade molds
0
Technology and sequence of applying sealant warm seam
Let's now look at the technology itself and the sequence of work. The first step is to clean the crown seams from dust and dirt with a wet rag. Then you need to prime a small number of seams. The primer is made from sealant in a ratio of 1/10, 1 part sealant to 10 parts water. We carry out this operation with brushes, just smear it on the seams. Then we take a construction gun and insert a tube with joint sealant into it, having previously cut off the tip of the package on one side of the tube. The next step is to glue the vilatherm cord into the middle of the seam. It is glued to the sealant points. Having secured the cord, and without waiting for the sealant points to dry, we begin to squeeze the sealant out of the gun into the inter-crown space. We make about three meters of seams. After this, we take the previously ground spatulas (sharpen them with a rounded edge) and begin to carefully smooth out the joint mass. We remove the excess and wipe it with a wet rag. For the sake of fairness, I note that no one has yet succeeded in applying an even, “Warm seam” the first time.” A beginner usually learns this under the supervision of a specialist for three months; it is especially difficult to master the application of vertical seams. It remains to wish you good luck and patience in mastering the skills of insulating a wooden house with your own hands.
The role of silicone in our life
Silicone has become the main material of the 21st century.
He is present in our lives much more than we think. Silicone is used in industry. manufacturing, space and automotive industry, repair and construction (sealing), medicine (contact lenses), cosmetology (care products, injections), cooking (potholders, molds) and electronics. Properties of silicone
A group of synthetic silicone polymers has many beneficial qualities for humans. The main one is inertia. Silicone itself does not have any effect, it only forms a thin breathable film.
Silicone:
- Elastic;
- Resistant to deformation;
- Has light weight;
- Lasting;
- Does not stick (no adhesion);
- Has minimal shrinkage;
- Does not transmit heat or electricity;
- Chemically inert;
- Easy to care for;
- Does not promote bacterial growth;
- Has a long service life.
These properties of silicone make it a versatile material for a wide range of jobs.
Silicone pastes (5)
Liquid silicones
Liquid silicone is used when you need a three-dimensional and detailed shape of an object. The category of liquid silicones itself can also be divided into two types: platinum-based and tin-based silicones.
The difference between these two types is the high cost (platinum silicones are an order of magnitude more expensive), quality and durability (the lifespan of tin-based silicone is much shorter than that of platinum silicone, and it itself is used to create molds for such products where ??? ?
Pros: you will get a detailed and durable three-dimensional form with a glossy finish (provided that the copied object was also glossy), even from objects with particularly complex relief.
Disadvantages: high consumption combined with the high cost of the material calls into question the purchase of this type of silicone to create forms with a large area (for example, to create the shape of a stand/tray).
In our assortment there are two types of liquid silicone, differing only in color: “Liquid Mold” of a dense white color (can be painted with dyes for epoxy resin) and “Pure Mold” of a translucent color. There are no big differences in use (besides different mixing proportions) for these two liquid silicones:
- -10%
Liquid silicone “Liquid Mold” 500 g 15/20 Shore
Rating 5.00 out of 5
1345 rub. 1210.50 rub. Choose …
- -10%
Liquid silicone “Liquid mold” 250 g 15/20 ShoreRating 5.00 out of 5
925 rub. RUR 832.50 Choose …
- -10%
Liquid silicone “Liquid mold” 1000 g 15/20 Shore2345 rub. 2110.50 rub. Choose …
- Translucent liquid silicone “Pure Mold” 200 g
Rating 5.00 out of 5
880 rub. Add to cart
- Translucent liquid silicone “Pure Mold” 500 g
1620 rub. Add to cart
Silicone pastes
This product is used to create impressions (for example, leaves, shells, etc.), small volumetric forms (by “plastering” an object with silicone mass), and also as a formwork-rim for pouring epoxy resin into flat products (cup holders, serving plates, etc.) even trays) due to its cost-effectiveness: to create the same shape of a stand, silicone paste will take you several times less than liquid silicone.
Paste-like silicone is a good sealant, so it is also excellent for sealing large forms made of other materials: for example, for filling cracks in wooden formwork for pouring countertops.
Pros: cost-effectiveness in creating forms in combination with auxiliary materials: glossy film as a lower base, supports, etc.
Cons: semi-matte surface of the mold; locally in-detailed copying of particularly complex reliefs is possible.
In our assortment there are two types of paste-like silicone: “iGum” - yellow in color, which hardens in 25 minutes after mixing the components, and “iGum Fast” - blue-blue, hardens in 5-7 minutes:
- -15%
Rating 5.00 out of 5
Pasty silicone “iGum” 500 gr
1300 rub. 1105 rub. Add to cart
- -15%
Pasty silicone “iGum” 1000 gr2400 rub. 2040 rub. Add to cart
- -15%
Pasty silicone “iGum” 250 gr880 rub. 748 rub. Add to cart
- -15%
Grade 5.00 out of 5Pasty silicone “iGum Fast” 500 gr
1370 rub. 1164.50 rub. Add to cart
- -15%
Pasty silicone “iGum Fast” 1000 gr2370 rub. 2014.50 rub. Add to cart
How to prepare blanks
Next, we’ll look at what preparatory work is needed to create a silicone mold yourself.
To create a form, you first need to prepare the container you need for later work. Because it will make the process of removing parts simpler and more convenient.
The container must be completely sealed, since the substance may leak out of it through cracks.
Before placing the substance in a container, it is coated with a solution. If a matrix is needed for vertical disassembly, it is secured to the bottom using plasticine. Afterwards the substance is poured.
It is important to pour the material slowly until the mold is completely filled. Then close the container tightly and wait 15 minutes.
Afterwards, the form is disassembled, and the substance should no longer stick to your hands. Thus, we are preparing to create a silicone mold.
Using sealant to create molds
The easiest way to make a mold is to use a silicone-based sealant. Many are not inclined to this option, but sometimes it is still used to create forms.
The advantage is the availability of this material. The disadvantages include a fairly rapid loss of shape, inconvenience during the application of the composition, the duration of application and hardening.
The form is made of sealant and takes several days to complete. To simplify the work with the material, potato starch is added to it. The mixture turns out like dough and it is easier to make the desired shape from it.