DIY garden crafts can bring you great pleasure. Choose the figure that best suits your character and the design of your garden. Let's try to make garden figurines from cement with our own hands. The process, surprisingly, is not as complicated as it seems. But the result is truly surprising!
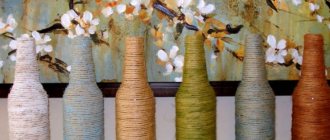
See what beautiful flower containers you can make from cement mortar and an old rag. This is truly crafts made from scrap materials!
Rules for purchasing gypsum
Beginning craftsmen often wonder: where to buy plaster for crafts? There are several options:
- Pharmacy.
- Hardware store.
- Construction goods store.
- Decorative art supply stores.
When purchasing a base powder, you should pay attention to the tightness of the packaging (after all, violating the integrity of the package will lead to the powder getting wet) and the expiration date.
After the shelf life expires or the rules for storing gypsum are violated, the material loses its basic properties, which affects the quality of the crafts.
Basics of working with plaster
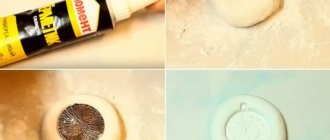
On store shelves, gypsum is presented in the form of a dry powder. Before you start, you should learn how to properly dilute plaster for crafts:
- First of all, you should prepare an old sealed container of sufficient volume.
- It is necessary to pour the proper amount of dry powder into the container.
- Water is added to the center of the gypsum mound.
- Water is poured in portions, alternating this process with stirring the solution.
For a high-quality base for creating crafts, it is necessary to obtain a thick consistency of gypsum without large lumps.
Fruit bowl
To make it, take a large dish and cover it with cabbage leaves. You can, of course, use burdocks, as shown in the photo, but where can you find them on the eve of the New Year! Then the gypsum solution must be poured into the prepared base.
A fairly deep saucer should be placed in the center of the dish filled with plaster, pressing it down with some kind of weight.
After the plaster has dried and the cabbage leaves are removed from it, you will find that the walls of your homemade product have a beautiful three-dimensional plant structure.
A snow-white container made in this way will look very good in combination with bright fruits.
Additional materials for work
To create figures from plaster, the master will need special forms:
We recommend reading:
- Crafts from plasticine: the best master class for children at school or kindergarten. 90 photos of the best ideas for creating plasticine figures
Felt crafts - the best patterns and templates. Step-by-step instructions and master class for beginners (130 photo ideas)
- DIY crafts from egg trays - the best step-by-step master class, with description. TOP 100 photos of original ideas for crafts
- Silicone molds.
- Homemade frames made of wood or metal.
- Natural materials: large shells, boulders or even unusually shaped leaves.
Also during the work you may need decorating materials: paint, acrylic varnish, brushes, beads, rhinestones. Photos of finished plaster crafts will help you choose a model to work with.
Working with plaster should be carried out in compliance with safety precautions: when diluting the powder, be sure to use a mask and goggles, and when creating figures, wear gloves.
What is used as a form?
To make plaster castings, stores offer molds from various materials: metal, wood, plastic and silicone.
Silicone is preferred. It is convenient to use because it does not require lubrication before pouring the gypsum solution and, due to its elasticity, can be easily removed from the finished casting without damaging it. You can make a silicone mold yourself without much difficulty.
Step-by-step making of crafts
To make plaster crafts with your own hands correctly and without errors, you can use educational video tutorials.
On various web resources on landscape design (garden figurines) and practical creativity (interior souvenirs) you can find a large assortment of models for the master’s work.
Step-by-step master classes on plaster crafts contain the following steps:
- Preparing the form.
- Dilution of gypsum.
- Filling the mold with gypsum mortar.
- Drying the product.
We recommend reading:
- DIY crafts from Kinder surprise eggs - 125 photos of exclusive options with step-by-step instructions, master class and video
Crafts made from twine - an overview of original design solutions. More than 100 photos of new products + step-by-step instructions for creating crafts with your own hands
DIY crafts from candy wrappers: 150 photos of the best ideas from craftswomen. Simple instructions, master class, diagrams and video tutorials on creating crafts from candy wrappers
The final stage is decorating the finished craft. For decorative finishing, acrylic paints and clear varnish are used.
Several layers of paint and varnish are applied to the finished, well-dried product. This condition must be especially observed when making garden figurines, which are supposed to be installed outdoors.
Paint and varnish provide additional protection from moisture, dirt and mechanical damage.
This scheme is universal, regardless of the chosen model: plaster crafts for kindergarten, New Year's toys or souvenir figurines for home decoration.
Master class “Do-it-yourself paper origami”
To make an origami paper water lily you only need two multi-colored sheets of paper . The paper must be colored. First you will need 1 pink sheet of paper and 1 green sheet of paper. You will also need glue to secure the pieces of paper. The paper should be two-layer and not very thick.
First, the diagonals . To do this, you need to fold a sheet of paper in half twice. Then each corner of the paper sheet needs to be folded towards the center - you get a small square. The corners of the resulting square must be folded again. The third time you need to repeat the same steps. Then the resulting square is turned face down, and again the corners of the paper square are folded.
After this, the corners of the square are bent a little again, but this time not towards the center. Thinner paper makes it easier to fold the paper than thick paper. The paper craft must be turned over to the front side again. Then you need to start opening the petals of the water lily. Everything must be done in a checkerboard pattern: first the first row is folded, then the second and finally the third row.
You can complement the water lily with green petals. To do this, just glue two paper jugs of different colors together. Unlike a real water lily, a paper lily will not wither and will always delight you with its appearance.
How to make a boat out of paper with your own hands How to make a bouquet of whole fruits with your own hands step by step Anonymous mask with your own hands Clothes from rubber bands for dolls, how to weave parts
Crafts for the garden plot
Plaster figures are great for garden decoration: you can place a beautiful craft on a children's playground, on a summer terrace or along a driveway.
If the craftsman desires, you can find molds of any size, and for the manufacture of absolutely any product: full-length animal figures, turrets for a toy castle, and the castle itself (for a playground).
We recommend reading:
Crafts flowers - 125 photos of the best ideas from craftswomen. Instructions on how to make it yourself from A to Z. Simple and complex options for crafts + video tutorial- DIY crafts: TOP-200 photos of the best ideas. Schemes, master classes, modern design, new products, instructions with descriptions
Crafts from nuts - 120 photos of the best ideas for beautiful crafts. Original design options + step-by-step instructions for beginners
Plaster shoe for flowers
To work, the craftsman needs to find a cut-out boot shape (to get two halves of a boot for a hollow figure). After diluting the plaster, the mold is greased from the inside with vegetable oil and the solution is carefully poured inside.
After the material has hardened, the mold is removed and the product is left to dry in a warm place with good air circulation. After drying, the blanks can be glued together to obtain a solid or hollow figure.
The craft is decorated at the request of the craftsman or the owner of the site. Holes are made along the bottom surface to drain moisture, and a drainage layer and fertile soil are poured inside.
Finishing touch
It looks like the bells are ready. But don’t rush to hang them on the wall, because for now they are just upside-down bowls with no ropes. In order for no one to doubt that these are bells, they need tongues!
Take wooden blocks so that they protrude slightly from the bottom edge of the product, and then glue them to the inner center using a glue gun. When the glue is completely dry, the bells are ready.
All that remains is to choose the ideal place for them, drive nails into the wall or make hooks, and then hang the craft. It's better if the bells hang at different lengths, but you can arrange them to your liking.
Found a violation? Report content
Garden figurine for the playground
To decorate children's playgrounds you will need crafts in the form of animals or fairy-tale characters. For example, in the form of three little pigs or a family of hedgehogs.
Bright acrylic paints will become not only a decorative, but also a protective coating. The coating layer will prevent moisture and dirt from entering, and will also significantly extend the service life of the product.
Figure options
You can create anything as long as you have enough imagination. For example, fairy tale characters . Near the house you can place gnomes who will guard the country house. These could be firebirds. If you have a pond, then funny frogs will fit perfectly into the space around it. Some corner of the site can be set aside as a mushroom clearing. You can also place figurines depicting animals in the garden. If you have a good imagination, you can come up with a whole fairy-tale town.
Gallery: DIY garden figures (25 photos)
Crafts for home
You can also make crafts from plaster to decorate your home. Miniature figurines on a book shelf, sets of fairy-tale or cartoon characters for children will complement the interior of the living room.
For lovers of indoor flowers, you can make original pots for small sedums, decorative dracaenas or a bright Christmas star.
Thread the ropes through the loops
In order to hang the bells, you need to thread pre-prepared pieces of rope or twine into the clay loops. Remember that they also perform a decorative function, which means they must match the resulting bells in color and style.
We took a thin rope 150 cm long, threaded it through the loop, folded it exactly in half, and tied a knot at a short distance. We then made a few more knots to create additional decorative texture.
Crafts for the New Year
New Year's crafts made from plaster will help you decorate your home in an interesting way on the eve of the holiday. These can be beautiful stars, balls or snow houses, painted in a variety of shades.
Working together with a child will please everyone: both children and parents. And the bright colors and shine of the New Year's toy will lift your spirits.
Photos of plaster crafts
Did you like the article?
3+