Today we will tell you how to make blacksmith pliers with your own hands.
Hello. Not a single blacksmith can do without tongs, as well as without an anvil, a forge with a burner, and other improvised tools that he makes himself with his own hands.
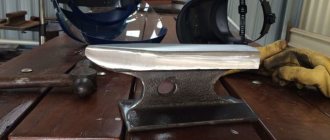
There are different types of pliers, but in this article I will tell you about the most convenient ones. This is, of course, a subjective opinion about convenience, but why do I think so: the pliers are quite large and will be convenient for clamping large and small forgings; they have round lips for easy gripping of reinforcement, as well as sufficient width to grab flat parts. This type of pliers is just right for a garage.
Special special We don’t need any tools, but we still need a little preparation!
Homemade blacksmith tongs from rebar
In the process of forging various metal products, a blacksmith has to use tongs with different jaws. The minimum set should include 4–6 varieties (with square, round, flat, shaped jaws, etc.).
In the store, a blacksmith kit is not cheap, so if you have fittings in stock, you can make the tongs yourself. To do this, you will need ordinary corrugated reinforcement with a diameter of 10–12 mm. It makes no sense to take thicker reinforcement.
Main stages of work
As you already understood, the handles of the pliers will be made from the reinforcement - to give them the desired shape, we clamp the reinforcement in a vice, heat it with a gas cutter or, for example, a welding electrode, and then bend it.
We weld two pieces of a plate approximately 5–6 mm thick, cut in the shape of a rhombus, into the reinforcement, in which a through hole for a bolted connection must first be drilled (or possibly after welding).
This is how the base for the tool is made. The jaws of blacksmith pliers can be made from scrap materials, depending on the desired shape. For example, jaws for fixing round and square rods can be made from pieces of angle iron.
Alternative Tool Options
To convert it into a blacksmith's tool, you can take nail pullers or old pliers.
In the first option, they need to be remade, since the grip of this tool is too curved for comfortable clamping of nail heads.
To do this, you need to disassemble them into two separate parts and, by heating the ends of the clamp, disperse it into a flat shape. You can also simply weld jaws made from a strip of metal to the clamp.
For normal and comfortable operation, you will need to lengthen the handles. This can be done by welding pieces of pipes or fittings onto the existing handles.
DIY blacksmith pliers
- BonnFactory February 28, 2017
- Artistic forging: do-it-yourself forged productstools
Today we will tell you how to make blacksmith pliers with your own hands.
Hello. Not a single blacksmith can do without tongs, as well as without an anvil, a forge with a burner, and other improvised tools that he makes himself with his own hands.
There are different types of pliers, but in this article I will tell you about the most convenient ones. This is, of course, a subjective opinion about convenience, but why do I think so: the pliers are quite large and will be convenient for clamping large and small forgings; they have round lips for easy gripping of reinforcement, as well as sufficient width to grab flat parts. This type of pliers is just right for a garage.
Special special We don’t need any tools, but we still need a little preparation!
How to make blacksmith's tongs
Pliers are an extension of the craftsman's hand; they should provide reliable grip and hold of the workpiece, be a little springy, and the jaws should adhere to the part.
Blacksmith pliers are classified as auxiliary tools. Their purpose is to manipulate heated workpieces during operation. Any master should have several types of such devices that are convenient to work with.
How to make such a tool yourself and what you need to know about blacksmith pliers is further in our article.
Materials required for making blacksmith tongs:
- round fittings with a diameter of 12 mm. approximately 50 cm long, 2 pcs;
- bolt for tie M8.
I’ll immediately explain why such materials are used. There is no point in taking reinforcement of a smaller diameter; it will be too soft and impractical. You can take a larger diameter, it will be even better, but in this case you will need to put more effort into forging and heating the workpiece as a whole. So 12 is quite suitable for work in the garage. The length is also for convenience - longer - it will be difficult to hold the forging with pliers; In short, you can get burned while working. And it’s better to take a little more, you can always cut it off! The M8 bolt was chosen according to the same principle: less means it is unreliable, more means the pliers will have thin walls at the drilling site.
In general, all the work is demonstrated on video, so I will only briefly describe the process in words and frames from the video below.
Working on the lips of ticks.
Since we make universal large pliers, we cut the reinforcement by 100 millimeters. If it is difficult for you to estimate the size by eye, then you can use a ruler. I made a convenient version of it for forging in the video about the anvil.
Having turned the workpiece 90 degrees, we begin to flatten the connecting point of the two halves of the pliers. To do this, we rest the reinforcement against the edge of the anvil and forge it from the edge of the previously flattened lips.
In order not to have too much trouble bending the pliers on the anvil (my stump is not very stable), I simply carried out this operation in a vice. It turned out to be quite convenient and fast.
Now our pliers have acquired a finished look and someone may stop there, but I decided to improve the pressing lips of the pliers by welding a couple of pieces of wire to the already forged pliers.
All that remains is to drill a hole and fasten the pliers with a bolt. Since it is unlikely that this connection will need to be unscrewed, I scalded the nut. It turned out to be such a half-rivet.
And now you can see everything described clearly in the video.
Author of the article “DIY blacksmith pliers” Bonn Factory
Source
Other blacksmith tools for forging, application, photo, homemade
Pliers, sometimes called tongs, are two castor beans connected by a rivet , which acts as an axis. The castor bean has a main, working part, which is called a sponge, a middle part with a hole for the rivet axle, and the longest part - a handle.
Forging longitudinal-transverse tongs. Photo ForgingPRO
Tools based on the shape of the jaws are divided into special, longitudinal and transverse . They serve the blacksmith as an extension of his hand, and therefore they must be comfortable and light, the handles must be springy, and the jaws must tightly grip the forging.
For more reliable fixation of the forging during operation, the handles of the pliers are tightened with a ring called a spandrel. In addition, in order for the tool to hold the forging tightly, the jaws must first be heated in the forge, clamp the forging with them, and then press the jaws with a handbrake.
In addition to tongs for hot forging of metal, other tools are used to carry out certain processing operations:
- sledgehammers and hammer, anvil - for deforming hot workpieces by striking;
Forging hammer with offset center. Photo ForgingPRO
- vice – reliable fastening of workpieces for bending, cutting, etc.;
Forge vice. Photo ForgingPRO
- manual and stand forks - for bending metal;
Hand forged fork. Photo ForgingPRO
Blacksmith chisel. Photo ForgingPRO
- nail shop - for making heads for bolts, nails, rivets and other parts of a similar type.
Manual blacksmith nailer. Photo ForgingPRO
The listed tools and devices are also quite easy to make with your own hands.
Dimensions and materials of forging tongs
This device, which can be used to hold a workpiece during blacksmith work, is quite simple to implement.
Ticks consist of two separate elements - castor beans, which are movably fastened together. A rivet or bolt with a nut is used as an axis between them. The main thing is that such a connection should not create obstacles in work.
Each castor bean consists of three parts: a sponge, a middle part with a hole for the connection and a handle of the required length. Depending on the shape and purpose of the jaws, pliers are longitudinal, transverse and special.
Pliers are, in fact, an extension of the craftsman’s hand, so they must provide reliable grip and hold of the workpiece, be a little springy, and the jaws fit tightly to the part.
Often, part of the holder is heated to ensure a secure grip. Therefore, the sponges must be made of a fairly heat-resistant material.
The length of the pliers is dictated by their purpose; a small tool is suitable for holding a small forging, but massive and large workpieces will have to be held with both hands, which means the tool must be appropriate.
In general, the length of blacksmith pliers can vary from 300 to 1500 millimeters, depending on the purpose of the work.
Different types of pliers for different workpieces
Both homemade and purchased versions of the tool should have these properties and parameters.
The material for the manufacture of forging tongs can be steel grades 15, 20, 25. They have the necessary qualities for the manufacture of such a tool. Also, some experts recommend using reinforcing steel grades. The material has excellent properties: resistance to deformation, ductility and good heat-resistant properties. In addition, reinforcement is a common rolled metal product and has a variety of cross-sections. This is convenient for making pliers of various sizes, from the smallest to a fairly large two-handed tool.
The main thing is that the reinforcement is not susceptible to hardening. After all, constant heating and cooling during operation will lead to the forging tongs becoming fragile and breaking very quickly.
Do-it-yourself blacksmith pliers are made as follows.
Manufacturing of forging holders
In a workshop, a blacksmith may have up to two dozen or more types of mites. Because you have to work with workpieces of different cross-sections and sizes. The algorithm for producing a forging device is as follows.
- To make pliers, take a piece of 25 mm reinforcement and heat it to forging temperature.
- At a distance of approximately 350 millimeters from the edge, the circular section is pulled onto a square with sides of 20 mm.
- Having retreated part of the square by 50 mm, press it into the depth of the workpiece 8-10 millimeters.
- The next step is to cut the remaining 300 mm square into a strip, which, in turn, is formed into the handle of the future tool. Their length is about 500 mm.
- Now the finished piece for the pliers is cut off from the rest of the piece of reinforcement.
- After heating, the end of the remaining square is pressed into sponges of the desired shape.
- The second half of the forging tongs is made in the same way.
- To connect them, you need to fold them together, stitch them, or better yet, drill a hole for the fastening rivet.
Step-by-step process of making castor beans from reinforcement.
The halves are connected into a single tool. To obtain the sponges of the desired shape, they are heated and forged into a mandrel.
How to make such a blacksmith tool will become clear after watching the video presented.
For the manufacture of smaller or, conversely, larger forging tongs, they take reinforcement or a workpiece of the appropriate diameter.
Design features of adjustable pliers
Since adjustable pliers are the most versatile tool, it is worth getting to know their design features in more detail. Based on the type of mechanism used, adjustable pliers are divided into two categories of tools.
The adjustable mechanism can consist of an axis fixed to the movable jaw of the tool and a groove on a stationary clamping element, which is a series of aligned circles. On the axis, so that it can be moved along the groove and thereby adjust the degree of opening of the jaws, a sector is specially cut out. This adjustable mechanism works as follows: the axis for moving along the groove is rotated so that its bevel is parallel to the side of the cutout. Having positioned the axis in this way, the adjustable pliers are set to the required amount of jaw opening.
Pliers with grooves on the fixed part
More common are adjustable pliers, the jaw opening mechanism of which is made according to the so-called American system. On the fixed jaw of such pliers there is a number of circular grooves along which the “tide”, made on the movable handle of the tool, moves.
Circular groove pliers
To adjust the degree of opening of the pliers, you must perform the following steps:
- Remove the “tide” from its engagement with the side walls of the grooves.
- Place the mite lips as far apart as possible from each other.
- Place the tool handles in the required position and bring them together again.
Adjustable pliers equipped with a mechanism of the second type are considered more reliable and easier to use.
Many experts, when comparing adjustable plumbing pliers with conventional adjustable wrenches, emphasize that the former are easier to use and the required degree of opening of their working jaws is carried out more quickly. As a rule, adjustable pliers, equipped with adjustable mechanisms of both the first and second types, have about seven fixed positions of the clamping jaws.
Basic tools you will need to set up a forge:
Blacksmith anvil
It can be almost any one that can be found. The main thing is that the edges and working surface of the anvil are not knocked down (the edges must be smooth). When you hit a real blacksmith's anvil with a hammer, it should bounce off it, and the anvil itself should ring loudly. The anvil can be installed either on a large wooden stump or on a frame welded from a corner. The second option is more functional; in addition, it allows you to turn the anvil and install it anywhere in the yard or room without any problems. Installation on a stump, as a rule, secures the anvil in one place “forever”.
The height of installation of the anvil is determined by the level of extension of the blacksmith’s arm: so that when struck with a hammer, its surface is approximately parallel to the ground.
Advantages and disadvantages
Disadvantages of forge welding:
- Provides relatively low connection reliability.
- Low productivity , requires a lot of effort and time.
- Not suitable for production scale.
- Suitable for welding not all types of metal.
- A highly qualified master is required for a high-quality result.
Advantages of forge welding:
- Increases the cost of the product.
- It is the only way to obtain some materials (for example, Damascus steel, mokume, layered steels).
- Creates a colorful appearance of the product.
- Sometimes used for welding large workpieces .
- This type of welding is easy to master .
- Requires a minimum of special equipment.
How to build a forging workshop with your own hands
It is recommended to locate a mini forge, built with your own hands, no closer than 10 meters from residential buildings. This is explained by the increased fire hazard of traditional forging technology.
The area required for convenient and safe placement of all necessary equipment is from 15 sq.m. The height of the ceiling above the forge and anvil should be at least 2.5 m. It is best for the building to be brick and stone.
The floor must be made of non-combustible material - concrete or laid with bricks or tiles. Clay coating is allowed, regularly moistened with water. If the walls and ceiling are wooden, they should be covered with a thick layer of lime whitewash.
Products made in a forge at home
In the garage space allocated for the forge, exhaust ventilation should be installed and good lighting should be provided. The wiring must be hidden in metal pipes or sleeves.
There is another option - the forge can be placed under a canopy attached to the wall of the garage. The problem with ventilation disappears, but it will be possible to work comfortably in such a workshop only in the warm season.
What GOSTs regulate
Until 2009, forge welding was regulated by the document GOST 2601-84 “Welding of metals. Terms and definitions of basic concepts."
This version of the document defines forge welding as “furnace welding in which upsetting is accomplished by hammer blows.” GOST was put into effect on February 29, 1984. A reissue with changes was published in October 1996. The document has become invalid since 07/01/2010.
Active
Types of welding are now regulated:
- GOST R ISO 17659-2009 “Welding. Multilingual terms for welded joints.”
- GOST R ISO 857-1-2009 “Welding and related processes. Dictionary. Part 1. Metal welding processes. Terms and Definitions".
Tools and devices necessary for work
A high-quality tool in good condition will be pleasant and safe to work with. In addition, a good tool allows you to achieve high quality products.
The selection of instruments begins with percussion equipment. It includes:
- Handbrake. A small hammer weighing 500-2000 g, with a handle 35-60 cm. The handle should be made from deciduous trees and sanded smooth.
- Sledgehammer. Heavy hammer, weighing 8-16 kg. The sledgehammer’s strikers are flat; its long (up to 120 cm) handle is held with both hands and used for blows of large amplitude and weight.
- War hammer. Hammer weighing up to 10 kg, held with two hands. One striker is flat, the other is wedge-shaped, used to accelerate the workpiece along the axis.
Handbrake Sledgehammer
Pliers with long handles are designed for:
- removing the hot part from the furnace;
- holding it in the position required for forging.
The pliers must be able to hold both large and small parts, preventing them from turning under impacts. To do this, they must have elongated jaws.
Measuring tools - steel rulers, squares, measuring gauges, calipers, protractors, etc.
The forge in the garage next to the house should also have a capacity for cooling and hardening the forged products. You can use a cut metal barrel.
Pliers
How to make holes for furniture hinges
Pliers are a type of pliers that have a flat working surface. Often it is equipped with small notches. They are designed to grip and hold relatively small parts. For ease of working with parts, two such tools are sometimes used at once. They can have various shapes of working surfaces, which is why they got their name: long-nose pliers, duck-billed pliers, narrow-nose pliers. Often, pliers are equipped with cutting edges designed for cutting wire.
Combination pliers are also called pliers. Such tools include pliers equipped with a cutting edge for cutting nails and wire, and serrated grooves designed to hold tubes, nuts and other cylindrical parts.
Measuring equipment
Steel ruler
It is difficult for a master to do without measuring tools, both special blacksmith and universal ones. The latter type should first of all include a steel ruler (1000, 500 and 300 mm) to determine the linear dimensions. A tape measure or metal folding meter serve similar purposes, but are much more compact.
To more accurately measure linear internal and external dimensions. there is a caliper. Thanks to bore gauges and calipers, not only the internal and external linear values, but the diameters of forgings and blanks are determined.
Goniometers and squares
Goniometers and squares are used to measure angular values. As a rule, squares with constant angles are used. However, in some cases it is more convenient to use inclinometers, in which the angle can be adjusted.
Patterns and gauges
Special measuring forging tools include all kinds of gauges and templates made by the blacksmith specifically for specific jobs. In some cases, if you need to make a large number of identical parts, it will be more convenient to make a template with which to check the part, rather than constantly looking closely at the divisions on a caliper or ruler.
Recommendations for choosing the right tool
Forging hammers
In order for pliers or any other tool of a similar purpose to be effective in use, you should be very careful when choosing such devices. The first thing you need to decide on when choosing pliers, pliers or pliers is the technical tasks for which such tools are needed.
The main criteria when choosing a tool: length, grip size and workmanship
To ensure high strength and, accordingly, reliability and durability, high-quality clamping devices are made from tool steel. At the same time, the working jaws of such devices, which experience the greatest mechanical loads during use, are additionally subjected to hardening. To protect the metal surface of the tool from the formation and development of corrosion, a special protective composition is used.
For ease of use, the handles of high-quality models of pliers and pliers are coated with a rubber or polymer compound. This coating not only prevents the tool from slipping out of the user's hands, but also protects against electric shock.
Pliers with anti-slip handles
Adjustable dielectric pliers
Tool size is another important parameter that those who purchase pliers should pay attention to. It is necessary to take into account the characteristics of the parts and workpieces for which the tool will be used.
So, if pliers are needed for cables of small diameter, it is better to choose more compact models of such devices, and for manipulating plumbing pipes you should purchase larger clamping devices.
Tongs and scoops
Among the auxiliary tools, one can also highlight devices for caring for the forge. This is a scoop that is designed to add coal to the furnace and remove slag. There is a poker for hilling and raking coal during combustion and cleaning the fireplace from slag. It is advisable to make its working end wider for more convenient raking of coal. The lance helps clean the fireplace and break through caked-on slag.
To lay coal and remove large pieces of sintered slag from the furnace, tongs are used. Thanks to the broom, fine coal, slag and debris are removed from the table and hearth. It is made of thin steel wire with a diameter of up to 0.2 millimeters.
It is advisable to make the entire set of tools for caring for the forge yourself, as this will be excellent practice for mastering the blacksmith's craft. You need to put all your love and imagination into this business, since a tool that you make for yourself should be comfortable and also pleasing to the eye. This applies to any device in the forge. It is important to remember that the tool is the face of the forge. In ancient times they simply said, show the blacksmith’s tools, and then it will be clear whether he is a good or a bad master. The final result of the work depends on the convenience and quality of the tool.
Source
Historical perspective
Initially, as a tool, pliers were intended to remove hot metal blanks and crucibles of molten metal from forges. They were also used by blacksmiths to hold various workpieces during forging.
Archaeologists prove that the prototype of pliers - tongs, which had a rod-axis - was invented back in the Neolithic era. Back then this instrument was made from burnt wood.
The first depiction of hand pliers tools dates back to the 6th-5th centuries BC. In the Bronze Age, blacksmiths used primitive pliers as clamps. They are currently found in the burials of blacksmiths as burial goods, indicating that the deceased had a special and fairly high social status.
Since ancient times, pliers have been two castor beans connected by a rivet that acts as an axis. This tool has been evidence of specialized blacksmithing skills since ancient times. Together with the anvil and hammer, pliers were an attribute of numerous ancient Greek and Roman blacksmith gods and lords of thunder (Thor, Vulcan, Hephaestus, etc.).
Much later, pliers began to be used in construction work, in plumbing activities, widely used in electrical work, etc. Depending on the specialization and principle of the device, various pliers are called side cutters, pliers, wire cutters, pliers, etc.