Home » Building a house » Do it yourself
Alexander Korovaev 05/31/2019
17377 Views
Cooking in the heat, and even in a cramped room, is not a pleasant experience. Especially if you have to do this quite often. A summer kitchen at the dacha created with your own hands is simply the ideal solution in this case. We will describe in detail the types of such buildings, their design features and construction methods.
Kinds
In order for the erected structure to fully meet the requirements of comfort and safety, the design of a summer kitchen should be thought through to the smallest detail. The use of non-standard solutions is only permissible if you already have serious experience in construction.
In order for the building to fit harmoniously into the surrounding landscape, it is better to use the same materials for its construction as for the construction of the house itself.
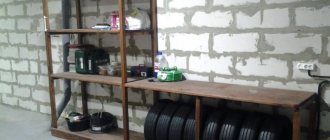
Open building with barbecue
A room intended for cooking in a summer cottage can take the form of an extension to the house or be constructed as a full-fledged separate building.
By type of design, all summer kitchens can be divided into:
- open : the simplest option is a canopy for protection from precipitation, attached to supports (pillars)
- semi-open with 2-3 walls
- closed in the form of a full-fledged building with 4 main walls, a door, windows and a roof
- combined open-closed, when some of the rooms are completely closed by walls, and one or two remain semi-open or completely open
Economical option
To build an economical version of a summer kitchen, scrap materials are often used. For example, to reduce costs they use old window frames and railway containers. It is probably more profitable to find a ready-made house that does not require modification.
An economical building is usually an open structure. There are several ways for construction:
- Creating an island that combines a stove, sink, work surfaces and places them on a single base with a country house. To protect against dampness, you can use stone, plastic, stainless steel and good design. For prepared meals, a tent is installed nearby;
- Summer kitchen located under the same roof with a veranda, terrace or gazebo;
- The use of stakes and other supports, braided with country pack greens and covered with straw;
- A building near a fence, complemented by an awning or a pitched roof;
- The use of adobe is a composition of clay, sand, straw and other available materials. Cob structures require a hot, dry area.
Choosing a location
Let's start with the fact that such a structure should not be located too far from the house. Firstly, with a strong distance, laying communications can turn into a serious problem.
Plus, if the kitchen is not equipped with a dining area, the housewife will have to carry breakfast, lunch and dinner into the house across the entire site every day.
It is better to locate the summer kitchen in the shade of trees, which will protect it from both heat and piercing winds
The ideal option is a place in the shade away from the road . It is good if the building is built on a slight elevation to ensure drainage of sewage and melt water. You should not locate the building next to a toilet, septic tank, compost pit, barn where animals are kept, an enclosure or other places that emit unpleasant odors.
If you do not want to periodically “enjoy” exhaust gases, you should not build it near a garage.
A summer kitchen in a country house can be adjacent to the house (for example, located on the site of a veranda) or built separately. It is better to attach the kitchen to the house from the north side. The walls of the main building in this case will become a reliable natural protection from the sun's rays.
The construction of a summer kitchen with a barbecue, that is, a brazier with an open flame, is allowed only at a distance from any buildings - you should retreat 5-7 m from them.
Functionality of the structure
In the case when plans are made to use the summer kitchen not only for cooking, but also for other purposes - a dining room, a guest room, a family vacation spot, then all these aspects must be taken into account. Often such structures are used as workshops, closets for household equipment, drying garden products and even a study, and this is an aspect that affects the size of the kitchen area.
Construction on a dacha, which often occupies more than six acres, is more rational to do vertically. We are talking about a project with a cellar and an attic that can be used in any way you like.
Pre-design is important because... will save your budget and avoid lengthy construction, since when building “by eye” it is problematic to calculate construction costs.
Foundation types
An expensive strip foundation will only be needed when constructing a full-fledged building made of stone or brick.
For light open or semi-open structures made of wood or foam concrete, a solid foundation is not required - it is enough to install the building on a columnar or pile-screw foundation. This kind of summer kitchen is easy and cheap to make with your own hands.
The simplest support for an open light timber structure
You can also use a concrete slab as a foundation, which will also serve as the floor of the summer kitchen . If desired, it can be finished with non-slip paving slabs in the future. Do not forget to make a slope for such a site for rainwater drainage of 1.5-2 degrees.
To build a closed structure made of timber or foam blocks, you can use a pile, slab or strip foundation . For a brick building, the foundation must be more solid, therefore, during its construction, a deeply buried strip foundation is most often used.
Conclusion
As can be seen from the brief instructions, the process of making a kitchen set requires a lot of attention and accuracy. You need to independently compile tables with detailed details and be able to use carpentry tools. Not all mistakes made can be corrected; in some cases, parts have to be completely changed. And this has an extremely negative impact on the cost of the set, not to mention the design characteristics.
Video - DIY kitchen set, drawings and diagrams. Step-by-step kitchen manufacturing technology
The kitchen set belongs to stationary furniture; in size it occupies a fairly large area of the room. Recently, very economical and efficient heated floors have been used to create a favorable microclimate, but they have a limited capacity per square meter. If the set is large, then the free space may not be enough to heat the room. Is it allowed to install systems under kitchen units, how can this be done practically? There are professional answers to these and other technical questions on the pages of our website.
Water pipes. Drain system
When drawing up a summer kitchen project, think separately about the communications lines. After all, most of them are laid at the excavation stage.
The simplest plumbing in the country
Full plumbing in a summer kitchen will not be cheap. For its installation and thermal insulation (and in cold climates this will have to be done, otherwise the pipes will simply freeze in winter) you will need about $300-500.
It is much easier to equip an electric pump to drain water for the winter or make a water supply system at an angle - then to drain it, it will be enough to open the valve. You can do it even easier by connecting a regular garden hose to the sink in the summer.
You will also need to think about the drainage system. Pipes for these purposes are laid at the stage of foundation construction. To prevent fluid stagnation, they are installed at a slight slope.
In this case, no insulation will be required - the water will flow freely from the pipes and will not freeze in them. If it is not possible to tap into the central sewer system, a septic tank will also be needed to drain wastewater. It is erected at a distance of 5 m from the building.
Disadvantages of Merging
- Smell. Aromas lingering throughout the house are perhaps the most important problem for those who decide to combine the dining room with the kitchen. It is necessary in advance, even at the stage of planning a kitchen in an ordinary rural private house, to purchase a powerful hood.
- Functionality. It's no secret that a house filled with children resembles a small island of chaos, where any room sooner or later turns into a playroom. Proper zoning of space will help solve this problem. And, of course, personal control over how household members use the original premises.
- Heating and air conditioning system. It can be solved quite easily: you need to install a sufficient number of heating radiators, plus several air conditioners, in order to feel maximum comfort in your own kitchen-dining room.
A high-quality modern hood can easily cope with unpleasant odors in the kitchen
Electricity and gas supply
To supply electricity to the summer kitchen in the house, it is better to provide a separate panel with automatic switches so that the system can be completely and easily de-energized. It is better to take machines with a GFCI circuit breaker.
Also purchase waterproof sockets with grounding and a rubberized curtain. Pay attention to the markings. The last number indicates the degree of moisture protection. For example, products with the number “3” are able to operate smoothly even in the rain. The number “5” means that the socket can withstand even a stream of water without shorting.
Select a separate RCD for the summer kitchen
Installation of gas stoves, even outside the home, is permitted only with the permission of the operating organization, taking into account existing conditions. As a rule, too many problems do not arise when arranging them in open areas.
Gas supply will cost $500-600. Please note that any installation of gas equipment is carried out only by specialists from gas companies.
If there is no gas supply, gas cylinders can be used. They are stored at a distance of 5 m from buildings and basements in special locked cabinets or outbuildings with the inscription “Caution, gas.” Such cabinets must have blinds for ventilation.
Summer gas will need to be used up before frost sets in. Winter gas is not afraid of negative temperatures.
When supplying any type of devices, you will need to lay seamless pipes with welded bends. They are connected to the stove or grill using flexible bellows tubes and gas valves. Such a room must be equipped with a hood.
Features of the design of kitchen countertops
Wooden countertops are made exclusively from solid wood and can have any shape.
They can be glued, prefabricated or panel. A solid countertop will serve as a worthy decoration for your kitchen. Therefore, when making kitchen sets from solid wood, panels or prefabricated structures are chosen as the material for the countertop.
Chipboard or veneer as a countertop is a bad option, since this material is short-lived and easily deformed, and veneer does not tolerate moisture. But the tabletop must be washed, so it will quickly begin to peel off.
The most practical option would be a wooden tabletop. This approach is beneficial: the product lasts a long time and looks attractive. It is easy to process such a countertop, it is not afraid of water, and mechanical stress (scratches) occurs extremely rarely.
Open summer kitchen
Even if you have no experience, installing a summer kitchen in the form of a canopy will not be difficult. Its construction is in many ways similar to the construction of a gazebo. The simplest structure will be a timber structure installed on a columnar foundation.
The covering can be anything - from lining, OSB boards to plaster or siding.
Summer kitchen, one of the walls of which is permanent
A very convenient structure is one that has two solid walls along which the stove, tables and shelves will be placed. The rest of the space remains open.
To protect from the sun, it can be decorated with trellises, next to which climbing plants are planted. You can separate the dining and work areas on such a site using curtains or light partitions.
Foundation for a light building
Even light open or semi-open areas should not be left unsupported. After all, loose soil will compact over time, and the building will warp.
Plus, due to uneven soil moisture during the process of swelling during freezing, the pressure on the site will be uneven, resulting in deformation of the load-bearing structures and the appearance of cracks in them.
Columnar foundation
So, let's describe how to make supports for a summer kitchen.
Even for the lightest building it is necessary to provide the simplest brick or concrete racks:
1The first stage is clearing the area and marking the site using pegs and twine.
2To lay the supports, pits with a depth of 50-60 cm are prepared. Their number depends on the size of the structure - the supports are placed at a distance of no more than a meter from each other.
3 At the bottom of the pits, a layer of sand is poured alternately, and then crushed stone, 15-20 cm each. It is better to additionally pour crushed stone with cement mortar.
4After the concrete has dried, a few days later the construction of columnar supports begins. You can use ready-made concrete blocks. When pouring them yourself, the formwork is first prepared, where the reinforcement is laid.
5Supports can also be made from bricks fastened together with cement mortar. They are laid in 5-6 rows. The last one should be above the ground.
Construction of walls and roof
When preparing the base for a summer kitchen-gazebo, thick-walled timber 100x100 mm is used. To do this, 4 interconnected bars are “placed” on metal pins, pre-filled in concrete. Columnar supports are also installed on the same pins.
To strengthen the structure, a timber frame is prepared on all its sides, which serves as the railing of the building. For flooring, ordinary floorboards or paving slabs are used.
The simplest wooden structure
The roof for a summer kitchen is made in the form of a frame made of timber (rafter system), sheathed with roofing material. The simplest roof is a pitched roof with a slope from the entrance to the building. In its gable version, inclined or hanging rafters are used.
The installation of open fires (barbecues and barbecues) in buildings with polycarbonate roofs is strictly prohibited. In this case, roofing tiles or corrugated sheets must be used as roofing material.
Tree species
A wooden kitchen set will be more durable the better it is cared for and the more durable types of wood it is made from.
- Oak serves as a kind of standard . This breed is classified as medium-dense and hard. But its resistance to moisture is unique: water and steam only make the wood stronger. In addition, the wood is impregnated with tannins, which provide unique durability to such furniture.
However, it is unlikely that you will be able to make a wooden kitchen set with your own hands, as in the photo. Oak is a very expensive tree and difficult to process. Kitchens made of oak are produced using special equipment, most often to order.
- Ash is inferior to oak in strength and durability, but has an exceptionally rich range of colors. Ash facades are decorated with carvings, as the wood is more pliable.
- Beech. This wood lends itself well to tinting. In addition, beech is highly flexible, which makes it possible to make radius facades from it. Not with your own hands, of course, since this requires special equipment.
- Birch is a soft wood, and therefore much cheaper. The mechanical strength of furniture is lower and it is quite easy to scratch or damage it. However, birch tolerates moisture well, which makes it a very suitable material. Moreover, the tree is very beautiful.
- Pine is the most affordable material for manufacturing. The breed does not tolerate temperature changes very well. Since pine is a coniferous tree, its high resin content ensures resistance to moisture. However, the material must be looked after carefully: pine is prone to rotting.
Pine is the best option for making furniture yourself: it is affordable, malleable in processing, and allows you to use different methods of processing and decoration.
Open area with tiled base
A platform made of concrete or brick is a fairly expensive structure. To save money, you can simply lay it out using non-slip paving slabs.
Dry installation
The principle of constructing such a building is similar to the previous one. The only difference is in the preparation of the base. At its location, the soil is leveled, onto which layers of sand and gravel are alternately poured. Next, the tiles are laid using dry or wet methods.
In the first case, a mixture of sand and cement is used. After laying and leveling using a building level, all seams are carefully sprinkled with sand.
The second (wet) installation method is to use cement mortar, which is poured 2 cm thick. There is no need to lay too large a surface at once - the work is done in stages over an area of 0.5 square meters. m.
When installing a barbecue, a small platform lined with refractory bricks is prepared separately. All subsequent work is carried out after the solution has dried for a couple of days.
Installation
Installation of a kitchen from furniture panels in stages. First, assemble the lower cabinets. All elements of the cabinets are pre-cut to size and processed. The bottom, back wall, sides, doors and parts for drawer cabinets are sanded.
The elements are connected using dowels or confirmations. To avoid mistakes, holes are cut out at the ends. The process is quite complex; accurate calculations and measurements are important. Then dowels are inserted into the prepared holes, and the parts are connected.
The back walls can be made of plywood or fiberboard. They are attached to the finished box with staples or small nails. When the cabinets are completely ready, you need to check the accuracy of installation. Next, install the fittings - hinges and runners for pull-out shelves and drawers. This task is performed using self-tapping screws and a screwdriver.
When installing a countertop from a panel, you need to double-check that the parameters of the slots for the sink, hob and other built-in appliances are correct. When placing hanging cabinets at the preparatory stage, you need to make markings for future fasteners and drill holes for anchor bolts. During the installation of facades and built-in appliances, doors and shelves are mounted on fasteners.
Prepare the facades Install the countertops Step by step assemble first the lower, then the upper cabinets Finished kitchen
Setting up a stationary barbecue or oven
Since the grill is a device for frying over an open fire, it can only be installed under an open or semi-open canopy. Such a building will require the removal of a chimney, so its design must be thought out in advance.
Types of foundation
Foundation for barbecue
Remember the main rule - brick grills, barbecues or Russian ovens require the construction of a separate foundation that has no points of contact with the main foundation of the building.
After all, even when building a small fireplace, you will need at least 800 bricks, the total weight of which will be almost 3 tons.
Without a strong foundation, there is simply no point in installing a brick fireplace - over time it will quickly sag and become covered with cracks. Such a base is made in the form of a monolithic reinforced slab.
Laying the foundation
Open building with barbecue
Let us describe the main stages of pouring the base for a barbecue or stove:
1The size of the pit is always 10-20 cm larger than the structure itself.
2The height of the foundation is no more than 30 cm. However, when preparing a hole for it, it is necessary to take into account the depth of the crushed stone cushion - it should be equal to 15 cm.
3After installing the waterproofing layer, prepare the formwork so that it rises 10 cm above the ground level.
4A 12-14 mm rod is used as reinforcement, from which cells measuring 150x150 mm are knitted.
5When liquid leaks from the solution into the ground, its quality may deteriorate, so it is better to lay a layer of plastic film into the formwork before pouring.
6The proportions of the solution are selected depending on the brand of cement. For example, when using M200 cement, the proportions will be 1:2:4 (cement, sand, crushed stone). Less durable concrete will be obtained by mixing them 1:3:5. When using tables of solution proportions, do not get confused in the notation. After all, there is a brand (class) of ready-made hardened concrete, indicating its compressive strength.
7After pouring, poke the mortar with a shovel to remove any voids that may have formed. To make it dry more evenly, cover it with film. In hot weather, it is better to periodically water the surface.
The concrete foundation must be well strengthened, and this will take at least a month. Therefore, all further work begins only after the end of this period.
Construction of a stove or barbecue
To build a barbecue or stove you will need solid red and fireclay bricks. The walls are made of red brick, and fire-resistant fireclay is needed for the construction of the fireplace.
Since cement can crack under the influence of high temperatures, it is necessary to mix a sand-clay solution for masonry.
For the hearth it is better to use special dry mixtures made from fireclay clay. Any hardware store provides a large assortment of them.
BBQ Layout Scheme
Building a stove or barbecue without any experience can lead to disastrous results. After all, this process is not as simple as it seems.
There are enough masonry schemes online (they are called ordering) , but even if you decide to do it yourself, be sure to invite a specialist who can help you with advice.
After all, the slightest mistake is enough, and the stove will begin to smoke mercilessly or will not light up at all. Even when constructing the simplest structure, you use only standard procedures - any innovations with a complete lack of experience can end in failure.
Construction of a chimney
Regardless of the type of kitchen, when installing a stationary barbecue, you will need to install a chimney. Its height and diameter are directly dependent on the volume of the firebox. For example, for a metal barbecue 72x25 cm you will need a 2-meter pipe with a diameter of 16-17 cm.
Metal chimney
There are special formulas for calculating its size, but they are quite complex, and it is not worth spending time on them if you have no experience. When laying a brick hearth, it is much easier to use standard ordering schemes - they indicate the number of bricks used in the construction, including the chimney.
Above the metal barbecue, before connecting the pipe itself, a smoke collector is placed in the form of an extended hood with a height of 0.8 m. Its edges should protrude 0.3-0.5 m beyond the brazier.
It is better to make a metal smoke collector adjustable - after all, when using different types of fuel, the distance to the fireplace may change. In the future, this parameter can be adjusted experimentally, so that the ball of smoke is at a height of 3-7 cm above the level of the skewers.
Main details
After determining the number of cabinets and their sizes, you can proceed to the manufacture of parts.
Marking places for fasteners
A standard cabinet consists of 4 parts:
- Horizontal (2 pcs). It is located between the side walls, to which it is attached with confirmatory screws. Its width should be less than the finished cabinet by two thicknesses of the side walls. If the chipboard is 1.6 cm, and the cabinet width is 80 cm, then the horizontal size is: 80-(1.6*2) = 76.8 cm;
- Side wall (2 pcs);
- Shelf (usually 1 piece). It can be screwed to the walls, then its width should be equal to the horizontal. If you make it removable and lay it on shelf holders, for convenient installation you need to make it 3 mm narrower than horizontal;
- Back wall (1 piece). To make the structure lighter, it is made of fiberboard. The height and width should be 5 mm less than the body parameters. This eliminates the wall from bulging with small cutting errors.
Cut material for future headset
Expert opinion Ekaterina Anatolyevna Smirnova has been engaged in interior design for 7 years, a professional architect
The parts are cut out with a jigsaw after careful measurements. You can order a cut when purchasing materials. It will be done for an additional fee. The furniture factory already has blanks that are used for sawing.
As a standard, their sizes are multiples of 15, which must be taken into account when drawing up your own drawings and diagrams for a kitchen set. Blanks can be made to individual sizes, but it costs more.
Finished parts for each module must be numbered to avoid confusion during subsequent work.
Lower kitchen cabinets assembled
Closed building
If the kitchen in the country house will be used in winter, it makes sense to make it in the form of a completely enclosed building. In this case, it must be insulated from the inside.
The flow of fresh air in the summer can be ensured by wide window openings or by installing an air conditioner or fan of sufficient power in the cooking room.
Completely enclosed building
A major covered building, heated all year round, is good because it can accommodate a full-fledged kitchen with any type of modern equipment. There are a lot of projects online for arranging an enclosed summer kitchen in a country house.
It is convenient if a cellar or bathhouse is provided in the same building. A covered summer kitchen attached to the house can have a single foundation and a common entrance.
We will not describe the construction of the building itself step by step. After all, this is a rather labor-intensive and complex process, little different from the process of constructing any permanent building. A separate article will be needed to describe it in detail.
Equipment for summer kitchen
With the correct supply of communications, just like in a regular kitchen, in addition to the sink, you can install here any types of appliances from an electric or gas stove to a refrigerator and dishwasher.
Separate side burners are very convenient in a summer kitchen, allowing you to boil water simultaneously with the grilling process. When installing equipment, ensure that the wiring is protected from moisture and ubiquitous rodents.
A full-fledged large refrigerator is unlikely to be needed in such a summer house. It is enough to choose a compact model. But it’s worth paying attention to the technical and operational characteristics.
You should not install this type of equipment in direct sunlight - find a place for it in the shade. Otherwise it will soon fail.
Equipment for summer outdoor building
An ordinary Russian oven, barbecue or grill is often installed in an open space. If it is not possible to place them closer to the edge of the canopy, only take care of the ventilation system. Otherwise, the area will be constantly smoky during cooking.
Installing a stationary Russian stove or barbecue will be justified if you have to cook often, and several dishes at once. If you tinker in the kitchen from time to time, a small stove with 1 or 2 burners and a light, portable barbecue are enough, which can be quickly put away in the house or garage for storage if necessary.
Grills are very convenient, in which cooking is carried out simultaneously on gas and wood. In this case, you won’t have to tinker with fuel for a long time - it is used in small quantities only to add flavor to the food. A gas grill will maintain the desired temperature.
It is better to take equipment with a plastic or stainless steel coating. The ideal option is AISI 304 low carbon steel.
Modern interiors
A traditional feature of any kitchen is the hearth on which food is prepared. But if in an ordinary apartment the main fireplace is a gas or electric stove, then the range of solutions for the interiors of summer kitchens expands significantly. Lovers of patriarchal antiquity will first of all put a Russian stove in the center. It is noteworthy that you do not necessarily need to cook with it all the time; it is enough to do it only occasionally. Having modern technology doesn't hurt either. A regular stove, barbecue, barbecue, microwave, fireplace - you can choose one thing, or you can approach the issue comprehensively.
You can’t do without a kitchen countertop, various shelves, cabinets and drawers for utensils, as well as a sink and a refrigerator. The dining area contains furniture that is light and practical, such as rattan, bamboo or wicker. If combined with a terrace, the dining area will simultaneously serve as a living room. Then here you can place a massive wooden table with the same chairs, a soft sofa, a TV, etc.
The windows can be decorated with short, light curtains so as not to block the beautiful view of the garden and nature. For textile decoration of a summer kitchen, it is better to choose a dense, easy-to-clean fabric. It can be monochromatic or with forest, floral ethnic motifs. The interior will be complemented by beautiful dishes, fresh flowers in flowerpots, photographs of family members in the lap of nature or landscape paintings. For extra romance, you can place a vessel filled with water with floating lighted candles.
Near the dining area you can arrange a cute Japanese-style fountain. Various wooden and bamboo elements, for example, coasters for plates, will look interesting in the interior of a summer kitchen.
As for the choice of style, there can be many variations, but most owners prefer smart eclecticism.
Selection of furniture
For an enclosed space, you can choose any type of furniture - the flight of imagination in this case is unlimited. But upholstered furniture installed in an open area is not the best idea. It is better to do it yourself or purchase light wooden or plastic chairs and armchairs with removable cushions. Such furniture will be no less comfortable.
Streamlined armchairs and chairs made of rattan or wicker are very comfortable - by the way, today there are inexpensive imitation of them made of plastic on sale. It is better not to use products in dark or bright colors - they get very hot in the sun and quickly fade and lose color.
Concrete kitchen island with stone trim
When selecting tables and cabinets, also pay attention to the material of manufacture. It is better to use wooden or MDF furniture if you plan to put it away for storage at the end of the season.
Do not install wooden structures near open fire. It is better to build a “concrete kitchen island” from a wooden beam covered with a plaster mesh with two layers of cement mortar applied to it. After it has completely dried and strengthened, the sink and countertop are installed and the doors are hung.
Choose a countertop from tiles, concrete or stone. Plexiglass or quartz can quickly crack due to sudden temperature changes. The ideal material for a sink installed outdoors is stainless steel.
In a small space, using the “working triangle” rule, in which the most important zones - the sink, stove and refrigerator - must fit into its vertices, is not always feasible.
After all, there may simply not be a refrigerator, the stove may be replaced by a grill, and the shape of the room is not always close to ideal. But still, to ensure comfortable work, try to keep these main zones at a fairly close distance from each other.
In an open summer kitchen, much more dust will accumulate, so use easy-to-clean materials to decorate it.
What are the advantages of homemade headsets
Why are purchased options not suitable for everyone?
- There are kitchens of non-standard sizes; installing ready-made furniture in them is very difficult, and sometimes impossible. Remaking furniture to new sizes is a long and thankless task.
- Every housewife wants to have a unique set of furniture, tailored to her personal needs and desires. This is due not only to design preferences, but also to physiological characteristics, habits and traditions.
- Kitchen sets even in the cheapest segment are only relatively inexpensive. Not everyone can afford to buy them due to their difficult financial situation.
The factory-made set you like may not fit into the dimensions of the kitchen
There is only one way out - to make a kitchen set with your own hands. The advantages of this solution are obvious: the dimensions of the product will exactly correspond to the parameters of the kitchen, and such pleasure will cost several times less. Let’s say right away that for this you need to have not only desire, but also professional skills, as well as a full set of special tools.
Lighting
A single chandelier in an open area is unlikely to cope with the task - after all, in the absence of walls, the light will be scattered. Therefore, provide several types of lighting. Be sure to place spotlights or LED strips near the work area.
You can hang one large chandelier above the dining table. This lighting can be supplemented with halogen lamps or lanterns hung on nearby trees.
Lighting must be thoughtful
With the help of light, you will be able to easily divide the space into separate zones. For example, after you've set the table, hide the work tables by turning off the lights and leaving only lighting on the dining tables and areas near the structure.
Don't forget that for street lighting you will need lamps and luminaires with a high degree of protection from dust and water (their IP should be in the range of 54-65). The first number is the degree of protection against electric shock. The second is to protect the housing from moisture penetration. Products marked with the numbers “65” will be needed if the lamps will be located outside the canopy area.