Where to begin?
To create crocheted crafts, just learn the simplest elements:
- chain of air loops;
- half-column;
- column;
- double crochets;
- edge loop.
In addition, you need to remember the simple symbols of various loops in order to read patterns for crocheting crafts. Schemes are easy to find on the pages of women's magazines and on the Internet. Schemes are used not only by beginners, but also by professionals with extensive experience, because a mistake can destroy the quality of the product.
Crochet leaves, large selection of patterns
The sheet is crocheted according to pattern 1 using both half loops:
The sheet is crocheted according to pattern 1 using the back half loop:
The texture of the sheet in the first photo turned out to be flat, in the second - ribbed.
Sheet 1 is crocheted according to pattern 2
Pattern 4. Crochet a leaf
Diagram 5 shows a sheet in which the turns are connected alternately in different directions. A variety of leaf shapes decorates the composition and gives it expressiveness. Experiment too.
How else can you get curved leaves? In addition to jagged ones, there are rounded and arbitrary leaf shapes. Often found in compositions are small leaves connected by columns of different sizes. To add rigidity and beauty, tie them with single crochets with a “picot” or “crawfish step” (see diagram 6 and 7).
leaves are crocheted according to patterns 6 and 7
Knitted clover leaves:
Knitted oak leaf
For beginners
For beginners in knitting, it is better to start with small shapes - round or square. The most popular knitted crafts that do not require special skills:
- bedside rugs,
- potholders in the shape of fruits,
- teapot warmers,
- sofa cushions,
- small napkins,
- covers for stools.
To make these gizmos, leftover colored threads of different textures or loose knitwear are suitable.
When circles, ovals and squares are knitted automatically, you can move on to creating larger and more labor-intensive products - gifts, functional interior items for a kitchen or room.
Yarn selection
The most common options are the following:
- Acrylic threads. Great for initial work experience, and the finished products will keep their shape well.
- Wool. Natural material with a decorative look. However, the product may become deformed after just a few washes.
- Cotton threads. The structure of the material is more rigid, but cotton products have clear shapes and hold it well.
In stores, needlewomen are presented with a huge selection of thread models that differ in texture, color and density.
We recommend reading:
- Knitting bactus with knitting needles - detailed description with photos and diagrams. Step-by-step instructions and recommendations from craftswomen. TOP 30 best models
Knitting socks with knitting needles - step-by-step master class with instructions. A selection of the best knitted socks models
- Garter Stitch Knitting - 140 photos and videos of basic garter stitch patterns and projects
Crafts for the New Year holidays
On New Year's Eve it is customary to give each other gifts. When choosing gifts for family and friends, we are guided by their hobbies and wishes. If you choose an unfamiliar company, small pleasant surprises of your own making can be a wonderful solution. Creating such souvenirs requires little time and materials. For example, you can knit small napkins in the shape of snowflakes, the face of Santa Claus, or miniature symbols of the coming year. The figurine can be either flat or voluminous, with the addition of felt details, artificial eyes, beads and seed beads.
A knitted cover for a coffee mug will protect the owner’s hands from contact with hot porcelain. The basis is taken from two colors reminiscent of winter: blue-blue and white. A base is knitted from blue yarn, the height being approximately one third of the height of the cup, and the length being equal to the circumference of the cup.
The resulting shred is tied around the perimeter with white thread, possibly with a small ruffle pattern. On the front side you can make an applique from threads, felt or knitted parts with the image of a Christmas tree or Santa Claus. We sew a couple of buttons on one edge of the patch, and on the other we make loops so that the craft fastens onto the mug.
Traditionally, a Christmas tree is decorated for the New Year. And needlewomen can also make a small knitted Christmas tree, for example, to decorate their desk in the office. To do this you will need green and white yarn, as well as glitter, beads, beads or tiny pompoms. A ring is knitted from a green thread, and a cone is knitted from the ring to the desired height of the future tree. Then a chain of double crochets is knitted in a spiral around the resulting cone. White ruffles are knitted along the top of the spiral row.
Knitted crafts will also be relevant for corporate events, parties and children's matinees. Knitted toys for the Christmas tree, angels and even whole bright knitted garlands can play a significant role in the decoration of the festive hall.
Materials for work
Before you start working on crafts, you should prepare your workplace. The creative process should bring joy and pleasure, so comfortable furniture, a comfortable posture and high-quality lighting are the key to success for the artist.
You should also prepare the following set of materials and tools:
- Hooks of various sizes.
- Classic knitting needles.
- Yarn.
- Nylon thread.
- Knitting needle.
- Scissors.
- Additional materials (toy eyes for animal figures, corrugated paper, decorative elements).
- Glue.
- Metal wire for creating three-dimensional shapes.
- Filler for three-dimensional figures (most often the material of choice is cotton wool).
Templates, patterns, and diagrams will also be useful for creating a pattern on a knitted fabric.
Easter crafts
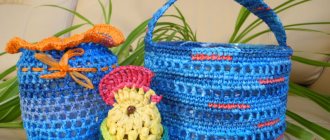
Probably one of the most popular Easter souvenirs is a decorative bag for a boiled egg. To create it, you will need the smallest crochet hook, a thread suitable for the size of the hook, an egg to determine the size of the bag (it is better to use wood or foam), and decorative tape.
The beginning of knitting is the ring (bottom), from which the bag grows upward, taking on the shape of an egg by adding loops. The top row is knitted with a pattern with holes through which the ribbon is threaded.
Knitting the main parts
There are a huge number of techniques for knitting fabric. For knitting needles these can be the following options:
- Classic elastic band.
- English gum.
- Knitting with garter stitch.
- Polish gum.
Experienced needlewomen with the proper amount of skills can knit fabric with an ornament or pattern. Using a crochet hook you can knit circular parts for a snowman, openwork fabric for beautiful decorative pillows, soft folded covers for a tea woman.
Lovely gifts
There are many more reasons for gifts. For your birthday, you can please kids with funny and at the same time practical knitted crafts - pencil holders, animal bags for pajamas or handkerchiefs, boxes for storing toys.
Older people will appreciate nice little things for the kitchen - oven mitts, kettle warmers, hot pads (individually or as a set). Elegant napkins, knitted tablecloths and curtains have come back into fashion. Pillows, rugs made of thick twisted threads, decorative vases made of twine and storage baskets made of knitted yarn look unusual and attractive.
Cheerful chicken
To work, you need to prepare diagrams: head, wings, beak, legs, torso. Next, using the standard ring pattern, each piece is knitted:
- The dimensions of the parts depend on the overall size of the toy.
- The beak, legs and wings occupy the minimum area of all elements and do not require the use of filler.
- The head and body are knitted in the round and then stuffed with cotton wool.
- Assembly is carried out in a classic way, and you can decorate such a toy with an original scarf knitted with an English elastic band.
Eyes and other decorative elements are placed on glue at the very end of the work.
Practical little things for the home
Functional knitted crafts fit into the interior in an original and modern way. And the use of natural dyes for yarn (instant coffee, hibiscus, turmeric, saffron) will give the products a unique charm.
Based on the napkin knitting pattern, you can make a cover for a faded sconce lampshade or table lamp. The finished product must be soaked in salt water, squeezed well, and then dried on an old frame. To add additional shine, the threads are coated with a layer of acrylic varnish.
A cozy atmosphere in country style will be created by a blanket thrown over the sofa. The blanket is assembled from individual squares, knitted according to the traditional, but timeless, “granny” square pattern. The elements are connected to each other with simple stitches or double crochets, then the entire blanket is tied. Pillowcases for sofa cushions, created using the same technique, will be an excellent addition to the blanket.
An old ottoman will be transformed beyond recognition if you make a knitted case for it. You can make small pockets on the side fabric for small items, and use buttons, beads, and jewelry as additional decoration. A small rug made in the same style will look good next to the updated pouf.
Against the background of a light wall, photo frames in the Provence style will look impressive - openwork in pastel colors. Frames of any shape and color are used for the base, and the corners are complemented with knitted bouquets of soft lilac, pink, light yellow with light greenery.
Many people remember from childhood their grandmother's rugs on the floor or seats on stools, knitted from thick yarn or from strips cut from old knitwear. So colorful, soft, and most importantly warm and cozy during the cold season... Nowadays pillows, kitchen towels, and a hot stand are knitted using these methods. And you can easily make knitted yarn for these crafts yourself from old T-shirts or nylon tights.
A little imagination and desire will help you create a rug from pompoms. The work uses a minimum of tools and materials - knitting threads, scissors and your own hands. The threads are wound around the hand, tied and cut - a pompom is obtained. The required number of pompoms is fixed on a special base for the rug or simply sewn together.
Anything can be a reason for inspiration for a creative person. New ideas for knitted crafts can come both during a country walk and while watching TV. And as a result, knitted cartoon characters, original toys and other unique things appear. The most important thing is not to be afraid of creative experiments.
Craftsmanship from time immemorial
Neither historians nor archaeologists have been able to establish the exact time of the appearance of this type of needlework. During excavations, objects were found crocheted both 4000 and 5000 years ago. The earliest find is a children's sock with separately knitted toes, discovered in one of the tombs of the ancient Greeks. The knitting technique and the nature of the weave of the threads indicate that it was a crochet hook and not knitting needles that was used in production.
The first complex patterns were developed by the Arabs before our era. Crochet “came” to Europe in the 12th century. The attention of European ladies was attracted by the boots that the missionaries who returned from Egypt brought with them. Over the next 100 years, this handicraft became a fashionable trend; noble young ladies were fond of it.
Despite the fact that in the modern world knitting has become industrial, handmade products are valued more highly. Such crafts are presented as gifts, made with your own hands for your closest and loved ones. Crochet patterns are passed down from generation to generation, and there are family secrets of the craft.
Mushrooms
You’ve already got your head full, what else could you do to surprise the seasoned kindergarten teachers who are waiting again and again for crafts from your child? We offer to capture their imagination with surprisingly realistic mushrooms made from the simplest materials at hand. To work you will need:
To begin, together with your child, select the types of mushrooms that you want to bring to life. From thick cardboard, cut out the base circles for their future hats. Pierce each circle in the middle with a nail. It will serve as the base for the leg. Instead, you can use thick steel wire. But it’s better not to bother and buy a dozen or two potential “mushroom legs” at your nearest hardware store.
Now it’s time to cook the paste. Boil a liter of water. Stir 5 tbsp in a glass of cold water. with a heap of potato starch. While stirring boiling water, pour starch into it in a stream. Stirring, bring the paste to a boil. It is ready to use, all you have to do is wait for it to cool to room temperature.
Coat the mushroom preparation with paste. Roll a cotton wool ball for the hat, dip it in paste and glue it to the hat. Wrap the mushroom stem with moistened cotton wool. Repeat this procedure several times until you get the fungus of the desired size and shape.
Don't forget to squeeze out excess glue from the cotton wool! The resulting blanks must be completely dried on a radiator or in a warm oven. Already at this stage the mushrooms turn out very nice.
Color the caps according to the selected types of mushrooms.
For additional shine and chic, you can coat the mushroom caps with any colorless varnish.
You can decorate a beautiful basket with mushrooms - your craft will not go unnoticed. And the secret of making realistic mushrooms will long excite the imagination of everyone who is lucky enough to see them.
These hand made beauties are the result of the efforts made.
Imagine and think outside the box - in kindergarten, and any other creativity, this is only welcome.
Hot stand
It is advisable to use natural threads.
Knitting a round warp:
- Make a loop, tie it with 6 single crochets, secure by pulling the tip.
- Knit the next row, doubling the number of loops, and knit two double crochets through each stitch.
- Increase the loops in the third row by one and a half times, increase through one loop.
- In subsequent rows, increase through two, three, four loops, continue until you achieve the desired result.
- Additional finishing upon request.
Toy house
For work you will need the following materials:
- Thick yarn, according to the needlewoman's choice;
- Product diagram;
- Hook number 2;
- Plastic needle and thread.
It is better to print out the diagram of the toy so that it is always in front of your eyes.
- According to the pattern, six squares are knitted, which are the same size.
- It is also necessary to prepare two identical rectangles, these are the roof elements.
- Using a plastic needle and thick thread, all parts of the figure are connected. A wide loop is made at the top of the volume.
- Threads of a contrasting color are needed for processing window openings.
- At the very end, you need to fill the toy house with filler so that it has shape and volume.
Making autumn crafts with your own hands: a wreath using the origami technique
We suggest using a simple origami technique to make an original autumn craft - a decorative wreath with which you can decorate a room, hang it on the door or bring it to school for the Autumn holiday. Let's prepare materials:
- colored paper (yellow, red, orange, green, brown);
- scissors;
- PVA glue or pencil;
- cardboard.
- We start by making maple leaves. To do this, cut a sheet of paper into squares. For one leaf you will need nine squares, each of which is arranged in a diamond shape and bent diagonally. Then, to the fold line, we wrap both sides of the rhombus from above so that its edges meet on the middle line.
- We also fold the bottom part of the product. Using glue, we connect three leaves each.
- We combine three blanks into one leaf, add a stalk. We make ten such blanks of different colors.
- We cut out a round blank from cardboard - the basis for the wreath. Glue the leaves on it in a circle, you get a wreath like in the photo.
If you need a craft for kindergarten, you can make everyone’s favorite Smeshariki together with your children. For this you will need:
- vegetables and fruits (two zucchini, red apple, pear, potato, onion);
- toothpicks;
- plasticine;
- We will make a car from a zucchini, our heroes will be located there. One zucchini will be the body of the car, cut four round slices from the other - these are the wheels, and attach them to toothpicks. We complement the car with headlights made of plasticine.
- Now let's make smeshariki. Let's start with Kopatych. We take a round potato, eyes, nose, make a hat from plasticine, Losyash is made according to the same principle from an onion, Nyusha from a red apple, and Krosh from an inverted pear.
- We “put” the heroes in the car on toothpicks.
The result is such wonderful smeshariki!
The advantage of knitted products
When there is a small child in the family, the parents try to protect him as much as possible. Most fashion toys are made from hard and non-environmentally friendly materials that can cause injury to a child or cause an allergic reaction.
Do-it-yourself knitted toys carry a positive charge and evoke only positive emotions in the baby. The person who creates them puts love and kindness into his work. Such products give off warmth, so children play with them with pleasure.
DIY crafts for kindergarten on the theme “Autumn” (all new items)
With preschool-age children, you can simply use your imagination. Take and lay out magical multi-colored trees from plasticine balls. And indeed there will be a golden autumn.
In addition, you can also use paints and cotton swabs for hygiene; you can use them to create paintings and scenes on any topic.
Agree, there is nothing difficult about this, just sit there and put it on a piece of paper.
Another fun work from scrap materials, made at home, such as millet, is what the author offers.
You can also make pictures from rice and semolina, or pasta, in the same way.
Everyone knows that kids love to play with signets, so why not take advantage of it. Dip dry leaves collected from the ground and dip them into liquid paint, you will get an excellent print.
You see how brightly and elegantly you can decorate any drawing.
Or you can go another way, put leaves (either real or paper) and use them as stencils, that is, paint directly on them, you will get prints.
Works made from palms are popular. Well, let's use this idea.
You need to take a disposable white paper cup and paint it green. Make a barrel out of a toilet sleeve and glue it to the plate.
Draw the children's hands on cardboard and cut them out.
Glue one of them brown on the trunk.
And then, in this order, everything else.
Alternatively, you can make the work in the form of acorns and even squirrels, cool!
Kids also love to use natural materials in their creations; for example, you can get by with pumpkin seeds. Print out a picture of wheat or rye on an A4 sheet of paper and decorate it with these branches. Doesn't it look creative? And most importantly, it’s simple and charming!
Read the finished description with materials and description below:
Do you want to use only colored paper? So you will need to cut strips of different colors and a couple of circles. Decide on the sizes yourself.
Fold each circle in half.
Then draw the trunk and make the crown of the tree, cut it as shown in the photo with scissors.
Glue the trunk on white paper, and the crown, that is, two circles with each other, only asymmetrically.
What is missing is, of course, colorful leaves! Cut them out in red, yellow and green.
So, what else, but here's what. You can take disposable paper plates, these are sold at a fixed price or in any hardware store. Paint them in the desired color, for example brown, and then let them dry. Cut out the body of a hedgehog or other animal from white cardboard, draw parts of the body, and let it hold a pine cone or acorn with its paws.
Probably the most primitive, but also so bright, souvenir made from cotton pads. Dilute the paint in a glass beaker and take pipettes. Carefully paint the discs with them. Let them dry.
And then glue it to any background, wow, beauty! And my mood even lifted, it was so bright and cool!
In my classmates I came across another such landscape, only it was made in a different technique.
Toys for children
With the help of a hook, you have the opportunity to independently create a toy for your child that no one else has. Your child will appreciate such a gift!
You can decorate a child’s room with toys or bring knitted crafts to kindergarten so that a piece of your love will be with your child, even when you are not nearby.
It is recommended to choose a filler from natural materials, such as cotton wool, wool, waste fabric scraps, or you can fill the toy with cereal. They do not contain harmful chemical additives, but some types can cause allergies in a child, so approach your choice based on the individual characteristics of the baby.
How to make an applique from leaves: quickly and beautifully
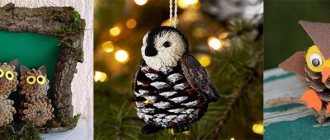
For such works, you can take absolutely any character and easily decorate it with dry leaves that you collected in the park. For example, you can lay out funny owls using cardboard and paper.
Or you can make a huge owl entirely out of leaves.
Or plant the birds on a branch decorated with bunches of rowan berries.
You can take any face, preferably some animal, cut it out, and then decorate it.
And with what, of course, leaves. Collect them and place them on a sheet of newspaper so that they do not shrink when drying.
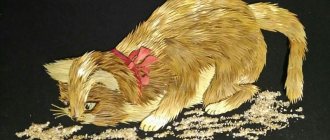
Maple leaves are best suited as decoration, for example a lion.
Or perhaps you will be interested in working in the form of a little lion cub.
Today my kids and I made these creations. And we actually sat down to do it, and then my mother remembered that she forgot to buy glue. I’m thinking what to do, mine are about to go broke))). It's good that there was plasticine. And this is what happened.
You can easily build a vase using a balloon.
Or make an applique of seeds and plasticine.
Or you can imagine the work in the form of a three-dimensional toy.