Useful tips
Watch the video if you are too lazy to read
Watch the video if you are too lazy to read
There is very little left until the New Year and Christmas, which means that the magical time of holidays and weekends spent with family, decorating houses and creativity is coming.
Toys and jewelry from the store are undoubtedly beautiful, but not always affordable. In addition, such decorations do not contain the main attribute of family holidays - love.
In this article we will tell you how to make New Year's gnomes with your own hands easily and simply
, from available materials and for every taste, and most importantly - with soul, because the process can be shared with loved ones and dedicated to creativity.
DIY felt gnome
© amylattacreations
Materials you will need:
- Any fabric you like, size depends on what kind of gnome you want to make. Medium gnome – 20x20 cm
- Sheet of felt for a hat. You can purchase additional felt if you want a different color hat or add color accents
- Faux fur for crafts
- Scissors
- Uncooked rice or dry beans
- Sintepon or any similar filler
- Thread and sewing needle
- Wooden bead or pompom for nose
- Polystyrene foam ball for head
- Glue gun
Manufacturing:
© amylattacreations
Step 1
: Cut a circle from the fabric and hand sew with a continuous stitch along the edge.
Gnome size
depends on the size of the circle you cut. To start, you can outline a large dinner plate. To sew an edge with a continuous stitch, you must first thread the thread through the eye of the needle and tie a knot at the end.
Insert the needle into the fabric from the top so that it comes out from the bottom side, then thread it through the bottom and out from the top side. Repeat these stitches until you have sewn all the way around the fabric. If you do everything correctly, when you pull the thread, the fabric will begin to gather, forming something similar to a bag.
Step 2
: Fill a sewn bag with uncooked rice or beans and padding polyester.
Rice and beans will add weight to the gnome and make it more stable. Once you have filled the fabric bag, tighten the thread until it is completely closed at the top and tie a strong knot.
Step 3
: Glue a Styrofoam ball to the top of the bag.
Don't worry if the joint or ball looks a little sloppy - it will be covered by the beard and cap.
© amylattacreations
Step 4
: Cut out a triangle of faux fur and glue it around the head.
Advice
:
cut off a piece of fur along with the lining
on which it is attached, if any. This way the fur will stick better and look more natural.
Step 5
: Make a felt cone of any height you like and trim it to fit your head.
If you want to make a looser style gnome, you can use a sock instead of felt.
Step 6
: Glue a felt cone to the gnome's head so that it hides the place where the beard is attached.
For brightness, you can cut out and glue snowflakes, stars or hearts from felt of a different color.
Step 7
: Glue the nose.
You can glue the nose directly to the beard the way you like - lower, higher, or even slide half of it under the hat so that only the lower part is visible.
Your gnome is ready!
Selection of materials and tools
First you need to choose the fabric. When choosing, the following factors should be taken into account:
1 Solid New Year's colors. These can be blue, scarlet, golden, metallic, green and blue shades. Avoid fabrics with small prints, as they are difficult to combine.
2 Choose fleece and coat fabrics that have a small pile.
3 The material must be dense so that it does not stretch or wrinkle.
4 The color of the thread should match the shade of the fabric.
5 Small wooden beads and compact bells are suitable accessories.
6 For the beard, prepare the fur.
7 For the frame - thicker cardboard.
8 Felt fabric.
9 Glue gun.
New Year's toy gnome
© marzipanknits
Materials:
- 2 sheets of felt - for the front and back of the hat, any color that matches your main Christmas decorations.
- Faux fur for beard
- Small pompoms for the nose and top of the hat
- Sewing machine or needle and thread to match the color of the hat
- Sintepon
- Glue gun
- Ribbon
Manufacturing:
Step 1
: Cut a triangle out of paper, approximately the size of the future hat, to your taste.
Step 2
: Attach the cut out triangle to each of the felt sheets and trace along the outline. Cut out the triangle for the back of the hat, leaving the front uncut for now - this will make it easier to sew the two parts together. Don't worry about pen or marker marks - they won't be visible.
Step 3
: If you want,
embroider a snowflake or any other design
of your choice on the front of the hat, on the side where the marker is not visible.
Step 4
: Secure
a ribbon loop
at the top of the hat, you can secure it with glue to be sure, but if you want the gnome to look neater, you can simply secure the ends of the ribbon while sewing the two parts of the hat together.
Step 5
: Connect the front and back of the hat with the wrong side facing out, then turning it inside out to hide the inner seam, and sew using a sewing machine or a simple stitch with a needle along the edges, leaving the bottom of the hat unstitched.
Step 6
: After you have sewn the two parts, cut along the outline without touching the seam, trim the edges. Turn right side out. If you want to give the hat a little softness or volume, you can fill it with a small amount of padding polyester.
Step 7
: Cut a piece of
faux fur
to fit the bottom of the hat. Glue to the front and either sew or tape the bottom to prevent the padding from falling out.
Step 8
: Glue the pom pom nose and pom pom to the top of the hat. Ready!
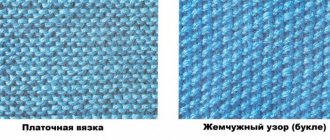
Crochet
Often, experienced needlewomen make a gnome for the New Year with their own hands using threads and a hook.
Such products will look original on a holiday tree. Process of creation:
- Cast on 20 loops on hooks. Use the elastic method.
- Knit loops with an elastic band using the 1x1 technique. One of them should be front, and the second purl. At the same moment, distribute them among the hooks, each of which should have 5 loops. Complete the circle.
- Knit the elastic to get the optimal width. It's better to stay at 6 rows. When knitting in the round, attach the knit stitch to the front wall and the purl stitch to the back wall. If this is not done, twisted loops will form.
- To make it easier to knit a gnome, switch to knit or stockinette stitch. If you have experience, knit using ropes. Then the finished product will be more original.
- If you want to create a more complex gnome, the first row will require 4 knit stitches and one purl stitch. Next row - slip two loops on the auxiliary hook, and knit 2 loops on one hook. Then knit 2 loops with an auxiliary one. Repeat the steps several more times: in the 5th and 8th row.
- In the 9th row, reduce the number of loops. Knit 2 loops twice on each hook, including knit stitches.
- The tenth row will be the last. Transfer the loops that are on the knitted row to the hook from right to left. Pull the last loop through 2 adjacent ones. Transfer the loop to one hook. Move the four right ones to the left onto the hook, and pull the outermost loop on the left through the adjacent three. Repeat the steps until the gnome is ready. Pull the last loop through the remaining 11 loops, tighten, and bind off the loop. Hide the tail on the wrong side.
- Fasten the thread to your thumb and knit a circle of 5 loops with a stitch. Afterwards you need a circle of three loops, and close your finger. Cut the long ponytail and hide it.
Gnomes made from cardboard toilet paper rolls
©craftsbyamanda
Materials:
- Cardboard rolls from toilet paper or paper kitchen towels
- Colored or wrapping paper of any color
- Pompoms
- White yarn
- Scissors
- Glue
Manufacturing:
Step 1
: Cut the cardboard tubes so that they are
different lengths
- this way you can make the gnomes taller or shorter. Cover them with any colored or wrapping paper of your choice.
Step 2
: Make
a cone out of white or colored paper
, glue along the edges and trim from the bottom so that the bottom edge is even.
Step 3
: Wrap a strand of yarn around 4 fingers 10-12 times, thread a piece of yarn through the resulting loops and tie a strong knot on top to tie the loops together. Cut the loops from the bottom.
©craftsbyamanda
Step 4
: Glue the resulting beard to the top edge of the sleeve. Then glue the sleeve and the paper cone placed on it to make a hat.
Step 5
: Glue
the pom pom nose
at the junction of the hat and beard.
Step 6
: Let the glue dry and lightly scrunch or tilt the tip of the paper hat to create an interesting shape. Ready!
©craftsbyamanda
The working process
The body and cap of the future gnome are absolutely identical in size, so that during the process of assembling the toy, they fit on top of each other.
- We cut out and sew cones for the hoodie and cap. We form the same cone-frame from cardboard, sealant or other flexible material.
- We put the robe on the frame, fill it with any filler (you can use cereal or legumes) to give stability to the figure and sew on the round bottom by hand.
- We try on the cap and mark where (approximately in the middle) the nose and beard will be located.
- Sew or glue the beard and nose bead. We put on the cap, pay attention: the seams on the robe and the cap must match at the back.
- Using any decorative seam or glue, we strengthen the cap on the head, carefully working around the entire circle.
- We attach the mittens-handles cut from felt. Sew a bell onto the tip of the cap. You can give the gnome a flashlight, beads, a Christmas star - it all depends on the imagination of the master.
Wool gnomes
To make these gnomes you'll need felting skills and a few special tools, but if you've never tried it, there's a first time for everything! Try it and you will definitely succeed.
© lauraleeburch
Materials:
- Felting needle
- Sponge as a lining surface on which you will roll the gnomes
Wool:
- Flesh or peach color for face
- Red for the hat
- Brown for pants
- White for hair and beard
- Blue for outerwear
- Black for the eyes
- A bunch of cotton wool, wool or padding polyester for the base of the gnome
- Sewing thread to shape the body
- Red sewing thread for a loop if you want to hang the gnome on the Christmas tree
- Sewing needle
Tip: Before attaching small parts to the toy (nose, eyes), gently roll them between your fingers to soften them.
Manufacturing:
© lauraleeburch
Step 1
: Roll
cotton wool, padding polyester or wool in one of the basic colors (blue, brown, red or white) into a body shape
- oblong or cone-shaped, wrap it with sewing thread to hold the shape.
Step 2
: Wrap the base over the thread on all sides with brown wool, felting with the thread until the body becomes dense and neat.
Step 3
: Wrap
the body of the toy with colored stripes
- leave brown wool at the bottom, wrap it higher with blue, even higher with white and then, even higher, with red. Felt until firm.
Step 4
: Add a little more red wool to the top of the hat toy and felt, thinning towards the end.
Step 5
: Take a small circle of flesh-colored wool for the face, secure it to a white strip and felt until tight.
© lauraleeburch
Step 6
: Gently roll the toy in your palms to soften it slightly. Take a small piece of white wool and secure it under the gnome's face in the form of a beard. Roll until it becomes tight and neat.
Step 7
: Roll up a small
piece of wool for the nose
- you can make it round, or you can make it oblong and long. Attach it to the gnome's face and go away.
Step 8
: If you like, add ears and eyes and curled or curly stripes of fur to make the beard look fuller.
Step 9
: If you made a Christmas tree decoration, sew a loop of red thread to the top of the hat.
Interior snowman
We suggest making an interior snowman with long legs that will look great under the New Year tree. It will definitely delight children and delight adults.
Manufacturing algorithm
The height of the toy is 83 cm. It is based on a dense frame that will give stability. The main material required for the snowman is white fleece. You need to cut blanks from it:
- torso (2 parts);
- legs (2);
- bottom with a cut hole (1), nose made of red material (1).
The largest part is the head (1).
Connect each part with the corresponding one, pin together with needles and stitch.
Cut the blanks for the mittens from dark blue velor. It will also make shoes for the toy. Before working with velor, the fabric should be glued with special gauze to add density and reduce elasticity. It is especially important to do this for boots, since they will need to be filled tightly with filler.
Tie the blank under the head along the edge with thread. Leaving a small hole, tightly fill the part with filler, for example, holofiber. In the place where the cheeks should be, add volume.
Using a long needle and a thread folded in half, pull the fabric together around the head. This is necessary to indicate the eyes, mouth and cheeks.
After this, you can sew on the eyes using beads or buttons, as well as the prepared nose, which should be shaped like a carrot.
Sew the details of the handles and mittens. Stuff them tightly with filler and then sew them to the body. In turn, connect the body to the head of the toy. Use a sponge to brown your cheeks. Draw a mouth with a marker.
The next stage is making the legs with shoes. Shoes need to be stuffed with holofiber and a cardboard sole inserted inside. Insert a dense frame into the legs. Wooden sticks are suitable for this. For volume you need to add a little filler.
String a snowman onto sticks and fill the body with stuffing. After this, carefully hem the bottom. Thanks to the wooden frame, the toy will be as stable as possible.
All that remains is to decorate the snowman. Mandatory accessories include a hat, a scarf, beautiful buttons on the toy’s body, and fur trims on the shoes.
Postcard with paper gnome
These gnomes can be made even with the smallest family members - they are very simple to make, the process does not take much time, the materials can be found in any home, and children will definitely love the result.
© twitchetts
Materials:
- White paper or cardboard for the beard and the base of the card, colored paper for clothes
- Scissors
- Glue stick
- Marker or flesh-colored pencil
- Gray marker or pencil
Manufacturing:
Step 1
: For the hat you need to cut out a long triangle from colored paper. Cut the bottom edge with an arc inward. From paper of a different color, cut out half an oval for the body.
Step 2
: On white paper
, using a gray marker, draw a beard
that is the size of your body and hat. Add stripes, straight or curly, that will look like hair. Cut out your beard.
Step 3
: Cut out a small oval or
circle for the nose
and color with a flesh-colored marker.
Step 4
:
Glue the body onto the card.
Then glue on the beard and hat. Since the bottom of the triangle is arched, a small oval gap is formed between the hat and the beard - this is the future face of the gnome. It must be painted over with a flesh marker.
Step 5
: The top of the hat will extend beyond the frame of the card - this is not a problem. Bend the tip to shape the hat.
Step 6
: Glue the nose and draw eyes. Ready!
About myths
No wonder many people like to surround themselves with various figures of mythical creatures. And I won’t be mistaken if I say that one of the most popular and intriguing will be the gnome figurine.
They are believed to be present wherever there is wealth that attracts them. And by placing a figurine at home, you automatically attract wealth.
The main symbols associated with these creatures are the earth, mines, jewelry and riches from the bowels of the earth.
They are also considered the guardians of underground treasures; there are many legends and myths about this. In all countries, from the northern peoples to the indigenous populations of the southern continents, they know about little people living underground, whose main concern is the extraction of gold and diamonds, they hide them in their storerooms and vigilantly guard them.
And it’s a disaster for anyone who quarrels with them; they are very vindictive. Gnomes living in gardens bring wealth and fertility to the land. And home ones symbolize family comfort, joy and love.
New Year's gnomes made from bushings
Another simple version of gnomes from bushings that can be made with children.
Materials:
- Toilet paper or kitchen paper rolls
- Paints – gouache and acrylic paints are best
- Black marker or pen
- Pompom and glue (optional)
Manufacturing:
© rufflesandrainboots
Step 1
: Cut half of the back of the sleeve so that the front resembles
a body and a pointed hat
.
Step 2
: Paint the hat any color you like, leave a small unfilled oval under it for the face and draw a
white beard below.
© rufflesandrainboots
Step 3
: Paint the rest of the sleeve with any color to create the body.
Step 4
: On the part you left for the face, draw
eyes with a marker and glue on the nose
. Your gnome is ready!
Cap
We cut it out and line it with cotton wool.
The same fabric is used for the interior.
We sew and turn it inside out.
We cut 2 strips along the width of the cap. The wool used here is the same as for the vest.
Place them together face to face and sew along one edge. Trim the allowance at the ends.
Iron the seam. We apply the resulting unfolded part to the knitwear. Cut out the inner part from knitwear as in the photo.
Sew the ends of the knitted part and the remaining ends of the front part. Let's put it together. Place the knitted strip face up and place the wool strip face up on its edge. We stitch close to the edge.
This is what the inside looks like.
Now we turn it inside out. We have a knitted part on top of the woolen part. So we put it under the foot of the sewing machine. Fold the edge of the knitwear evenly over the edge of the wool and sew a stitch. We make sure that the knitwear under the foot does not move forward too much.
Assembling the strip with the cap. We place it on the edge of the cap with the wool part outward with sufficient allowance. We fix it at 4 points at equal distances. We sew along the perimeter.
Gnomes on a stick for home puppet theater
© sugarspiceandglitter
Materials:
- Colored paper or cardboard
- Popsicle sticks
- Glue
- Pencils
- Scissors
Manufacturing:
Step 1
: Take
colored paper of different colors
- white for the beard, gray for the boots, flesh-colored for the nose, and any paper of your choice for the body and hat.
Step 2
: Cut out the beard of the future gnome from white paper. From colored - a hat and body of any shape you like - for each new gnome the shape can be different. For example, you can make one with a round body, one with an oval body. One with a sharp triangular hat, the other with a curved one. In addition, cut out a small flesh-colored circle for the future nose, and two circles for the boots.
Step 3
: Glue
the shoes to the lower part of the body
- right and left, it is better to glue them on the wrong side so that only half is visible on the front.
Step 4
: Before gluing the hat, decorate it to your taste - you can add some sparkles, stars, snowflakes, or draw stripes or polka dots.
Step 5
: Glue
the beard to the top of the body
so that it covers about half of it.
Step 6
a cap
to the top of the beard .
Step 7
:
Glue the nose
. If you want it to look neater and more voluminous, use a piece of double-sided tape instead of glue.
Step 8
: Glue the gnome onto a popsicle stick. Ready!
Suit size
We made a Gnome outfit for a 4 and 5 year old boy. Below you will find patterns for two sizes: choose depending on how tall your child is. There are 98 cm and 104 cm. If you need a larger size (or smaller), then using the template of our pattern you can design your own. We wish you good luck!
Glossary of terms
Experienced seamstresses already understand all the terms used in this material. But perhaps it was you, inspired by our master class, who decided to sit down at a typewriter for the first time and don’t know many special words. This matter is fixable. We decipher the terms especially for you!
To stitch or topstitch means to join two layers of fabric. Ironing is simple: iron the allowances (edges) in different directions. Iron - iron seam allowances (edges) in one direction. The face of the fabric is the side where the pattern or surface is clearly defined. At the edge of the overlock seam , stitch (see above) the fabric the width of the foot from the edge of the allowance.
Gnome finger puppets
© iheartcraftythings
Materials:
- Red and green colored cardboard
- White yarn
- Small flesh-colored pompom
- A hole puncher that makes holes the diameter of a finger (if you don’t have one, you can use nail scissors, but it will look less neat)
- Decorations – snowflakes, glitter, stickers (optional)
- Scissors
- Glue
Manufacturing:
© iheartcraftythings
Step 1
a rectangle and a triangle
(or a cone - depending on what shape you want to make the hat) from colored paper
Step 2
: Decorate the hat to your liking - you can add stickers, glitter or snowflakes.
Step 3
: Wrap the yarn around 4 fingers 12 times, thread a length of yarn through the resulting loops and tie a strong knot at the top to tie the loops together.
Cut the loops from the bottom to create a thread beard
.
© iheartcraftythings
Step 4
: In the rectangle (this is the future body of the gnome), in its lower part, cut two holes with a diameter of your fingers with scissors or a hole punch.
Step 5
: Glue the finished beard to the rectangle, just above the middle, closer to the top.
Step 6
:
Glue the hat to the gnome's body
so that it slightly covers the beginning of the beard. Your gnome is ready!
Original finger gnomes, very easy to make
There are different types of gnomes...
DIY New Year's gnomes are a wonderful gift for family and friends for the Christmas holidays. This product will perfectly decorate the interior of an apartment or become a favorite toy of a little fidget. A New Year's gnome with a beard will certainly become the most touching symbol of the holiday in your home if it is made with your own hands with love and trepidation.
The character himself, according to legend, protects the house, brings into it the spirit of joy and celebration, and helps Santa Claus in his difficult craft.
Small, slightly clumsy creatures are located on shelves, candlesticks, at the festive table and on the most beautiful New Year's tree - the Christmas tree. When bringing an idea to life, you immediately need to decide what size the gnome will be and what function it will perform.
Sewing such a gnome, shown in the photo above, is not at all difficult. This can be done using this pattern:
If the result of your creativity becomes a gift for a child, then it is better to make it from natural fabrics with a minimum number of details, it will be safer. And if a little man is needed as a New Year’s decoration for the home, will sit on a shelf, a bottle of champagne, or become a pendant, then such work can contain many small details and various decorative elements.
Gnomes made from disposable plates
© gluedtomycraftsblog
Materials:
- Disposable paper plates
- Scissors
- Colored paper or scrapbooking paper with different patterns
- Flesh or brown craft paper
- Glue
- Stapler
- Stickers, glitter or snowflakes for decoration
Manufacturing:
Step 1
: The plate will serve as
a beard for your gnome
. Take a plate and cut it in half.
Step 2
: Cut strips along the curved part of the cut halves so that half of the plate looks like a beard. Be careful - cut the strips close to each other, but do not cut all the way through.
Step 3
: You can curl the strips with your fingers or with scissors to give your beard shape and volume.
Step 4
: Take colored paper with any pattern, cut out
a large triangle
so that its lower part approximately coincides in length with the diameter of the plate - this is the future gnome hat.
Step 5
: Cut out an oval for the nose from flesh-colored paper.
Step 6
: Attach the triangle to the beard using a stapler - the staples can then be covered with stickers or glitter.
Step 7
: Glue the nose at the junction of the beard and the hat.
Step 8
: Decorate the gnome to your liking with stickers, glitter or snowflakes. Ready!
So let's get to work
It’s quite easy to sew New Year’s gnomes with your own hands without a pattern. To do this, needlewomen use bright fleece or terry socks in variegated colors. The first detail is the body of the gnome. It is formed in the form of a primitive sac. Often grain or sand is poured there for stability. The upper body is sewn up or tied with rope. The second part is a cap or pointed cap. It is cut out of a triangle, and its top may be geometrically irregular and twisted. This will give the image of a gnome a playful clumsiness. Before putting the hat on the body, you need to attach the beard and nose bead using a glue gun. The cap is placed on the body, only the beard and nose remain visible from under the headdress. The details of the arms and legs for such miniatures are completely optional.
Paper gnomes
© floramax
Materials:
- Colored construction paper in different colors and with different patterns or textures
- White thick paper
- Beige face paper
- Scissors
- Glue
- Black marker
Read also: Christmas tree made of foil
Manufacturing:
Step 1
: Roll
two cones out of colored paper
- one large, the other smaller for the hat. It is better to make them from paper of different colors so that they do not get lost against each other.
Step 2
: Cut out a beard from white paper
- triangular, elongated or semicircular
. Cut small strips from the bottom, without cutting all the way through, and twist them with scissors to give the beard volume.
Step 3
: Cut out a small oval from beige paper
for the face,
no wider than the beard.
Step 4
: Before gluing the beard and face, attach all the elements to a large cone to get an idea of what the future gnome will look like.
Step 5
: Glue
the beard onto the large cone
. Then glue the face oval on top of the beard. Draw eyes with a marker; optionally, you can glue a button nose.
Step 6
: When the rest of the parts are glued and dry, put the cone hat on top, carefully glue it. Scrunch or bend the tip of the cone to shape. The gnome is ready!
A more complicated option
To sew a New Year's gnome with a beard, it is enough to have basic sewing skills. The simplest option, which will be easy to implement, will be the pattern of the next New Year's character.
Such a gnome consists of two cones, one of them has a bottom and a cardboard frame (body), the second is a hat. This DIY New Year's gnome, the pattern of which is below, is an excellent decor and souvenir for the upcoming holidays.