Burner advantages
Working with a gas soldering iron is convenient and has a number of advantages:
- quick preparation. The soldering iron heats up in a short time, depending on the attachment used and rarely exceeding 30 seconds;
- Full autonomy of operation, without connection to the mains or generator;
- light weight and compactness of the tool;
- possibility of heating to a high temperature of 1500-2000 ℃;
- the ability to adjust the flame and, accordingly, the heating temperature.
Gas soldering irons are used by amateurs and professionals. A huge number of models are produced, many of which come with attachments.
What it is?
A person who has at least once seen the operation of a gas welding machine can well imagine the design of a gas soldering iron . This tool consists of three parts:
- Gas filling tank;
- Flame adjustment button;
- Connector.
In fact, the design is a little more complicated, but if you do not plan to change the nozzle or air intake, and this is not worth doing, then you will not have to disassemble the soldering iron. The main advantage is the ability to use stings of different shapes and purposes. You can replace the working tip within a few seconds if it has cooled to an acceptable temperature.
Manufacturing from MLT and PEV resistors
A popular version of a homemade mini-soldering iron is using an MLT resistor (this abbreviation stands for “metallic, varnished, heat-resistant”). This is not even a mini, but a micro-device, but it heats up to 190°, which allows you to melt POS-60 solder.
To create it, in addition to the resistor itself, you will need:
- two insulated single-core copper wires;
- wooden block.
The resistor is the main part of the future device, and therefore its choice must be taken responsibly. It is better not to buy cheap Chinese products, but to give preference to domestically produced copper resistors.
To make such a mini-soldering iron, first the resistor is cleared of paint with some sharp object and the copper wire is protected. Then a loop is created from one end of the wire, freed from insulation, and placed on one of the edges of the resistor. And to the other edge they attach (ideally solder) the second end of the same wire.
Now you need to make a small twist from another copper wire to attach it to a wooden block (it will play the role of a handle here). The tip should protrude beyond the bar by no more than 1 centimeter, and the end of the resistor by no more than 2.5 centimeters.
They also make mini-soldering irons from a PEV-20 resistor (resistance 2 kOhm), inserting a copper wire tip into it, attaching a handle and wires. This mini-soldering iron can work from your home network. This is a very popular and simple design. The main thing in it is to make the copper rod correctly. For the tip, take either the rod of an old soldering iron or a piece of copper busbar.
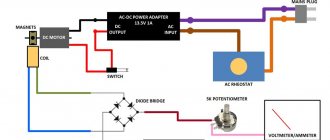
Option No. 3 – Set the impulse
This method is for more advanced masters. Here you will need intermediate level blueprint reading skills. Let's look at the circuit and structure of soldering irons of this type using an example.
The main advantage of this device is its higher power, thanks to which the tip will heat up much faster, literally within a few seconds after power is applied. A rod that has reached the optimal temperature will be able to melt the tin layer without any problems.
So, the list of materials in our case will be as follows:
Ring from a pulse converter (material – ferrite)
Important: the primary set of turns on a transformer device should number 100 units, ideally no more than 120. Diameter - 0.5 mm
The additional winding is in the form of a single turn of a copper busbar, with a maximum permissible diameter of 3.5 mm.
Copper wire (diameter: 1.5-2 mm). Used to create a rod.
How to make a soldering iron with your own hands from all this? Yes, very simple! It will take literally a couple of steps - to connect the rod and the secondary winding, which, in principle, is originally part of it. Next, an arbitrary lead of the sinker will need to be connected to the network winding. And that’s it, the device is ready!
The three options described above are most often used by hobbyists to create homemade soldering tools. Additionally, we recommend watching a video on how to make a power and temperature regulator for a soldering iron with your own hands, a stand for fixing the device, etc. peripherals.
If you choose which of the three methods is preferable, we note that the first two are the easiest to implement. Not everyone can create a pulse device, and in terms of operation it requires some skills. But at the same time it allows you to implement more serious tasks. Therefore, the choice is yours!
Choosing the right tool
An attachment for a soldering iron for soldering small parts.
The choice depends on your priorities in work, because you can solder various parts, but at home they often deal with problems such as extending wires, soldering connectors, antennas, and electrical equipment.
For work in the country or at home, an electric soldering iron, which has a reasonable price, is well suited. It’s convenient that you can work with it for a long time. Its disadvantages:
- temperature is not regulated;
- the tip overheats;
- the presence of static electricity, which can damage soldering elements;
- short service life;
- poor insulation of the soldering iron tip.
A convenient and functional device is a gas soldering iron, the main advantage of which is that you can work anywhere, regardless of the presence of an outlet. Such a tool has a fairly high price, but it can solder everything you need.
A gas soldering iron is convenient to carry with you or carry in a car.
You can repair electrical equipment on the road when your car breaks down or fix an antenna on the roof of your house.
Gas tools are mobile; they operate from a canister filled with gas. You can use them as a gas burner. The price of the tool may vary. It depends on the manufacturer, type of flame, degree of protection, heating temperature.
Physical indicators
Such a soldering tool must have some physical characteristics that are worth considering when creating it. Below is a list of such indicators:
- voltage applied to the solder;
- heating element power;
- power adjustment;
- tip design;
- solder heating method;
- handle design;
- price.
The voltage supplied to the soldering iron determines the power of such a product. It can be alternating (220 V) or constant (low voltage) 12 or 24 V. The power of the unit is determined by values in increments of 20 W, for example, 40, 60, 80 W. It is worth noting that equipment with a power regulator becomes simply irreplaceable in the hands of an engineer.
Such equipment contains a minimum number of elements and is relatively easy to make yourself.
USB soldering iron
A DIY USB soldering iron can be connected to any Power Bank device - it’s very convenient.
To make a soldering iron with a USB plug, you must first take a copper wire with a millimeter diameter and use pliers to make a ring at one of the ends. The ring must be large enough for the bolt to fit through it.
Then you need to take a nichrome wire 7 cm long and wind several spirals onto a copper rod on the side where there is no ring (closer to the end, but not at the very end - this is important!)
It is worth paying special attention that the copper rod and nichrome wire must be insulated from each other, for example, with fiberglass. Next, the copper wire should be attached to a suitable size bar with a bolt
In the next step, two copper wires are screwed to a nichrome wire, the switch is glued to the bar, and the wires are soldered to the switch. Then you need to wrap the lower part of the bar with electrical tape - this is how the wires of the mini soldering iron are fixed
Next, the copper wire should be attached to a suitable size bar with a bolt. In the next step, two copper wires are screwed to a nichrome wire, the switch is glued to the bar, and the wires are soldered to the switch. Then you need to wrap the lower part of the bar with electrical tape - this is how the mini-soldering iron wires are fixed.
Finally, a USB plug with a wire of a certain length is taken and connected to the copper wires. Polarity is not important in this case. Before heat shrinking, those areas where the wires are connected to each other must also be insulated.
In addition to this, you should also tape the wire from the USB to the bar with electrical tape. After this, the performance of the soldering iron can already be checked on some workpiece.
Structural parts and gas used
A gas soldering iron consists of a gas reservoir and a burner on which a soldering nozzle or tip can be installed. Gas soldering can be carried out either using heated air, when only a torch is used, or when using a nozzle.
The gas reservoir can be replaceable and connected to the burner using a hose, or it can be portable, made in the same design as the burner and refilled from a cylinder, which are often used for refilling lighters.
The latter design is more common and preferable for domestic use because of its compactness and high mobility.
But in production shops, and especially in car repair shops, you can also see large gas soldering irons running on propane coming from 50-liter cylinders.
Various gases are used for operation: propane, butane or a mixture of gases - mapp gas. The latter contains methyl acetylene, propadiene and propane in a certain proportion.
Mapp gas is very effective due to its combustion temperature reaching almost 3000℃. But the main advantage is that with the same performance of a gas soldering iron, it will be required eight to ten times less in volume than acetylene.
The main thing is to choose correctly
A master planning to purchase a new tool for himself will try to find out which gas spigot is better . There is no clear answer to this question. First you need to decide for what purpose you are going to purchase this unit, and then find a store where you can buy a gas soldering iron at an affordable price and of appropriate quality. Well, let's say you've already found a place - our store has goods from the best manufacturers. There are still goals.
Hobby or home use - inexpensive models are suitable as a tool, but preferably not made in China. An average tool can easily cope with everyday tasks: soldering a part, connecting wires, soldering or cutting plastic, even starting a fire from wet wood. By the way, for lovers of hiking and relaxing in the lap of Mother Nature, we offer gas soldering irons and burners that will save you from the unnecessary hassle of cooking or heating food.
Professional soldering - this requires a tool with the ability to fine-tune and a wide range of tasks performed. An excellent choice would be the Dayrex gas soldering iron, which is suitable for working with hard and soft solders, heats up parts perfectly, and easily cuts plastic. It is better to refill a professional gas soldering iron (the instructions are often silent about such nuances) with proven, well-purified butane. Using cheap gas for a gas soldering iron, you risk quickly ruining the catalyst - it will simply become clogged with solid impurities. However, if such a problem does happen, then there is no need to panic - just take out the catalyst and clean it.
By trusting a professional gas tool, you get the opportunity to quickly get to work and carry it out at the highest level. And we, in turn, are always happy to provide you with gas soldering irons from trusted manufacturers and at affordable prices.
Structure and principle of operation
Soldering irons have an extremely simple structure: a copper rod that interacts with a heating element is placed in a kind of tube that acts as a housing. A heat-resistant power wire is connected to the heater. And the whole structure is completed by a handle made of a material with low thermal conductivity.
Under the influence of electric current, a heating element (for example, a nichrome spiral) transfers thermal energy to a copper rod called a tip. The tip, having high thermal conductivity, heats up, which allows soldering.
https://youtube.com/watch?v=yFHqd2w1ZE0
Main details
The soldering device is made from a copper rod. A nichrome spiral heats the device. It is important that the heat is immediately transferred from the heating element to the tip - this is the name given to the rod with a wedge-shaped tip. It is inserted into a steel tube, which is wrapped in glassy fabric or mica. A wire is wound around the mica, which serves as a heating element. To reduce heat loss, nichrome wire is wrapped with asbestos. The ends of the nichrome spiral are connected to the conductors of the electrical cord. To ensure reliability and preservation of the generated heat, the spirals are bent and folded in half at the point of connection with the copper wire. Additionally, they are compressed at the coupling point.
Work to improve flame control
Burners with adjustable flame power
To ensure normal operation of our burner, it is necessary to equip it with a divider and a tap. A suitable place to mount the tap is near the handle, 2–4 cm higher. But it can also be installed on the supply pipe. A faucet from a burner from an old autogenous engine or its other analogue will do. It is permanently fixed to the tube with a threaded connection. To seal the connection, use FUM tape.
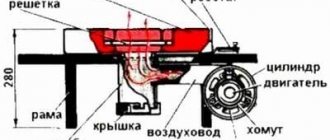
The divider will be installed on the pipe with the nozzle. It also needs to be made of brass Ø 15 mm. The best option is a cylindrical part with a hole for a tube with a nozzle. If there is none, do the following:
- Take a brass pipe Ø 35 mm and cut a piece of 100–150 mm.
- Stepping back from the end, use a marker to mark 3-5 points exactly distant from each other.
- Drill 8–10 mm holes in it with a drill and use a grinder to make even cuts to them.
- Now you can bend everything to the center and weld it to the burner tube.
Burner nozzle device
To properly secure the divider, it must be placed so that the nozzle protrudes 2-3 mm from the connection point. Thanks to this device, two goals can be achieved: to protect the flame from strong winds and to provide it with a flow of oxygen, which is necessary for a more stable and strong flame.
All welding points can be smoothed using a grinder. Then your homemade burner will look more solid. That's all. Now all that remains is to supply gas and use the burner for its intended purpose.
Kinds
Burners can be of different types. Let's look at the main ones.
Atmospheric
Such devices are quite cheap. The reason is obvious - their production is not too difficult technologically. The operation of atmospheric burners is also simple. Air is sucked directly from the surrounding space. The formation of a gas-air mixture does not require additional effort.
Supercharged
This option uses a fan that actively pumps air. Stabilization of air pressure (pressure) allows you to compensate for almost all negative external factors
What is important is that “fire separation”, which often occurs with atmospheric burners with a significant increase in pressure, is also excluded
The following evidence supports such devices:
- stable operation under any conditions;
- efficiency of 95% or more;
- a fairly high level of safety (determined by the design);
- almost complete combustion of fuel;
- wide range of achieved powers;
- excellent level of automation;
- Possibility of use in furnaces and boilers of a wide variety of structural types.
It is worth noting that forced-air burners are much more expensive than their atmospheric counterparts. Even the most affordable models of this kind cost at least 4.5 times more. However, the main technical advantages fully justify such a fee. When the burner is operating with supercharging, noise of varying volumes may occur. Special protective covers will help to cope with this problem.
Such models are approximately twice as efficient as traditional flare designs. Some people even take tourist-type ceramic burners (for cylinders) and convert them into a boiler or stove. But you can do this only with complete confidence in your actions.
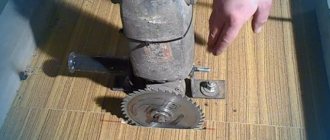
Using a lighter
This mini soldering iron can be assembled in no time. It will be based on a gas lighter with a piezoelectric element; you will also need masking tape and thick copper wire (its thickness should be from 1 to 3 mm).
Creating a mini-soldering iron in this case begins by wrapping wire around a pencil or other similar object. It is necessary to make 5 turns in a row, after which you can pull out the pencil.
Next, on the convenient side, about two centimeters from the turns, the wire is bent so as to form a right angle. On the other hand, at the same distance from the turns, the wire is simply cut off.
The straight end of the resulting copper element must be processed, say, with sandpaper, so that it is sharp, like a needle. This end will be the tip of a homemade mini-soldering iron.
Then you need to try on how this wire will be combined with the lighter. The end of the wire in the form of a right angle should be located below, and the coiled part together with the sting should be located directly above the hole from which the flame comes out.
Now you need to insulate the lighter with tape, that is, wrap it at the point of attachment to the wire 5 to 7 times.
Then the wire is installed in its place and the entire structure is again wrapped with tape. Ready! A mini-soldering iron made from a regular lighter is good because it does not require connection to batteries or an electrical outlet.
For soldering with such a mini-soldering iron, it is better to choose tubular solder with flux in the core. And during operation, you should not keep the lighter in the burning mode for more than five seconds, otherwise the internal pressure mechanism may melt.
Features of a homemade soldering iron
You can make tools of different power with your own hands. The choice of a specific option depends on what you plan to solder. After all, a low-power device will not heat the soldering parts to the required temperature, and using a powerful soldering iron can lead to overheating.
The main advantage of a homemade mini soldering iron is the opportunity to save on purchasing a factory-assembled product. Small work can be carried out with a device assembled by yourself.
What can you make a mini soldering iron from? This could be a resistor, a ballpoint pen, a gas lighter, etc. improvised materials.
Stand
Another important accessory is the stand. A stand for a soldering iron can be easily found on sale throughout the Internet, but it is much more profitable to make it yourself.
The most common type is the wire stand, which is made from a thick, cone-shaped spring attached to a wooden platform. In addition, the stand can be made from fuses mounted on a wooden or textolite base.
If you need a portable stand, then any metal plate, for example, from an unnecessary desktop PC power supply, is suitable for making it.
The methods we have considered will allow you to significantly save on many parts and accessories, as well as make the manufacturing process as simple and safe as possible.