Today we will look at how to make a small giraffe from plasticine - an interesting bright figure in two versions. One giraffe will be adult and serious, and the second will be cute, with huge eyes, looking like petshop toys. Kindergarten and preschool age children will love both options. Experiment using our step-by-step photo tips.
How to make a giraffe from plasticine
To initially have an idea of future work, you can use a diagram that shows all the stages of sculpting a giraffe from plasticine. The choice of color and size of the craft must be made before starting the process.
A simple plasticine giraffe for children
Thanks to its long neck, the giraffe is considered an unusual and tallest animal, and therefore attractive and interesting to children. It’s not difficult to make such a craft. Based on the master class, you can mold a giraffe from plasticine in stages. Step-by-step photographs will make the process simple and clear.
- Sculpting begins with the base - the body. Roll out a medium sized oval from the yellow mass.
- The next stage is blanks for the giraffe’s legs. To do this, roll 4 balls of approximately the same size.
- The blank balls are given a cone-shaped shape.
- Attach the legs to the body.
- Roll out a “sausage” from a mass of the same color and make it flat. Place a toothpick in the middle so that its edges remain free.
- The toothpick is tightly sealed with the mass, smoothing out the seams.
- They “pin” the giraffe’s neck to the body. Compact and level the joints.
- The next stage is making the head. To do this, make an egg-shaped blank from the yellow mass.
- To mold the nostrils, first roll two small balls of the same size and flatten them, making round indentations in the center. The ears are made triangular in shape. All sculpted parts are attached to the giraffe’s head.
- Roll two white balls, attach dark pupils to them and place them on the head.
- To make the horns, take a brown one, roll two sausages and attach them to the very top of the head. Check the strength of the attached parts and attach the head to the neck.
- Create a small ponytail, decorated with a brown tassel.
- Smooth out all unevenness and roughness. A stack is used to cut the mouth in the shape of a smile.
- To add spots to the giraffe, tear the brown mass into small, uneven pieces and flatten them.
- The spots are distributed over the entire body and neck of the giraffe, trying to ensure that they lie smoothly and the edges do not stick out.
Giraffe made of light plasticine
Step-by-step modeling of a giraffe from light plasticine brings joy and does not entail any difficulties. This is an excellent material that does not stain your hands and table surface, and also does not have an unpleasant odor.
- The giraffe's head is rolled into the shape of an egg, pointed on one side. The ears are sculpted in the form of petals. For the horns, choose orange color and make them spherical at the ends.
- Balls for the eyes are molded from a white mass, pupils from any dark one. Roll sausages for the upper eyelids and eyebrows. Use a match or toothpick to make the nostrils at the end of the nose.
- The body is created in a pear shape. Cover it with orange spots of different sizes. To attach the head to the neck, use a toothpick.
- Roll out 5 yellow sausages, slightly thicker on one side, these will be 4 legs and a tail. The hooves and tail brush create a brown color. All the parts are assembled and the body is given the required shape.
Application giraffe made of plasticine
An excellent option for crafts is plasticine applications. The giraffe will look beautiful among the African palm trees on which bananas grow. The principle of creating such paintings is simply “smearing” plasticine on cardboard and rolling it out with a rolling pin.
The first step is to create grass and sky by smearing blue and green plasticine. To make the task easier and make the application more interesting, you can take blue cardboard. In this case, only grass will be plasticine.
The body, legs, neck and tail of the giraffe are made yellow. Place all parts on the surface of the picture.
The next step is to create the head, ears, horns and eyes. Nostrils, smile and other features are created using a toothpick. A mane is created from the orange color using a stack. For the spots, take brown plasticine, first rolling balls and then flattening them.
The applique is completed by creating a palm tree and bananas on it. The leaves are made from green plasticine, making a pattern on them in a stack. They take pieces of the red mass, roll them into droplets and place them on the surface, forming a trunk.
The applique can be decorated with plasticine flowers, butterflies, etc.
We sculpt a plasticine giraffe. Master class for children
At the last children's crafts lesson, we made a giraffe from salt dough. Today we will continue the theme of modeling and make a giraffe from plasticine. We will need the following materials for the product: Plasticine (orange, white, yellow, pink and green), stack, toothpick, sheet of paper. Before starting work, lay down a sheet of paper. This is your work surface. Knead the plasticine in your hands. Make a large ball of orange plasticine - this is the future body of the giraffe. Roll an oval out of the ball and stretch out one end of it - this is the neck.
Bend the giraffe's neck and roll a giraffe's head out of orange plasticine. The shape of the head should be similar to a drop. We attach the head at the end of the neck.
- To make the legs, you need to roll four identical ovals from plasticine.
We attach the legs to the body. Attention! To make the giraffe stand confidently, you can take half a toothpick, stick one end into the leg, and the other into the giraffe’s body.
Make cakes from brown plasticine - these are the spots on the giraffe’s body.
Take some more brown plasticine and mold a nose. Use a toothpick to create nostrils on your nose. Our giraffe is almost ready.
Decorate his neck with yellow sausages, attach eyes and cheeks.
Oh! We almost forgot about the tail made of an orange plasticine sausage and a brown tip. Attach the tail and...
Now our plasticine giraffe is completely ready, look what a cute plasticine toy we have made.
Source: https://partnerkis.ru/lepim-plastilinovogo-zhirafa/
Progress of the event:
- Guys, do you like Fixies? Who are the Fixies? What can they do?
- Let's be Fixies today!
-I suggest we do a little tinkering, but what? ,You will find out now!
-Guys, do you know what “Bilboke”
?
Children's answers.
-Today, I will introduce you to a toy called “bilboke”
.. Bielboquet is an ancient game that appeared in France in the 19th century, which has not lost its appeal to this day.
The name “bilboke” comes from the French bilboquet (bille – ball + bouquer – to put on the horns)
.
Bilboke - in a figurative sense, “a person who knows how to get out of any situation
.
It is also called “catch the ball”
. This fascinating toy develops the eye, endurance, visual-spatial orientation and reaction, and coordination of movements.
-Rules of the game: holding the toy by the base stick, you need to throw and catch the ball into the recess of the bowl. The one who scores the most hits will win.
-What do you think such a toy can be made from?
-These toys can be made from paper, cardboard, plastic bottles, plastic cups. I want to show a few samples of such toys (showing)
.
-Try to catch the ball yourself! Well, did it work? Fun, right?
-Let's relax a little and start tinkering! (Physical minute "Fixies"
)
-Before we start making the toy, let’s remember safety precautions! How should you hold scissors correctly, is it possible to point them at each other, how to properly place the scissors after work.
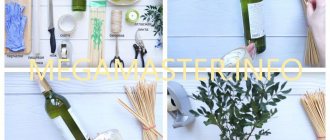
-Look how I make such a toy! On your tables there is a colored material called FOAMIRANT, this is foam rubber, various decorations, a Kinder capsule, thin rope, scissors and glue. I suggest you make the same toy yourself.
-First, I will decorate the bowl, this is a cut bottle. To make the toy safe, I will cover the cut edge with a thin strip of foamiran, then I will start decorating the cup itself.
From colored floss we cut out flowers of different sizes and shapes.
There is already a hole in the center of the cork, insert a lace into it, secure it tightly with a knot on the inside.
We clamp the other end with an egg or also tie a knot.
Glue the flowers to the base.
We are starting to design our capsules. I suggest making a bee! Glue on the brown stripes, wings, eyes and our bee is ready!
Our "Bilboks" are ready.
-Now let's show each other our wonderful toys!
-Guys, please remind me what is the name of the toy that we made with you today?
-Bilboke!
-Now let’s everyone clean up their workplace, thank you for your work, you’re great!
Elephant
You can make animals from plasticine with your child, starting with an elephant. This is an amazing animal with a shape that is easy to recreate using plasticine. The long nose-trunk is attached to the large head at the front. So that the elephant can breathe, holes are made with a pencil on its end part, and stripes are drawn with a stack. On both sides of the trunk are white fangs. Above the nose, on the large massive head, are the eyes. They are made from two colors. White circles are on the bottom, and black circles are on the second layer.
View gallery
The large head should be firmly attached to the body; you can strengthen it with a toothpick. Elephant feet are known to everyone for their pillar-like shape. They are sculpted from thick sticks and placed on the bottom of the stomach. The tail of the animal is small and thin, narrowed downwards. There is a small brush at the tip.
The most recognizable part of an elephant's body is its huge ears. They are molded by pressing the balls with your fingers on both sides. White ear centers are made in the same way.
Rocket
If your child wants to make a rocket out of plasticine, then prepare plasticine of different colors so that the child can choose what color his rocket will be. We will sculpt as follows:
- Having decided what color the rocket body will be, we form an oval, the nose of the rocket should be more elongated than its lower part;
- We roll out two thin strips from red plasticine, which we then stick around the nose and base of the rocket;
- on one side we attach two or three blue portholes (flatten small balls);
- now we make a stand: we sculpt three identical triangles and symmetrically fix them at the bottom of the case;
- the final touch is the orange flame at the bottom of the rocket.
Ready to fly!
Junior group
Crafts for kindergarten from waste material for the younger group:
Candy for dolls. For these simple crafts, foil, candy wrappers, corks and caps will be useful. It will be good if the general equipment is ready: the doll will sit at the table waiting for sweets, already with cups and a samovar. At the end of the event, you can have a real tea party with sweets.
Magic tree. It is very interesting to assemble a real tree from scrap materials - cups, bottles, wire, tubes, mosaic barrels. Plasticine, glue, various oblong caps and tubes are relevant here. You can decorate the tree with pieces of fabric and beads that are hung on paper clips.
Spiders. Make spiders from cups or small containers, fluffy wire, attach the parts with plasticine.
Funny cacti. Cacti are made well from plastic glasses and pots; you can use toothpicks and plasticine for needles. An interesting idea is to attach a pre-drawn and cut out smile and eyes to a cactus, then it will turn out completely alive.