Hello, dear readers! In this article we will look at how to make a deer from wire with your own hands. After a difficult 2022, we all want something joyful and positive. A great idea would be to create a cool New Year's reindeer. In this article you will learn:
- How to make a DIY wire Christmas reindeer. After all, making it yourself is not at all difficult. And how much joy there will be! You just need tools that can be found in every home;
- We'll tell you how to choose materials for crafts. It is on them that the quality of our deer will depend;
- We will advise you on how to choose a color for a deer and how to decorate it;
- Instructions on how to make a Christmas reindeer step by step.
Let's look at the instructions on how to make a deer from wire with your own hands
How to make a New Year's deer with your own hands - Materials
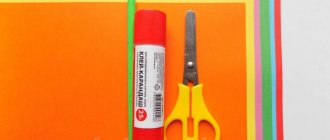
An extremely important point will be the materials from which our deer will be made. In order to make a New Year's deer at home you will need:
- sharp nippers;
- scissors;
- meter or ruler;
- pliers;
- masking tape;
- small hammer.
Of course, the main material for crafts is wire. We recommend choosing a large diameter (0.8-2 mm). The length of the wire should be 30-50 meters. Moreover, it is better to take it as a reserve, as something may not work out. And at this moment we will have a spare wire at hand. Why so much? Because:
- Firstly, thanks to this, the figure itself will have a thick length. In addition, a voluminous and large deer is always more pleasing than a small one.
- Secondly, it will be able to withstand the weight of additional decor. For this reason, it is better to use thick wire for the legs and torso of the frame. However, for some parts of the animal you can use a thinner and more flexible one. For example, it is suitable for horns and tail.
First, let's prepare the materials before making a New Year's deer with our own hands.
What do you need
To create Santa's fleet-footed helper you will need the following materials:
- hard wire;
- garland or LED string lanterns (battery-powered, better so that the figure is mobile);
- spray paint (silver, gold, pearlescent, etc.);
- glitter and/or artificial frost in a can (optional);
- decorative accessories (optional): Christmas tree beads, ribbons, tinsel, etc.;
- metal or plastic brackets or tape for attaching the garland to the frame.
How to make a deer from wire with your own hands - Color solutions
New Year's balls are usually used as decorations. As a rule, they hang themselves on horns. You can also use garlands. Keep in mind that their colors affect the mood and perception of the craft. The brighter your decoration, the better the holidays will be!
- The white lights resemble the shimmer of snow;
- Green lanterns look harmonious next to the Christmas tree;
- Yellow color creates a feeling of light and warmth;
- Red lights are reminiscent of parties and dancing;
- Blue color creates mystery.
Making a wire deer for the New Year with your own hands
After completing the frame, you need to creatively design your deer. We advise you to wrap it with multi-colored woolen threads. This will make your deer fluffy and naturally colored.
Undoubtedly, it is very important to choose the right color. Firstly, it must be combined with balls and garlands. Secondly, the shade of the threads also affects the impression of the decoration. Finally, it must be in harmony with the interior.
- White color is a win-win and standard option;
- Gray is an interesting and stylish solution. However, it may look too dull. It is necessary to choose the right decorations to create contrast;
- Black color looks impressive with a white frame. We recommend adding red or blue garlands;
- Shades of gold and beige fit perfectly into the home environment. They go well with warm-colored lanterns;
- Brown looks great with a copper or bronze colored wire frame. Moreover, it goes well with red and yellow garlands.
Only you can decide what color your deer will be. You can totally be creative here. The more creativity the better!
Let's look at the options for decorating a wire deer for the New Year with your own hands
New Year's glowing composition, ideas with photos
Idea #1:
Near the Christmas tree decorated with garlands, place a glowing snowman on one side and a gift box on the other. The box can be made from the cube we described above.
Idea No. 2:
Next to the Christmas tree, you can simply make a huge dome ball with a hole for the entrance. You can put a gazebo or just a bench in it to spend wonderful winter evenings there in a romantic atmosphere.
Preparing to work to make a wire deer for the New Year
So, now the moment has come. Now you will learn how to create a Christmas reindeer from wire with your own hands. First, prepare the necessary tools and wire. Decide on decorations and their colors. Additionally useful:
- Paper;
- Glue gun;
- Pencil or pen.
Here is an example of a template on how to make a wire deer for the New Year
Before you start working, think over the silhouette of the animal. Find a deer image template on the Internet. Print it on whatman paper or 4 sheets of A4 paper. Remember that the figure must be stable.
Tips from needlewomen
It is not necessary to make a deer right away from solid wire. For convenience, you can separately create the torso, head, paws, tail, horns. And then carefully fasten all the parts together. This method is great for creating a large figure. If the wire is too thick and difficult to bend, you can stuff it onto the plywood and use pliers. Special attention should be paid to the symmetry of the parts so as not to end up with “lame legs”.
To make a deer figure from wire in one piece, you should strictly follow the prepared drawing. To get as close as possible to the sketch, you can apply the finished parts directly to the diagram, repeating every centimeter.
For greater beauty, the finished deer can be painted. The wire does not always have a beautiful shade. The most suitable colors are gold, silver and white. In any case, these colors are only recommended; in fact, you can choose any color of the rainbow. Especially if the craft is made by children together with their parents.
The main advice is that when painting deer, it is better to go out into the fresh air. It is not recommended to do this indoors so as not to stain the furniture and not to inhale chemical fumes when sprayed.
Creating a torso frame
Before we make a New Year's deer with our own hands, we will need to make a body. This will be the base of our deer. Therefore, take this stage very seriously. We don't want our deer to be ugly, do we?
- Attach the wire to the picture on a piece of paper. Bend the wire to follow the silhouette of the deer. However, at this stage, do not touch the legs and horns. We will work with them later. Fasten the ends of the wire to each other with pliers or wire cutters. You can also secure it with masking tape.
- This should give you a flat shape. That is the basis. To create a three-dimensional figure, take rings. The diameter of the rings will be equal to the width of the figure in the selected location. Measure it directly on the base and twist it out of wire. An example is shown in the photo below. Place the rings along the entire length every 5-8 cm. There should be 4 large circles on the body. This is a conditional average. It is your deer that may be larger or smaller.
- Place the rings in the correct places. Secure top and bottom with masking tape.
- Lay one piece of wire on each side from the nose to the tip of the tail. At the same time, attach it to the circles. Just do it carefully so as not to break anything. The base of our deer is ready!
Creating a leg frame for a New Year's deer from wire
- Legs are performed separately. First, as with the torso, attach the wire to the image. Also “circle” the silhouette of the deer, exactly repeating its shape. Keep in mind that at the intersection with the body you need to leave a margin of length. It will be useful for further fastening. Bend points can be further bent. To do this, use pliers or a hammer.
- Secure the deer's legs with masking tape along the sides of the body to two large rings.
- To prevent your legs from looking flat against your body, make arches. Place them where the deer's hips are. It is important to attach them where the legs attach to the body.
- Next, make 2 more such arcs along the outside of the legs. In places where the knee is and just below it.
- From the inside of the legs, from the body to the hoof, draw an even piece of wire. Secure with masking tape.
- Similarly to the hind legs, outline the front legs.
- Secure by placing the top pieces between the two base rings in the deer's chest area.
- Run a piece of wire from the middle of the chest to the lower hooves of the front legs. Next, wrap them with tape.
- The volume of the front legs is created by small pieces of wire. Attach them between the sides of the main workpiece.
- Finally we are done with the legs. Place the deer. Perhaps the hooves should be made more stable. To do this, wrap more tape around them. Press firmly from the bottom.
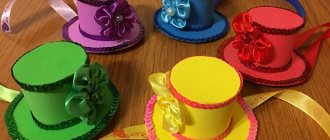
Paper Products
Colored paper strips are great for making a deer craft for kids. Why are they shaped like a glued ball? This toy can become a homemade Christmas tree decoration.
You can try to make toys in several layers, placing shiny beads or any other decorations between them.
Another deer idea is for younger students. This is a voluminous craft, similar in shape to a regular donut, folded in half for stability of the structure.
A head with small attractive horns is attached to it using glue. The craft is very simple to make and looks very good.
It’s simple and fun to make this deer craft. You will need either thickened paper or thin cardboard.
The following is done:
- A long part of the neck is cut out, which is then folded in half. Ridge – line for folding;
- The base of the neck and the beginning of the head should be marked with pencil lines to mark subsequent folds in the form of folds.
- It's best to practice on rough drafts first;
- The resulting modules are bent and a miracle deer is obtained.
We create antlers for a deer from wire with our own hands
- First of all, reproduce the horns along the outline. It is better to use thin wire. As a result, the horns will look more graceful. Their large and small branches can be made separately from each other. Next, they should be fastened. Thanks to this trick, the horns will be more voluminous.
- Fix the resulting blanks onto the largest ring of the head.
- Make ears from wire. To do this, pieces measuring 8-10 cm need to be rolled into “droplets”. Next, attach them under the horns.
How to make a Christmas deer from wire - Completing the work
- Paint the finished frame. This way you will hide the attachment points so that our deer looks complete. Of course, a large amount of tape on a craft looks sloppy. Therefore, we advise you to additionally wrap the joints with thread. Alternatively, you can also completely cover the deer with tape. In addition, there is an option to dress our deer in spruce. Simply attach spruce paws or just branches to the main parts of the deer. Looks amazing!
- Next you have two options. First, you can decorate with balloons and garlands. Secondly, you can wrap the workpiece with threads.
This is what step-by-step instructions look like on how to make a wire deer with your own hands for the New Year
To be honest, the second option will look neater. It will help to completely hide the places where the tape is attached. Now we’ll give you a couple of tips on how to make your deer fantastically beautiful:
- When wrapping threads around a deer, try to make the turns chaotic.
- Use hot glue to attach the threads to the frame.
- You can glue a small ball of thread as a nose.
- We recommend covering each part of the body with threads separately. But do not forget to sometimes connect body parts to each other.
- Finally, it is better to use short (no more than 1 m) pieces of thread. Each of them needs to be glued at the ends.
Knitted deer amigurumi
An unusual New Year's toy will be made from yarn. Knitted deer will come out large and voluminous, making a wonderful New Year's gift for adults and children. It is better to crochet a deer, starting the process of creating a toy 3-4 weeks before the New Year.
MK author: Svetlana Bozhko
Each part - head, horns, body, hooves and tail - is knitted separately and then connected using threads of yarn. A padding polyester or other filler is placed in the middle to give the deer volume.
Author MK: Oksana
Eyes, ears and a nose are sewn onto such a toy. They must be attached to the deer's head before the product is fully assembled.
MK author: Natalya Morozova
How to make a New Year's deer - Finishing the design
Please note that the most difficult thing to wrap is the horns. However, it is thanks to their elaboration that they will become more stable. They will require approximately 1 skein of wool. On the body - 2-3 skeins.
We will need approximately these threads
In addition to woolen threads, you can use tinsel. This method is faster and easier. This way your deer will definitely be fluffy and shiny. Just like the real thing.
Moreover, you can wrap a garland of lanterns around your Christmas reindeer. In this case, it is better to choose a battery-powered model. Then your deer figurine will become mobile. You can move it to different places in your home or yard. Therefore, it is not only a cool decorative item, but also a great light fixture. So we figured out how to make a New Year's deer with our own hands!
We finish learning how to make a deer from wire and garland
Doing simple crafts
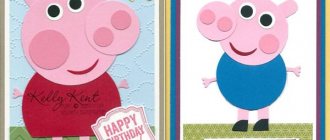
Applique is the simplest type of deer craft made from paper and cardboard.
Preschoolers can cope with this task quite well:
- All the necessary details are simply cut out from colored paper.
- Muzzle, body, antlers, hooves and spots of a deer.
- Then everything is glued onto cardboard and decorated with either a thin garland or a beautiful ribbon.
Older girls and boys can create the same craft in a different version:
- Having mastered working with scissors, they are able to independently carefully cut out an already drawn deer outline.
- Then the entire improvised “herd of reindeer” is suspended on one ribbon.
- This is how you get a garland of a team of running reindeer.
- If you attach a sleigh at the end of it, and put Santa Claus in it, then you can decorate an entire wall with such a composition for the New Year.
Silhouettes for a deer can be very different:
- Various sized rectangles or other small shapes.
- Moreover, the children themselves will be able to cut them out.
- The figurines are decorated with simple cotton wool depicting snow and snowflakes.
- They are quickly made thanks to a hole punch with figures.
- You can use old newsprint, which will find a new life in cute and different deer.
- They can be painted in different colors and glued to cardboard.
Coloring is always interesting for children. It’s good when natural materials are used when making crafts. These can be large seeds, cones, coarse hemp rope, etc.
The work will look much richer and more interesting.