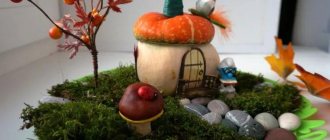
A pumpkin carriage made with your own hands by a child will become a real decoration of an exhibition of autumn crafts and will attract the attention of all children. Girls who, from childhood, have been interested in everything related to fairy-tale life and princesses will be especially partial to it.
DIY pumpkin carriage: master class
Since making a carriage from a pumpkin is quite simple, start making this craft on the eve of a holiday or the opening of an exhibition - this will guarantee that the product will retain its original appearance before the arrival of visitors, spectators, guests and the jury.
Choosing a pumpkin for crafts
A round, light weight vegetable is more suitable for a pumpkin carriage. It is better to choose from 500 g to 1 kg; small decorative fruits are also suitable. They weigh no more than 200 g, just right for miniature crafts. It is important what type of vegetable it is, because products from decorative species are stored for years. Cucurbita pumpkin is suitable for crafts.
It has a round shape and pronounced convexities, the color is golden brown.
When choosing a pumpkin, you need to pay attention to its appearance. The peel should be intact, without scratches or cracks. For crafts, take a fully ripened fruit. It’s good if it grew in a suspended state and did not come into contact with the ground, then the dents will not be visible.
Important! To make the craft last a long time, it is better to use a completely dried pumpkin. Fresh food spoils quickly.
What you will need
First of all, you should decide on the choice of pumpkin. It should be as regular as possible in a round shape and with a clearly defined surface relief. Depending on the type of craft, the pumpkin can be white or bright orange.
You will also need:
- sharp long knife;
- glue gun;
- paper towel;
- old newspapers or other waste paper;
- spoon or scraper;
- paints (aerosol and acrylic);
- awl;
- elements for decoration.
How to prepare a pumpkin for a carriage craft
The pumpkin must be properly prepared before work. First, wash it well in soapy water using a soft sponge. Afterwards, the skin is wiped dry and treated with alcohol. Next, start cleaning the pumpkin.
How to peel a pumpkin for the “Carriage” craft:
- Using a sharp knife, carefully cut off the top of the vegetable and remove the seeds.
- You need to clean it thoroughly, leaving as little pulp as possible so that the craft can be stored longer.
- Treat the inside of the fruit with lemon juice to prevent it from darkening.
- Dry the prepared vegetable in a well-ventilated area away from sunlight.
The pumpkin for the “Carriage” craft takes a long time to dry under natural conditions. Moreover, you need to dry it with the stalk so that the juice does not leak out, otherwise everything will go down the drain. The entire procedure takes 2-3 weeks, during which time the shell should change color and become darker. You can determine that the pumpkin is ready for use by the thickness of the peel. It should harden well.
You can speed up the process with the help of modern equipment. Dry in the oven at a temperature of about 80 ° C, constantly turning the vegetable so that it does not burn. Small fruits can be placed in a 600 W microwave oven. Drying in a convection oven at a temperature of 80° is allowed.
You need to store pumpkin for crafts in a dry room, where the temperature does not fall below +10°C and does not rise above +30°C.
Another way. The pumpkin is first cleaned of seeds and pulp. Next, stuff the vegetable with newspapers and put it in a well-lit place. The paper is changed several times a day as it gets wet. Drying is continued for 2-3 days. The room temperature should not be lower than +25°C. You can put the workpiece on a kitchen cabinet, where the air is warmer. In the cold, the process is delayed.
Delicious mastic recipe, step by step
In a water bath, stirring constantly, heat 50-70 g of chewing marshmallow until completely melted.
It is important not to overcook the base for the mastic. As soon as the marshmallow mass becomes liquid, it is removed from the heat. Add 25 g of butter to the melted chewing marshmallows, as well as food coloring (if you need to prepare colored mastic to decorate the cake)
Stir until smooth. Add powdered sugar in small portions and knead the mastic, achieving the desired thickness and elasticity. In total, marshmallow mastic may require up to 140 g of powder.
Unlike marshmallow-based mastic, marshmallow mastic is suitable both for sculpting confectionery decor and for covering homemade cakes. For modeling, the mastic mass should be of a fairly dense, elastic consistency; for covering, it should be soft and plastic. Before use, it is advisable to wrap it in film and put it in the refrigerator for half an hour or an hour.
- Grind 100 g of white chocolate into pieces. Melt at low boil in a water bath.
- Add 70-80 g marshmallows to liquid chocolate. As soon as the marshmallows begin to melt, add 1.5 tbsp to the mixture. spoons of butter, pour in 30-40 ml of heavy cream, 1-2 tbsp. spoons of cognac or rum. Stirring frequently, heat until the marshmallows are completely melted and smooth.
- Add sifted powdered sugar (about 140 g) in portions, thickening the mastic and achieving the desired density and plasticity. The finished product is rolled into a ball and placed in the cold for 40-50 minutes. Before use, white chocolate mastic is kept at room temperature for 5-7 minutes, after which it is thoroughly kneaded.
Cake "Ideal"
We invite you to familiarize yourself with Cleaning after the death of a person: the dangers of untimely disinfection of an apartment after removing the deceased
What to make wheels for a pumpkin carriage from
Wheels for the “Carriage” craft are made from various available materials. It can be:
- covers;
- thick wire;
- apple halves;
- carrot mugs;
- small squash;
- tree cuts.
To make carriage wheels from metal covers, they are first degreased, then painted with acrylic paints and varnished.
Baby food caps are used and glued to the craft with a glue gun.
Making wire wheels for a carriage is also easy. It is enough to twist a circle of the required diameter, make knitting needles, and connect them together. To make the work look more attractive, each wheel is wrapped with bamboo thread.
Start processing wheels from the spokes, then wrap the circle and hide the ends
Wooden mugs also work well as pumpkin wheels. They are pre-cleaned, painted and varnished. They are attached to the carriage with hot glue.
It is better to take birch or oak cuts
If the wheels are made from vegetables, then they are cut into circles, dried and used for further work. Papier-mâché blanks look original. The paper is soaked in PVA glue, the composition is applied to the wire wheels and allowed to dry. After this, the blanks are coated with golden paint.
Attach the finished wheels to wire axles
Subtle art
The art of artistic cutting of vegetables and fruits - carving - was born in medieval Japan. According to legend, in the 14th century a royal festival was held there, to which various gifts were brought. The king especially liked the composition made by the hands of a simple Japanese girl - a floating lamp with a bird figurine carved from vegetables and fruits. Then the ruler declared that every woman in his kingdom should master the same art. Later, fancy shapes began to be cut out of products throughout the Far East, and in Thailand, the art of carving was even dedicated to school discipline.
Eastern masters use exotic fruits such as papaya and taro root for carving. In Russia, it is very popular to make decorations from melons and watermelons, as well as traditional vegetables: radishes, beets, carrots, bell peppers, pumpkins, eggplants and cucumbers. At home, ordinary kitchen knives and scissors are used for carving, but professionals have a whole set of special tools in stock: elastic blades, square and round, engraving and flute knives (for cutting grooves).
In addition, carving masters know a lot of secrets on how to keep finished products looking fresh. For example, you need to store vegetables in cold water for several days before serving or sprinkle the cut out shape with lemon juice to prevent it from darkening.
DIY pumpkin carriage for Cinderella
You can make an interesting “Carriage” craft from a pumpkin in different ways. If the orange color is not satisfactory, then the workpiece is painted in the chosen shade. After complete drying, start working:
- Using a sharp pencil or chalk, draw the outlines of the windows and doors, and cut out with a knife.
At this stage, you can get the pulp if the fruit has been dried whole - Use a gold contour marker or paint to apply patterns on the sides, doors, and around the perimeter of the windows.
Let dry. Patterns can be made convex if you first apply glue to them and then paint them - Start assembling the parts into a single whole.
Attach the top cover to the workpiece. To make the wheels hold better, make the mounting axle from thick wire
You can place a doll inside the pumpkin carriage or place a lit candle to create a fairy-tale atmosphere.
Simple pumpkin carriage
You can make a simpler carriage for Cinderella in a different way, without coloring the fruit. For work you will need:
- pieces of tulle;
- safety pins;
- rhinestones, beads and ribbons;
- thick wire;
- gold color spray;
- varnish
Progress:
- Prepare the pumpkin in advance, cut out the bottom and remove the pulp.
Mark and make holes for the windows. Use a sharp tool to ensure clean cuts. - Make curtains from pieces of tulle. Attach them with safety pins. Carefully paint the windows with gold paint.
- Make the top of the carriage from a hair clip, add a crown and attach the blank with glue.
Make the crown with gold paint and decorate with beads - Make wheels from thick wire, cover them with gold spray, and dry them.
Thread a knitting needle through the pumpkin and secure the pieces to it. You can assemble wheels for a carriage from an old construction set.
Decorate the finished craft with rhinestones, ribbons, and beads. Place a doll inside and a horse in front. Make the harness from painted wire.
White mastic recipe
- First, invert syrup is prepared. 350 g of sugar (it is better to use fine crystalline sugar) is poured into 150 ml of water. The syrup is brought to a boil over moderate heat, after which about 2 g of citric acid is added to it. Cover the mixture with a lid. Heat over low heat for 40-45 minutes, cool for about 30 minutes.
- Add a pinch of soda (no more than 1.5 g) to the cooled invert syrup. The mixture, if done correctly, should begin to bubble. After this, it is thoroughly kneaded for 5 minutes.
- Soak 25 g of regular (not instant) gelatin in half a glass of water. It will take approximately 20 minutes for it to swell.
- Pour half a glass of water into a tall saucepan, add 2 cups of sugar and 160 g of invert syrup (about 2/3 of the prepared portion). Boil at low boil for 7-8 minutes.
- Gelatin is slightly heated. Pour, stirring, into the mixture of sugar and syrup, after which all ingredients are beaten with a mixer until snow-white and viscous consistency. At first - at a low speed of rotation of the beaters, after 1-2 minutes - at maximum speed.
- The base for the white mastic is cooled and then thickened to the desired density, intensively kneading with powdered sugar (finely ground).
How to decorate a pumpkin carriage
Before you start decorating the pumpkin craft, the carriage needs to be varnished. It is better to use an aerosol from a can so that the layer is even and thin.
Attention! When applied with a brush, the varnish may drip.
Beads, ribbons, and fragments of lace are used to decorate the carriage. You can make a crown from wire, which is installed at the top of the craft. Then you will get a royal carriage.
Paint the crown with gold paint and varnish
Leftover tulle or parts of doll clothes can make decent curtains for a decorative pumpkin carriage.
It is better to attach the curtain with pushpins
If you get a little creative, you can add a team of horses to the craft. First they make a bench for the coachman. Any fairy-tale character is used as a cab driver: a mouse or a gnome. A rope whip and horse reins are placed in his hands.
With horses, the craft will look realistic
A little history
Carving crafts from pumpkins is an echo of the distant past. According to the history of the Irish people, carving began with turnips. The ancient Celts created lanterns from this vegetable to mark the onset of Samhain, the end of the harvest and the day of honoring the dead. On this holiday, October 31, the Celts placed burning coals in carved turnips to light the way for the souls of close relatives and protect themselves from evil ghosts.
When Irish immigrants arrived in America in the 1840s, they discovered that pumpkins were much easier to carve. Other ethnic groups followed suit, and the pumpkin became the fall symbol of Halloween.
Other DIY pumpkin carriage ideas
A simple fairy-tale carriage for an exhibition in a kindergarten can be made quickly, using a minimum of material.
The craft will not be stored for long, but will delight children with its beauty.
Royal carriage made from scrap material with translucent curtain
The carriage for Cinderella with a coachman looks interesting. This craft is suitable for a school exhibition, where it will undoubtedly attract the attention of children.
The stand for the composition is made of thick cardboard and covered with fabric
Vase master class
Step 1
Place our glass on top of the pumpkin and indent it by 1 centimeter. Using a knife, mark a circle and its future diameter for cutting.
Just make sure in advance that your glass is smaller in height than the pumpkin.
Cut a cone with a knife and remove all the seeds with a spoon. Ideally, you need to remove all the seeds if you want the pumpkin to last longer.
We wash the pumpkin and let it dry. If the diameter of the hole allows, then you need to blot the inside with a napkin. So that the pumpkin is dry from the inside.
TIP: to make such a vase last longer, you can heat paraffin or an old candle and treat it with wax from the inside. This pumpkin will remain calm until March.
Step 2
Fill the glass with floral foam and form a composition of fresh flowers. What to do if there is no foam? Then take a regular glass of water or a simple foam rubber.
We insert the glass into the pumpkin and the vase is ready!
Such a vase without paraffin treatment costs 1-2 months, of course, a lot depends on the humidity in your room, as well as on the type of pumpkin. If you treat it with paraffin from the inside, it will last 3-5 months.
Pumpkin confiture with tangerines
Pumpkins come in different colors: white, yellow, green, black, as well as spotted and striped. Photo: pixabay.com
Ingredients
- Pumpkin pulp - 1 kg
- Tangerines – 500 g
- Lemons - 4 pcs.
- Fresh ginger root - 4 cm
- Sugar – 1 kg
- Cardamom seeds - 1 pinch
- Ghee - 1.5 tbsp. l.
How to cook
Peel the pumpkin and cut into cubes. Add peeled and chopped ginger, zest of 1 lemon and 1/4 of the sugar. Cover with a lid and leave to steep for 8–12 hours. Pour 1.5 liters of water into a saucepan, add unpeeled tangerines and bring to a boil. After this, cook over low heat for 1 hour. Cool, remove the tangerines, cut into slices and remove the seeds. Squeeze the juice from the lemons, finely chop the lemon peels and add to the tangerine broth. Bring to a boil, cover and simmer over low heat for 30 minutes. Then remove the lid and cook for another 15 minutes. Pass the finished broth through a fine sieve, squeeze out the lemon pulp. Pour the liquid into a clean saucepan, add lemon juice, tangerines and pumpkin pulp. Bring to a boil, add cardamom and simmer over low heat for 30 minutes. Dissolve the remaining sugar and cook the confiture until it thickens. Add oil. The confiture is ready!