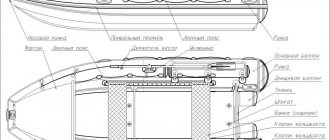
DIY iron boat
IRON BOAT
An iron trough is clearly better than a wooden one. It is lighter, stronger, cheaper and does not leak. An iron boat is just as much better than a wooden one. It costs about 150 rubles, weighs 30 kg, is durable and does not allow water to pass through.
Buy 5 sheets of "four pound" roofing iron and combine them into one large sheet. Its size will be approximately 1,400 X 3,500 mm.
The best way to join iron sheets is butt welding, but you can also weld an overlay with an overlap of 4-5 mm or solder brass with an autogenous torch. You can also join the sheets with a double border, but each seam will take about 4 cm of sheet width and the boat will be shorter. It is easier to connect galvanized iron with a single bead and solder the seams with tin.
Exactly in the middle of the resulting large sheet, draw the center line “OO”. Trace the outline of the boat pattern (1) and mark the locations of the six holes on the center line.
Cut the sheet along the contour, punch the intended holes with a dia.
A. VODAR, engineer
meter 8.5 mm and a row of holes with a diameter of 2 mm along the sides and stern at a distance of 15 mm from the edge and 10-12 mm from one another.
Weld or flange the bow and stern corners, and the shell of the boat is ready. Cover it inside and out with drying oil.
Get 4 pine boards 20 mm thick and 4-4.5 m long, if possible without knots. Plan them and cut out two side beams (2), two bow beams (3), and a cross member (4). Nail down the shield (5), cut it to the shape of the stern of the shell so that its size is 1-2 mm smaller, and its height is 5 mm lower than the sides of the shell. Cut one board lengthwise and use it to make blanks for the outer and inner keels with a cross-section of 20 X 70 mm and a length of 2,000 mm (6). Cover all wooden parts with drying oil.
Insert the shield inside the shell of the boat with the flat side towards the stern, insert the inner keel, press it tightly against the shield and trace the outlines of the six holes in the shell.
Place the outer shell on the outside
Many of our readers built the boats described in the magazine “Technology for Youth” No. 4 for 1955 and in Ne 7 for 1956. However, we have received many letters complaining that in some areas it is difficult to obtain plywood for this purpose.
In this issue we publish an article by engineer A. Vodar, who made, in our opinion, a completely acceptable three-seater boat from roofing iron. On it he sailed many hundreds of kilometers along rivers and lakes.
The new keel is level with the stern and also outline the contours of the same holes. Then drill holes with a diameter of 8.5 mm in the keels and attach them to the body with M8 bolts and nuts (the nuts must be inside the shell). Place washers under the heads of the bolts and under the nuts - plates of roofing iron measuring 60 X 60 mm. Before assembly, lubricate the bolt threads with drying oil or grease.
Place the side beams into the shell, rest them against the stern panel and nail them to the sides, passing the nails through two-millimeter holes made in the hull. The side should protrude 5 mm above the side beam.
Place the bow frame into the shell, measure and cut off the excess side beams and nail the frame in the same way as the side beams. Bend the protruding edge of the bead and press it into the wood flush with the surface of the beams.
Under the junction of the bow frame and side beams, place pieces of boards about 400 mm long and nail them with nails, 3-4 pieces on each side. Attach 2-3 planks with the ends beveled to nothing on top of the bow frame. Then nail to them a deck cut from a sheet of roofing iron or plywood painted with hot varnish.
Mark the seating areas (bow, middle and stern), prepare 12 pieces of planks for the seats (section 15X70 mm, length 0.7-0.9 m) and 6 strips of iron (size 60X400 mm, thickness 0.5-0.8 mm ). Bend the strips lengthwise at right angles. Cut the boards so that their length matches the distance between the sides in the designated* places.
Attach the iron strips to the boards with screws (7). Then drill holes with a diameter of 6.5 mm in the sides of the boat and the vertical bends of the strips and fasten the strips to the sides with MB screws. Fasten the ends of the side beams to the stern board with squares.
Preparing to chisel a boat
Having installed the workpiece on the keel, using a plumb line we check the verticality of the lines at the ends. Then, looking from the ends, stepping back from the extreme vertical lines to the right and left by 20 mm, we beat off two horizontal lines along the length of the trunk. Using a string, measure the length of the arc along the sides and bottom of the boat. Now, dividing the resulting value by four (folding the lace in four), we put it away from the end of the nose bevel and make a mark. We measure the same distance, but reduced by 20–25 mm, from the bevel on the stern and also make a mark. We perform these operations on both sides (along the sides) of the workpiece.
|
| Preparation for chiseling the workpiece. Side view. |
We connect the resulting marks, as shown in the figure, and use an ax to select the part of the workpiece highlighted by hatching. To speed up the work, you can use a chainsaw or a two-handed crosscut saw, making preliminary cuts.
We cut the space between the points marked with the letters A and B with an ax in the form of a gutter, and towards the stern and bow the slope of the gutter walls increases from 90° to 120°.
DIY boat “Dolblenka” using old-fashioned technology
Dear visitors to the site “Visiting Samodelkin”, from the material presented you will learn how to make yourself a “Dugout” boat with your own hands. For which only natural material is used, namely soft wood, for example willow or aspen. The tree is selected in advance, straight and without branches, and the thickness of the trunk will be responsible for the displacement of the future vessel.
This technology for creating boats is very ancient and was passed down from generation to generation, from Father to Son, today it is almost forgotten, but there are still “Craftsmen - Well Done” on the Russian Land!
Let's look at what exactly the author will need to build a boat? We’ll also look at all the stages and watch the movie (Cut down your nerd).
Materials
1. softwood (willow, aspen)
Tools
1. chainsaw 2. hacksaw 3. ax 4. adze 5. jointer 6. fire source (blowtorch)
Master class from Ivan Petrovich Ovchinnikov on building a “Dolblenki” boat with your own hands
And so, the author adopted this technology from his Father, and he, in turn, from his parent). In ancient times in Rus', the main building material, as you know, was wood, and furniture, dishes, peasant implements, carts, etc. were also made.
Boats and longships, respectively, were also built from wood; entire artels and brigades were created for this purpose. It may seem strange. but they began to make boats in the winter, when the tree is still asleep. The most suitable tree (aspen) was selected in the forest, cut down and shaped into a boat, after which the workpiece was covered with snow and remained in this position until early spring. During this time, the tree absorbed moisture properly. Why leave the boat in the forest, and even in the snow. The fact is that for the further process of forming the boat, it is necessary to dry it over an open fire, place spacers, thereby giving it its final shape (everything is described in detail in the film)
But D. Vanya took a slightly different, easier path, chose a large and thick one (willow) in advance, cut it down to the very root, removed the bark and began to form the boat.
Our author got such a wonderful boat; now he can sail along the Don and fish. As you can see, it was quite easy for the craftsman to cut down the boat, and the most important thing is that the material is free and given by nature itself.
You can also watch a very good film about the production of “Dugout” boats using ancient technology.
This concludes the article. Thank you for your attention! Come visit often, don't miss out on new items in the world of homemade products!
The article is presented for informational purposes only! Source
Receive a selection of new homemade products by email. No spam, only useful ideas!
*By filling out the form you agree to the processing of personal data
SECRETS OF THE DOUGET BOAT
For many years, M-K has constantly paid attention to amateur shipbuilding: on the pages of the magazine there appear descriptions of the designs of motor boats, tourist sailboats, and original designs of windsurfers made by amateur designers. However, in our opinion, another type of small vessel has been undeservedly forgotten. We are talking about a dugout boat. Behind its apparent simplicity and “absurdity” are hidden both the rationality of the design and excellent driving performance. The absence of scarce materials and the minimum set of required tools make it possible to manufacture such a boat directly on the shore, far from populated areas, in hunting or fishing areas.
For many decades, the secrets of boat masters were passed on “by word of mouth,” from father to son, without drawings or calculations. And since a limited number of people were engaged in this trade, today it is very difficult to find a specialist who can competently, according to all the rules, make a real dugout. This is aggravated by the fact that now, in the era of modern materials and technologies, there are practically no masters of the younger generation, and the old ones, unfortunately, take their experience and skill with them: their art dies with them. That’s why we decided to introduce home-made people, M-K readers, to the process of making a dugout boat. Perhaps some of them will be interested in this topic. We hope that the traditions of folk crafts will be preserved and continue with their help, bringing benefits.
When describing the procedure for working on a boat, we proceed from the capabilities of a single craftsman, without the use of machine tools or any lifting mechanisms. However, in any case, both the manufacturing process and the boat itself will bring you real pleasure.
SELECTION OF MATERIAL AND BOAT SIZES
A dugout boat can be made from pine, cedar, larch, aspen or poplar. In our area, preference is given to aspen and poplar, as their wood is durable and easy to process. The time of year for cutting down a tree does not matter much: it can be either winter or summer. It is important that this is done “to the full moon.” According to the experience of old craftsmen, if you cut down a tree “for the new month”, then the manufactured boat will be very difficult to build, and during operation it will quickly fail. This may seem like prejudice to some, but this advice has come to us from antiquity.
A dugout boat can be made directly on the river bank.
In the photo is the oldest master boatmaker Yakov Evmenovich Solomennikov. The length of the boat is selected based on the required carrying capacity (usually about half a ton), the condition of the body of water where it will be used, and the availability of suitable size wood. The following dimensions are usually used: 4.5 m, 7 m and 9 m. The longer the boat, the more labor-intensive it is, naturally, to manufacture, but it runs better. The appropriate diameter of the trunk is selected as follows: clasp the tree with both hands, and if the fingers do not meet by 30...40 cm, this is what you need (circumference length is approximately 180...200 cm).
TOOL
Tools required for work.
Tesla: A - side left, B - straight.
To make a boat you will need the following tools: an ax; adze - straight and boom (made from an ax with subsequent hardening); plumb line; brace or drill with a drill Ø 10 mm; a two-handed plane (a regular one-handed one will also work, but it’s more difficult to work with); crosscut saw or chainsaw.
PREPARING THE BOTTOM OF THE BOAT
Having laid the felled trunk of the selected dimensions on two thick poles (this will make it more convenient to work alone), they begin to prepare the bottom of the future boat. To do this, inspect the workpiece along its length and find a section that is flat along its entire length, without visible dips or curvatures in the middle - this will be the bottom. The selected area is sanded with a width slightly larger than the width of the ax blade, and then a line is struck on the resulting strip using a plumb line and a cord. Now we carefully remove the layer of wood along the line, making sure that there are no humps or depressions.
Beginning of work. Breaking out the marking line.
Processing the bottom of the boat.
Definition of the midline. Bottom marking.
Having turned the trunk over on the poles and secured it so that the bottom plane is horizontal, we determine the middle of the log. For this, a plumb line and a ruler are used. Having punched through the middle with a lace, we step back to the right and left from this line by about 40...45 mm (two fingers) and draw two more side lines.
BOW AND STERN PREPARATION
When starting to mark the bow and stern, you need to remember that the butt of the workpiece will be the bow of the boat, and the top will be the stern, that is, the bow should be larger in size than the stern. This factor is associated with operating features, for example, with outboard motors.
After completing all of the above, from the bow and stern, along a plumb line, we beat off lines that are, as it were, a continuation of the middle and lateral lines of the bottom. Stepping back from the bottom edge of the log by 120...150 mm, we draw the lower edges of the bow and stern perpendicular to the vertical lines.
Marking the ends of the workpiece.
Determining the length of the bow and stern of the boat. Selecting reference points.
Processing of the extremities: A - formation of the cheeks, B - processing of the stem.
Now we need to determine the lengths of the bow and stern. When making a boat of recommended dimensions, they are approximately 500...600 mm and 400...500 mm, respectively. In general, they depend on the diameter of the trunk and can change in one direction or another. But for any value, the length of the bow should be 100...120 mm greater than the length of the stern. In order not to subsequently “lose” the necessary points (the intersections of the lower edge lines with vertical markings at the ends and the side lines of horizontal markings with limiters for the length of the stern and bow), highlight them with a bright pencil or charcoal.
The cutting of the bow and stern is done with an ax. Here it is important not to rush and not to cut beyond the marked points. The slope of the cheeks should not be too steep and not too gentle. Any other recommendations are hardly appropriate: you just need to feel the tree and, when choosing sizes, rely first on intuition, and then on experience. So, with a sharply sharpened ax we give the cheek the shape shown in the figure. We process the workpiece on the other side in the same way. Then we connect the reference points and remove the excess so that we get a narrow inclined surface.
Applying markings to the workpiece for installing guards.
Processing the ends of the boat blank.
Having processed both ends in the described way and without turning the workpiece over, sand it over the entire visible surface. From the outermost horizontal marking lines, we remove the wood with tapes so that the cross-section of the trunk takes on an egg-shaped shape. Usually this requires going through 4-5 tapes. Of course, we must not forget about the symmetry of the sides, and also avoid visible dips and bulges. The exit of the tape to the bow and stern should be smooth. This work is not difficult, but it requires accuracy and should not be rushed. Finally, turn the workpiece over and finally sand it.
PREPARATION FOR CHAULING
Having installed the workpiece on the keel, using a plumb line we check the verticality of the lines at the ends. Then, looking from the ends, stepping back from the extreme vertical lines to the right and left by 20 mm, we beat off two horizontal lines along the length of the trunk. Using a string, measure the length of the arc along the sides and bottom of the boat. Now, dividing the resulting value by four (folding the lace in four), set it aside from the end of the nose bevel and make a mark. We measure the same distance, but reduced by 20...25 mm, from the bevel at the stern and also make a mark. We perform these operations on both sides (along the sides) of the workpiece.
We connect the resulting marks, as shown in the figure, and use an ax to select the part of the workpiece highlighted by hatching.
To speed up the work, you can use a chainsaw or a two-handed crosscut saw, making preliminary cuts. Bottom treatment.
We cut the space between the points marked with the letters A and B with an ax in the form of a gutter, and towards the stern and bow the slope of the gutter walls increases from 90° to 120°.
Now you need to gradually “finish” the shape of the gutter booms, the tan kan and the shape of the bottom. In addition, in the stern and bow it is necessary to narrow the upper part by 30...40 mm on both sides. From the points marked with the letters B, D, D, E, we beat off lines to the ends of the bow and stern and remove the excess with an ax. This concludes the preparation for chiseling.
GOLDING
To perform this work you will need a straight and side adze, an ax, a stick for cleaning wood chips, and a two-handed plane.
We start by taking out the bow and stern with a straight adze, and then cut out the entire “gate” as far as the tool allows us to “take”. Be careful not to cut the edges of the sides!
Having turned the workpiece over, we use a plane to cut through its entire surface.
In this case, we leave the plane of the bottom as it is, without rounding the edges. It is more convenient for two people to plan with a two-handed plane: the craftsmen sit face to face and gradually move from bow to stern. Chiseling.
The gatehouses are clearly visible. Every 250...300 mm perpendicular to the longitudinal axis of the boat from one side to the other, we draw marking lines, and then, stepping back from the edge of the bottom area by 30...40 mm, we drill holes along these lines about 10...12 mm to a depth of 40...50 mm. Hole pitch 100…120 mm. Drilling is carried out along all lines, including on the cheeks of the bow and stern.
Based on the number of holes obtained, we prepare gatehouses - rods from cedar round timber. With their help, when chiseling, the thickness of the walls of the boat is determined. Before driving the rods into the holes, their ends are blackened with charred logs - the tan will be better visible. The average length of the guard is 17...18 mm; at the bow and stern it can be increased by 15 mm.
Preparing for chiselling. Marking: A - marking lines;
B - determination of arc length; B - determining the location of marking points; G - marking marking lines. Having “set” the thickness of the walls, the boat can be turned over and finally hollowed out along the gatehouses, tilting the workpiece to one side or the other for convenience. A spacer placed in the middle can make the work easier. But it should not be very large - otherwise the edges may chip. And one more thing: along the entire length of the boat in the middle it is necessary to leave a thickening called a “melon”. Its dimensions can vary from 70...80 mm at the bow and stern to 50...70 mm amidships. The width of the “melon” is approximately 70...90 mm.
A workpiece prepared for chiselling. Side view.
Chiseling the gutter.
Marking marking lines on the body.
Drilling holes for guards
Making gatehouses.
All the work described usually takes the master 2.5...3 days of work. After the boat has been hollowed out and cleared of wood chips, you can proceed to the wiring. If it is not possible to start this procedure in the next day or two, then the workpiece must be lowered into water for storage. In general, an undiluted boat can be stored for one to two months.
BREEDING BOAT
First, a few recommendations.
Since the breeding process involves heating over the entire surface on an open fire, all fire safety rules must first be followed. It is also advisable to wait for calm weather or to specifically choose a suitable place.
It’s easier to work together, clearly assigning roles, since the wiring itself will only take an hour and a half, and everyone’s actions should be quite clear and quick.
Section of the hull of a boat prepared for breeding.
We prepare raw spacers from bird cherry or other flexible wood ahead of time. Their task, being installed inside the boat, is to apply even pressure on the heated side.
During operation, due to uneven heating, burning of the sides or bottom is possible. These places are clearly visible, and in this case they are moistened with a damp cloth. Therefore, ensure that you have a couple of buckets of water and a rag on hand at the right time.
The tank, like a boat, is located on two points of support; when heated, the bottom may sag or the stern and bow may hang down. This defect will dramatically reduce driving performance. This can be prevented by correctly positioning the boat on the poles and not bending the workpiece excessively.
Now let's make a fire and spread it along the entire length of the boat. Above the fire, at a height of 0.8...1 m, we fix two strong, damp birch poles and place the workpiece on them, bottom down.
The boat is ready for deployment.
Having achieved a uniform flame, warm up the bottom. It will reach “standard” when bubbles of moisture appear next to the “melon” and the sides begin to diverge. Having inserted the spacers, we tilt the boat on one side over the heat, making sure, however, that the bottom does not cool down. If at some point it turns out that the side “does not go”, then it is necessary to remove a strip of wood 5...7 mm thick from the middle of the boat to the bow and the norm - this will eliminate the tension and the process will continue. In principle, using this technology, the barrel can be deployed even in a leaf. The other side is processed in the same way. You just need to remember about symmetry. The spread of the sides will show how well you have processed the hull. If there are unevennesses in the thickness of the boat, then during breeding, bumps or holes will appear in such places that cannot be eliminated. If the bottom was planed too roughly, this will be noticeable later. There are no trifles here. The stresses arising in the material during wiring are very significant, so any removal of wood from the side must be done very carefully: one wrong movement and chipping will occur. All the work will have to be done first.
The moment of completion of the wiring and the symmetry of the boat are determined by eye - this is where the skill lies. Each boat has its own distinct personality.
After heat treatment, without removing the spacers, the boat is moved away from the fire and kept until the material hardens without changing its adopted shape.
REFINING AND FINAL FINISHING OF THE BOAT
Refinement includes the manufacture and installation of frames (we call them “irons”) and plating the sides (this operation is called “lining” the boat). Irons are made from uprooted stumps. You can also use fallen trees left after the spring flood. Frames are obtained by splitting a stump with roots and extracting the required part from it. The strength and reliability of such parts is amazing.
In the places where the irons are installed, the “melon” is cut a little and a groove is selected. For the moaning of water from below, cuts are provided on the frames.
The total number of transverse parts depends on the length of the boat and usually ranges from 5 to 9 pieces. Of course, you can also use frames assembled from parts. And not only wooden ones, but also metal ones. Their technology is described in detail in the literature on amateur shipbuilding.
The irons are fixed in the body with nails: one or two along the upper edge on each side.
The boat's stems are reinforced with overlays made from birch bars, which are nailed with four nails each.
To cover the boat, it is necessary to prepare material in advance. As a rule, these are wide dry cedar boards 20 mm thick and 8...9 meters long. Replacement is also possible - for example, pine, larch, spruce or fir. However, it is difficult to select long-length boards without knots from them, and in addition, when bent, they are more prone to chipping. Processing (planing) cedar boards is also easier.
Manufacturing of frames and irons.
Installation of overlays on stems.
Zhom.
Cross-section of a split and sheathed dugout boat.
Now you need to make three presses, or clamps. The boards are planed on both sides to a thickness of 12…15 mm. Having slightly wetted the board (putting it in water for 5...10 minutes), it is fixed in the midsection area with the help of a press, and then pulled to the extremities. It is necessary that in the central part the board overlaps the side by 80...100 mm - this is necessary for driving nails (preferably copper), as well as for caulking and filling the joint.
Drive the nails from the center to the edges, also moving the clamp. The edges of the board are rounded at the top of the board and trimmed into a wedge at the bottom. At the bow and stern, the board is cut evenly and rounded. Tan is also sheathed on the other side.
When performing work, make sure that the thickness of the board is not less than 10 mm (otherwise it may break).
Now, having turned the boat over and laid it on two blocks, we begin to caulk the grooves between the skin and the side with tow or cotton wool. After this, the grooves are filled with molten pitch or tar.
All that remains is to cover the inside of the boat hull with hot drying oil and then paint it with oil paint. This operation allows, as we joke, to walk along the river in felt boots.
If properly organized, the entire work of making a dugout takes about five days. The last boat we built has been in service for more than five years. By the way, about operation. When not in use, the boat should be on the shore with its bottom facing up. Over time, the guards sometimes fall out, especially during transportation, so it is necessary to make new ones with a slightly larger diameter. Usually, after lying on the shore for a long time, a leak occurs, but after 20 minutes the boat is ready for sailing.
Cracks caused by impacts are sealed with tin with a rubber gasket on nails.
A few more words about using a dugout with an outboard motor. It is best installed on boats at least 6 meters long. When planning to install a motor, the stern should be made a little higher than usual, as well as steeper. The motor suspension is mounted on a special removable bracket, preferably metal, welded. It is secured with bolts with rubber gaskets. It should be noted here that although the propulsion of a dugout boat under a motor is better than that of a plank boat, its maneuverability in narrow spaces is somewhat worse. Engine maintenance afloat is also more difficult.
We have described a simple and reliable technology for making a dugout, proven over many decades. We wish good luck to everyone who wants to use it and make such a boat with their own hands.
Y. SOLOMENIKOV, I. SOLOMENIKOV, Krasnoyarsk region
We recommend reading
- COMBAT TODAY AND TOMORROW Air combat... The popularity of this class has been and will remain unchanged. Let some say that fighting today is not so “prestigious” - the whole world is switching to radio-controlled...
- THE FIRST “THREES” The Pz.lll tank was destined to become one of the concrete embodiments of the military doctrine of Nazi Germany. This vehicle did not constitute the majority in the Wehrmacht tank divisions either in Poland or in...
Preparation
The prepared wood is brought into a dry room and laid on a flat surface. Then a small weight is placed on top to avoid distortions. The board will remain in this position for a year.
Boat hull sheathing with sheet metal
After waiting the allotted time to prepare the material when building the boat, we proceed to the following stages of preparation:
- We measure the length of the sides, leaving a small margin, and file them down, maintaining an angle of 45 degrees. The location of the cut will be the bow of the boat. Next, take a plane and plan the board along the entire length on both sides; chamfer is removed at the cut points in order to fit the parts tightly to each other. After the preparatory work, it is necessary to cover all cut areas with an antiseptic.
- Next, you need to make a triangular block to fasten the bow of the vessel. The length of the workpiece should be one and a half times the width of the side. The block is planed and coated with an antiseptic.
- To make the back part, you will need a wider board, preferably fifty. Don't forget about small reserves after sawing.
Frame assembly process
After preparing all the parts for the boat, we begin the actual process of assembling the boat from galvanized sheets and boards with our own hands. To do this you need to do the following:
- In the bow, it is necessary to combine two sides and a triangular blank for the bow. Nails or screws can be used as connecting elements. If the block protrudes above the sides, then it needs to be sawn to one level.
- The next step will be to install a temporary spacer. This process must be approached carefully. To prevent the sides from bursting when bent, the spacer is filed at a not too large angle.
- After installing the spacer, you need to bend the sides further. A rope or a couple of assistants are suitable for fixation.
- We substitute the back part, adjust it, remove the necessary chamfer. It is necessary to fit well so as not to leave gaps. Everything should fit snugly.
- Having finished fitting, we knock together the sides and saw off all the protrusions.
- After the sides are assembled, we install permanent spacers and remove the temporary ones. How many parts to install depends on the owner’s preferences.
Before fastening wooden parts with nails or self-tapping screws, it is worth pre-drilling holes with a drill. This method prevents the boards from cracking.
The final stage of assembling a wooden structure will be chamfering the lower parts of the sides, spacers and coating with a protective layer of antiseptic.
Selection of material and dimensions of the dugout boat
| A dugout boat can be made directly on the river bank. In the photo is the oldest master boatmaker Yakov Evmenovich Solomennikov. |
A homemade solid wood dugout boat can be made from pine, cedar, larch, aspen or poplar. In our area, preference is given to aspen and poplar, as their wood is durable and easy to process. The time of year for cutting down a tree does not matter much; it can be both winter and summer. It is important that this is done on the full moon. According to the experience of old craftsmen, if you cut down a tree “for the new month”, then the manufactured boat will be very difficult to build, and during operation it will quickly fail. This may seem like prejudice to some, but this advice has come to us from antiquity.
The length of the boat is selected based on the required load capacity (usually about half a ton), the condition of the body of water where it will be used, and the availability of suitable size wood. The following dimensions are usually used: 4.5 m, 7 m and 9 m. The longer the boat, the more labor-intensive it is, naturally, to manufacture, but it runs better. The appropriate diameter of the trunk is selected as follows: clasp the tree with both hands, and if the fingers do not meet by 30–40 cm, this is what you need (circumference length is approximately 180–200 cm).
Tools needed to make a dugout boat
To make a boat you will need the following tools: an ax; adze - straight and side (made from an ax with subsequent hardening); plumb line; a brace or drill with a drill with a diameter of 10 mm; a two-handed plane (a regular one-handed one will also work, but it’s more difficult to work with); crosscut saw or chainsaw.
Preparing the bottom of a dugout boat
|
|
Preparing the bow and stern of the boat
When starting to mark the bow and stern, you need to remember that the butt of the workpiece will be the bow of the boat, and the top will be the stern, that is, the bow should be larger in size than the stern. This factor is associated with operating features, for example, with outboard motors.
After completing all of the above, from the bow and stern, along a plumb line, we beat off lines that are, as it were, a continuation of the middle and lateral lines of the bottom. Stepping back from the bottom edge of the log by 120–150 mm, we draw the lower edges of the bow and stern perpendicular to the vertical lines.
|
Now we need to determine the lengths of the bow and stern. When making a boat of recommended dimensions, they are approximately 500–600 mm and 400–500 mm, respectively. In general, they depend on the diameter of the trunk and can change in one direction or another. But for any value, the length of the bow should be 100–120 mm greater than the length of the stern. In order not to subsequently “lose” the necessary points (the intersections of the lower edge lines with vertical markings at the ends and the side lines of horizontal markings with limiters for the length of the stern and bow), highlight them with a bright pencil or charcoal.
|
The cutting of the bow and stern is done with an ax. Here it is important not to rush and not to cut beyond the marked points. The slope of the cheeks should not be too steep and not too gentle. Any other recommendations are hardly appropriate: you just need to feel the tree and, when choosing sizes, rely first on intuition, and then on experience. So, with a sharply sharpened ax we give the cheek the shape shown in the figure. We process the workpiece on the other side in the same way. Then we connect the reference points and remove the excess so that we get a narrow inclined surface.
|
| Processing the ends of the boat blank. |
Y. Solomennikov, I. Solomennikov, p. Karatuz, Krasnoyarsk region.
Share this page on social media. networks or add to bookmarks:
Source
Fastening galvanized bottom
The main material for the manufacture of the bottom will be galvanized sheet. The most suitable option would be the appropriate sheet length to match the dimensions of the boat frame. If you cannot purchase iron of this size, you can take two sheets, but some difficulties may arise during the construction of the boat. The main actions when performing such work are:
- We cut out a piece of galvanized sheet along the bottom of the boat. To do this, you can outline the outline with a marker and trim it.
- We apply sealant to the lower parts of the sides in a straight line, and a special thread is laid on it. If there is neither one nor the other, then everything can be replaced with paint and tow. These steps will prevent the boat from leaking.
- We lay galvanized sheeting on top.
- We secure it with self-tapping screws with a press washer or nails (1.8x32). You need to start fastening from the middle to the edges. The distance is approximately 2-5 cm between the fasteners.
- Galvanized iron protruding beyond the edges is trimmed and tapped with a hammer.
- Next, you need to strengthen the bow. We also do this using tin.
Further work consists of varnishing and drying the boat. Drying must be done in the shade. If desired, you can protect the bottom from corrosion by covering it with oil paint in several layers.
Boat chiselling
To perform this work you will need a straight and side adze, an ax, a stick for cleaning wood chips, and a two-handed plane.
We start by taking out the bow and stern with a straight adze, and then cut out the entire “gate” as far as the tool allows us to “take”. Be careful not to cut the edges of the sides!
Having turned the workpiece over, we use a plane to cut through its entire surface. In this case, we leave the plane of the bottom as it is, without rounding the edges. It is more convenient for two people to plan with a two-handed plane: the craftsmen sit face to face and gradually move from bow to stern.
Every 250–300 mm, perpendicular to the longitudinal axis of the boat from one side to the other, we draw marking lines, and then, stepping back from the edge of the bottom area by 30–40 mm, we drill holes Ø 10–12 mm along these lines to a depth of 40–50 mm. Hole pitch 100–120 mm. Drilling is carried out along all lines, including on the cheeks of the nose and normal.
|
| Applying markings to the workpiece for installing guards. |
Based on the number of holes obtained, we prepare gatehouses - rods from cedar round timber. With their help, when chiseling, the thickness of the walls of the boat is determined. Before hammering the rods into the holes, their ends are blackened with charred logs - this will make it easier to see. The average length of the guard is 17–18 mm; at the bow and stern it can be increased by 15 mm.
|
| Section of the hull of a boat prepared for deployment. The thickening in the middle of the boat is a “melon”. |
Having “set” the thickness of the walls, the boat can be turned over and finally hollowed out along the gatehouses, tilting the workpiece to one side or the other for convenience. A spacer placed in the middle can make the work easier. But it should not be very large - otherwise the edges may chip. And one more thing: along the entire length of the boat in the middle it is necessary to leave a thickening - the so-called “melon”. Its dimensions can vary from 70–80 mm in the nose and normal to 50–70 mm. The width of the “melon” is approximately 70–90 mm.
| Chiseling a boat. The gatehouses are clearly visible. |
All the work described usually takes the master 2.5–3 days of work. After the boat has been hollowed out and cleared of wood chips, you can proceed to the wiring. If it is not possible to start this procedure in the next day or two, then the workpiece must be lowered into water for storage. In general, an undiluted boat can be stored for one to two months.
Breeding a dugout boat
First, a few recommendations.
Since the breeding process involves heating over the entire surface on an open fire, all fire safety rules must first be followed. It is also advisable to wait for calm weather or to specifically choose a suitable place.
It’s easier to work together, with an even distribution of roles, since the wiring itself will only take an hour and a half, and everyone’s actions should be quite clear and quick.
| The boat is ready for deployment. |
We prepare raw spacers from bird cherry or other flexible wood ahead of time. Their task, being installed inside the boat, is to apply even pressure on the heated side.
During operation, uneven heating may cause the sides or bottom to burn. These places are clearly visible, and in this case they are moistened with a damp cloth. Therefore, ensure that you have a couple of buckets of water and a rag on hand at the right time.
Since the boat is located on two points of support, when heated, the bottom may sag or the stern and bow may hang down. This defect will dramatically reduce driving performance. This can be prevented by correctly positioning the boat on the poles and not bending the workpiece excessively.
Now let's make a fire and spread it along the entire length of the boat. Above the fire, at a height of 0.8–1 m, we fix two strong, damp birch poles and place the workpiece on them, bottom down.
The moment of completion of the wiring and the symmetry of the boat are determined by eye - this is where the skill lies. Each boat has its own distinct personality.
After heat treatment, without removing the spacers, the boat is moved away from the fire and kept until the material hardens without changing its adopted shape.
Refinement and final finishing of the boat
Refinement includes the manufacture and installation of frames (we call them “irons”) and plating the sides (this operation is called “lining” the boat). Irons are made from uprooted stumps. You can also use fallen trees left after the spring flood. Frames are obtained by splitting a stump with roots and extracting the required part from it. The strength and reliability of such parts is amazing.
In the places where the irons are installed, the “melon” is cut a little and a groove is selected. To drain water from below, cuts are provided on the frames.
The total number of transverse parts depends on the length of the boat and usually ranges from 5 to 9 pieces. Of course, you can also use frames assembled from parts. And not only wooden ones, but also metal ones. Their technology is described in detail in the literature on amateur shipbuilding.
The irons are fixed in the body with nails: one or two along the upper edge on each side.
The boat's stems are reinforced with overlays made from birch bars, which are nailed with four nails each.
| Installation of overlays on stems. |
To cover the boat, it is necessary to prepare material in advance. As a rule, these are wide, dry cedar boards 20 mm thick and 8–9 meters long. Replacement is also possible - for example, pine, larch, spruce or fir. However, it is difficult to select long-length boards without knots from them, and in addition, when bent, they are more prone to chipping. Processing (planing) cedar boards is also easier.
| Zhom. |
Now you need to make three presses, or clamps. The boards are planed on both sides to a thickness of 12–15 mm. Having slightly wetted the board (putting it in water for 5–10 minutes), it is fixed in the midsection area using a press, and then pulled to the ends. It is necessary that in the central part the board overlaps the side by 80–100 mm - this is necessary for driving nails (preferably copper), as well as for caulking and filling the joint.
Drive the nails from the center to the edges, also moving the clamp. The edges of the board are rounded at the top of the board and trimmed into a wedge at the bottom. At the bow and stern, the board is cut evenly and rounded. The other side is also sheathed.
When performing work, make sure that the thickness of the board is not less than 10 mm (otherwise it may break).
Now, having turned the boat over and laid it on two blocks, we begin to caulk the grooves between the skin and the side with tow or cotton wool. After this, the grooves are filled with molten pitch or tar.
| Cross-section of a split and sheathed dugout boat. |
All that remains is to cover the inside of the boat hull with hot drying oil and then paint it with oil paint. This operation allows, as we joke, to walk along the river in felt boots.
If properly organized, the entire work of making a dugout boat takes about five days. The last boat we built has been in service for more than five years. By the way, about operation. When not in use, the boat should be on the shore with its bottom facing up. Over time, the guards sometimes fall out, especially during transportation, so it is necessary to make new ones with a slightly larger diameter. Usually, after lying on the shore for a long time, a leak occurs, but after 20 minutes the boat is ready for sailing.
Homemade wooden boat
Before starting work, you need to have basic knowledge - the properties of the material itself, which boards are suitable for construction, how to bend. For those who are curious and have no experience, there is enough useful literature on the Internet to understand how to work with wood, and drawings of a boat for making it yourself.
It is immediately necessary to determine the material that holds the boat together and protects it from leakage. The assembly area must be dry, and beginners will have to prepare for a work period of at least two weeks. It is advisable to have assistants.
Standard dimensions of the boat: 3-4 m long, 50 cm side height; 1-1.5 m width. Think through the details in advance, what is more important - the number of people, maneuverability of the vessel, stability.
Sizes can be changed. A drawing of important small parts is attached to the boat drawing.
Boat (mans.-cap) – dugout
Dugout boats made of straight-layered aspen have been widely used in the Kondinsky region since ancient times. Among the Kondinskys, the Mansi were of great importance in the household. Basic information about their use and manufacturing technology is recorded from the words of the oldest resident of the village of Polovinka, Anatoly Nikolaevich Khomyakov.
The boats were made single-seater, that is, small (mans.-vishkep), for moving one person and a small amount of cargo, or large (mans.-yanykep) (photo 1).
The shape of the boat was suggested by nature itself, made from a solid log; it follows its streamlined shape and glides well through the water. It is comfortable, lightweight, durable and has a high load capacity.
Traditionally, the boat was steered with one oar (mans.-tup) while standing or sitting on bent legs (photo 2). The material for making a dugout boat in the Kondinsky area was mainly aspen; the boat was called “osinovka”.
In the spring, in the forest, a tree of suitable diameter is selected, at least 30 cm in cut (from the top), cut down and bucked in length, depending on what kind of boat is planned to be made, from 4.5 m to 6 m.
The log is laid on transverse beams (beds) approximately 1-1.5 m long, and with a diameter of 16 cm and thicker.
The aspen must be sanded, all irregularities leveled with an ax, and the bow and stern of the selected log must be sharpened. Use a hand plane to smooth out the entire log until smooth (photo 3).
Then they prepare a board for making guardhouses with a thickness corresponding to the expected thickness of the future boat 1; 1.5 cm. The guardhouses were prepared from pre-dried pine or larch material. The length of the guard was 1 cm for small boats, and 1.5 cm for cargo boats. The same drill was used to drill holes in the board for hammering guards into these holes, and with the same drill holes were drilled on the boat from the outside around the circumference at a distance between holes 10 cm apart. The next row of holes is at least 30 cm from the previous one, and so on across the entire surface of the processed blank (photo 4).
Then the prepared guards were taken out of the board, dipped in heated resin, and hammered into the drilled holes of the boat (photo 5). After which they began the main work of chiseling the boat. Using a special tool, an adze, they hollowed out the middle of the blank (photo 6,7,8). The blank was hollowed out from the sides using a special side ax - a bokovik. When completely stripped, you must carefully find each clogged gate inside the blank, observing the thickness of the boat walls along the length of the gate. Between the found guardhouses, you must carefully clean the inside of the boat with a special plane - a sherhebel.
Holes are drilled in the bow and stern in the opposite sides and tied together with wire so that the boat does not tear during deployment (photo 9).
Water is poured inside the boat up to the sides for a day in order to soak the wood. The next day, the water is poured out and the boat is placed over a hole corresponding to the length of the boat, where a small fire is lit. They make pulpits from the board for the bow and stern to support the edges of the boat. While moving the boat, the presses are gradually weakened, moving them towards the ends of the boat. Resin is added to a bucket of water and heated over a fire. The heated resin is poured into the boat, lubricating the inside of the sides.
While the boat is heating, spacers spread the edges of the boat, changing the length of the spacers. Extinguish the fire, leaving the boat to cool. Spacers are made from cedar root.
Boat lining - aspen boards are prepared from spruce boards, placed on the edges of the boat, secured with nails (photo 10). The nails must be flattened on an anvil so that the board does not split.
Treat the boat with resin again and after complete drying the boat is ready for use.
To prepare resin or tar, a tar plant was built on the river bank, where a place was equipped to complete the construction of the boat.
A trench was installed in the steep bank, hollowed out of a tree trunk in an inclined position to drain the resin. The top of the gutter must be covered with a board so that the earth that is used to fill the top of the gutter does not get in. An earthen mound with a diameter of 2.2.5 meters is prepared in the upper part of the trench. In the center of a hill with a diameter of 1 meter, a funnel treated with clay is made, in the center of which there is a hole connecting to the upper part of the gutter (photo 11). The funnel must be filled to the top with chopped birch bark.
A vat (cast iron container) of approximately 60 liters is installed at the edge of the prepared funnel (photo 12). The vat is also filled with finely chopped and tightly compacted birch bark. Then the vat must be turned over onto a funnel, and the resulting joint must be covered with clay. Light a fire around the vat and maintain it for 24 hours so that the birch bark slowly simmers, releasing tar. The resulting tar flows down the chute into the prepared container. This volume yields approximately 15–20 liters of tar.
Preparing resin is similar to preparing tar. Only to prepare the resin you need to prepare resin (from pine stumps collected from burnt areas).
Practical work on making
A prepared drawing with the dimensions of the boat and related parts.
Purchase of materials: polyurethane glue, tow, water-repellent paint, resin, metal sheets, antiseptic, varnish and the most important thing - wood. The material must be chosen to be of the highest quality for long-term service and great work.
Boat sides. Use a file and sandpaper to remove dangerous areas from two wide beams. Be sure to use glue and resin along all edges, sparing no consumables.
Working with the nose part - an angle of 45 degrees is sawn off the side of each board so that they fit without gaps or cracks.
The borders are treated with antiseptic resin and glue to eliminate subsequent leaks. Do not skimp on material when making a wooden boat with your own hands; sawing off the excess is always easy.
Sources:
https://englishpromo.ru/stroitelstvo/lodka-iz-zheleza-svoimi-rukami https://usamodelkina.ru/8887-lodka-svoimi-rukami-dolblenka-po-dedovskoy-tehnologii.html https://portovoy. ru/lodki/kak-sobiraetsya-lodka-iz-otsinkovki-i-dosok-svoimi-rukami.html https://rybackaja-lodka.blogspot.com/2011/10/samodednaja-lodka-iz-dereva-i.html https://fishingadvice.ru/kak-sdelat-lodku-svoimi-rukami/