Despite the great development of the heating appliance market, stoves for private buildings do not lose their popularity. They will help heat your home and save a lot of money at the same time. The construction of the furnace begins with the arrangement of the base. The foundation for a stove in a wooden house guarantees the stability of the structure, protection from destruction and cracking or fire. Creating a base for a fireplace is a responsible undertaking that requires knowledge of certain nuances.
Foundation for a stove Source striphaus.ru
Purpose of the foundation for the furnace
If the stove weighs no more than 250 kg, you can do without arranging a base. But if the floor in the house is made of wood, there is an extremely high probability of fire, so you should think about filling the base.
A brick kiln cannot be installed without a foundation; this is due to soil heaving and subsidence of the structure. If the foundation of the house is made using reinforced concrete, then the base for the stove may be of a different type. The foundation for the furnace will ensure uniform distribution of the load from the product and protect it from damage, destruction, and cracking.
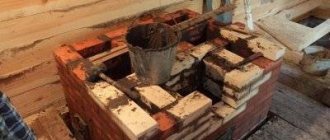
Construction of a furnace on a foundation Source firreplace.ru
In general, the base will help to significantly extend the life of the fireplace, prevent a possible fire in the building and expand the functionality of the structure.
Financial and economic aspect of building a Pompeian oven with your own hands
What is the reason for the relatively high price of such a stove?
- The Pompeian stove is made of fireclay bricks, which cost an order of magnitude more than usual.
- The design of the stove is quite heavy, and for ease of use it must be raised to a height of 80-100 cm. To do this, you will have to lay out a brick stand on which the stove itself will be built, which means you need to think about a good foundation.
To slightly reduce the cost of building a stove, any materials available on the farm are suitable for the stand: blocks, ceilings, old bricks, etc.
Building a pizza oven
Another disadvantage is the lengthy process of laying a Pompeian stove. A rather complex design, which requires the presence of a foundation, a pedestal, the stove itself, and a large countertop, indicates that the whole process will take at least a month.
In addition, you will need significant technological breaks to harden the concrete for the foundation, etc.
If you come to the dacha only for the weekend, then the entire masonry process can be rationally distributed into several stages, calculating that the technological break for “setting” the materials occurs during your absence.
Traditionally, the Pompeian oven has the following layout:
- solid foundation;
- pedestal for the stove;
- bake.
Pompeian pizza oven
The oven itself, in turn, consists of four parts:
- base (furnace bottom);
- dome (vault);
- entrance arch;
- chimney.
The base (pedestal) is made of small cinder blocks, 20*20*40 cm each.
The tabletop is a monolithic slab made of reinforced concrete 10 cm thick.
Tabletop
Unlike a traditional stone stove, here the chimney is located at the front. This determines one of the main differences in the design. The fire rises up along the dome, heating the vault. Thanks to this, heating is carried out simultaneously from above and below, which contributes to fast cooking.
The Pompeian stove has undergone many changes over the many years of its existence, and today you can find several of its varieties.
Neapolitan oven
There are Tuscan and Neapolitan ovens. The Tuscan stove has a higher arch and is more versatile in use. You can bake not only pies in it, but also cook stews, meat, and soups.
The Neapolitan oven is traditionally used for baking pizza and has a small dome that is approximately 80% of the total dome height.
Tuscan oven with a higher arch
As for the shape and size of the stove, the most optimal design is the one with an internal diameter of 80-110 cm. It is not recommended to make the stove smaller than this.
The spherical arch of the oven serves for maximum heating and heat accumulation, and the arched entrance is used for storing firewood and the food itself.
The size of the oven may vary, but in any case, strict proportions should be adhered to: the height of the arch should be approximately equal to 60% of the total height of the dome.
The width of the entrance for storing firewood should be equal to the total height of the dome.
Multilayer dome of a Pompeii oven
The vault itself has several layers:
- the internal surface is made of fireclay bricks;
- clay coating;
- 1st layer of basalt wool (thermal insulating);
- 2nd layer of perlite;
- Facing layer made of cement mortar.
In this case, the thickness of each layer should be approximately the same size, 5-10 cm. The more heat-insulating layer is laid, the longer the oven will cool down.
The facing layer can be made from any moisture-proof and water-repellent materials, since its main purpose is protection from precipitation. If the stove is being baked in the house, then this protection can be omitted.
In addition, the facing layer also performs a decorative function, so you can make it to your taste: decorative plaster, painting, mosaic, etc.
Nuances of laying the foundation
When arranging the base for a fireplace, you will need to take into account a number of certain rules. These include:
- The foundation for the stove in the house must be separate, not connected in any way to the base of the building itself. This is due to the fact that over time the house may sag. However, it should not be connected to the stove, otherwise this may lead to its deformation, poor draft or other damage. Sometimes it is possible to partially connect the bases with one wall.
- If the bases of the building and the fireplace are located nearby, they must be separated by sand-based backfill with a thickness of 50 mm.
- If the base of the building is strip, the base of the furnace should not come into contact with it in any way.
- When choosing the location of the heating structure and its base, you need to take into account the location of doors, windows and roof beams. It is necessary that the chimney pipe does not touch the ceiling beam during the installation process.
- When calculating the size and depth of the base, you need to take into account the weight of the stove with chimney and ceilings.
Loamy soil in section Source stroidominvest.ru
The size of the base depends not only on the weight of the stove, but also on the quality of the soil on which it will be installed. Most of the pressure is exerted by the chimney, so during the design process you should try to place it in the center of the base. This will prevent load asymmetry and shrinkage of the structure. The choice of base is also influenced by the material from which the stove will be built. The depth of the foundation for metal and brick fireplaces will differ significantly.
Design Features
Thanks to the special internal structure of the oven, it heats up quickly and retains heat for a long time. Historians claim that the Pompeian oven appeared on the Iberian Peninsula and was initially used specifically for preparing an open cheese pie, where the structure was not needed to heat the room.
Decoration of a Pompeii oven
Later it spread throughout the world. It is also called Neapolitan, Italian oven, tandoor.
The Pompeian oven will not only be an ideal design for preparing pizza, pies and bread, but will also decorate any countryside area. In combination with a gazebo or barbecue, it becomes a real landscape decoration, becoming a favorite vacation spot for the whole family.
Stove in the yard
Basically, such a stove is installed in suburban areas on the street, in a barbecue area, in an outdoor garden, but if desired and some technical modifications are made, a Pompeii stove can be built in the house. To do this, of course, you will have to provide not only a reliable, solid foundation, but also a chimney.
In this article we will look at the classic option for building an Italian oven in the open air. Before proceeding with the step-by-step instructions, I would like to warn you that laying a Pompeian stove is a very difficult and expensive undertaking.
But if you do everything correctly, then such an oven will delight you for decades, giving you an authentic look to your dacha and helping you prepare delicious homemade baked goods. Thanks to our clear and simple instructions, even a beginner can master the laying of a Pompeian stove with his own hands.
The structure of the Pompeian stove is somewhat similar to the design of the ancient Slavic stove.
Construction of a Pompeii furnace
But, unlike a traditional Russian stove, it heats up much faster. You can cook pies in it literally 30 minutes after heating, while a Russian oven will take at least 3-4 hours before reaching the optimal temperature for cooking.
This heating rate in the Pompeii furnace is achieved due to the lower thermal mass. The layer of brick that is heated is only 12 cm. Within 45 minutes after kindling, the temperature in this oven reaches 260 degrees, and after an hour - 370 degrees.
How is the temperature distributed in a Pompeian oven?
| In 30 minutes | In 45 minutes | In 60 minutes | In 90 minutes | |
| Outer part of the vault | 150 | 260 | 370 | 370 |
| Inner part of the vault | 315 | 370 | 370 | 370 |
The peculiarity and main advantage of the Pompeian oven is that you can cook almost any dish in it in a short time. Thanks to the high temperature that is reached inside the vault, pizza and bread are perfectly baked in it. Smoke adds a special piquancy to baked goods.
Types of bases for the oven
The most common base options for such structures are:
- Based on continuous poured concrete.
- Rubble concrete.
- Support-pile.
A conventional foundation is built from rubble on a cement composition or from concrete. In size it should be approximately 100 mm larger than the area of the stove itself. The height used is the same as when arranging the base for a conventional building. Roofing felt or several layers of waterproofing are installed on the finished structure, a brick is placed on top, and with the help of metal corners it will be possible to guarantee fire safety.
Scheme of the foundation for the furnace Source stopdacha.ru
See also: Catalog of companies that specialize in foundation repair and design.
When choosing the type of foundation and its size, it is necessary to take into account the quality of the soil. The density of the soil and the level of its freezing are of great importance. There are 3 types of soil: clay, sandy loam and loam. In areas where there are rivers, reservoirs and lakes, most often there is a sedimentary type of soil. In this case, it is better to entrust the creation of the foundation to specialists, since it will be necessary to perform accurate calculations of the water passage point.
A fairly common type of soil is loam, which contains sand and clay. Because of this, the soil has low plasticity rates, and the arrangement of the foundation can be problematic. The fact is that when dry, loam crumbles, in cold weather it swells, and when precipitation occurs, the viscosity increases significantly. To avoid complications with this type of soil, the depth of the base should be above the freezing point.
How to decide on the material
There are several options for making a concrete barbecue. For example, a poured design. This is a cheap way. But technological constraints and a large amount of work discourage people from following this path.
Photo: modular barbecue
Another option is to use cinder blocks to organize a prefabricated structure. There are a lot of advantages here. Construction will take several hours, since the assembly process is no more complicated than a LEGO constructor, and the price of such a barbecue will not be much more expensive than a flood oven. In addition, the design can be easily supplemented with a grill for preparing barbecue.
Arrangement of a concrete base
The foundation for a concrete-based Russian stove is created using the following materials and elements:
- Cement. If the soil contains a large amount of sulfates, sulfate-resistant cement of the SSPTs brand is best suited.
- Sand. You need a coarse-grained type without inclusions; mountain sand is the best choice; river and sea sand are also suitable.
- Formwork.
- Crushed stone.
- Waterproofing layer. Ruberoid would be a good choice.
- Container for preparing construction mixture.
- Bayonet and shovel shovels.
- Level for measurements.
- Hammer, nails and construction stapler.
Concrete foundation for a furnace Source hozsektor.ru
To build a high-quality foundation, you must carefully follow all instructions. The procedure consists of the following steps:
- Marking, digging a pit and filling it with sand and gravel.
- Arrangement of formwork and installation of reinforcement.
- Pouring concrete solution.
Digging holes and backfilling
The first step is to decide on the location of the stove, based on its size, the volume of the house, the number of windows and doors. The approximate dimensions of the structure are indicated on the ground. The base should be approximately 20 cm larger than the heating device. Pegs are used to mark the boundaries of the pit.
After which a trench is dug. It should be deeper than the soil freezing level and 100 mm wider than the base. Thanks to this backlog, it will be possible to avoid the consequences of possible soil movement. For dry sandy soils, the pit depth should be about 80 cm, for heaving types - at least 1 m.
Then a pillow is placed at the bottom of the hole. First, a layer of sand about 15 cm thick is poured and filled with water. When the water evaporates, add a small amount of sand and add water again. After which crushed stone and small stones are laid, the thickness of this layer should be 20 cm. The pillow is compacted, then sand is poured back in and water is poured in. The action must be repeated until the sand stops settling.
Installation of formwork and reinforcement
Formwork is installed along the perimeter of the trench. To do this, you can use old boards or sheets of plywood; the material will not affect the functionality of the structure in any way. Supports must be installed at intervals of 50 cm. It must be taken into account that there must be a free space of at least 10 cm between the formwork and the soil. At the corners, the structure is fastened with metal staples. The boards are fastened using nails.
The finished formwork is immersed in the bottom of the trench. Then you will need to waterproof the base. For this, polyethylene is used; it must be stapled around the perimeter to the formwork. Next is reinforcement. This will ensure the rigidity of the entire structure. Reinforcement is performed using steel rods with a cross-section of 12 mm, which are fastened together by welding or wire. At the end you will need to connect the floor to the foundation. To do this, you need to lay out an even row of bricks.
Concrete foundation diagram Source karelia-dom.ru
Materials and tools
To work you will need:
- Cinder block – 60 pcs;
- Reinforcement ᴓ10 mm – 7 m;
- Sheet steel 2 mm thick – 1x1 m (2 pcs);
- Red clay – 3 bags;
- ASG – 2 bags;
- Grinder with cutting disc;
- Shovel;
- Master OK;
- Hammer;
- Oven grate – 2 pcs.
A few clarifications on the list. Cinder blocks are needed in a standard size, preferably with a hollowness of 40%. This will ensure less heating of the entire structure. It is better to cut the reinforcement into pieces of 1 m. Sheet steel is required to construct the lid, and it is important that it be double. For this purpose, you can use any available non-flammable material, for example, a glass-magnesium sheet.
An oven rack is used to increase the area when placing food in the oven. This is especially useful when cooking small pieces. The use of refractory bricks is not a necessary condition, since the temperature, even when grilling, is not too high. In the oven chamber, the internal walls are coated with clay, especially since this part of the structure is often used as a barbecue.
Arrangement of a rubble concrete base for the stove
Creating this type of base for a stove consists of the following steps:
- The trench is being marked. Just as in the case of a concrete foundation, the size of the pit should be 10 cm larger than the foundation itself so that the movement of the soil does not cause significant damage to the structure. A hole is dug out.
- At the bottom of the pit, a cushion is placed based on crushed stone with a thickness of 15 cm. The layer is carefully compacted.
- Then a layer of large stones is placed on the bottom, but they should not be more than 15 cm in diameter. Crushed stone is poured on top, which will fill the empty spaces between the stones.
- A cement-sand composition made in a ratio of 1 to 3 is poured. It is best to use cement grade 400 or higher.
- A day later, a new layer of stones is laid, and so on until the entire trench is filled. The layers of stones must settle, otherwise the service life of the rubble base will be significantly reduced.
- When the hole is filled, the evenness of the surface is measured using a building level. If irregularities are noticed, they are eliminated using a cement-sand composition.
- The smooth base is covered with film and left until completely dry. This takes at least 2 weeks. The solution must be constantly moistened and protected from exposure to the sun.
- After drying, the formwork is dismantled and waterproofing is carried out. You can use molten tar for this. The empty spaces between the base and the soil are filled with coarse sand and crushed stone.
Rubble concrete foundation for the furnace Source stroimdom.com.ua
Application
Typically, fire-resistant and heat-resistant concrete is relevant for use in the construction of chemical, energy, and metallurgical structures. The material is suitable for the construction of smelters, blast furnaces, heating plants.
In everyday life, the need to prepare heat-resistant concrete appears during the construction of stoves, heating boilers, and fireplaces. Also, pipe leads are made from the solution and heating circuits are laid out. In private construction, concrete is prepared with your own hands, using special components and strictly following the instructions, observing the specified proportions.
New structures are put into operation after at least 3 days (rapid-hardening cement, aluminous cement, liquid glass), 7 days (Portland cement) or after the monolith has reached its design strength. Before heating, the structures are dried to completely remove free water in the composition. Heat up according to special modes, in accordance with technological instructions.
Creation of a support-pile foundation
A fairly popular type of base is the support-pile structure. It is durable and reliable, so it is perfect for a stove, bathhouse or wooden building. The process of creating such a foundation is as follows:
- Markings are made on the ground according to the dimensions of the stove with an addition of 10 cm in each direction.
- Use a bayonet shovel to dig up 20 cm of soil.
- Pegs are installed around the perimeter and ropes are pulled.
- In the places where the peg is installed, holes are drilled with a depth of 50 cm and a diameter of 20 cm.
- Formwork is created on the basis of boards, which are connected using nails. It is installed in a pit.
- Along the perimeter of the formwork, polyethylene is attached to its walls. It will help provide waterproofing.
- A 15 cm layer of sand is poured into the bottom of the trench and compacted thoroughly. Gravel is poured on top and water is poured in.
- Reinforcement is knitted based on wire with a diameter of 0.8 mm. It will need to be twisted carefully.
- Piles are installed in the pits. For such purposes, it is best to use asbestos pipes.
- The piles are filled with concrete mortar. It will take about 2 weeks for the composition to dry.
- After the concrete has hardened, you can pour the entire base area. It will also take about 2-3 weeks to dry.
Support-pile foundation for a furnace Source besedkibest.ru
This basis is durable and of high quality, but its creation will take quite a lot of time. If you want to complete the construction as quickly as possible, it is better to give preference to the concrete or rubble concrete type.
Home production
The easiest way to make heat-resistant concrete with your own hands is to buy a ready-made mixture and mix the solution according to the instructions (usually found on the back of the container). Everything is very simple: the dry mixture is poured into a concrete mixer, mixed for 1 minute, and mixed with ordinary water or liquid glass.
Self-preparation of heat-resistant concrete:
- Selection of the optimal composition of materials.
- Fill the concrete mixer with 90% of the required volume of water or liquid glass (diluted).
- Filling with finely ground additive, adding half of the aggregate and cement, mixing, gradually adding the remaining materials, the rest of the water (or glass).
- Kneading should be carried out for at least 5 minutes.
- Shipment of the finished mixture directly on site, pouring.
Base for a metal stove
A metal heating structure also requires a separate base. The fact is that if the stove does not stand level, this can lead to its deformation and destruction.
The procedure for constructing a base for a stove weighing no more than 150 kg is as follows:
- The trench is marked and excavated. Its depth should be no more than 0.5 m.
- Crushed stone is laid and compacted. The final layer of the pillow must be at least 30 cm thick.
- The concrete mixture is poured. You will need to set aside a day to set it. This solution is made in the following proportions: 1 part cement, 4 parts sand and water.
- After the cement has set, roofing felt is installed. It will serve as a waterproofing layer.
- The remaining space is also filled with concrete, but made in different proportions. You will need to take 1 portion of cement, 4 portions of gravel and 3 portions of sand and water.
- The finishing layer is leveled using a building level.
Metal furnace on a foundation Source sarinform.com
It will also take about 2-3 weeks for such a base to harden. It will need to be moistened periodically.
Finishing work
A prefab barbecue made from cinder blocks is quite stable. But the structure can be further strengthened and made monolithic. For this you will need 0.33 m3 of concrete. To obtain this volume you will need:
- Cement M400 – 2 bags;
- ASG – 7 bags;
- River sand, washed - 4 bags;
- Water ≈ 60 l.
The prepared concrete is poured into the cinder block voids. When dressing is performed correctly, through wells are formed in the furnace design. If you fill them with concrete, you get a monolithic system. But remember, such a procedure will sharply increase the thermal conductivity of the furnace, although it will also increase its heat capacity.
The outside of the barbecue is coated with clay, alabaster or plaster.
The basis
If you don't have a flat cement surface to install your future furnace on, you may need a couple of asphalt pieces to serve as a base for the concrete blocks. Place one concrete block horizontally and another vertically in front of it. Other options are possible, in which the horizontal block is directed in a different direction, and the holes go from side to side. This way you will have a deeper fire container. Try both methods to see what works best for you.
Water with honey on an empty stomach: starting the day with the right drinks
Do you have frozen blueberries? You can grow fruit-bearing bushes from it
German scientists: salt can suppress multiple sclerosis
Where is it often used?
Heat-resistant concrete is used not only in rooms and structures with high temperature loads, but also in the construction of residential and industrial premises. The following structures are constructed from fire-resistant concrete slabs:
You can make a barbecue from this material.
- fireplaces;
- home and industrial ovens;
- barbecues;
- designs for the chemical industry and energy sector;
- bridges;
- floating structures.