This is where Santa Claus lives
Who didn’t enjoy making paper crafts as a child, especially if your parents were present with you?
They cut out snowflakes, folded cockerels and boats - a special chic. Back then they didn’t know that this creativity was called origami. It would seem that everything is clear in the name: ceiling tiles - put them on top. But no!
The material from which the tiles are made is cut; breaks evenly if slightly trimmed; It is painted - that is, it lends itself well to processing. Imagination took over and away we go! But man is a social being, and cannot help but share his knowledge and skills with others.
And these others carry the information further. Here we are, with the help of a thematic video: “What can be made from ceiling tiles”, we want to share interesting ideas with you.
Composition of tiles suitable for crafts
Who, after renovation, did not collect the remains of tiles, baseboards, their pieces and trimmings, glue? And it’s a pity to throw it away - what if it comes in handy, but suddenly it may never come. Perhaps our instructions will allow you to take a fresh look at the used material, and your children will enjoy communication and joint creativity with you on New Year's Eve.
For clarity, we offer several photos showing handmade crafts:
It is necessary that children's crafts hang on the Christmas tree in the most visible place, because the main thing is not the price of the toys, but the importance of joint production.- Foam ceiling tiles can be easily cut with a knife or scissors, can be painted and glued well;
- Household packaging foam allows you to produce voluminous crafts and various gizmos;
- Combine tiles of different thicknesses in your crafts.
Openwork paper snowflake
For this craft you need to take:
- white sheets of paper (can be from a sketchbook);
- scissors;
- stapler
First, the paper should be cut into squares. Each square is folded into a triangle twice. Before reaching the middle fold, we make several cuts along the edge with scissors. Then we will completely open the square, after which you can begin to connect the ends in pairs, alternating sides. This results in one segment. You need to form 4 more of these and connect them with a stapler into one large snowflake.
Making various crafts
Let's start with simple crafts, like in mathematics - from simple to complex.
Doves
Christmas tree pendants
The New Year is coming, we are preparing Christmas tree pendants or toys:
- Trace the outline of a heart, bell, tulip, star or snowflake with a pencil, and use a paper knife or just scissors to cut out your outline sketches;
- They should be fairly simple. Consider attaching crafts. As an option, loops of thread will be glued to the toy with glue, or holes will be made in the crafts and threads will be pulled through them;
- Help young children cut out pictures. Do not make complex figures, so as not to discourage either yourself or your children;
- Let the ceiling tiles from which the blanks are prepared lie in wait;
- From simple colored paper, various candy foils, sparkles, rhinestones, beads, we will prepare a whole heap of decorations for our drawings;
- We attach and decorate tile crafts with PVA glue: cutouts from colored paper, sparkles, rhinestones, beads;
- You can sit and paint everything. It is preferable to use gouache, tempera, felt-tip pens or artistic oil paints. If you have time to dry them, oil paints take a long time to dry;
- Pencils, even the softest ones, do not draw, but press through the material of the blanks; it is not advisable to paint with them;
- For the Christmas tree, of course, it is better to prepare figures of Father Frost, Snow Maiden and snowflakes. They are distributed either one at a time in different places, or garlands are prepared from them.
Attention: To avoid melting of the foam, the paint composition should not contain acetone or other active substances.
Volumetric Christmas tree
Crafts in 3D format
A voluminous Christmas tree made from ceiling tiles is an original idea and is very easy to prepare:
- You only need 10 pieces or more of foam, and a circle is drawn on each. The principle of the nesting doll is from a large circle to a small one. A large circle is the base, a small circle is the top, and inside there is a pyramid made of circles of different circumferences;
- We cut teeth on each contour of the circle, imitating branches with needles;
- A fairly stiff wire or a thin metal rod is taken onto the tree rod, a baked electrode can be used, and one end is inserted into the stand;
- The mugs are painted green and strung onto a rod from below.
Valentines
Have you tried making your own Valentine's Day cards and surprising your loved ones? Everything starts for the first time - so let's try to experiment.
Valentine's card for loved ones
- The Valentine card is cut out in the shape of hearts, painted as desired, backed with paper, glitter, foil, decorated, and smeared with transparent glue. Manicure glitter is poured onto these artistic spots of glue, ribbons and butterflies are glued;
- You can make a postcard in the form of a book. Two identical square or rectangular polystyrene foam plates go on it; the edges are fastened with a paper strip glued to both halves;
- Letters and numbers for teaching reading and counting to small children are cut out from ceiling tiles;
- Various parts to collect educational toys and build entire cities with cars, trees, flowers;
- Various details are glued onto a large sheet of cardboard, and a picture of the city, a swamp with reeds and frogs is created, Vasnetsov’s paintings are recreated, and warning signs about danger on the roads are made.
Two inseparable hearts
Three-dimensional paintings
Cut-out picture on foam plastic
Cut-out paintings made from the remains of foam tiles can be compared to wood carving - and this is aerobatics. A sharp stationery knife is used to remove all excess and leave a drawing previously applied with a felt-tip pen to the tile, or pressed from paper with a sharp pencil;
The reverse side is either covered with colored paper and the drawing is hung on the wall on a loop, or a stand or leg is prepared for it.
Attention: The walls of schools, gymnasiums, and lyceums are decorated with such crafts.
House layouts
From the remains of foam tiles you can make houses of various sizes and complexity with your own hands. All parts of the house are made separately: walls, roof, doors, windows and much more.
Castle layout
- They cut out interior items, furniture and household appliances from tiles.
- Using scraps of fabric, imitation curtains, upholstery and other home textiles are made.
- All parts are painted and glued together with transparent glue. The process is quite labor-intensive, but very exciting.
You can create copies of architectural monuments or simply beautiful buildings. The cost of the raw materials is quite low, but the result is impressive.
DIY Santa Claus from ceiling tiles
The main expected hero of the New Year holidays is Santa Claus. This is probably why children and adults enjoy making his figures from scrap materials.
Such a fertile material as ceiling tiles is an excellent basis for both the classic figure of a bearded grandfather and an openwork, creative one.
Another point is that in the latter case, the craftsman’s skill with a knife and a high-quality template that will be securely fastened during the cutting process are required.
Be sure to add paints with acrylic or gouache. And also sparkles and smiles on the face of Santa Claus.
Slotted relief technique
This is slightly reminiscent of cutting out plywood with a jigsaw, only instead of a nail file there is a knife, and ceiling tiles replace the plywood. In this technology it is better to go from simple to complex.
Volumetric composition The first works will consist of one plane with a cut-out pattern and a background of a contrasting color:
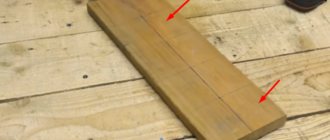
- Transfer the design to the tile using the pressing method (described above).
- Cut out all unnecessary parts, starting with large parts and moving on to smaller ones.
- Select a background and stick the product onto the base.
- Make a stand (or glue a loop for hanging).
Complex works consist of two or more layers of foam, each of which has its own images cut out to create foreground and background. You can use double-sided tape to connect the layers.
The master's work is afraid
To make the picture look three-dimensional, you should experiment with different background colors and lighting to achieve the best final result. Do-it-yourself cut-out crafts from ceiling tiles are a very exciting activity.
Crafts made from ceiling tiles will bring you and your children many pleasant moments. Create for fun and involve your children in the process, and the attached video will help you with this!
New Year crafts made from polystyrene foam and ceiling tiles are an easy way to decorate your home for the holiday. We have made for you a selection of popular ideas and the best master classes on working with these materials. The article will be useful for those who love original decor, as well as for parents whose children are already preparing their crafts for competitions in kindergarten or elementary school.
For crafts made from ceiling tiles, you will need New Year's templates. We advise you to take a look at the “stencils” section on our website: snowflakes, New Year’s characters, deer and other selections await you there. Any of these templates can be printed, and then simply cut out and traced onto the foam - there you have it.
Tile house
White ceiling tiles will be an excellent basis for a New Year's hut. If you are doing creative work with children, entrust the child with decorating the craft.
We will need:
- tile (1 piece);
- plastic baguette;
- foil, “rain”;
- glue, markers, felt-tip pens;
- cotton wool
We cut out 4 walls from polystyrene foam. The side ones can be made narrower. The main thing is that the height is the same.
It is best to glue the house with glue, but if desired, you can also add tape to connect the internal edges. Decorate the roof with baguette. And if you don’t have one, put cotton wool on it - you’ll get a beautiful snowball.
We decorate the house with snowflakes, Christmas trees and other New Year's attributes. Make several of these houses from ceiling tiles with your own hands - you’ll get a whole festive village.
Snowflakes
From ceiling tiles you can make a simple and cute decoration for the New Year in the form of large snowflakes.
We will need:
- 2-3 sheets of tiles;
- thin cutter;
- "rain" or fishing line.
First, you need to print out snowflake stencils (you can take them from our selection). You can make them small and put several snowflakes on one thread. Or paint a snowflake all over the ceiling tiles.
You need to cut out small parts with a cutter. If they are very small, you will have to gouge out the holes with a needle or awl.
Additionally, you can decorate the snowflake with bright colors or sparkles. Hang snowflakes from the ceiling.
Complete the decoration with cotton wool or foam balls. This way you will get artificial snowfall, which will look very cool on a window or just in your apartment.
Christmas tree decorations
Ceiling tiles make excellent garlands or New Year's decorations for decorating a Christmas tree. The main thing is to prepare bright colors and sparkles, and then it’s just a matter of small things. This New Year's craft made from polystyrene foam is perfect for participating in a competition in kindergarten.
We will need:
- ceiling tiles or foam;
- laces;
- stencils;
- markers, pens, paints, glitter.
Print out the stencils and transfer them to foam plastic (any New Year’s images will do, even figurines of New Year’s characters). It is best to cut them using a cutter rather than scissors, so as not to spoil them.
Draw an outline with a thin felt-tip pen. The base can be painted with bright colors, and decoration can be added with sparkles or special paints to create ornaments.
Pierce the figures at the top with a thick needle, insert a string or rain.
Styrofoam snowman
If you want to make a stable figure, you are better off using foam. If you need a snowman to stick it on the wall or to decorate windows for the New Year, take ceiling tiles.
We will need:
- tiles and foam;
- paints;
- stencil;
- sharp knife or cutter;
- sandpaper.
Views: 9,182
Nowadays, there is a huge variety of building materials, the remains of which we most often throw away. After the renovation, there are a lot of pieces and scraps left that can be used for all kinds of souvenirs and to make useful things for the house.
Most people have a creative streak, and especially if you have children, there are an endless number of interesting crafts you can make with them.
Decor ideas
Any snowflake – both simple and intricate – can be easily decorated with a variety of decorations. Thanks to such additions, crafts become more original and attract more attention. Let's look at how such products are often decorated:
- applications – snowflakes with various applications will definitely attract a lot of attention;
- color combinations – snowflakes (for example, paper ones) look bright, which combine 2 contrasting colors; this can be an elegant thing in the form of an accordion;
- inserts in the center - you can get an original snowflake if you design its central part in a non-trivial way: sketch the face of the Snow Maiden or Father Frost in it;
- sparkles – a scattering of sparkles on the surface of homemade snowflakes can give them a unique look; from the outside they will appear soft and fluffy.
There are many ways to decorate cute homemade snowflakes. Each master himself chooses an interesting solution that he likes more than others.