Krosh
To create a toy we will need:
- deep blue fleece;
- pale blue or white fleece for the muzzle and tail;
- pink fleece or felt for the nose;
- white and black felt for eyes;
- filler;
- threads, needles, pins, scissors.
How to sew a toy - description and master class
First, let's redraw or print the pattern in full size.
We cut out the required number of all parts using templates. Don't forget about seam allowances.
We sew down small parts - arms, legs, ears. This can be done by hand or by machine - the choice is yours. We leave a hole for stuffing on all parts.
Next, let's work on Krosh's head. Sew all the petals together, leaving a hole for the filling. It is better to make such a pass in the middle of the seam, away from the corner joints. Then it is more convenient to sew it up.
Advice
If you are sewing a toy from fleecy material, consider the direction of the pile when cutting and sewing. It should be the same for all parts. For convenience, you can indicate the direction of the pile on the wrong side of the parts with an arrow.
We turn the part inside out and stuff it with filler. Try to keep the filling density uniform. Otherwise, the toy will warp when washed. Sew up the hole using hidden stitches.
All parts are prepared, you can start assembling.
The next stage is a very important one. We need to sew the muzzle evenly and symmetrically. It is most convenient to focus on the joining seam of the head and body. We fold the muzzle part in half and, aligning the fold line with the joining seam, fix the part with pins. Next, straighten the part and, slightly pulling, pin the pins along the contour. We evaluate the symmetry and, if necessary, correct it. We sew the muzzle with hidden stitches.
Let's move on to the design of the back. Sew together the parts of the tail, turn them inside out and fill them with filler. This should not be done very tightly. If desired, you can sew or drag the petals of the tail with threads, giving it the shape of a flower. Sew the tail in place.
We turn the ears inside out and fill them with filler. The degree of filling is not too tight, so that the ears just hold their shape. Sew on the ears, tucking the cut inside. At your discretion, this can be done in a circle along the contour of the part or with a straight seam. With the first option, the ears will stick out on the head, with the second, they will hang down. Our MK has a circular seam.
To design the muzzle, you need to find the center line and mark it. Cut out the eyes and highlights. There should be two glares for each eye – Ø6mm and Ø10mm.
We try on Krosh's eyes and attach them with pins. We sew on the eyes using a very neat buttonhole stitch with small stitches. It is better to do this with a bead needle.
We cut out a round nose from pink fleece. We sew it in a circle and gather it together, putting a little filler in the middle. We tighten the thread, getting a spout - a button. You can try it on the muzzle, but you shouldn’t sew it on yet. We outline a smiling mouth and embroider it with a “back needle” stitch. We hide the knots of thread in the place of the future nose. Finally, we sew on the nose.
Now we will work on the arms and legs. We turn them inside out and fill them with filler. We try it on Kroshik and sew it on.
Help me sew Nyusha from Smeshariki
Participant
- Offline
- Visitors
- 21 messages
My child ordered Nyusha from Smeshariki for New Year. I can't find it in any store. The idea came to sew it. I don’t know where to get patterns or how to decide on materials. Can anyone advise on this issue?
Newbie
- Offline
- Visitors
- 8 messages
Participant /> />
- Offline
- Visitors
- 25 messages
Newbie
- Offline
- Visitors
- 18 messages
Newbie
- Offline
- Visitors
- 17 messages
I found this pattern for Nyusha, it seems like all the details are there. As for the materials, I would take fleece as the main material and felt for the eyes. I can’t tell you by colors, cartoon Nyusha will help you.
Newbie
- Offline
- Visitors
- 11 messages
Participant
- Offline
- Visitors
- 25 messages
Participant
- Offline
- Visitors
- 37 messages
Access closed.
- You are not allowed to respond to topics of this forum.
Latest topics
- A type of origami - kirigamiAuthor19:04, 12/21/2020
- "OXFORD" shoes. Knitting needles. Author: mtricote18:06, 11/25/2020
- knitted neck warmerAuthor: mtricote17:08, 11/24/2020
- Short socks “Jasmine”. Knitting needles. Author: mtricote19:31, 04.11.2020
- Knitting washclothsAuthor: Matvey Uritsk17:34, 08/06/2019
Status changes
Articles
- Master class on making an openwork fruit bowl. 10:00, 06/20/2016
- How to make potholders without a sewing machine using the patch technique. 09:57, 06/20/2016
- How to make spherical flowers from wool: master class p. 17:27, 06/15/2016
- How to make a simple flower from wire and fabric: master. 17:25, 06/15/2016
- How to make a cute gift box out of cardboard and fabric. 17:23, 06/15/2016
- How to sew a fabric bag for storing vegetables for the kitchen: . 17:20, 06/15/2016
- How to make a bowl from an old record and twine: master. 17:19, 06/15/2016
vote
Article rating
Pillow
If desired, you can sew a funny pillow - Krosha.
It is better to make all parts, except the head, from two different materials - plain blue and multi-colored.
To make it, print out the stencils below. We print them in the required sizes.
We cut out all the details from the selected fabric.
On one of the petals of the muzzle we sew on eyes, teeth, and embroider a smile. Sew all the petals together, leaving a gap.
We sew together the details of the arms, legs, ears and tail.
Turn it inside out, trim off the excess allowance, and stuff it.
Sew all the limbs, tail and ears in place. The pillow is ready!
Our next toy will be the pink coquette Nyusha.
DIY smeshariki made from plasticine and mastic
The characters of the popular cartoon “Smeshariki” are familiar to all children. Many kids enjoy watching this wonderful, kind fairy tale and laugh at Krosh’s tricks, dream with the talented Barash, and are touched by Nyusha’s behavior. You can not only watch funny little animals on TV, but also sculpt them from various materials: plasticine, salt dough, mastic, polymer clay. Your child will definitely enjoy such a fun and interesting activity; in addition, it develops thinking and visual memory, improves fine motor skills of the fingers, and reveals artistic abilities.
Preparing for the creative process
Before sculpting Smeshariki from plasticine, you need to prepare a convenient place for practicing and all the accessories that will be useful in the work. Here are some points to consider:
- It will be convenient to sculpt figures of fairy-tale characters at the table, and to keep it clean, first cover it with oilcloth.
- You need to choose multi-colored, colorful and bright plasticine. It is desirable that it be soft, since it will be easier for the baby to form small parts from such material. If the plasticine is too hard, you can heat it in a mug with warm water for a few minutes.
- In order to emphasize the eyes, highlight the mouth, nose, paws, tail, a stack or a pointed stick is useful. It wouldn’t hurt to have a special small board on which you can roll out pieces of sticky mass.
- Before you mold Smeshariki from plasticine, you need to get a color picture of the cartoon characters and try to repeat their characteristic features so that they turn out as similar as possible.
Nyusha
For sewing you need:
- fleece in pink and red (or brown) colors;
- a small piece of white fleece or felt for the eyes;
- a little black felt (can be replaced with black buttons) for the pupils;
- red threads for mouth embroidery;
- thick threads (possibly wool) for hair;
- filler;
- lace for bow;
- threads, needles, scissors, sewing machine (if you do the work with machine seams).
Description
We make patterns for all parts of the toy.
We cut out the components from the material.
We sew each wedge from parts of the body and head. Then we grind all the wedges together, leaving an area for turning and filling with filler.
We turn it inside out, fill it with filler and sew up the remaining seam area with blind stitches. We make a patch.
Sew the patch in place, embroider the nostrils (you can sew two black beads instead of embroidery). We grind down the parts of the ears and turn them inside out.
We sew the arms, legs from the main part, and hooves. Turn it inside out and fill it with filling. Sew on the legs.
Similarly, using invisible stitches, we sew on the handles.
From thick red woolen threads (or from strips of fleece) we make a bun of hair. We sew it onto the top of the head and braid it. For decoration you can use bows, buttons, beads or beads. After all, Nyusha is a big fashionista, she must be beautiful!
For the eyes, cut out two circles from white fleece and sew black buttons to them. As an alternative, using ready-made eyes is quite suitable.
We cut out eyelids from red fleece. Sew them to the eyes. We embroider the mouth and eyelashes with red thread.
It turns out an almost finished toy.
All that remains is to put some blush on our coquette. Cut out hearts from red fleece and sew them onto the face.
And the final touch - we make a tail with a crochet hook and sew it on.
For Nyusha, you definitely need to sew or knit her favorite – Tuzya. For the dog, you can draw the pattern yourself - it’s completely simple. Tuzya is performed in beige and brown tones. And don't forget about the letters on your belly! Details of the toy - see photo.
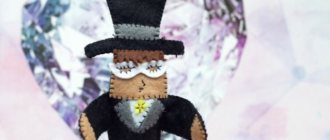
Let's continue sewing Smeshariki from felt with our own hands using patterns. Let's start making an adult and smart Pin.
Create a funny turtle from felt spirals
I bring to your attention a method for making a felt turtle with a multi-colored shell. This cute reptile can be used as a brooch, pendant or just a soft toy. The originality of the idea lies in the application of the principles of soutache embroidery to felt. Having mastered this relatively simple product, you will be able to use the technique you have learned in other combinations. Good luck!
We will need:
- sketch of our turtle;
- pattern of a turtle silhouette according to a sketch;
- soft felt 2 mm, 2-3 colors;
- sewing threads in the color of felt;
- beads of different sizes and colors;
- beading and sewing needles;
- glue moment;
- scissors.
From felt we cut strips 4-5 mm wide and two felt silhouettes of our turtle. I have them in different colors, you can make the back and belly the same color.
We fold the felt strips in a pile of 2-3 colors and roll them into a spiral to make circles with a diameter of 2 cm. We pin the end of the strips with a pin.
Now you need to sew the spiral so that it does not fall apart during the installation of the turtle shell. I usually start by sewing on the tail, and then make several stitches all the way through, along the diameter of the circle. We secure the thread with a regular sewing knot. Do not pull the mugs too tightly, at this stage they should retain their round shape
We assemble the shell by sewing the circles together. I stitch right through, no stitches or fastenings are visible either on the back or on the face. The assembly diagram is visible in the photo. In this process, the circles will change shape, becoming more like the plates of a turtle shell.
The shell itself will become a hemisphere when we fasten all the circles together.
We fill the gaps between the circles sewn together with beads, plain or multi-colored.
We seal the dome of the shell from the inside with cotton wool or synthetic down.
We sew the finished shell to the felt silhouette - the back of the turtle.
Glue pieces of felt in 2-3 layers to the underside of the silhouette of the turtle's belly. On the fin and head areas to create a volume effect.
We fasten the back with the belly with pins so that they do not move during stitching.
We sew the parts together using an overlock stitch along the entire contour.
We trim the edges of the fins and sides with large beads.
You can additionally decorate the fins and head with multi-colored beads. In place of the eye we attach two large beads. We sew a brooch pin onto the belly.
Hooray! 
www.livemaster.ru
Toys for children that develop fine motor skills
For the little ones there are options for crafts in the form of puzzles, it looks quite interesting:
Or you can make a game like this, choose “clothes” for the animal))).
Or make a finger fairy tale or cute animals.
The most famous fairy tale is Teremok.
Or lacing.
That’s all for me, what I liked I shared with you, so take threads, a needle, scissors and felt and create different masterpieces. Enjoy your creative fruitful work everyone. See you later))).
Sincerely, Ekaterina Mantsurova
Hedgehog is the hero of the popular cartoon “Smeshariki”. He is inquisitive and a little thoughtful, and enjoys collecting cacti. If your child likes the cartoon about Smeshariki, sew him this cute hedgehog from felt.
Decor options
Any available means are suitable for the visual design of the box. What is important here is imagination and the ability to compose compositions. For example, the kanzashi method involves the use of voluminous decorations made of satin ribbons. Another technique called quilling uses twisted strips of colored paper for decoration.
Decorative elements can even be made from eggshells by selecting fragments of the desired size, as well as suitable paints. Boxes lined with fabric and decorated with a bead pattern give an attractive look. An applique made of cardboard or a simple ornament applied with oil paint is also quite suitable. Another option is to decorate the box in a nautical style using shells of different sizes. Buttons of different colors and sizes are also suitable for this purpose. Sequins and glitter of various shades are popular today - these decorative options are attached to the surface of the box with glue. You can choose many options for decorating the box, the main thing is to find the necessary notes for inspiration, and then build a harmonious composition in your imagination.