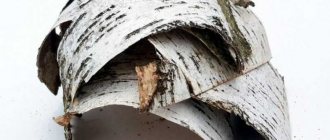
The slender, beautiful birch tree is a real symbol of Russia. They loved it at all times not only for its flexible body and branches, but also for its white smooth bark - birch bark.
Since ancient times in Rus', birch bark was the only material available to the common people. That’s why it was used so often on the farm:
- made dishes, household utensils (tueski, boxes, baskets, baskets);
- clothes and shoes (bast shoes);
- toys and musical instruments;
- furniture (chairs, cradles);
- amulets and jewelry;
- boats, tackle, ropes, harness for horses;
- they lit stoves and lit fires;
- covered the roofs of houses;
- recorded important life events (birch bark letters).
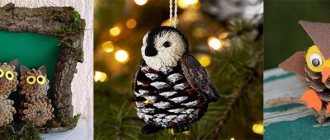
Now the love for natural materials is returning, and making handicrafts from birch bark is becoming popular again. Modern craftsmen make antique utensils, boxes, paintings, artistic panels, souvenirs and much more from birch bark.
Why is birch bark so attractive?
- Flexible and easy to process.
- Able to retain heat and allow air to pass through.
- Products in birch bark dishes remain fresh for a long time.
- Products made from it are safe for allergy sufferers.
- Beautiful, strong and durable material that is not afraid of moisture.
Preparation of birch bark
Before you begin the creative process, you need to prepare birch bark for crafts. It is best to do this in June-July, when the birch bark is most pliable.
You should choose sawn or fallen trees so as not to harm the forest. If the bark is removed from a young tree, then it is necessary to monitor the depth of the cuts so as not to damage it.
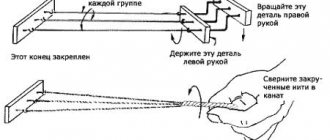
Harvesting can be done in layers or strips. For this:
- On the bark you need to make a vertical incision that is not too deep, up to 1 cm.
- Then - 2 circular cuts along the edges of the vertical one.
- To separate the birch bark from the trunk, its edge is picked up with a knife or spatula. This is how harvesting occurs in layers.
- If there are many layers, they are placed on top of each other, alternating the outer and inner sides.
- In order to prepare the bark in strips, it is cut in a spiral and then immediately rolled with the outer side up.
It is believed that birch bark ribbons are best suited for making birch bark crafts for beginners.
Instructions on how to make a birch tree craft step by step
1. Prepare a set of colored paper for work. White is also necessary, since the trunk will be made from it, because it is planned to model birch. If it were another tree, we would choose brown or gray. The rest of its details: crown, leaves, as well as the base, will be made of colored paper.
2. First, take yellow cardboard. Cut out a rounded piece with wavy edges. Use thick paper at this stage. The purpose of this round piece is the base of the tree.
3. Roll a small sheet of white paper into a tube, coat the end with glue and seal it. Next we will make a trunk out of it. 4. Take a black marker and casually draw stripes along the length of the entire trunk to create a distinctive design.
5. To make the tree stable, you need to attach it to a yellow cardboard base. Make cuts on one side of the tube, retreating 5-6 mm, and spread the resulting fringe to the sides.
6. Coat the bottom of each cut with glue and press the trunk to the base, smooth it out with your fingers. Wait for the glue to dry. Now place the craft, it will be quite stable.
7. Cut out 2 approximately identical rectangles from green paper, coat both with glue and press the glued sides together. But before that, place the barrel inside. Smooth the paper over the entire surface and press the barrel inside so that the parts stick together.
8. Using scissors along the edge, cut out an oval blank with wavy edges, showing the crown characteristic of the tree.
9. Next, cut out the leaves - very simple models that look like droplets. You can first draw them with a pencil or cut them out randomly, or you can cut out one sheet and then use it as a template. Since small parts are supposed to be cut out, it is convenient to use nail scissors, although it is better to give children safe tools.
10. Make many leaves to cover the crown. If you wish, you can decorate both parts of the tree. Glue the leaves randomly. It is better to use different shades of green, yellow and also add orange details. The tree will not lose from this, but will only add a lot of autumn colors to it.
11. Additionally, stick a few fallen leaves at the foot, hiding the fringe attached there, which will also look like roots. Attach 1-2 leaves to the trunk.
12. So your wonderful paper craft is ready. The result is a tree - a tender and beautiful autumn birch.
+1
Processing birch bark for crafts
So, the birch bark has been collected. But before you start getting creative, you need to prepare the groundwork:
- To begin with, the birch bark is cleaned of dust, dirt, and growths using sandpaper.
- Use a soft cloth or sponge to slightly moisten the underside of the bark.
- Then a warm salt solution is prepared in a large bowl and birch bark material is placed there for 2-4 days, depending on the age of the tree.
- The soaked bark is divided into strips and layers.
- After which they are ironed for final drying and separated by shape, color, pattern.
- If you need to get small crumbs to decorate future products, then the birch bark is ground in a meat grinder.
Birch tree for children's creativity
This birch tree is perfect as a craft for kindergarten. Even a five-year-old child can cope, naturally, under the strict guidance of an adult. To make such a birch we will need white and green colored paper, a compass, a ruler, a pencil, a black marker or felt-tip pen, glue, and scissors. Using a compass, draw a circle on white paper. Mark a point in the center of the circle. Draw a line from this point to the edge of the circle. Cut a line to the center of the circle. Then we begin to roll our circle into a little bag, holding the cut edges. They will overlap one another. When we see that the resulting cone has approached the desired size of the trunk, we stop and use a pencil to mark the point where the edge of the paper stopped. We unfold the paper circle, and from this point, using a ruler and pencil, draw a line to the center of the circle. Cut along the line. Then we glue the edges of the cut. We have a cone. This is the trunk of our birch tree. Using a marker or felt-tip pen, draw black stripes on it. We make birch leaves from thin strips of green paper, which we glue to the resulting trunk. In order for the crown of our birch to be curly, the strips of paper must be curled before gluing. This is done as follows: a strip of paper is clamped between the blade of the scissors and a finger, and pulled out lightly. It turns out to be a beautiful paper spiral. The more of these spirals we stick on, the thicker the crown of our birch tree will be.
Tools for making birch bark crafts
For fruitful and high-quality work with birch bark you will need:
- scissors;
- sharp knife;
- staples;
- office clips for fixation or clothespins;
- tweezers;
- pencil or pen;
- compass, ruler, square;
- templates;
- awl, pliers;
- hole punch, chisel;
- a board or any hard surface for working with sharp tools;
- vegetable oil and soft dry cloth.
Wall panel
Birch bark panels are a great alternative to art paintings! It will not only decorate the wall of your home, but also bring an element of eco-style to the interior, giving a touch of freshness and unity with nature.
To create a panel you will need:
- thin birch bark blanks and birch bark chips;
- pencil and paper;
- cardboard (can be colored);
- scissors or knife;
- PVA glue and glue gun;
- wooden beads, beads for decoration (optional).
Stages of work:
- PVA glue is applied to the smooth side of the cardboard and birch bark chips are poured. If colored cardboard is used, the color should contrast with the birch bark. A good combination would be light bark and a blue, black or chocolate background.
- While the glue dries, elements of the plot of the future panel are drawn on a sheet of paper.
- They are then cut out and traced onto a birch bark blank.
- The resulting drawings are also cut out on birch bark.
- After that, they are glued with a glue gun, embodying the intended plot.
- To give the panel a 3D effect, it is best to use birch bark of different shades.
- If necessary, you can decorate your creation with decorative elements (beads, seed beads, etc.).
Birch twig with leaves
To make a branch with quilling leaves in more detail, it is recommended to use templates. For example, like this:
The template design must be transferred to paper, and then a quilling strip should be glued along its contours to create an empty form. Next you need to fill out the form. There are two options for this.
I want to tell you how my son and I made a 3D model of an autumn birch tree.
Consumables:
- white cardboard
- small yellow birch leaves
- white and black gouache
- scissors
- plasticine and various natural materials for animals
Birch bark body
The body is a multifunctional thing in the household! You can go to the forest with it to pick berries. Store bulk products. Or use it as an original pencil stand, for example. It would be a fantasy!
Before starting work, prepare:
- birch bark blank of suitable size;
- birch bark ribbon;
- pencil or pen;
- scissors, knife;
- awl;
- stationery clips or clothespins.
Stages of work:
- Cut a rectangle of the desired size from a birch bark blank and roll it into a cylinder so that the edges are on top of each other. Secure with clamps.
- Make holes along the seam with an awl.
- Pass a birch bark ribbon through them.
- Step back 10 cm from the bottom of the cylinder and make a mark. This is where the bottom of the box will be.
- To the mark, cut the edges of the birch bark in 4 places at equal distances and bend them inward.
- Then pierce the edges of the bends and fasten them with birch bark tape.
- You can make a lid for the box by cutting it out of bark of a suitable diameter.
- It is also easy to add a handle to the body if you make 1 hole from 2 opposite edges and stretch the tape.
Birch from a plastic bottle. Author Svetlana Shishkina
Home ← From unnecessary to necessary ←
26.04.2012
Administrator
- “I am interested in many types of needlework, I try different things - I just can’t sit idle. I watch TV and tinker with something, says Svetlana Shishkina (Korolev, Russia), “I think it’s a waste of time to watch TV and not make anything at the same time. I don’t have any free time as such; my hobbies consume me all the time. And I consider myself a happy person, because... Besides everything, I also have my favorite hobbies. I don’t understand those people who have time to be depressed and have nothing to do after work.”
- Master class by Svetlana Shishkina “ Birch from a plastic bottle ”.
- Photo 1. To make leaves for a birch tree we will need a green plastic bottle. From there we cut out a leaf measuring 1.5-2 cm.
- Photo 2. Melt the leaf over the candle (I did it with a lighter).
- Photo 3. Make a small hole (you can use an awl or a needle).
- Photo 4. We thread the wire and screw the leaf.
- Photo 5. We are gradually forming such a branch.
- Photo 6. We assemble a large branch from twigs.
- Photo 7. We gradually assemble a tree from branches. We have a wire trunk. Fill it with alabaster, shape it and dry it.
- Photo 9. I made moss under the tree from a sponge. I cut it into small strips, glued it with Moment glue and then painted it with gouache. Covered with varnish.
Share the link to the post on social networks ↓
Source: https://kollekcija.com/bereza-iz-plastikovoy-butyilki-avtor-svetlana-shishkina/
Casket
There are so many little things that every woman has in her home. A birch bark box will be an excellent gift and a container for the most valuable treasures.
To bring the gift to life you will need:
- birch bark;
- cardboard;
- knife and scissors;
- glue;
- carbon copy;
- paper and pencil, ruler, compass;
- strong thread and needle.
Stages of work:
- Think about what your box will be like: shape, size, ornament.
- Draw on paper the parts of the required size (bottom, lid, sides).
- Cut out paired stencils and transfer them to cardboard.
- After the cardboard elements are ready, glue them together.
- On the bark, mark the location of the product elements based on the size of the cardboard ones with seam allowances.
- On the reverse side of the birch bark, apply the intended pattern through carbon paper.
- Cut out the pattern with a knife.
- Glue the paired birch bark blanks together and dry them.
- The box is almost ready. All that remains is to glue the bark parts onto the cardboard base. Or sew the birch bark elements with strong thread and insert the cardboard base inside.
Birch bark products are beautiful, safe and practical. Whatever DIY craft you decide to make yourself or with your child, it will delight you and your friends for a long time. And it will give you a feeling of warmth and unity with nature.
Birch tree made from plastic bottles|Trees made from bottles
A birch tree made from plastic bottles will decorate any area; this Russian beauty will not leave anyone indifferent.
Good afternoon, dear friends, today it’s unlikely that you’ll surprise anyone much with crafts made from waste material. But if the works are interesting and unique, then you will definitely like them. Today we will look at an interesting master class on making birch trees from plastic bottles, the author of this master class is Nelya Ashakova. Nelya has already shared with us her interesting ideas for decorating her site from plastic bottles and if you are interested, look HERE. Making crafts from plastic bottles is not as difficult as it might seem to you at first glance, and you will definitely enjoy the work done. Working with bottles is easy, even a beginner can handle it. So let's grow a beautiful birch tree on our plot. After all, birch is considered one of the most beautiful trees on the planet. Using this master class, you can create other trees from bottles. Therefore, create and please your friends and family. To make a birch tree we will need: * Green plastic bottles. * Screwdriver. * Scissors. * Pliers. * Wire. * Marker. * Awl.. * Polystyrene foam. * Dye.
* Glue.
Method for making a birch tree: First we need to make leaves for the birch tree. This is the most difficult and tedious task. We take a bottle and cut off its neck and bottom. We will use the middle to make leaves. Bottles that are flat and without any indentations are best suited. Leaves can be cut by eye or you can make templates according to which you can cut out the leaves.
In the middle of the bottle we draw or outline the leaves with a marker. It is best to make the leaves of different sizes, then the birch tree will turn out more lively and beautiful. Here you yourself look at the number of blanks, because each birch tree will turn out to be different in size. But about 2 thousand.
First you need to make leaves of different sizes. You can call the whole family to help and then you will cope with this task much faster. When you have made enough leaves, move on. You need to make veins on each leaf.
Nelya made the veins with a screwdriver or scissors; we squeeze out the veins on each leaf. Next, use an awl to make a hole in each leaf. You can also lightly melt each leaf over a candle, then the leaf will look more natural and interesting.
That's it, the leaves for making a birch tree are ready. This is the most important part of making our wood.
Next, we take a slightly thick wire and cut it into the pieces we need. We insert it into each leaf and twist it at the base. If you don’t twist it at the base, then the leaf will dangle in different directions. This is how the leaflet turned out.
We begin to collect leaves into a branch. We connect them in order and by size. Leaves that are smaller first, and larger ones later.
When all the branches are ready, we begin assembling our birch tree. We make a strong and reliable frame. It should preferably be heavy so that strong winds cannot move it.
The barrel can be made from a plastic or iron pipe; here, see for yourself what you have available. We paint the trunk with white paint and wait until it dries, and then apply strokes with black paint. We attach the finished branches to the main trunk.
If the trunk is made of an iron pipe, then you can weld the branches (this will be more reliable).
We dig our beautiful birch tree into the right place. You can concrete it for strength))) Just look at what a beautiful birch tree Nelya made from ordinary plastic bottles.
You can also make snow on a birch tree. We take polystyrene foam, crumble it and sprinkle it on our beauty. Instead of glue, you can use paste. Here the snow on the birch tree is real and in my opinion it looks very beautiful.
- That’s it, the birch tree made from plastic bottles is ready, we thank the author for the interesting and exciting master class on making it and we are waiting for new interesting ideas.
Birch from plastic bottles
But we all know that every master does any work in his own way. Therefore, I want to offer you another fascinating master class on making birch trees with your own hands from bottles. The author of this master class is Safter Yeshilev. Safter also shared his works with us and if you haven’t seen it, you can watch it HERE. Let's start production.
To make a birch tree you will need: * Plastic bottles. * Marker. * Scissors. * Electrical cable. * Plastic tubes.
* Dye.
Method for making birch trees from bottles: Take a plastic bottle and cut off its neck and bottom. We will use the middle to make leaves. Bottles that are smooth and green in color are best. If you don’t have or have few green bottles, you can paint them. Draw leaves on the bottles using a marker, as shown in the photo.
- Then, using an awl, we pierce each leaf at the base.
We insert a thin wire into the hole and twist it. We do this with all the leaves.
- Your leaves should be of different sizes, so the birch tree will turn out more natural.
Next we will make the frame. We take a multi-core electrical cable and cut it into the required pieces.
- We insert the cut pieces of multi-core electrical cable into the tubes.
- Tubes of different diameters fit into each other, and a hose is put on top.
- We also make the top of our tree from electrical cables and tubes.
- We put it on top.
Then we screw the leaves onto the cable in the required order and get a beautiful birch tree. The trunk needs to be painted with white and black paint like a birch tree.
- We thank the author for an interesting master class on making birch trees from bottles.