Step-by-step instructions for making crafts from clay will help both adults and younger talents master the basics. In fact, learning how to sculpt the simplest crafts from polymer clay with your own hands is quite simple.
The main thing is to know the properties that the material has, to have the necessary tools, to study basic techniques and to know how to properly process this or that type of clay.
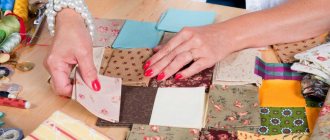
Tools
Before you start sculpting from polymer clay, you need to acquire the following tools:
- Cardboard crafts - 135 photos of useful and beautiful crafts for children and adults
Unusual crafts: we make cool and original things from scrap materials (120 photos and videos)
- Beautiful crafts: examples of very stylish and unusual options for homemade crafts (125 photos)
- A small board made of plastic, plastic or glass.
- Stationery knife.
- Cutters are special shapes for cutting blanks of different geometric shapes.
- Pasta machine or roller for rolling out clay. A rolling pin will also work.
- Long needle or knitting needle.
- Stacks are a special set of tools for modeling.
- Emery cloth for polishing the surface of the finished product.
Depending on what will be manufactured, other tools or additional materials may be required.
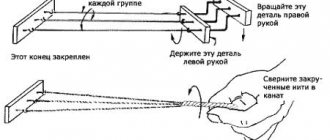
Skinner Blend (smooth transition)
Allows you to make smooth gradient transitions from several colors. The technique itself is simple, but requires multiple repetitions of the procedure of rolling the workpiece in a pasta machine.
To create a gradient, triangular elements are cut out from clay of different colors. Then they are connected into a rectangle and rolled in a pasta machine.
During the process, the rolled out workpiece must be repeatedly folded in half (in one direction only) until the desired effect is achieved.
Watercolor technique
The watercolor sculpting technique is most often used to create beads. Rolled out pieces of clay of different colors are placed on top of each other, then rolled out and torn (that is, torn, not cut) into small pieces, which are randomly placed on the rolled out layer. The result is a kind of mosaic, which is then rolled to form an original abstract pattern.
Family hobby
This activity can be a great family hobby. When teaching children how to sculpt, your time together will be interesting and useful.
This is a great chance to give children your love and at the same time introduce them to creativity, reveal their abilities and talents.
And at the same time, through joint efforts, create objects that will then delight everyone at home.
Solyanaya
A fairly simple technique that is easy to master even for beginners. Also used to form beads of various round shapes.
Before sending the pieces for baking, they are coated in coarse salt and immersed in a vessel with water to obtain a textured pattern.
Mica Shift (mica-shift)
A technique that requires working with metallized polymer clay that contains mica. The plastic is rolled out and an extruded pattern is made on the workpiece using a stamp.
Then the upper part of the pattern is cut off so that the texture remains and baked. In the process, mica particles are displaced, forming a three-dimensional pattern.
Many craftsmen like to mix different techniques, making handicrafts from polymer clay with their own hands. As a result, amazing works come out that can be called masterpieces.
How to make modeling clay at home
You don’t have to buy artificial clay in a store; you can make it yourself, and it will be no worse than the factory one.
A very simple recipe you will need:
- One cup of PVA glue
- One glass of corn starch
- One tbsp. Vaseline
- Lemon juice - two tablespoons.
- Cup or bowl
- Cling film
- Spatula
Combine PVA, Vaseline and starch in a cup. Add lemon juice and mix well. Place the cup with the mixture in the microwave for thirty seconds. After this, knead thoroughly again and again in the microwave for half a minute. Spread the table with glue and place the dough on it, start kneading and kneading. Then form it into a sausage, wrap it in cling film and put it in the refrigerator for a day.
Another easy recipe with glycerin. Here you will also need PVA glue, a couple of tablespoons. Glycerin, fifteen drops, a glass of cold water and the same amount of cornstarch. Instead of corn, you can use potato, but then the clay will be a little grayish.
Take a saucepan with a thick bottom. Combine PVA and half a glass of water in it. Place on low heat and cook for three to four minutes, stirring constantly. In a bowl, mix the remaining half glass of water and cornstarch. Pour the contents of the bowl into the pan, add glycerin and mix well. Then remove the pan from the stove and cool.
Sprinkle some starch on the table and place clay on top. Knead the clay well until it becomes smooth and flexible. Also wrap it in cling film and put it in the refrigerator for two days.
You can also make self-hardening clay at home.
Take a saucepan with a thick bottom. In it, combine two tablespoons of soda, a quarter glass of water and a glass of cornstarch. Mix all ingredients. Cook the clay over low heat until it becomes mashed potatoes. During cooking, do not leave the mixture, it must be constantly stirred. Cover the cup with baking paper and place the clay there. Let it cool down. Lubricate your hands with thicker cream. We knead the clay and can immediately begin modeling. This clay should be stored in airtight packaging. You can add dye to any of the above recipes and get clay of different shades.
Baking process
Baking can be done in a conventional electric oven. Before baking the product, you must read the instructions from the material manufacturer. To properly bake a craft, you need to know the temperature at which it will not lose its properties.
It’s also worth remembering right away that baking should only be done on a smooth, flat surface. Before baking the finished product, you can experiment with a piece of plastic.
When baking complex sculptures, it is better to do this in several stages. You should not put a large number of products in the oven at the same time, especially if they are of different sizes.
Painting and decorating clay crafts
After the product has dried, another very creative process begins - painting and decorating.
Natural clay after firing is less bright than polymer clay, which initially has a variety of colors and shades. But both can be painted. Here everything depends on the imagination and idea of the master.
Acrylic and oil paints work best.
For the first works, paint without firing is suitable. However, it should not be used for painting dishes. If you need to paint a plate or mug, it is better to take paints that are fixed when fired in the oven.
Do I need to prime the product before painting? If it's acrylic, then it all depends on the effect you want. If you want a calmer tone, don’t prime; if you want bright and rich colors, prime.
It's more difficult with oil. It penetrates into the porous structure, so priming or glazing is necessary.
These are the 2 most common types of paint. Want to experiment? Take an aerosol, dry soft pastel, powder, and special ink for ceramics.
To preserve the brightness and design after the paints dry, the product must be coated with a special varnish.
Ribbons, beads, and sparkles are suitable for additional decoration.
Varnishing
Finished baked products require opening with varnish, especially some types of clay. There are two types of varnish coatings: matte and glossy.
For crafts made from polymer clay, there are special varnishes, which are usually produced by the same manufacturer. They adhere perfectly to the workpiece and retain their shine for a long time.
You can also use some varnishes for wood materials as a coating. They dry quickly, apply evenly to the surface, maintaining their original shine for a long time.
Some varnishes require reapplication to achieve the desired effect.
Usually the varnish is applied using a regular brush, but if the products are small in size, they can be processed by completely dipping them into liquid. This creates an even, high-quality coating in a matter of seconds.
Firing clay products
Firing is one of the main stages in creating products from natural clay. On an industrial scale, special muffle furnaces are used. Amateurs bake in classic Russian kilns, over an open fire in special containers and ovens.
“Baking” clay products takes 1-2 hours at 180-200 degrees. The temperature must be constantly monitored so as not to spoil the craft.
It is much easier to fire polymer clay, not to mention self-hardening clay, which dries in air in a couple of days.
There are no particular difficulties with baked clay. You need to carefully study the manufacturer's recommendations. The temperature is usually 110-130 degrees. Baking time 15-30 minutes. Small parts are first pinned onto toothpicks inserted into a ball of foil.
Parts thicker than 1 cm and three-dimensional figures take longer to bake. At the end of the heat treatment, the product is left to cool in the oven.
Another way is cooking. Water is poured into a deep metal container (which is not used for cooking and storing food).
After boiling, figurines and blanks are lowered into it for 5 minutes; if the volume is large, increase the time by 1 minute. At the end of “cooking”, rinse with cold water.
Note! When polymer clay is heated, due to the evaporation of the plasticizer, a smell of melted plastic appears. Therefore, for baking, it is better to choose a baking tray that is not used in everyday life. And after finishing work, wipe the oven.
How to quickly learn how to make clay crafts
How to make a craft from clay if you have no experience working with such materials? You should not immediately aim for any complex figures.
It’s better to start with something simpler, gradually complicating the process by alternating different techniques. An excellent option for beginners are small figures of simple shapes, for example, beads, hearts, fruits, berries, etc.
Youtube is a great resource with many clay sculpting channels.
The hosting offers simple training videos for beginners or master classes for more experienced craftsmen, and every person, regardless of their skill, will find exactly what they like.
Octopuses
Let's analyze the sculpting of a luxurious octopus from 2 colors, for example, lilac (blue) and black.
Step-by-step instructions for beginners:
- First we form a round roll of blue clay.
- We make a sheet of about 3-5 mm from dark-colored clay, then we need to cover it with a blue roller.
- Using a utility knife, separate 2/3 of the resulting roll and divide it into 8 long strips - these are octopus tentacles.
- We use the remaining 1/3 of the workpiece for a convex large head. Use a spoon to create the head, and use a match to highlight the eyes.
- We lengthen each leg strip, narrow it and twist the sharp ends.
- Long tentacles look more beautiful when they look in different directions. It is better to choose a drawing (template) in advance. The light part should be internal.
- We make “suckers” only on the light part, so they will be more voluminous and stand out against the general background. It is more convenient to create them with a tube. I started under the head (2nd plan), then 3-4 legs on top of them.
- We work on the details well. Dark tones should be visible in the empty spaces between the tentacles.
- Then dry (or bake). If necessary, glue on decor: eyes, rhinestones, etc.
The photo shows a beautiful lilac octopus, as the designers see it.