How to make a paper snowman for the New Year with your own hands
I propose to “blind” a three-dimensional snowman from white thick paper, which children of any age can make. Or make an applique with kids. Let's consider two options, and you choose what you like. For your convenience, I have prepared pictures with exact dimensions for you. So, meet master classes on how to make a snowman from strips of paper or an accordion.
For the craft we will need:
- White A4 paper - 2 sheets
- Colored paper
- Paper cupcake tin
- Glue, scissors
- Markers
Take a sheet of paper and cut it lengthwise into 4 strips 1.5 centimeters wide. Also cut 4 strips crosswise from another sheet. Since the A 4 format is determined by the side sizes of 29.7 and 21 centimeters, our stripes will be short and long. Smaller head, larger body.
To quickly determine the middle, slightly bend the strips in half. Along the fold, you can apply them crosswise in the center, as shown in the photo. If everything is done correctly, you will get an eight-pointed star or a snowflake.
Now we make a round volumetric ball from a flat snowflake. We coat the opposite strip with glue from the very edge and connect it at the top. We do the same with the others. Do not forget to glue all contacting surfaces with glue.
We repeat the same steps with long strips. We collect the “snowflake” in the center.
And then we turn it into the three-dimensional body of the future snowman.
Apply glue to the top of the large ball and press the smaller ball onto it.
We draw buttons on the body with a felt-tip pen, as well as eyes and a smile on the head.
Cut out a carrot nose from orange paper and place it on your head. The scarf can be of absolutely any color. Besides, show your imagination. After all, the decoration can be made of tinsel or fabric. We insulate the snowman's neck.
You can't go without a headdress either. That's why we came up with a hat made from paper molds. There are no different colors. If you don’t want to spend money on a whole package, you can make a cone hat from colored tissue paper.
For stability, so that our snowman does not fall over like a tumbler, we cut out the cardboard base and glue it in the center. But we don’t have to stop there. Cut out thin strips of twigs and small mittens from brown or black paper.
And here is a paper snowman with an accordion applique.
Step-by-step pictures will help you easily prepare the necessary templates and make such a funny round character.
We will need 4 strips of paper measuring 7.5 by 21 cm. We fold them into an accordion 2 centimeters wide and glue them to each part.
Now we collect them in a pile along the inner edge and fix them with glue to make a solid circle that looks like a flower.
Cut out button circles from black paper and glue them onto the belly. The snowman's body is ready.
Now let's start creating the head. On paper, measure 12 centimeters in diameter and cut out a circle. For now we put it aside.
Let's immediately proceed to the headdress, since regarding its placement on the head, in the future we will glue the eyes.
We will need colored paper measuring 8.5 by 7.5 centimeters.
We draw the outlines of the hat with brim and cutouts along the contour. To make the hat more festive, I suggest adding a contrasting stripe. Now we determine the place of the headdress on the prepared circle.
Cut out eyes from black paper. You can determine the size yourself. Which ones do you like best? In order to give the eyes life and sparkle, glue small white circles onto the black circles, as shown in the picture.
Assembling the carrot nose. We roll a sheet of 6 by 11 centimeters into a cone and glue it together. We trim off the excess protruding part. We coat the smooth edge with glue and glue it to the muzzle. It turns out to be a perky protruding nose.
You can't live without a smile either. It can be prepared from red or black paper or simply drawn with a marker. Now we connect the torso and body of the snowman with glue.
But that is not all. Scarf! We draw on paper, repeating the circumference of the head so that it can be evenly “tie” under the neck. And we will complement it with branch handles, as well as felt boots if desired.
We glue everything together and our snowman is ready! If you don’t want to measure every detail yourself, I leave ready-made templates for you. Download and transfer to colored paper.
A simple and easy way to create a costume from scrap materials
Now an option for a quick suit for a boy. For convenience, we will use items from the parents' wardrobe.
Let's take:
- a child's shirt or long brown sleeve,
- women's long white sleeveless T-shirt,
- white baseball cap or cap
- underwear elastic,
- black fleece.
First, cut out 3 round pieces from a sheet of black fleece - this is the basis for the buttons. We cut them out and sew them onto the front of mom's or dad's T-shirt.
Fold and sew the bottom of the T-shirt, leaving one edge unsewn. Insert the rubber band and tighten it. This will create volume.
Cut out eyes from white felt. And from the remaining black we cut out smaller circles and paste them onto the white one. This is how we made wonderful eyes. Glue them to the top of the cap. We make a nose from orange felt. To do this, take a triangle of felt, shape it into a cone, and cut off the excess.
We sew the edges so that the cone does not open and fix the carrot on the cap between the eyes.
We also make hair from fuzzy wire or rope. To do this, cut 6 pieces of 10 cm and sew them onto the top of the baseball cap.
It turns out to be a very funny and cute costume.
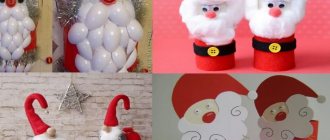
Snowman made of threads, glue and balls step by step
I really like this creative option. And making a snowman using this technology is as easy as shelling pears. The size of the blanks will be determined by how much you inflate the balloon. So you can create a whole family: dad, mom and baby snowman. In order for everything to work out perfectly, I have prepared instructions for you that you will go through step by step. Use PVA glue and thick white or multi-colored threads. And then the beautiful figures will celebrate the New Year with you. Cute, isn't it?
For the craft we will need:
- Balloons of any color.
- Thick white or colored threads or knitting yarn
- PVA glue
- Starch
- Water
- Thick needle or other sharp object for piercing balls
- Buttons
- Scarf fabric
- Colored paper
- Scotch
- Thick brush
We inflate balloons. A large ball is needed for the body, a smaller one for the head. If you plan to make a snowman from three elements, then the sizes will be from largest to smallest.
We connect them together and fix them with tape.
Looking ahead, I will say that when the threads dry, a problem may occur in the form of their sticking to the surface of the ball. Therefore, I recommend pre-lubricating the balls with oil or baby cream.
Of course, wrapping with threads will not be very convenient, since the surface will be slippery. But this can be dealt with quickly.
We prepare the mixture. You can use simple PVA glue without additives. But we will make it from glue, starch and water. This way the product will be stronger and harder. Mix everything well, take a wide soft brush and begin to coat each thread richly. Do not skip a single centimeter so that all the yarn is well saturated.
Now our task is to be patient and let the future snowman dry thoroughly. To do this, you can place it near heating devices in a dry room. When the threads have dried, carefully pierce the remaining locked ball and carefully remove it.
The hardest part is over. Let's start creating the image. We mark the places for the eyes and glue the black buttons. The spout can also be made using a similar technology by wrapping a cardboard cone with thread and leaving it to dry thoroughly. Or you can cut it out of colored paper and glue it to the face.
We fasten the buttons, make a smile and a hat if desired. Also, bring beautiful twigs from the street and stick them on the sides and turn them into handles. And of course, a scarf. So warm and cozy made of fleece or tinsel.
Toy Sewing Snowman Olaf Glue Paint Wire Fabric
I have long been attracted to the character from the cartoon “Frozen,” the snowman Olaf. and somehow there was no time for it, and then suddenly a burning desire to sew it appeared. What I found on the Internet did not suit me. I sat for a long time thinking about how to make this complex snowman more realistic)) And this is what I came up with))
Snowman made of fleece. Wire branches and handles, wrapped in corrugated paper and painted with acrylic and PVA.
There is a frame in the neck area, so that the head will not “fall” over time. Felt carrot.
Some people miss the snow, some miss the feeling of a holiday, the approaching New Year, and others just want to engage in an exciting game, and at the same time make a craft with their children. That’s why you just need to create a funny, quite classic, charming snowman with your own hands. You don't need to know how to sew, knit or draw. It's very simple and fast.
Materials for work:
- toilet paper - 1 roll;
- PVA glue (stationery or construction);
- medical cotton wool;
- gouache or acrylic paints;
- pieces of thick cardboard;
- strip of fabric for a scarf (15-20 cm x 2 cm).
Tools for work:
- scissors;
- brushes (large and small);
- ruler 30 cm.
Prepare all the materials and tools so that the work goes faster; everything you need should be at hand.
Let's start by making a base, or frame, from toilet paper and PVA glue. I used construction glue, but you can use regular stationery PVA.
We tear about half a roll of toilet paper into small shreds for easy mixing with glue. The volume of paper depends on the size of the snowman. The larger the snowman, the more paper you will need.
Add PVA glue and mix. If the glue is thick, add a little water. The result will be a dough-like mass - sticky and viscous.
Form three balls of different sizes with your hands - large, medium and small; for easy comparison, place them on top of each other. I had a lot left, and it was decided to make another snowman, this time non-standard, but for now it’s a surprise.
Carefully separate the lumps and place to dry in a warm place, on a radiator or near another heating device. The drier the room, the faster the workpieces will dry. Please note, if you want to make a larger snowman, I would recommend adding volume to the inside using aluminum foil or a ball of cotton wool rolled into nicks, so that the drying rate does not increase. My balls - the parts for the future snowman - took about a day to dry. As soon as the parts are dry, glue them together with PVA glue.
We put the snowman on a piece of cardboard, draw a stand and cut it out.
We glue it with PVA glue, form legs from lumps of cotton wool and glue it to the stand.
We begin to cover the snowman with cotton wool. Apply PVA glue to the area with a brush and apply a thin layer of cotton wool.
Cover the snowman completely with a layer of cotton wool.
Draw branch handles on thick cardboard and cut out with sharp scissors.
Use toilet paper to form a carrot nose using PVA glue.
Paint small parts with gouache.
Glue the arms and nose to the snowman. To secure the handles you will need pieces of cotton wool.
Paint the snowman with white gouache or acrylic paint.
Use black paint to draw eyes, eyebrows, mouth and buttons. From a fabric of a matching color, cut out a strip for a scarf and tie it beautifully around the snowman’s neck.
And here's a surprise - the second snowman, made in the same technique, the character of the popular cartoon "Frozen" Olaf - I love hot hugs!
Please do not seriously criticize this work and the master class as a whole; the master class was developed specifically for working with children, for kindergartens, schools, or simply enthusiastic mothers and fathers.
DIY cheerful snowman Olaf for the New Year
This cheerful cartoon snowman Olaf! He won the hearts of many children and their parents. Shall we invite him? To do this, we need to study the presented master class, add a little of our creativity and make a funny snowman with our own hands. I have attached ready-made templates that you can download and print. Perhaps you will come up with a different expression for the face and draw your own blank.
We print the templates on A4 sheet. Please note that the sample for the body has 4 parts, but the muzzles are different. Therefore, if you decide to make several types of Olaf, then cut out more blanks. In addition, our snowmen can not only stand, but also sit. It is enough to glue the legs not from the bottom, but from the front.
For the craft we will need:
- Ready template
- Scissors
- Glue
- Colored paper
- Markers
After the painstaking work of cutting, we begin assembly. Bend the elements along the dotted lines and apply glue to the outermost narrow area. Apply the opposite edge and get a semicircle. We repeat this with all the details.
We also bend Olaf's head along the dotted lines and glue along the thin edge.
Color the eyes with a black marker. You can also draw a carrot, but in our case we’ll cut it out of orange paper using a template later.
Now let's put everything together. On the largest part we glue the body on top and the legs on the bottom, as shown in the picture, and of course the head.
There are no ready-made arms on the template, so you can draw branches like these and glue them to the sides of the body. Moreover, Olaf can pose as you wish. Raise the handles or lower them. Or he can spread them to the sides, inviting them to hug.
Glue buttons on the caftan
And this is the second option with an open smile. Please note that the spout will not be flat. We'll make it stick out forward. To do this, cut out the carrot with an additional round piece to fix it on the surface. I hope the kids will really like this snowman. Moreover, they can be made completely different, even with the same blanks.
We make the costume ourselves
Since this character is very popular among children, it is not surprising that at the matinee there will be many children dressed in a snowman outfit.
However, as practice shows, the vast majority of parents follow the path of least resistance and simply buy a suit at the store.
However, a hand-made snowman costume will stand out from the rest; it will truly be unique.
Making a snowman from plasticine - a detailed master class
You can make a snowman from plasticine, either in volume or in the form of an applique on cardboard. The master class is suitable for children 3-4 years old, for the middle group of kindergarten or primary school. Classes may take place in the classroom. And at home with your parents, make some for a competition or just decorate the house. Now there are many different types of plasticine material. I especially like the airy one. It is so easy to work with, it is very gentle and light and kids can easily handle it.
For the craft we will need:
- White plasticine
- Pieces of plasticine in black, orange and blue colors
- rolling pin
- Plastic knife
Plasticine, as I already said, you can use any plasticine. The standard one, which comes in boxes in cubes, must first be kneaded in your hands for softness. If you use Play-Doh or air brand, then in this case it will be easier.
So, let's roll two balls. One large one for the body, one smaller one for the head. The longer you roll the material in your palm, the denser and rounder it becomes.
Make a small notch on top of the large ball with your finger, press lightly and place the smaller ball. We tear off several small pieces from the black plasticine and roll into balls for the eyes and buttons.
Take a small piece of orange plasticine and roll it first into a cylinder, and then press the tip on one side to make an even cone. Glue it on the face.
To make a scarf, roll out a strip of your favorite color: blue, green or red. Or you can roll out several at once, twist them and roll them out together. Get a multi-colored knitted accessory. Now press the rolled out sausage with a rolling pin to form a flat strip.
We make fringe at the ends with scissors or a knife.
We warm the snowman by wrapping a scarf around his neck. If desired, you can make a hat with a brim, a pointed one in the shape of a cone, or warm headphones. Scroll on, below I showed you how to make such beauty.
These babies are made from the same plasticine or polymer clay.
We also roll two balls and stick them on top of each other. We will paint the beady eyes with acrylic paints.
To prevent the mouth and eyebrows from looking too rough, you can simply press them with a thin object. It turns out very cute and tender.
We also roll out the scarf with a flat object and wrap it around the neck.
And now there’s an option on how to make headphones. You can use any wire or paper clip. We measure the required length relative to the shape of the snowman’s head and bend it into an arc. We roll small balls of plasticine and attach them to the edges of the wire.
Now we put a cute snowman on our head. It turned out great!
Such a souvenir can be presented as a gift by making several perky kids and placing them under a glass dome. Perhaps you can come up with your own original design.
Making Olaf from Frozen
It so happened that a good girl I know has Elsa and Anna from the cartoon “Frozen” living at home.
In my opinion, this is a great opportunity to put Olaf the snowman there too. What else can you say? For work we need:
- Polymer clay (list of colors used in the video);
- model tools;
- gel liquid plastic;
- a stationery knife (or just the blade from it) or a scalpel;
- glitter (spangles) to imitate sparkling snow;
- acrylic paints (brown and black) and brushes;
- a piece of foil;
- sandpaper;
- tweezers;
- small drill or micro drill with drill bits;
- dry pastel (color - blue);
- optional, a little glossy varnish;
- good mood.
Snowman made from a sock - step-by-step instructions for beginners
Craftswomen can come up with anything. And we will take over their idea and make a snowman out of a simple sock. Such figures made from terry white socks will look more interesting and fluffy. But don’t forget that during this magical time our heroes can be not only white, but also green, blue or even multi-colored striped. Children simply won’t let go of such soft toys in the first days. Therefore, make snowmen in advance before going to kindergarten or decorating an apartment.
For the craft we will need:
- Socks in white and other colors
- Rice or millet for filling
- Sintepon
- Thin rubber bands, preferably white
- Scissors
- Glue
- Beads, buttons
In order to conveniently fill the snowman with grains, I suggest taking a narrow and deep glass. We lower the sock inside and bend its edge to the outside of the glass. Now it’s convenient to pour in the cereal. You need to fill it 1/3 full.
We put cereal in the sock in order to weigh the snowman down and give him stability.
Next we fill the padding polyester on top. Be guided by the size of the sock so that the figure is harmonious in length and width. This can be understood by removing the sock from the glass and adjusting the padding inside.
We take rubber bands and begin to design the figure. We tie the crown. It's okay if there is still a lot of loose tissue left. Then we'll just cut it off. Next, we determine where the head will be. We throw the elastic band over 1/3 of the entire figure several times. We form a round head, distributing padding polyester inside.
We make handles on the sides. To do this, we pinch off the fabric together with the padding polyester, form a ball and secure it well with an elastic band. We repeat on the other side. Oh. At this stage, the snowman looks like a bunny. It’s a good idea to make a ponytail at the back and cut along the top along the toe. So if you have white socks, you can make New Year's hares.
But since we have a snowman, this time we cut off the top.
Now let's make a warm hat. To do this, bend a sock of a different color outward along the edge so that it looks like a winter hat, and measure the depth of the headdress. We also tie it with an elastic band and cut off the excess.
Making a scarf is also easy. Cut a strip from the same sock. Just thicker, since when you stretch it a little, the edges bend (which is what we need for accuracy), and glue it to the neck.
The buttons will serve as eyes, and the fluffy little bobbles will be used for decorations and a nose.
Beautiful ideas for girls
Now, as I promised, there will be ideas for girls. Everything there is also simple, but it’s better to see it once and imagine everything.
This photo provides a complete description of how the costume was created.
Step-by-step instructions for a faux fur outfit.
With a tutu and a white turtleneck it looks so beautiful.
For a while, the skirt can be sewn to a blouse and decorated with a bow and felt appliqués.
Well, it's cute!
The idea of decorating the skirt itself.
What a laconic snowman in a hat.
I think you got the idea. The resulting costumes are simply stunning and stylish.
New Year's snowman made from plastic cups
Disposable plastic cups come in different sizes. Therefore, by choosing the main material, you can make a large or small snowman. It is also convenient that the cups are mostly white and have a convenient shape for assembly. Therefore, such a New Year's snowman will come in very handy for decorating a home, kindergarten or school class. And you know what’s most magical about this. A snowman can glow from the inside. Due to the fact that the material is quite thin, you can place a safe garland inside the figurine and... In general, beauty! I invite you to a master class.
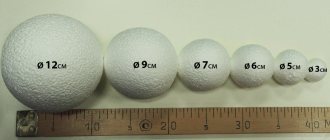
In order for the snowman to look harmonious and the body to be larger than the head, you need to use white cups of different sizes. Below is a table of the required amount of material.
Consumption of plastic cups for a snowman:
Regarding the volume, you can create snowmen of different sizes. Below I have attached a picture with the types of cups so that you can decide on the size. Mostly standard 200 ml cups are used. These are exactly the ones we will use in our master class.
For the craft we will need:
- Plastic cups
- Stapler
- Colored cardboard or foam
- Hot glue
- Snowman decorations
For the first row we will need 23 white cups. We fasten with a stapler, placing them one next to the other. It is more convenient to do this on the floor in order to accurately determine the place of fastening and the product would not move crookedly.
Then we lay the next row like bricks and use a stapler to go through not only the sides, but also attach it to the first and subsequent rows.
Since the cups taper towards the bottom, when a new row is added, the sphere narrows.
We form the upper semicircle completely without holes.
We leave a hole at the bottom. Those. We don’t get two rows. We do this so that the snowman stands firmly “on his feet” and does not turn into a tumbler. It turns out to be a kind of bagel.
Now we fasten the upper and lower hemispheres with a stapler to form a three-dimensional ball. It will become the torso.
Makes a smaller ball from smaller cups. The technology is the same. We fasten the hemispheres together along the entire circumference.
We identify the very central cup on the body and liberally coat the edge with hot glue. To make the contact area larger, try combining with several cups from the head part, as they are smaller in volume.
We make a headdress. This time it will be a hat with a brim.
We cut out the blanks to the shape of the head and glue them together as shown in the photo.
To give the snowman some magic, distribute LED garlands inside. Then, on New Year's holidays, such a handsome man will delight you with warm, diffused light.
Here's an idea for a three-ball snowman. But accordingly, you need three times as many cups.
If you can’t spend money on that amount of material, don’t worry. I suggest making a snowman from just two cups.
To do this, take low containers, glue them along the edges and make a funny face. Well, here the whole family can use their limitless imagination. Another version of Olaf.
Snowman costumes for children with patterns
Snowman costumes are often made in two versions: overalls or a blouse with pants/shorts.
Like here, for example.
Take this pattern as the basis.
Option of overalls with a pattern.
With long pants.
Another jumpsuit idea.
Cartoon Olaf pattern.
An idea on how to quickly and easily create volume by running an elastic band around the waist.
For volume, you can fold the filling inside or roll up the clothes and lay them out in layers at the waist. But the child will get hot. I think you shouldn't overload it.
Snowman made of cotton wool or padding polyester
In my time, a snowman made of cotton wool or padding polyester was perhaps the most common. Firstly, it could be done easily and simply even without the help of parents. And so in childhood I want to make things here and now. And the imagination always pictured cotton wool as snow, so it was very easy to make a snowman. How can you use these materials for crafts? The cotton wool can be glued to cardboard, making an applique, or a light Christmas tree decoration, hanging on a fluffy branch. Another variation is to use cotton pads.
For the craft we will need:
- Cotton wool in a roll or padding polyester
- Newspaper or other thin paper
- PVA glue or hot gun
- Colored paper
- Paints
We decide on the size of the future snowman. If you have padding polyester, then of course you can change the diameter. If it is a roll of cotton wool, then look at its width.
We crumple a sheet of paper into a tight ball. Tear off a piece of cotton wool to make a flat square. We place the rolled ball in the center and gather the corners up, as if wrapping them in a pellet.
We coat the surface of the paper and the edges of the cotton wool or padding polyester well with glue. Carefully press at one point and wait for the glue to set.
Similarly, roll a smaller ball and wrap it in cotton wool.
We assemble the snowman together by gluing the body and head.
We are preparing accessories. Again, here it is your choice what kind of hat to make. Either a hat with a brim, as the most complex option, a cone cap, or, as seen above, a warm one made from a sock.
We cut out the scarf from paper or brightly colored fabric. The ends can be shaped into a triangle or cut into fringes.
Glue eyes and paper carrots
I suggest painting the mouth and buttons on the caftan with paints using a thin brush. To make the snowman stable, make the base out of thick cardboard. Or if the figurine is small, then you can decorate a Christmas tree as a New Year’s toy.
Craft a snowman from plastic bottles for kindergarten and school
Any master class is suitable for a kindergarten or school. Large snowmen, voluminous or small souvenirs. Here I would like to separately show several options for how to make a snowman from waste material, namely from glass or plastic bottles.
For the craft we will need:
- Glass bottle or white plastic bottle
- White paint in a can
- Terry socks of any color
- Acrylic paints
- Brush
In this master class we use a glass bottle. To make it white, cover the entire surface with spray paint and leave to dry.
We dress up the snowman in a fur coat and a hat. You don't even need scissors and the socks will remain intact. You just need to fold the sock outward several times.
We dress the snowman in warm clothes.
We squeeze a little acrylic paint onto the palette, for example black and red, and start drawing the face.
Carefully draw the eyes, smile and nose. You can also add some blush to your cheeks.
To simplify the task, I suggest using simple plastic bottles that don’t even need to be painted. And the white color will be given to them by the cotton wool with which we fill the container. Decorate with scarves and glue on eyes and buttons.
If the house has containers for gels, shampoos or yoghurts, then in this case the options are unlimited. From handy things that are still lying around idle, excellent snowmen are made.
And finally, a few more ideas. Take note.
Sleeveless vest and fleece shorts
You can sew an excellent snowman costume for a boy with your own hands from white fleece. This material is remarkable in that it does not require processing, provides the required volume, is inexpensive, and, most importantly, is very similar in structure to snow. You can tailor a separate sleeveless vest and knee-length shorts. Underneath, wear a brown or white long-sleeve T-shirt and white tights.
To make the snowman more round, you need to increase the size of the shorts in width, and gather the top and bottom of the legs with an elastic band. We also insert an elastic band into the bottom of the sleeveless vest, and to make the upper part of the snowman more voluminous, we cut it in the form of a trapezoid with a wide bottom.
Increase the length of the sleeveless shirt by 5-10 centimeters so that after the bottom is tightened with an elastic band, a plump roll is formed.