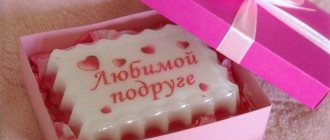
A homemade postcard is a source of bright positive emotions
At an early age in kindergarten, children learn simple skills in making such gifts.
Teachers show children how to make cards for their mothers with their own hands. Thick paper leaves with appliqués given for birthdays are often kept for many years. These first cards for mom are the most expensive, valuable gifts. A child cannot go to the store and buy a present for a holiday or birthday. A postcard made by yourself is the only opportunity to please your loved one with a gift. We become adults, we can afford to buy things that our mother dreams of, which will be useful to her in everyday life. Traditionally, the gift is accompanied by a card with congratulations and wishes. The easiest way is to buy it in a store. Fortunately, the choice of such products is huge. However, a mass-produced product, no matter how beautiful it is, will not be able to express your feelings.
A handmade postcard will give you unforgettable emotions.
If you want to surprise a loved one, give a bright, unforgettable experience, choose the time to make this simple but incredibly effective gift. Many sites on the Internet explain step by step how to make a card for mom. You can choose a simple or complex option, implement your creative idea or borrow ready-made proposals.
No matter what your masterpiece is, it:
- guarantees a pleasant surprise, sincere surprise, admiration;
- will reflect your feelings as much as possible;
- will be carefully kept in my mother's archive.
There is no need to think that this type of creativity is not appropriate for adults to engage in. You can make a birthday card for your mother with your own hands at any age. Bright positive emotions from such a gift are guaranteed both at 30 and at 80, 90 years old.
The postcard guarantees a pleasant surprise
What will you need for this?
- Colored cardboard.
- Colored paper.
- Glue.
- Decorations (glitters, ribbons, ballpoint pens, petals - basically everything that comes to mind).
- Colored pencils, paints - anything you can use to depict a beautiful congratulation.
Types of homemade cards
Homemade cards can have different designs. The difficulty is selected taking into account personal skills, experience in cardmaking, and the availability of professional equipment. The simplest and most accessible option is applique, which everyone mastered in childhood. Such a postcard can be incredibly attractive if you choose the right base and decor. Don't limit yourself to traditional flat images. A postcard with three-dimensional components looks much more impressive.
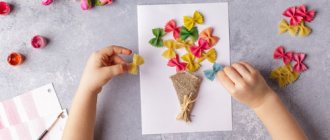
Flowers can evoke positive emotions in every woman. If you're planning to make a card for your mom's birthday, create a bouquet of her favorite plants on it. You can make any buds from colored paper material. These can be simple daisies, luxurious roses, elegant chrysanthemums, etc.
Draw your mother's favorite flowers on the card
You can make more complex, spectacular options for your mother. A voluminous postcard can provide the maximum effect. When it is opened, a three-dimensional composition made of colored paper unfolds. To many, such products seem incredibly complex. But anyone can create them. On sites that tell you how to make a postcard for your mother with your own hands, you can find step-by-step instructions for making these masterpieces.
Spectacular 3D card for mom
The three-dimensional design can contain flowers, hearts, butterflies, balloons, etc. The consistency in assembling the elements, the correct placement of cuts and bends will provide the composition with an accurate opening technique. You also need to think about the design of the outer part of the card, use decorative elements, and make a beautiful congratulatory inscription.
Postcard-topiary
With your own hands, you can actually make not just a three-dimensional card with flowers or a real panel, but also a topiary card. This “flower on a leg” is perfect for congratulating you on March 8 or the New Year (in the form of a Christmas tree).
If you make the topiary large enough, you can write congratulations and wishes on paper “petals” or on a flowerpot stand.
Made from paper, the topiary will resemble an independent craft. Whereas the author will know that his creation is nothing more than a greeting card for a birthday or other holiday.
Birthday cards for mom
There are thousands of different options for designing congratulations for your mother's birthday. Every year you can create something new, taking into account the preferences and tastes of each mother.
From my daughter
A postcard from your daughter, embroidered with cord, will look original. The present can be made in a short time:
- To do this, mark the location of the composition on colored (folded) cardboard.
- Then flowers are made using a large needle and string. The main goal is beautiful and soft volume.
- Using a regular thread and needle, unevenness is corrected. A bow or ribbon is glued to the base of the “bouquet”.
Congratulations are written on the inside.
From my son
The beloved son will greatly please his mother if he chooses an unusual way of congratulations - with a 3D effect. Such a hand-made postcard for mom will make a very unusual and positive impression. You don't need to draw anything. The execution is simple:
- Buy two or three identical postcards.
- On the reverse side, each of them is divided into thin strips and numbered.
- Strips are cut - there should be 2 or 3 of each number.
- On the prepared cardboard format, glue strips of postcards by numbers - the first two (or three), the second two, and so on until the last number.
The edges of the card can be decorated with decorative tape or tape. Congratulations are written on the inside; you can make a hole on the edge with a hole punch and hang mini congratulations with wishes.
Postcard “Bouquet of Flowers”
Such a birthday card can be presented to mother from either her son or her daughter. It’s not difficult to make it yourself using a detailed master class with step-by-step photos; it won’t take much time.
Materials:
- quilling or origami paper of different colors;
- a sheet of thick light cardboard;
- decorative paper for scrapbooking;
- scissors;
- glue;
- pencil;
- ruler;
- toothpick.
Progress:
- First you need to make paper flowers. It is best to use paper of 9 shades at once. Divide it into sheets of dark and light colors. Cut the first into strips approximately 3 cm wide, the second - 2 cm wide.
- Place all strips of the same color next to each other. Make a fringe along one edge using scissors.
- Cut strips of orange paper about 5 centimeters wide. Twist them tightly onto a toothpick, and then secure with glue to form the center of the flowers.
- First attach a dark stripe to the middle of the flower, and then a light one. Carefully bend the light petals outward. This is convenient to do with a toothpick. You should work with each layer separately to make the flower look three-dimensional. Curl the dark petals inward.
- To make roses, you should take bright paper. Trace a round container on a sheet of paper with a pencil, then carefully cut the circle in a spiral. Curly scissors are suitable for this. Screw the workpiece onto a toothpick.
- Cut sheets from green paper. Form a fringe along the edges.
- If desired, for additional decoration you can use spirals of green paper, cut into thin strips and twist with a toothpick.
- Cut out tags from scrapbooking paper and attach greeting messages to them.
- Attach flowers with leaves to paper in random order. Add spirals and congratulatory inscriptions.
You can write poetry on the back of the card.
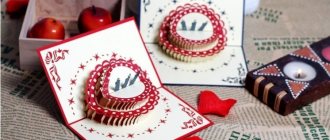
Volumetric card “Hearts”
A DIY birthday card for mom will look especially heartfelt if the central figure on it is a heart. To make it you will need sheets of thick white A4 paper and scarlet paper, glue and scissors.
All work consists of 4-5 stages:
- Preparing 2 heart templates. White paper is folded in half, and a large heart appears on it, one side towards the fold. A strip 4-5 cm wide is cut out of colored paper and folded into a square accordion consisting of 6 sections. On the extreme section, half of the figure is drawn so that its middle falls on the fold.
- Receiving figures. It is necessary to cut the paper along the contour. From white paper you will get 2 paired hearts - this is the basis of the craft. Made from colored paper - an accordion of 3 small hearts.
- Connecting workpieces. Small 3 hearts are attached using PVC inside the larger ones so that when opened they open up like an accordion.
- Inscription. Warm words and wishes can be written with felt-tip pens in any place you like.
- If the outer sides of the card remain empty, then you can glue glitter and beads on them.
Complex components that add chic and shine
When making your own “Happy Birthday!” You can use unusual design details that will decorate it with their surprise.
For example, attach a small envelope inside the postcard or on the back so that you can insert a bill there. Or glue another card of a smaller format on the inside, which also includes congratulatory inscriptions.
You can place flowers made of corrugated paper inside the card, so that when you open it you get a 3D card: the flowers will “bloom”! This option is possible for making any other three-dimensional postcards with your own hands.
There is inexhaustible scope for imagination about what kind of paper figure to place inside - a boat or an anchor, a cake with candles or a kitten, the Eiffel Tower or an Egyptian pyramid.
Postcard pendant “Butterflies”
For your mother's birthday, you can make your own card-pendant in the shape of a butterfly.
A gentle and romantic craft, made in the birthday girl’s favorite colors, will require a set of tools:
- thick white paper for the base;
- lace ribbon of 2 varieties;
- scrapbooking paper;
- details in the form of flowers and butterflies;
- lace;
- beads or beads that match the overall tone of the card;
- a ready-made chipboard with pleasant, succinct content (for example, “From the Heart,” “With Love”).
The work takes a little over an hour and is divided into 4 stages:
- A blank for the postcard base is cut out of a sheet of white paper and folded in the middle. On the outside, this part is decorated with a sheet of scrapbooking paper of the same size with an unobtrusive pattern.
- After joining the two sheets, a small hole is made in the upper left corner with a hole punch, which can be fixed and reinforced with a grommet. Now you can thread a beautiful cord through the future postcard and hang the craft in a prominent place.
- The base is ready, all that remains is to decorate the front part of the craft. Pieces of lace are glued just below the middle of the cover, imitating the fencing of a flower bed. 3 flower heads are attached to one of the edges with double-sided tape. A pair of butterflies are glued above them so that their wings remain free. You can make flowers and butterflies yourself, find ready-made ones, or cut them out of postcards.
- The decoration process is completed by randomly gluing beads or seed beads, as well as attaching a small chipboard against the background of flowers.
The birthday card for mom is ready. Now you can decorate the inside of the product with your own hands by writing a couple of warm lines in calligraphy.
Making an electronic piano from a MIDI keyboard with your own hands
Since both my wife and I were taught to press keys in childhood, there was clearly a lack of some kind of device at home with black and white keys to pass on the experience of pressing them to the younger generation.
Alas, in the small “one-room apartment,” not only “Stanway,” but simple “Red October” had no place. The solution was found - a MIDI keyboard! Moreover, attempts to do something similar myself were made at the dawn of my “radio destruction”. Again, due to lack of space, it was decided to limit ourselves to 4 octaves to begin with. And finances did not allow me to buy some kind of Roland. After a little searching on the Internet, I came across an advertisement for the sale of an evergreen device called Fatar 49 for 50. After searching everything on the same web, I found a description of this miracle.
MIDI keyboard Fatar StudioLogic CMK 49
- 4-octave, full-size, dynamic (velocity sensitive), unweighted; 49 keys
- MIDI output connectors, a plug labeled “IN” is connected to it
- Power The power adapter may not be included in the package.
- The required power adapter is 9V, 0.5A. Internal contact “+”, external “-“.
- External dimensions 75.2 x 15 x 8 cm
- Weight 2 kg
The family council decided - TAKE IT. The previous owner, demonstrating that it worked, even attached a power adapter to it. I already had a MIDI cord (I had been using it for a long time). And when I brought it home and connected it to the computer, I was finally able to remember my childhood. I. understand that in 15 years everything has been forgotten almost completely.
A very interesting program “Play Piano” from Midisoft was found on the Internet. She can teach almost anyone to play. She makes sure you play correctly and points out your mistakes, like a good teacher. It’s just a pity that during this time it was not possible to find something similar, but newer (program from 1996).
This all happened in the last century. As they say in novels, years have passed. Children were born and grew up. Even then the keyboard on the table was not particularly convenient - it was very high compared to a regular piano.
The chair stand helped, but... This year it was decided to start torturing the elder. We need to make up for our training on someone. For him, he generally had to build a pyramid on a chair. And the keyboard was constantly trying to get away from him. Attempts to place the keyboard on the children's table did not help much. Now he was too low.
Yes, and the baby was now constantly trying to press the keys, but she especially liked the shutdown button, illuminated by a light bulb. And then we had to take the problem seriously.
Firstly, it became clear that there was no point in making a keyboard the height of a standard piano, since this was already done for specific people. Secondly, having only made a keyboard stand, I quickly realized that I would have to extend the MIDI cable. And then the decision was made to make a completely autonomous musical instrument. After rummaging through the computer hardware stores, completely working (albeit obsolete) components were extracted from it: motherboard, processor, video card and hard drive. An old power supply was also found. There was one small thing missing: memory. A good person from the service department gave me a module before the New Year. Now there was everything we needed.
The configuration turned out to be the most primitive for modern times:
- CPU: Pentium MMX 166 MHz overclocked to 200
- RAM: SDRAM PC100 128 Mb
- HDD: Coner 340 Mb
- VIDEO: TRIDENT
- AUDIO: Onboard Yamaha OPL3
But for MIDI processing, the only weak point here is the sound card. For the body I had to buy 4 furniture panels 800x200x20.
After spending half a day off I got this unit:
We drill holes for the power button and the “Power” and “HDD” indicators.
We saw off the chassis of the case to the size of the motherboard. We screw it on by installing the processor memory and video card.
We close all empty chassis slots with beautiful shiny plugs.
We screw the HDD cage with the disk to the case.
We connect the power supply and all other cables and wires
The operating system was installed in advance. Only Win98 could be installed for such a volume. We connect the monitor, keyboard and mouse. Let's make sure everything works.
Now let's move on to acoustics. Previously, everything went through a computer, which was connected to a good amplifier, which in turn was connected to decent speakers. You can’t fit all this into the volume of a new device. Yes and there is no point. For such a sound card, something simpler will suffice. Again we dive into the storage rooms and take out this (so to speak) speaker system:
Let's take it apart and see inside:
Yes, but if there is no fish there is only cancer. I’ll have to go to the dacha, there are some good speakers lying there somewhere and an amplifier I soldered on the K174UN7 about 12 years ago - it will still have more power.
Let's connect this “Sound”.
Here you go. what happened.
The speakers were not found at the dacha (obviously already used somewhere and forgotten), but the world is not without kind people and a neighbor gave me two car midrange speakers.
In the process of poking the keyboard back and forth, one of the keys began to sound only when pressed hard. I had to take everything apart and give my dear C2H5OH to drink. I wiped every key, every rubber band, dried it and put it back. At the same time, I clicked the internal device with my camera.
The amplifier on the K174UN7 was discovered, but either the condensers on it died out for a long time during this time, or it was too sensitive. In general, it sounds terribly loud. I had to leave the old amplifier for now.
How to Make Birthday Cake Cards
What do you need
- Thick blue or turquoise double-sided paper;
- scissors;
- ruler;
- a simple pencil;
- thick white paper;
- colored paper with drawings and patterns;
- glue stick.
How to do
1. Cut a rectangle measuring 15 x 11 cm from blue or turquoise paper. Fold it in half crosswise. Cut a rectangle measuring 14 x 10 cm from a white sheet.
2. Fold the white piece in half crosswise. On the fold side, make four cuts at equal distances from each other. The first two (at the bottom of the paper) should be the same. The third is about 1 cm shorter, and the fourth is even slightly shorter in length.
3. Fold the cut pieces as shown in the photo.
4. Unfold the strips and open the paper. Bend the cut pieces inward along the marked folds.
5. Cut out three rectangles from colored paper according to the size of the layers of the future cake. They should be quite a bit taller than the white stripes. Fold them in half and glue them to the sheet.
6. Bend and straighten the white sheet again so that the lines on the cake are more clearly visible. Cut out several candles in the form of small rectangles from bright paper, and the same number of droplet figures from yellow paper. Glue the droplets to the candles and them to the cake.
7. Apply glue to the back of the white paper and attach it to the blue base. The card can be signed next to the cake or outside.
A Doll's Life Master Class Cardboard Master Class DOLL PIANO Cardboard
Our doll decided to take up music and asked for a piano. The piano was inspired by an ordinary shoebox. It was so black lacquered, it looked like a piano! First there will be a master class, and then a short story.
For work we will need: - a black cardboard shoe box - a black paper bag - scissors - a knife with a retractable blade - a cutter - moment crystal glue - a black pen - a black super durable marker - gold clippings from candy boxes - tape
Here are the objects of future reincarnation
On paper we draw a pattern for the sides of the piano. Apply from the inside, outline. We cut the bottom of the box to fit the doll’s height and bend it inward.
Cut out the sides. We fold the excess inward.
Take the lid of the box. We cut off a piece like this and measure it so that the edge of the lid becomes the base for the keys of our piano. We will attach it upside down as shown by the arrows.
This piece will attach to the bottom of the shoe box. We bend along the dotted line, this will be our base for the keys.
From the remains of the lid we make a piano façade with a lid that will cover the keys.
To prevent the inside of the piano from being white, we will paste black paper inside, cutting it out of a bag. We tear the bag to make one sheet. We put our blank on top, measure how much paper is needed for the inner “white” part of the shoe box.
Cut it out. I got this little vest. There is a cardboard blank nearby for comparison.
We put it inside, trim it from the sides so that the side slits are visible.
Now we cut out the top part for the front of the piano. (If your box lid was black, you don’t have to do this.)
Now let's make the keys. Take a white cardboard strip and bend it 2 times, as shown in the figure. Then we draw white and black keys.
We assemble all the parts together: 1) We fasten the box from the bottom with a stapler, 2) we glue our undershirt from step 11 inside the white part of the box. 3) Then we glue the base for the keys, which we cut out in step 8, onto the back wall of the box (PRELIMINALY, OF COURSE, GLUED TO THIS BASE OF THE KEYS ITSELF). 4)Next we glue the front of the piano, which was cut out in step 9. 5) Glue the black paper from step 13 onto it on top.
We color all the folds, joints of the paper and sections of cardboard with a black marker. And the final stage is to decorate the piano with cutouts from candy boxes. I also glued the notes in a gold rim. Usually, in front of the eyes of someone who plays the piano, there is a special stand for music notes, a music stand, I think it’s called, so I was too lazy to come up with it and I just made a gold oval frame with notes.
The mother doll played so beautifully that her daughter came running into the room.
And of course she immediately climbed onto her mother’s lap.
“If you want to listen to music, sit next to me. I can’t play when you’re squirming on my lap!” And the baby sat down on a chair to listen to her mother play the piano.
Source
How to Make a Pop-Up Cupcake Birthday Card
What do you need
- Pink double-sided paper;
- ruler;
- a simple pencil;
- scissors;
- glue;
- White paper;
- double-sided bulk tape;
- paper of different colors;
- Red ribbon;
- felt-tip pen.
How to do
1. Fold a sheet of pink paper in half. Place it so that there is a fold at the bottom. Place a ruler at a slight angle on one edge and draw a line. Approximately in the middle, draw another slanted line so that the figure resembles a pot.
2. Cut out the part along the marked lines. Apply glue to the side edges inside the figure.
3. Connect the elements and press the paper on the sides so that it sticks together. Place a ruler in the resulting pocket and measure the distance from the bottom to the edge. Also measure the length of the bottom edge of the figure, stepping back a little on the sides. The author got 9 cm.
Draw a rectangle on white paper. Two sides should be 9 cm each (or whatever value you get), and the other two should be a few centimeters more than the distance from the bottom to the edge of the figure.
The resulting rectangle should easily fit into the pink pocket. Cut out the white piece.
4. Place the item in the pocket. Measure the length of its top edge and the height of the pocket along with the inserted white piece.
Draw another rectangle on white paper. Its length should be 2–3 cm longer than the edge of the pocket, and the required width should be approximately half the measured height.
Draw a cloud-like figure in a rectangle.
5. Cut out the cloud. Place it on top of the white piece so that it covers the pink piece. For convenience, mark the places of their contact with a pencil.
Remove the cloud. Glue several pieces of bulk tape to the visible part of the white part. Attach a cloud to them by placing it on the pencil marks.
6. Cut out small circles of different diameters from colored paper. Glue them to the cream, that is, to the part in the form of a cloud. Cut out a heart from red paper and attach it at the very top.
Tie a bow on the side of the ribbon. Cut out a small tag from white paper - a rectangle with cut corners. Write “For You” or a congratulation on it.
Glue this element to the bottom of the card and attach the ribbon horizontally above the tag.
7. Glue the ends of the ribbon to the back of the card. Write your congratulations on the white removable part.
How to make a paper piano using origami technique
The piano can be called one of the most common musical instruments. If we talk about keyboards, then the piano is the undisputed leader in popularity all over the world. This instrument was first invented by an American in 1800. But it only became similar to a modern piano in the 19th century. Sounds are produced from this instrument by pressing the keys. A child can learn all this if you tell him about the piano while making this paper craft. The creation of this musical instrument using the origami technique is given in the master class and its step-by-step photographs.
To make a paper piano using the origami technique, take:
- a square of black one-sided paper;
- black marker.
First, fold the sheet in half.
Then we make another fold, marking a fold line in the middle of the resulting rectangle.
The side edges must be folded towards the central vertical line. First we make such a fold on the right side.
After this you need to make a symmetrical fold on the left.
The right curved part needs to be straightened so that its upper part takes on the shape of a triangle.
On the left side we do the same. As a result, we received a blank of the following type; in origami it is called the basic “House” shape.
The lower rectangle, located in the middle of the future piano blank, needs to be bent upward.
We bend its upper edge down a little.
The side edges of the workpiece need to be folded towards the middle.
Now let's bend the sides of our piano and lower the top part down (to a horizontal level).
All that remains is to draw the keys on our musical instrument. We do this with a black marker.
Our paper piano using the origami technique is ready.
"Embroidered" postcard
More precisely, not the entire card should be embroidered, but the image on it. What it will be - flowers, an animal, a pattern or something else is not so important. Everything will come in handy, everything will be beautiful. Of course, it’s easier to make such a card for your daughter, because embroidery is mostly a woman’s job.
This is how a postcard is made.
- Take half of a strong cardboard.
- It outlines the location of the future composition.
- Next, using colored thick threads and a large needle, flowers or some other image are made. It would be better, of course, if they were flowers - they were easier to make. Alternatively, you can buy ready-made flowers in the store. Flowers (or other image) should be voluminous and soft.
- Finished flowers (or something else) should be glued to cardboard. Using an ordinary needle and thread, their edges are adjusted so that they do not extend beyond the boundaries of the postcard and do not become shaggy.
- You can glue a ribbon or bow to the base of the bouquet - it will be very beautiful.
- Congratulations are written on the inside of the card.
Musical scales: playing the C major scale and others
Harmony is the coherence of notes that is pleasant to our ears. A tonality is a set of specific notes subordinate to one main note.
The first thing you will need to know, based on the knowledge you have acquired, is the construction of major scales.
Scales are notes that are arranged in a certain order. The difference between major and minor is often explained to children as “happy” and “sad” scales, respectively, but this is not completely true - there is nothing stopping you from making sad songs in major and vice versa. Here are their main features:
- Scales are built from 8 notes
- The first and the Eighth, the last, notes are the same in name, but different in height (pure octave)
- The notes are played in strict order, the minimum distance between them is a semitone, and the maximum is a tone.
Remember carefully, with this simple formula you can play any major scale:
Tone – Tone – Semitone – Tone – Tone – Tone – Semitone
To make it easier:
2 Tones – Halftone – 3 Tones – Halftone
The C major scale is played the easiest and most obvious way - across all the white keys in a row from C to C (yes, there are too many Cs in this sentence, but c'est la vie!).
At the first stage, you will need to know 3 scales: C major, G major and F major.
Major scales are played with the following fingers: Thumb (1) → Index (2) → Middle (3) → (“tuck” the thumb) → Thumb (1) → Index (2) → Middle (3) → Ring (4) → Little finger (5)
Postcard "with laughter"
It's not difficult to do, but you need to have a sense of humor to do it.
- Take half a cardboard sheet.
- We glue (or draw, or embroider) something funny onto it. Or simply something fun and bright that will definitely cheer up mom.
- Of course, such a postcard should also have a corresponding congratulatory inscription - just as cheerful, bright and unusual.
Well, is it really difficult? But how much joy and fun there will be when mom receives such a gift!
We give mom a musical card
Of course, making it yourself is unrealistic. Therefore, a musical postcard must be purchased in advance at the store. Fortunately, there are any number of variants of such postcards on sale now.
But you need to decorate such a gift with your own hands. This can be done in many ways: glue “music” to the inside of a hand-made card, hide it in a special envelope, disguise it among flowers so that mom does not immediately find it, etc.
Coloring pages - cards for mom
Why not take advantage of a little help and download coloring pages, remember we did this on March 8th? And now a few tips on what and how to download and “draw” using coloring books.
Bouquets! Mom will also like scenes in which children give flowers.
And if a brother and sister give a gift together, then you can color such a cute card.
And here is a cute bunny with a huge bouquet!
Mom will definitely like even a simple bouquet of daisies.
Confessions that their mother is the best (and if you decorate it beautifully with flowers, balloons and fireworks, it will turn out to be a bomb!).
Sweets or gifts.
And here on the right you can even write a short congratulations. For example:
***
My dear Mom! Happy birthday to you! Shine like a star. Float like a butterfly. Shine like the sun. And most importantly, know that I adore you! ***Mommy, mummy, my star, Happy birthday, dear, I congratulate you. Let all the sorrows go away, let the trouble go away, You are my treasure, my mom. ***Happy birthday! I wish you health, success and happiness, May the world smile like a clear sun, May your every day be the most beautiful, May happiness always stand in your way, May your smile give people joy!
And here in each heart you can write a word - a wish. For example, smiles, love, happiness, peace, kindness, joy, health...
birthday greetings
It's so easy to make mom happy!!!
You can also give such a cute bear with a bouquet or a heart and sew a cute cat for your mother.
A worthy reason to give a handmade postcard
Postcards are a classic option for birthday greetings. Children and adults, mothers and grandmothers, classmates and neighbors - everyone will be happy with such a simple surprise.
A postcard can be made specifically for the holiday of February 23 or March 8, for the New Year or Christmas, or for September 1 or Mother's Day.
Handmade has many followers and fans who do not care at all about what to get inspired by. The reason for creativity is the world around us and life itself, flowing smoothly or running without looking back.
How to make birthday cards with balloons
What do you need
- Thick gray paper;
- double-sided paper of different colors;
- ruler;
- a simple pencil;
- scissors;
- double sided tape;
- compass;
- regular glue and/or glue stick;
- glue gun;
- twine or other thick threads;
- White paper;
- felt-tip pen;
- glue stick;
- colored tape.
How to do
1. Fold gray construction paper in half crosswise. Cut a rectangle with sides 20 and 14 cm from a pink sheet. Cut a rectangle measuring 16 x 10 cm from gray construction paper.
Using double-sided tape, glue the small gray part onto the pink one, and secure the latter onto the cover of the future card.
2. Cut many strips of colored paper of different thicknesses, but the same length. These are blanks for balls. Conditionally divide one strip into three parts and bend it twice along the lines.
Draw a circle on the resulting part using a compass. Cut along the contour - you will have three circles.
3. Prepare circles from the remaining colored stripes in the same way.
4. Cut small triangles from the remaining folded paper. Glue them to the bottom of each circle.
5. Fold a small strip of paper in half. Unfold and fold each side like an accordion, as shown in the photo and video below.
6. Make as many of the same parts as you have balls. Glue them to the circles so that the accordions are on top.
7. Using a glue gun, attach a piece of twine or other thick thread to each ball.
8. Fold the long edges of the white paper about 2 cm and cut along the contour so that you get two strips folded lengthwise. Fold each one in half crosswise three times. Cut out identical triangles from them so that the bases of the shapes are on the fold. Details are in the video below.
9. Write one letter from the phrase “Happy Birthday” on each triangle. Lubricate the inside of the flags with glue, put them on two pieces of rope and glue them together. Tie the ends of these two strings together.
10. Lubricate the accordions with glue on the back of the balls and distribute them beautifully inside the card. Save a few for the cover.
11. Tie the ends of the twine, twist and cut off the excess. Using a glue gun, attach the letter flags to the card.
12. Write a congratulatory message at the bottom of the cover. Glue a few balls at the top. Cut off the excess twine and tie it with ribbon.
DIY New Year's card: 10 ideas with instructions
Photo: thejoysharing.com
A handmade New Year's card is a great idea! Firstly, this postcard will be one and only, and secondly, such a congratulation always turns out to be very warm and sincere. This collection contains several ideas for New Year cards that you can make yourself. Many are quite simple - for example, you can do them together with your child.
Photo: redtedart.com
If you want to please your children for the holidays, pay attention also to the patterns of toys and children's fancy dress costumes, which you will find in our electronic catalogue.
DIY New Year's card: button balls
Photo: doodlecraftblog.com
You can make this New Year's card with your own hands with your child. First prepare the base: cut out a rectangle from thick paper and fold it in half. The kid can help glue the buttons onto the paper, and you will add loops to them and write a congratulation.
DIY pop-up card for the New Year: Christmas tree
To make such a card, prepare a base from a rectangle of paper or cardboard folded in half.
Fold the green paper like an accordion.
Cut the part into five parts, so that each is smaller than the previous one.
Glue the widest part to the fold of the card, as shown in the photo.
Glue the rest higher, from the widest to the narrowest part.
Add a trunk, a star, gifts from pieces of colored paper and a congratulatory inscription.
Photo: sweetteal.com
DIY New Year cards: 10 ideas with instructions
DIY New Year's card: fabric applique on paper
Stock up on thick paper, scraps of beautiful fabrics and ribbon or cord. Cut out rectangles for cards from paper. Cut out applique details from the fabric, for example, stars. Use a sewing machine to sew the appliqué parts to the paper - however, this can also be done by hand. Fold the card in half, sign it and tie it with ribbon or string.
Photo: aspoonfulofsugardesigns.com
Postcard with a painted garland
This DIY New Year's card is worth making with your child: after all, the lights of the garland drawn on the card are fingerprints!
Prepare the base of the card.
Let your child draw colorful lights with his finger. When the paint is dry, add highlights to them with white color, and then use a felt-tip pen to draw the wire of the garland.
Photo: thejoysharing.com
How to wrap a gift in paper: step-by-step instructions
Postcards with pencil eraser stamps
These cards can be made by adults with children, or younger children with older ones. First you need to prepare the base of the cards: fold a sheet of paper in half and glue a simple applique on it, for example, in the form of a Christmas tree or a snowman.
And the next stage of work will be handled by those who are younger. Prepare stamp ink and pencils with erasers. Erasers can be used as stamps and can be used to draw snow, balls on a Christmas tree, snowman buttons, and so on.
Photo: liagriffith.com
Card with colored balls
This card looks like a real artist worked on painting the balloons! In fact, you can make such a New Year’s card with your own hands with your child.
First you need to color the paper from which the balls will be cut. Use watercolors to make the colors transparent and improvise with your children.
When the drawing is dry, cut out the circles.
Also prepare parts from foil or paper with a metallized coating.
Gather the balls by adding a loop.
And glue them to the prepared card base.
Photo: make-it-your-own.com
10 ways to beautifully wrap New Year's gifts
New Year card with snowman
These snowman cards are absolutely adorable and super easy to make with your child. Prepare a base from a sheet of paper folded in half. Glue a carrot nose cut out of orange paper and a scarf made of some colored paper. Draw the eyes, mouth and buttons with a felt-tip pen.
Photo: easypeasyandfun.com
DIY New Year's card: Christmas tree from pages of old books or newspapers
If you have unnecessary books, newspapers or magazines, you can use their pages to make such an original New Year's card with your own hands.
Choose several pages of slightly different colors: this will make the applique look more interesting. Cut out triangles and glue the cards onto the prepared base.
Photo: auntpeaches.com
Christmas tree decorations made of paper: 6 master classes
New Year card with a Christmas tree made of ribbon
This New Year's card is much easier to make than it looks!
Start gluing the green ribbon in a zigzag pattern onto the prepared base. Use a hot glue gun.
Extend the zigzag downwards until the Christmas tree is ready.
Hide the place where the ribbon is attached by gluing colored buttons.
Photo: casaetrend. it
New Year's card: Santa Claus
In one style you can not only make a card, but also decorate a gift bag and a label to write a name on it.
All three crafts are made according to the same principle.
Glue a wide strip of pink paper onto the base in the center.
Glue a strip of red paper over the top.
Tear off the strips for the beard and for the edge of the hat and glue them on.
Draw the eyes, nose and mouth.
Finally, add some blush and you're done!
Photo: katescreativespace.com
Snowflakes for cutting: 40 best stencils and templates
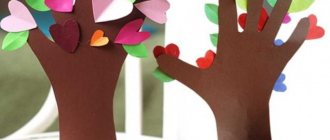
Cards from palms
This refers to children's palms, or, more precisely, their contours cut out of colored paper. The creative procedure itself is simple, funny and exciting, and the crafts are very cute and touching.
What's the best way to make a craft like this? That's how.
- We place a child’s palm on a sheet of paper and trace it with a pencil. A child can do this on his own, but it’s even better if someone older helps him.
- If you wish, you can outline and cut out one palm with a pencil, or two at once. You will get two palms if you bend the paper in half before placing your palm on it and tracing it with a pencil.
- Cut out the outline of the palm with scissors.
Well, then creativity begins. It’s easy to make a flower or even a whole bouquet from single palms. For example, this one.
And from two palms folded together, you get such excellent holiday crafts. For example, with a heart...
Or with a butterfly...
Or you can do it even simpler, and don’t cut anything out, but just smear the children’s palms with paint, and then apply them to a white sheet of paper. Even one child’s hand printed on a sheet of paper will bring joy to the mother. And if there are a lot of prints...
Panoramic postcard
You can get an original DIY postcard if you think of it as a panoramic one. In this type, parts of different heights are thought out and drawn separately, and then glued from smallest to largest on the inside. So, when you open a postcard, you can see a three-dimensional image.
Another type of such creativity is a collage postcard. If you draw and cut out the profiles of a tree, bush, hare, you can combine them on the same level by adding several details.
The recognizable outlines of the Bronze Horseman, the Admiralty, and the Rostral Columns will help to recreate the appearance of St. Petersburg. Any tourist visiting Northern Palmyra will be happy to receive such a postcard with parts superimposed on each other.
Postcard with a dress made of fabric
The most notable thing about this card is the fabric skirt. We collect one edge using a needle and thread.
Assembling a fabric skirt
Glue the top part of the paper dress.
Glue the top of the dress
We complement the craft with various decorations and designs.
Postcard with a dress made of fabric
Postcards made of plasticine
Children love plasticine even more than colored paper. And making different figures from it is generally one of the most favorite children’s activities. So why not make a holiday card for mom from this craft material? For example, a plasticine bouquet. Or - some picture with animals, houses, cars, etc.
It should be done like this.
- We prepare the base for the postcard - a flat rectangular board or plywood. It would be better if it was painted in some nice color.
- We sculpt an image from plasticine: colorful flowers, a landscape, a funny animal, etc.
- We glue it all to the base as we sculpt.
When the plasticine card is ready, we give it to mom.
Postcard made of cotton pads and colored paper
A very beautiful craft that anyone, even a very small child, can make.
- Take cotton pads and a colored button. The discs are the petals of the future flower, and the button is its center.
- Cut out a stem and leaves from green paper.
- Take a colored rectangular piece of cardboard (any color can be) and glue a button onto it. We place cotton pads around it, and below - a stem with leaves along the edges.
That's it, the cute greeting card is ready. And besides, it’s also voluminous!
Postcard made in scrapbooking style
Doing it is also quite difficult, but difficult does not mean impossible. First of all, let us provide preliminary accompanying clarifications.
- Such cards are made from any material that is at hand: cardboard, various decor, lace, ribbons, felt, curly staplers, etc.
- In principle, you can buy materials for making postcards if you don’t have anything suitable at hand.
- The same goes for the decorations used to make the card. They can be homemade or store bought.
These photographs will tell you in detail how to make such cards. They capture the entire process from start to finish.
At the same time, it should turn out to be such beauty.