how to make a paper flower for beginners
Here is a selection of the simplest paper flowers for beginners . With a variety of craft options available, there is something for everyone. These step-by-step tutorials are not only simple, but also fun, and believe me, not just for kids.
Try everything, regardless of your skill level, because what matters is not experience, but the desire to do it yourself. There are different ways to make easy paper flowers for beginners and you may learn a lot here. For example, how to make simple three-dimensional paper flowers , use the accordion method, make paper flowers using a template and other techniques and methods. All these examples are wonderful craft ideas for children, so let making easy paper flowers become your family creativity.
Instructions for making flowers from paper:
To make such flowers, we will need:
Tools and materials:
- Double-sided colored paper (possibly with patterns) or pages from newspapers, magazines, books
- Scissors
- Glue
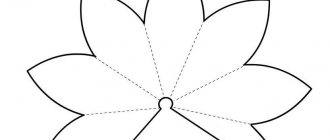
1. First, take scissors and cut out a square from colored paper (the larger the square, the larger the flower will be).
We twist the square so that we get a rhombus. 2. Fold the diamond in half diagonally. We have a triangle.
3. Once again, fold the two corners of the triangle into the middle to form new corners, as in the photo below. We have a rhombus again.
4. Now let's start creating the core. Thanks to the core, our paper flower will look more natural. To do this, carefully straighten the two side corners. The bend line should be exactly in the middle on them.
5. We bend the side corners of the triangles (F and G) inward so that they do not extend beyond the boundaries of the sheet.
6. Next we need to fold the two side triangles in half. The corners remain inside. After this, apply glue to the sides, as shown in the picture, and glue the petal.
7. We have one petal with a core.
8. To make one flower, we need five such petals. We already have one, we need to make four more of these petals. To do this, repeat the previous steps four times.
9. We got 5 petals. Now, to make a flower out of them, spread glue on the sides of the five petals and glue the petals together.
To make paper flowers more vibrant and original, you can use colored paper with patterns.
If you want to give a vintage look to your paper flowers, you can make flowers from newsprint or from book pages.
By showing your imagination, these paper flowers can be used to decorate almost any holiday or gift!
Templates
The simplest blanks to work with are a circle and a rectangle. But to make the plants look more natural and picturesque, it is better to create them from individual petals. For this you will need templates and patterns.
Features of working with patterns:
- It is better to print stencils in advance from thick Whatman paper.
- Each plant will require a set of patterns.
- To prevent the sets from getting mixed up with each other, it is better to make them from colored Whatman paper and sign them.
- For ease of assembly, all parts should be numbered.
- It is better to write on each part how many such parts will be needed.
This way the template will turn into ready-made instructions for creating a plant.
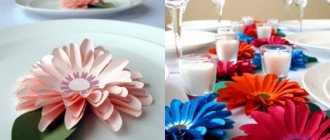
Paper flowers - Rose
Let's make such a wonderful paper rose together. For this we need:
Tools and materials:
- Scissors
- Ruler
- Threads
- Scotch tape (preferably colored or double-sided)
- A piece of wire
- Stretch Crepe Paper
- Ball or candy
Step-by-step instruction:
1. First we need to prepare the preparations. To do this, you need to choose the color for our rose and cut crepe paper of the desired shade measuring 7 x 5.5 cm - these will be our petals. The more preparations we prepare, the more magnificent the rose will look.
2. Now we need to stretch our blanks across. This is necessary in order to give them a bend and shape.
3. Next, we make a blank using green paper (look at the picture). This trick will make our rose look more realistic.
4. At this stage you need to connect the stem of the rose with its petals. Carefully wrap the petal blanks around the ball or candy and attach them to the stem with a thread.
5. Now you need to make the wire more similar to the stem. To do this, take green paper and wrap it around the wire. After this, we attach the green leaf blanks to colored or double-sided tape.
That's all! The paper rose is ready. If you want to make a whole bouquet of such roses, then repeat all the steps as many times as necessary.
To make the bouquet look more fun, you can use paper of different colors.
Wall decor
- To make a wall hanging step by step, roll up several newspapers into a thin tube.
- Now glue these folded sticks onto the cardboard, let the glue absorb well.
- After this, use scissors to cut out any chosen shape from these glued paper rolls, such as a heart shape or a flower shape, or choose a doll shape.
- Make sure you cut out a large object identical to the smaller ones (it's best to make shapes using a template).
- Now take some string with beads and make 5 strings of different sizes by attaching their bases to the paper craft.
- Now choose the color in which the product will be made, come up with some interesting designs on top of the base to make the pendant more beautiful.
Volumetric pendant made of newspaper tubes in the shape of hearts - beautiful and romantic
DIY paper orchid
Such wonderful orchids can be used for decoration or you can make a branch and put it in a vase.
Tools and materials:
- Scissors
- Color printer
- Glue
- Paper
- Clothespin (if we want to decorate gift wrapping)
Paper orchid templates
Download and print these templates on a color printer
Step-by-step instruction:
Furniture items
This product is made using the quilling principle - wrap rolled sheets of newspaper around a pen or pencil using glue, and then paint them in your preferred color. The building material for the decorative vase is ready.
The most convenient way to fold sheets of paper is to wrap them around a pencil.
Rolling sheets of newspaper into ropes is the best way to use newspaper for DIY crafts. With these tubes you can design a modern flower vase by gluing strips horizontally or vertically, and also create more complex shapes like a mirror frame, photo or wall plates, etc.
Coasters for mugs are made using the quilling technique from newspaper tubes
Sweet bouquet of paper flowers
Such a bouquet of flowers with a sweet surprise inside will be a unique gift for a loved one!
Let's start making it.
To make such a bouquet of flowers from paper, you need to prepare the following tools and materials:
- Corrugated paper
- Wide tape
- Narrow ribbon (0.5 cm)
- Wire
- Green type tape
- Scissors
- Wire cutters
- Wooden skewers
- Wrapping paper or mesh for a bouquet
- Sprigs of greenery
- Bow for decoration
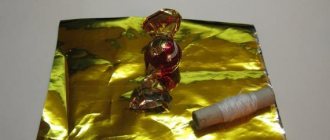
Well, and, of course, chocolates
Step-by-step instruction:
1. First you need to take wire cutters and cut the wire for the stems into 10 cm pieces. In our case, you need 7 pieces of wire.
2. Take scissors and cut a thin ribbon (0.5 cm wide) into pieces about 25 - 28 cm long.
3. From corrugated paper we make seven blanks in the form of rectangles, measuring 18x12 cm.
4. Then cut out small rectangles in the bottom corner of a sheet of paper, measuring 9cm x 5cm. These will be our future flower buds.
5. Place the smaller piece on top of the larger one and place the candy on the smaller piece.
6. We twist our blank together with the candy into a tube, forming a bud.
7. We take the wire and place one end of it in the middle of the bud. We wrap the bottom of the bud blank around the top of the wire, forming the stem of the flower.
8. Now you need to wrap the tape around the top of the wire to secure the stem and bud well.
9. We take the previously cut ribbon and tie it around the bud with the candy.
10. Now we need to fluff the flower and give it a wavy look. To do this, gradually turn away the edges of the paper at the top of the bud, pulling it a little so that the paper stretches and bends like a petal.
11. We carry out all the above steps with all the buds.
12. We take a wooden skewer and, using tape, attach three flowers and decorative greenery to it. Then we add other flowers and continue wrapping the stem with tape.
As a result, we should get a bouquet like this:
You can stop here, or you can continue and beautifully package the composition.
13. We take the packaging, which should be longer than the stems of the bouquet, place the bouquet diagonally and wrap the flowers in the packaging.
14. We tie the bouquet with a ribbon and decorate it with a bow.
The bouquet of flowers is ready!
Main features of working with paper material
Paper of any density and color is actively used in the creative process, ensuring the creation of crafts of various designs and intended purposes. With your own hands you can make simple products and decorative decorations for your home, figurines of animals and birds, unusual three-dimensional installations and magnificent paintings.
Even a child who will definitely enjoy participating in an interesting creative process can work with such material. Paper can be glued and stitched, folded and formed into individual elements of future crafts, and its main feature remains its low cost and affordable cost.
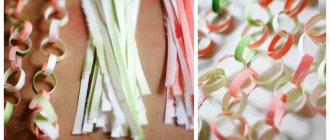
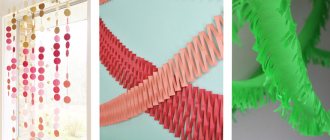
Paper flowers with rounded edges
Quiet paper usually comes in large sheets, in a stack of 8-10 layers. This is exactly how many layers we need for the flower.
1. Take a stack of eight sheets and cut out a rectangle of any size. The diameter of the flower will be equal to the width of the leaf.
2. The next step is to fold our rectangular sheets into an accordion. The height of the fold was about 2 centimeters, but you can also experiment with this parameter.
We fold the sheets into an accordion until the very end, turning the sheet over after each movement.
This is how it should turn out.
3. Cut a piece of rope, ribbon, fishing line or thread
4. We tie our accordion in the middle. It should look like this.
5. Use scissors to round the edge to form a rounded petal.
It is difficult to cut through all layers at the same time, so try to cut in several steps.
6. On the other side we do the same.
This is how it happened:
7. If you buy ready-made pom-pom flowers from tishu, then you will be given exactly such a blank, which now you need to open, forming the flower as follows: starting from the top, lift all layers of paper to the middle.
At the same time, rotate the flower, grabbing the paper in turn from one side to the other.
After a while, you will have a stunning paper flower in your hands!
You can also watch all the steps in this video:
It was a flower with round petals. Go ahead!
Costume elements
Children's matinees and role-playing games, which are fashionable today, contribute to the development of the art of creating paper crafts. Various types of paper and cardboard are used. Using a headdress, you can make a real fairy-tale hero out of your child. For you need:
- Make a base from wide Whatman paper.
- Wrap the blank around the baby's head. Please note that the accessory should not cause discomfort to the child.
- Sew the ends together with thread or glue them together.
- Decorate the “hat” to your liking. You can use artificial hair yarn to make a figured crown, animal ears, a snowflake or a mustache.
Paper flower with pointed petals
1. We repeat all the same steps until the petal formation stage.
2. At the stage of petal formation, we do not round the edge, but make it sharp.
3. We make sharp edges on both sides.
4. Now open the flower and see what happens.
This is what a miracle turns out to be like in the end!
Let's turn the pages of history
The history of the bouquet goes back more than one century. Since ancient times, flowers have been an excellent way to decorate a person and his home. Not a single event in life (cheerful, solemn, sad) is complete without charming flowers.
In Ancient Greece, noble guests were honored with bright garlands, and in India a similar custom has survived to this day. In Europe, the first flower bouquets were in the 14th century and were valued not so much as decoration, but as a source of aroma. The shape of bouquets underwent constant changes related to fashion and certain requirements and trends of the era.
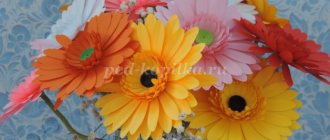
Paper flowers. Chrysanthemum
The next version of paper flowers that we will learn to make resembles a chrysanthemum.
1. We take the workpiece, but now we do not round or sharpen the edge, but cut it into thin strips.
2. We do the same on the other side.
3. Opening the flower.
As a result, we got such a flower.
Very cool!
How to make a gift bag
Choosing handmade gift bags with elements of old newspapers will be the decision that will bring out the extraordinary courageous personality in you. After all, it is not easy for our mentality to make a gift in a newspaper, like our grandparents in the pre-perestroika era. This solution not only leads us to a way to recycle things, but, at the same time, fulfills all the necessary transportation requirements usually imposed on packaging - that is, it is still a very good option.
The gift bag can be decorated with a lace napkin - this will make it more festive
Flowers made of paper (paper towels)
Let's now look at how to make these paper flowers using paper towels. 1. Tear several rectangles from the paper towels.
In our version, the paper towels came with perforations. It needs to be cut off.
2. Now divide each sheet into several layers, depending on how many layers it consists of. They are usually two-layer or three-layer.
Thus, we obtain a fairly thin and durable paper suitable for making flowers.
3. Take 8 thin pieces of paper and stack them on top of each other.
4. We fold the sheets into an accordion, bend them in the middle and tie them.
5. We make sharp edges on both sides.
6. Opening the flower.
As a result, we get such a beautiful flower from paper towels in a couple of minutes!
Applications
Applications in the form of flowers will become a picturesque decoration for any postcard or even a simple drawing. When making them, it is important to adhere to several rules:
- Think about the composition in advance.
- Use several layers to make the decoration voluminous.
- Cut out the details using unusual, curly patterns.
- Give each part volume by curling it or straightening it with your fingers.
- Before assembling, decorate the appliques with pencils or paints.
Such plants will turn out to be a real work of art, and the child will be proud of his creativity.
Paper flowers (we use napkins)
Now let's look at creating flowers from paper napkins.
In our version, we took a multi-colored napkin. Let's make the lower layers of the flower yellow and the middle white.
1. As with paper towels, we also divide the napkins into layers.
2. Stack the yellow layers of napkins and cut out a rectangle of the desired size.
3. After this, we stack the white layers of the napkin and cut out a rectangle slightly smaller than the yellow rectangle.
4. After this, we place the yellow layers with the colored side up, and place the white center just below the main petals.
5. We fold the layers into an accordion.
6. Open the accordion and carefully separate the yellow layers from the white ones.
7. Fold the layers back into an accordion. As a result, we get two packs of white and yellow accordions.
8. Take a white accordion and cut its edges into thin strips.
9. Take a yellow accordion and make rounded edges.
10. Open both accordions and combine them in this way: put the white one on the yellow accordion and assemble it back into the accordion.
11. Bend it in the middle and tie it.
12. Layer by layer we open the flower.
This is such a wonderful flower! Agree, napkins make no less original flowers!
Finally, one more master class:
Proper placement of ingredients
The design of round bouquets involves the following types of placement of the material used:
- The concentric circular look requires a specific arrangement of flowers. In this case, it is necessary to observe alternation. For example, in the initial circle there are large, alternating with small, inflorescences of various colors. In the next round, a different material is used.
- The spiral look is characterized by the formation of an interesting spiral path in the bouquet. This interesting effect is obtained by using flowers of various shapes and colors.
- The schematic look is characterized by the proportional arrangement of small color groups.
- A diagonal image is created by highlighting small sectors located oppositely along the diagonal of the product, which are filled with certain colors.
Modifications of round bouquets can be expanded, but this type is always the most common creation of florists.
Let's take it and do it
We wash and dry the fruit. We string each fruit onto a skewer with pre-prepared cuts. It is better to pierce the fruit halfway so that the skewer does not slip out of it. Notches provide additional insurance.
You can make a bouquet of whole fruits, or you can cut, for example, a couple of lemons. This will add originality to the bouquet. And the smell of apples and lemon will drive not only the hero of the occasion, but also everyone present, crazy!
We collect everything into a bouquet, secure the stems of the “flowers” with a rope and pack them in paper. The vitamin bouquet is ready!