- June 20, 2019
- Repair Tips
- Marina Lobacheva
Repairs in residential premises must be carried out at certain intervals. This is due to the fact that old finishing materials quickly fail and therefore cannot be used for their intended purpose. But the owners of the apartment and house may not have the funds necessary to carry out repairs. Therefore, they have a question about how to make repairs without money. Some work can be done with your own hands, and you can also use rental tools. There are several tips that can help you achieve budget-friendly renovations that don’t cause a significant blow to people’s family budgets.
Carrying out general cleaning
Are you planning a renovation? It’s difficult to do this without money, but it’s possible. First, you need to thoroughly clean your living areas. To do this, various unnecessary things that are not used for any purpose are completely eliminated.
During general cleaning, you can see all the shortcomings of the home. As a result, a list of materials that need to be purchased for repairs is formed. Thanks to this list, you can decide in advance how much you will have to spend on repairs.
Add some greenery
If you love plants and know how to care for them, take a bold step and add some greenery to your apartment.
A modern floral interior has little in common with pots placed wherever possible. The latest design tips center around vertical gardening - hanging gardens and green walls. You need to select plants and soil, assemble a building on which the greenery will be placed, fill it with soil and equip it with drip irrigation systems. Everything together seems expensive and difficult, but with your own hands you will achieve excellent results for modest money. skillville.ru
How to make a green wall?
- Container wall. Place several horizontal containers on a vertical frame. Plant with climbing plants that will hide the pots. The simplest option is normal watering.
- Pocket wall. Instead of containers, the vertical frame uses pockets. In this case, not only climbing plants are suitable. The more pockets and the closer they are located, the easier it is to cover the surface with greenery.
- Modular wall . These are the kind of walls that specialized organizations deal with. The most expensive method, since it requires not only a special frame for attaching plants, but also a substrate to fill it, which will ensure the life of the plants without spilling outside the frame.
Under any system you need to provide a place to collect excess moisture. Designers recommend using containers with stones, pebbles, sand and shells.
Using decorative plaster instead of wallpaper
Walls most often need repairs, since various drops and dirt constantly fall on the coating. Modern high-quality wallpaper has a really significant cost, so it can be replaced with affordable decorative plaster.
It is especially important to use such coating in a house where children or pets live. The coating is easy to clean from various contaminants, and you can also remove plasticine or even pen stains from it. It can be scratched without fear of causing significant damage.
The cost of decorative plaster is considered acceptable if you do not focus on famous brands. The application procedure is considered quite simple, so you can do it yourself even without any experience in this field. The result is quite an interesting wall decor, and the coating will last about 20 years.
Textured plaster is available on the market in numerous colors, so you can choose a material that is ideal for any living space. Additional patterns applied may vary depending on the tools used.
Electrical and plumbing
This stage involves performing the dirtiest, but responsible and necessary work. Laying new power cables requires certain skills, so sometimes it makes sense to call in a specialist. If there are errors in these types of work, it will be very difficult to correct them. Often this requires major repairs to be done almost all over again. For the same reason, experts do not advise saving on the cost of the materials used.
First, you need to draw up a plan for storming each of the walls. It is better to save these diagrams even after the repair is completed. This will make it possible to avoid damage to pipes or wiring by nails when deciding to change anything in the interior of the room. Wires with the required type of cross-section are laid in the grooves, after which it is necessary to carefully seal the place where the corrode is formed.
When replacing pipes, experts recommend giving preference to polyethylene products, as they will last much longer than their metal counterparts.
Installation of suspended ceilings
If the ceiling has numerous irregularities and problems, then the procedure for leveling it is a complex and expensive process. Additionally, you will have to hide various wires if they are not hidden in the ceiling. Under such conditions, the ideal solution is the formation of suspended ceilings. If you are planning an economical apartment renovation, then this method of finishing the ceiling is considered the most acceptable.
The advantages of using suspended ceilings include:
- their installation is carried out within a short period of time;
- You can perform the procedure yourself if you have a heat gun at your disposal, which will save money on labor costs for experienced installers;
- there is no need to carry out costly preparatory steps represented by leveling or cleaning the base of the ceiling;
- there is no need to cover the ceiling with plaster or primer, which saves a significant amount of money;
- a suspended ceiling is considered not only attractive, but also safe, since even if flooded, water will not get into the apartment, since the canvas can easily withstand a significant weight of water.
The cost of such a ceiling is considered low, since craftsmen usually charge only 250 rubles per square meter. Therefore, even with a small budget, anyone can afford to install such a structure.
Step-by-step instructions for renovating a room
For those who like order in everything, it is recommended to use a step-by-step room renovation plan:
- We empty the room of things and begin preparatory work.
- We get rid of old wallpaper, remove floor coverings that have already served their purpose. To make the wallpaper easy to remove, you need to wet it well.
- If the walls are covered with paint, it must also be washed off. To remove paint easily, use hot water and a spatula.
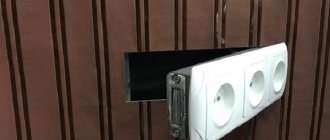
- We check the electrical wiring and install new sockets and switches according to the sketch of the room. It is important that the socket does not end up behind the wardrobe.
- Don't forget to mark the places on the sketch where the distribution boxes are located, because... They are usually covered with wallpaper.
- We are laying a new floor. If the floor base is fairly level and does not require additional leveling work, then first clean the surface of dust.
- Then lay the underlayment under the laminate and begin assembling the floors.
- If you plan to lay linoleum, spread it around the perimeter and give it time to smooth out before you start trimming around the door or walls.
We make zoning from plasterboard partitions. We install new windows. This item is provided for major repairs; if it is not in the plans, you can skip it. We putty the walls and ceiling.
Before painting or wallpapering, cover all cracks, grooves and other irregularities. When the putty has dried, apply a special primer to the walls, preferably a day before wallpapering.
If the ceiling is not suspended, you can whitewash it with water-based paint using a roller to freshen up the room. The next step is to glue the ceiling plinth. It is recommended to paint the baseboard the same color as the ceiling.
- We glue wallpaper. An important point at this stage is to protect the room from drafts so that the wallpaper does not fall off. Experts advise starting gluing from the window, then the joints will not be so obvious.
- If the walls are imperfect, choose non-woven wallpaper. They will help hide some of the imperfections of the walls. Walls to be painted must be perfectly leveled and puttied.
- The floor plinth is nailed at the end of all work. The final stage is cleaning the room and arranging the furniture.
Important points about renovating a room can be seen in the video.
Linoleum for flooring - an economical option
Of course, any person wants to live in an apartment that is beautiful and well renovated. But at the same time, many people think about how to make repairs without money. In any case, you will have to spend some money on purchasing materials. The work itself can be done with your own hands, but materials for forming floor and wall coverings will have to be purchased.
For flooring, cost-effective renovation ideas include the option of purchasing linoleum. It is considered the most inexpensive material for forming a complete floor covering. For a small room, you can find a single canvas that is laid out on the floor surface and then carefully smoothed out. Only after this its edges are fixed with a plinth. You can choose linoleum in any color and texture, so even if you have a limited budget, you can create the optimal design in any room that matches the tastes of the owners.
The cost of linoleum is considered low, so you won’t have to spend a lot of money on such finishing. It is more affordable compared to other flooring materials. Therefore, its purchase is more profitable compared to the purchase of laminate, tiles, parquet or solid boards.
Dimensional plan of the apartment - why is it needed and how to draw it up?
Before we look at the measurement plan, I would like to draw your attention to one detail. We need to decide right away whether we will plan and carry out repairs as expected or as necessary. If you have to, which is usually closer to us, then you shouldn’t bother with a measurement plan and figure out why it’s needed too.
But I still recommend sticking to the normal progression of repair work.
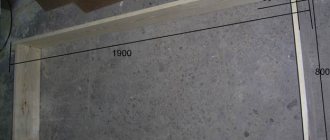
A measurement plan is a little boring, but necessary and useful work, especially if you are planning a major renovation in your apartment.
Doing this job is not at all difficult. You need to take a notepad, a tape measure and take down all the main measurements in the apartment. After this, you need to draw an apartment plan on paper or on a computer, whichever is more convenient for you, and transfer the dimensions you prepared to it. It is necessary to indicate not only the general dimensions of the premises, but also the location of risers, heating radiators, windows, doors, sockets, switches. This will help you avoid annoying mistakes and repeated rework in the future.
Hiding the toilet cistern in the wall
Wall-hung toilets are truly beautiful and unusual plumbing fixtures that save limited space in the toilet. But their cost is considered too high. Therefore, if you are planning a budget renovation with your own hands, then you can simply hide the toilet barrel in the wall of the room.
Under such conditions, an attractive appearance of the entire room is ensured, and the space visually increases. You can hang a cabinet or attach shelves to the free space.
Add light
Sometimes it is difficult to be in a room just because of poor lighting.
As you know, there are two types of light: functional and decorative. It is difficult to make a room brighter without altering the wiring, but conductive structures allow this too: the lamps, which are mounted on a supporting frame, can be rotated in any direction and the lighting can be changed. But decorative lamps and LED lighting can be used with all their might. Original chandeliers and floor lamps look especially good in a minimalist interior.
Installing spotlights instead of conventional chandeliers
When renovating a kitchen or hallway, people always think about what lighting fixtures to use. To save money, it is advisable to install spotlights instead of conventional chandeliers. This is due to the following reasons:
- the cost of spotlights is much lower than the price of modern and beautiful chandeliers;
- their installation is considered a simple process that anyone can handle;
- with the help of such small lighting fixtures you can focus on any important parts of the room, as well as illuminate the work area or the place in front of the mirror;
- such lamps are installed not only in the stretch ceiling fabric, but even in interior items;
- they can be replaced with LED strip;
- wires are hidden behind the ceiling structure or in special boxes;
- LED lamps consume a small amount of energy, so the owner of the premises will be able to save on paying for consumed electricity.
Due to the above advantages, the use of LED lamps is considered justified when implementing inexpensive repairs.
Should you renovate your apartment yourself or hire professionals?
The main advantage of self-repair is saving. Modern finishing materials have simplified installation technologies. Therefore, even those who have never held a hammer in their hands can handle them. And if you have any doubts about the correct application of a particular decorative material, watch videos on the Internet that describe the technology for using the selected material.
As for the disadvantages of self-repair, there are plenty of them. The most important of them is the loss of time. Without proper experience, repairs are difficult and time consuming. You will not only spend a lot of effort and nerves, but you may also get a result that will not please you. That is why it is advisable to contact specialized companies that are ready to offer a comprehensive repair service. From such companies you can order repairs based on a turnkey design project. Free up time for vacation or visiting your parents. And upon arrival, a renovated apartment will be waiting for you, in which you can live comfortably. A guarantee is issued for every work. Therefore, you will receive high-quality repairs that will delight your family.
Optimal wall decoration
In order for an apartment made using inexpensive finishing materials to look attractive and interesting, you need to pay a lot of attention to the decor of the walls. You can purchase inexpensive plain wallpaper or even use textured plaster. Only after this can you start decorating the walls.
To decorate the walls, you can use paintings, clocks, photographs or various accessories. You don’t have to spend a lot of money to create such items, and at the same time you can create a cozy and comfortable atmosphere in any room.
If you use an inexpensive option for wall decoration, you can get truly updated rooms that will surprise you with their beautiful appearance.
Preparatory stage
Even before starting work related to finishing the premises with new decorative materials, it is necessary to prepare the foundations. To do this you will need to remove the old coating:
- Dye. Removable using drill attachments in the form of metal brushes. You can use special solvents.
- Tile. Removable using a hammer drill. To do this, use the “Impact” mode and a special lance attachment.
- Wallpaper. Removed manually using a scraper. To facilitate the process, it may be necessary to heat the coating with a hair dryer.
Important point! Dismantling work is one of the most difficult from a physical point of view. They can greatly increase repair time. It is better to entrust such work to specialists with the necessary knowledge.
After dismantling, pay attention to the base. It must be smooth and free from cracks and potholes. If there are defects, they are repaired using putty. To level the surface you will need cement mortar.
Creation of frameless furniture
If there is no financial opportunity to purchase interior items, then you can make frameless sofas or armchairs. To do this, purchase dense fabric with which polymer balls are sheathed.
To create such furniture, you can use leather, fabric or even fur. If a person wants to figure out how to make repairs without money, then he must prepare for the fact that many actions will have to be performed with his own hands.
Planning
Consider the functionality of the room taking into account your life needs. For example, if you like to watch TV with the whole family, then you need a large sofa. If one of the family members likes to read, then provide a chair with a lamp. For creative individuals, choose a location for your work area. Don't forget about places to store things.
If you don’t have the time or desire to deal with the program, you can go the simple route. Draw a scale sketch of the room on a checkered sheet of paper. One cell can be taken as 50 cm. Please note that the passage between the furniture is at least 50-60 cm.
Artificial aging of existing items
Country style is considered quite popular, and making such a design in residential areas is quite simple. To do this, you can find various old things that are artificially aged. With their help, any room can be decorated.
Additionally, you can use different aging techniques for old floor or wall coverings. In this case, housing that was not renovated due to lack of financial resources will be updated. It will create the feeling that high-quality repair work has been carried out.
Practical crafts
If you don’t like various trinkets, then you can make practical interior items with your own hands from scrap materials.
Shelving from an old staircase
Sometimes there isn't enough shelving at home. So why not make it yourself? This will be a truly practical craft. The rack is made from an unnecessary ladder. In addition to the ladder, you will need boards, paint, a jigsaw, a brush, sandpaper and glue.
Stages of work:
- prepare the frame of the structure: cut the stairs into equal parts and fasten them in the form of two pyramids;
- cut shelves from boards;
- attach the shelves to the frame with glue;
- polish the structure and its elements;
- paint the shelving.
On such a rack you can place books, original baskets, flowerpots with flowers, A4 size paintings and other beautiful do-it-yourself things for the home and interior using improvised materials.
Table made of drawers
We invite you to create another practical craft for your home - a table from unnecessary wooden boxes. Vegetables and fruits are often stored in such boxes. For this craft you will need 4 of these boxes, nails and a hammer.
Place the drawers on the side surface with the open side facing out and connect them together into a square. Fasten the elements with nails. It is possible to decorate the open space of the drawers with additional shelves. At the end of the work you need to paint the table.
Pallet spice rack
We invite you to create a unique spice rack from an old pallet. To do this, clean the tray with sandpaper. Use a jigsaw to saw off unnecessary elements. You can make additional shelves. The result is a panel with a pocket that is suitable for any interior. Containers with oil, wine bottles, and spices are placed in this pocket. The shelf is painted in the color of the interior. Crafts for interior decor
A house is a reflection of its owner. It’s nice to come visit a creative person and look at the embodied ideas and unique style. We offer you some tips for interior decor and creating crafts.
Mirror frame
An interior decor item made from scrap materials can be a wall mirror decorated with an unusual frame. It is easy to make from a regular newspaper or magazine. Colored sheets are cut into equal squares measuring 10x10 cm and rolled into tubes of equal thickness. These tubes are glued along the perimeter of the frame parallel to each other. The result is a beautiful mirror design. The tubes need to be secured not only with glue, but with varnish.
Plastic lampshade
To make a plastic lampshade, you will need several sets of plastic spoons, an empty 5-liter plastic container, and glue. The neck of the container is cut off. The handles of the spoons are cut off to form petals. Using glue, the original petals are fixed to the surface of the container in the form of scales. The plastic lampshade is ready.
Fabric jewelry
The interior of a home made from scrap materials will become more lively if you use the remains of bright fabric. You can make various crafts from them, for example, fabric flowers. Using a stencil, circles d = 20 cm are cut out. A spiral is drawn on the circles, which is cut along the entire length. The spiral is twisted from the bottom, gluing it so that the bud does not fall apart. After drying, the petals are straightened. Unusual do-it-yourself decor from improvised materials for your apartment is ready. Several fabric colors are combined into a composition, panels, paintings are made, shelves, walls, etc. are decorated with them.
Candlestick made from old beads
If you have old beads, do not rush to throw them away. They are disassembled into beads to make a hand-made candlestick. You need to attach an unnecessary CD to the base of the candlestick. Glue beads in rows along the edge of its circumference to form a cup. If you put a shaped candle in this glass, it will turn into a beautiful candlestick. This decorative element has a big plus. Thanks to the beads, it shimmers beautifully when the candle is lit.
Festive garland on the window
On New Year or any other holiday, the windows of the house are decorated with garlands. It is not necessary to hang bright lights; we recommend that you make an unusual curtain from scrap materials. To create a garland you will need thick colored cardboard, thick thread, a needle, and scissors. Using a stencil, cut circles d = 10 cm. The circles are strung on threads of the required length. The threads are connected together into a curtain and secured to the window frame.
Jewelry hanger
There can never be too many DIY crafts. A woman's dressing table can be decorated with a homemade jewelry hanger made from scrap materials. It's easy to do. To realize the idea, you will need a picture frame, a small piece of plywood, paint, small hooks, and a jigsaw. Saw off the plywood to the size of the baguette, paint it with paint. Mark the places where the hooks are attached and secure them. With this decorative element you can store your jewelry in an original way.
Canvas box
We suggest you make a box from plastic canvas. Canvas is a material for embroidery and crafts. It has the dimensions of an A4 sheet. The canvas has a varying number of perforations. To work, you will need the workpiece itself, threads, a needle, a piece of fabric and scissors. You can embroider with cross stitch or satin stitch on canvas. Make the details of the future box from canvas and decorate them with your favorite embroidery method. Connect the parts with thread and a needle. The canvas box is ready, it needs to be stored on the shelf. Without a doubt, it will become the main decoration of the interior of your home.
Braided rug
The tapestry technique allows you to create a rug at home with your own hands from any available materials. For example, they cut old clothes into strips. This option is called a “grandmother’s” rug. For crafts, you should choose a durable material and draw the thread by hand.
Prepare cardboard 500x500 mm. Sew it with thread. Having secured the first thread, begin weaving the tapestry. Once you have completed the last circle, turn the rug inside out and sew rope around the perimeter to cover the ends of the threads.
Pots from bags
From scrap materials that are sometimes accumulated at home, they make a pot for an indoor flower. For DIY crafts you will need paper bags, wooden skewers, scissors, rope, glue gun, containers (for example, you can use a mayonnaise jar).
From paper bags, make blanks in the form of ribbons measuring 70x300 mm. Using skewers, make tubes from the blanks. Secure the corners with glue. Wrap the sides of the container in a paper bag. Turn it upside down. Attach 8 tubes to the base. Return the future flowerpot to its normal position. Fold the tubes up, pressing them tightly against the walls of the pots. It remains to braid the main tubes with the remaining ones in a checkerboard pattern. The pot is pierced at the top, a rope is threaded through the holes and the pot is hung on the wall of the room.
Fabric hanger
Hangers are always needed in the household. We suggest you make several of them. For crafts you will need:
- wire hangers;
- satin ribbons in contrasting colors;
- piece of fabric;
- scissors;
- needle and thread;
- glue;
- padding polyester
Draw the outline of the hanger on a piece of fabric. Leaving a small gap, cut out 2 blanks. Sew the pieces together to make a cover. Wrap the hanger hook with satin ribbon, securing it with glue. Place the fabric cover on the hanger. Fill the internal space with padding polyester. Sew up the hole. Make a bow from a contrasting satin ribbon and secure it at the base of the hook. The fabric hanger is ready. You can hang delicate items on it.
Expert advice
How to make repairs without money? To do this, it is advisable to use expert advice:
- all work will have to be done with your own hands, even if you do not have the necessary skills;
- you need to choose only inexpensive but high-quality materials;
- You should not throw away old things, as they can be used to decorate the premises;
- Wallpaper can be easily replaced with plaster or paint.
Instructions for installing certain coatings can be easily found on the Internet, so it will not be difficult to understand the rules of this work.
Laying out electrical communications, performing plumbing work
The most difficult process during repairs is the wiring of communications and electrical systems. In this case, you won’t be able to do it yourself. Errors when installing wiring yourself can lead to a short circuit. Therefore, such work is entrusted to professionals. They will conduct:
- Laying water pipes.
- Installation of heating and ventilation systems.
- Development of a sewerage system.
When designing any engineering system, specialists will carry out the necessary calculations that will help avoid force majeure situations.
Thinking through the design
Oddly enough, even before starting the rough work, it is necessary to decide on the interior design, since, based on this, it will depend on where and what communications to lay and what finishing solutions to use.
Before proceeding with rough finishing, if necessary, windows, heating radiators, plumbing communications and electrical wiring are replaced.
Replacement of all of the above can be carried out either completely or selectively; it is important that all this work is completed before performing rough finishing, Bortnikov points out.