Additional materials for work
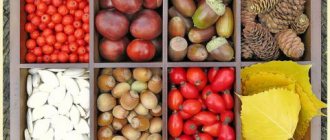
To create original crafts, a number of auxiliary materials may be useful:
- Thick cardboard.
- Sewing needle.
- Glue.
- Paints, brushes.
- Scissors.
- Decorative elements (rhinestones, beads, decorative mesh).
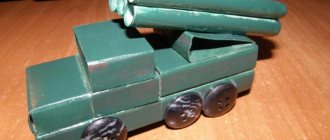
To make more complex models, you will need additional accessories: wire, magnets, iron frames to frame the product.
Paintings
If you have several balls of thread in different colors, you can create a picture. Draw a drawing on a sheet of cardboard with a simple pencil. It could be a landscape or an animal. What does your imagination tell you?
Apply glue to the part of the design that needs to be filled with one color, carefully lay the threads on the cardboard. They can be laid in different directions, straight or zigzag, the main thing is that it is beautiful and matches the pattern.
Thus, fill all parts of the picture with other colors. When laying the threads you need to press down a little. Insert the dried picture into a frame.
Use of thread crafts
Creating crafts from threads is most often done for school and creative exhibitions. But this is far from the only application: crafts can be used as Christmas tree decorations or original applications.
Using a minimal set of accessories and a little ingenuity, you can make a decorative refrigerator magnet.
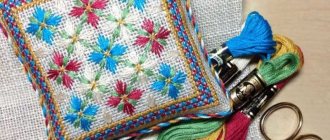
Nitcography
This is a very interesting needlework technique. You can also hear other names for the technique, for example, thread painting or painting from knitting threads. The drawing technique is very interesting, it does not use paints or brushes, the working tool is thread and PVA glue.
By choosing this technique, you will be able to realize your artistic potential, without the need for special training. Once you try this technique, you will certainly become a fan of it.
Master classes on making crafts
Very often in practice, various products are created based on pompoms made of threads. Therefore, the first thing a novice master should learn is how to weave a pompom.
We recommend reading:
- Crafts from plasticine: the best master class for children at school or kindergarten. 90 photos of the best ideas for creating plasticine figures
- Felt crafts - the best patterns and templates. Step-by-step instructions and master class for beginners (130 photo ideas)
DIY crafts from egg trays - the best step-by-step master class, with description. TOP 100 photos of original ideas for crafts
What you will need for production: we share secrets and tips
So, the list of what you need to make balls is actually small. Moreover, you can probably find almost all of this at home without even going to the store.
Basic list:
- in fact, balloons in the required quantity;
- PVA glue;
- threads of the desired color;
- food or construction film;
- Vaseline or massage oil.
However, so that everything really works out the first time, and working on the balls does not turn into stress due to the fact that not everything comes out beautifully and accurately, we tell you a few secrets about how to choose materials.
Balloons
Many people claim that you can take any balls, even the cheapest ones. But in this case, there is an unpleasant possibility that the balls will not have the desired shape. Standard balloons are egg-shaped, so they will never achieve a perfect sphere. In addition, such balls are more fragile, they are easier to damage during operation and ruin the result.
The optimal solution is special children's balls of special density. They have a hole at the top through which an elastic band is threaded, so the ball can be hung or worn on the hand. These balls are more practical to use, suitable for reusable use (if you tie the ball with a thread and not in a knot) and have an ideal spherical shape.
PVA glue
If you use yarn, it is better to use PVA glue marked “M”. It can be purchased at a hardware store and will hold better. For thin threads (floss or sewing thread), regular PVA from a stationery store is also suitable. The average glue consumption is 1 liter for 8-9 balls.
Threads
It all depends on what image you want to get. The thinner the thread, the more windings will be made on the ball. You will have to fiddle with a large ball and a thin thread for a long time, because you need to fill the empty space between the threads. With a thick thread the result will be faster.
Film
You only need it if you want to tie the ball with a thread, not a knot, and then use it again. The film will help the ball not stick to the threads, which means it can be easily pulled out of the structure.
Petrolatum
Any fatty mixture that will help the threads easily separate from the base ball will do. You can use massage oil or even any vegetable oil that you have in the kitchen. Fat cream is also allowed.
Since the work is quite dirty, it is additionally worth covering the workplace with at least newspapers (preferably oilcloth). You also need to immediately determine where the ball will dry! Especially if you make several balls in a row.
Thread pompom
One of the most common methods for making a pom pom is to wrap yarn around a cardboard base. To work, you need to prepare the following materials:
- Cardboard.
- Scissors.
- Compass.
- Yarn.
You should give preference to soft yarn with high pile, because crafts made from woolen threads turn out fluffy and keep their shape.
Step-by-step instructions for the master:
- You need to cut a circle out of thick cardboard.
- Cut a smaller hole in the center of the paper circle.
- On one side, it is necessary to cut out a wedge-shaped section to make it easier to thread the threads.
- Next, start winding the yarn. For a pompom you need a fairly large number of threads, because pomp is the main quality of the product.
- The skein of thread is cut along the edge and the cardboard frame is carefully removed.
The threads are straightened, irregularities and blemishes are removed. The pompom is ready, and now it can be used in further work.
Wool watercolor
You can “paint” with fluffy thin strands of wool yarn, as if using watercolors. Different colors of yarn remnants create delicate color transitions in a thread painting, and unsuccessful “strokes” can always be corrected. With this method of working with wool, you do not need needles, but rather scissors for cutting the threads into small pieces, tweezers for ease of work, and a base on which the image will be created.
You can come up with a plot yourself or use an idea from the Internet. Transfer the drawing or stencil onto thick cardboard or thin plywood. Color parts of the picture with colored pencils and lay out pieces of thread of the corresponding color step by step on a surface greased with PVA glue.
The denser the thread layer, the more colorful and bright the image will be. Compositions with complex color transitions imitate watercolor paints. Each product made using this method is unique. Framed by a frame, the created craft can become a wall decoration in any room.
Rug made of pompoms
Having a sufficient number of lush and colorful blanks on hand, you can make an original and soft rug for your feet.
We recommend reading:
- DIY crafts from Kinder surprise eggs - 125 photos of exclusive options with step-by-step instructions, master class and video
- Crafts made from twine - an overview of original design solutions. More than 100 photos of new products + step-by-step instructions for creating crafts with your own hands
DIY crafts from candy wrappers: 150 photos of the best ideas from craftswomen. Simple instructions, master class, diagrams and video tutorials on creating crafts from candy wrappers
The master can place it at his computer desk, near the bed or as decor on the coffee table. The soft and fluffy base will warm your feet, and the beautiful decor will emphasize the style of the interior.
To work you will need:
- Sewing needle and thread.
- Scissors.
- Decorative elements (in this case you can use silk ribbons, large elastic mesh, a piece of felt).
- Pompons prepared using the presented technology.
It is also worth pre-preparing a work diagram, a photo of the finished thread craft and step-by-step instructions. Work should be carried out in the following order:
- According to the existing pattern, pompoms are sewn in rows using thread and a needle.
- Additional seams are also laid between adjacent rows of parts.
The original frame of the rug will emphasize its curvaceous shape. Some experienced craftsmen can create very fancy and complex patterns on a rug using only pom-poms.
Decor items in the interior
Using threads you can make not only children's crafts and toys. This material is perfect for creating interesting decorative elements. Try freshening up your home decor a little with a new painting, lamp, or intricate floral arrangement made from wool threads.
Shade
This decorative element plays an important role in creating coziness in our homes. In order to make it yourself, we will need:
- wool yarn
- PVA glue
- children's inflatable ball
- scissors
Find a children's pool ball of the appropriate size and inflate it. Cover the surface of the ball with glue. Wrap it with threads in any direction. Cover with a second layer of glue. The density of the winding determines how much light the product will transmit in the future.
Let the glue dry thoroughly. When the glue has dried and the structure has hardened, the ball inside must be deflated. Make a hole for the cartridge, proceed carefully so as not to damage the structure. Carefully remove the ball from the cavity of the lampshade and insert the socket with the light bulb.
You should not use regular incandescent lamps for such a lampshade. If overheated, there is a risk of fire. Therefore, it will be safer to use energy-saving lamps.
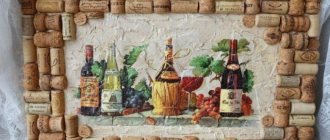
Painting
To create truly complex canvases that are as beautiful as real works of art, you need to hone your skills. However, even a beginner can make a picture with large elements and simple details.
For it you will need:
- threads of different colors
- cardboard
- glue
- scissors
- sample drawing
Cut the threads into pieces and arrange them by color. Transfer a sample of your design onto cardboard. Cover the elements of the picture that are painted the same color with glue. Place threads of the corresponding color on them.
Do the same for all other parts of the picture. Let the glue dry. To give the canvas a finished look, decorate it with a frame. Such a picture will become an interesting accent in any interior and will emphasize the creative nature of the hostess.
This is only part of what can be accomplished with just a little imagination and perseverance. You can involve your loved ones in creating crafts from yarn and then a warm evening together is guaranteed. You don’t have to spend a lot of money, because all the necessary materials can be found in almost every home.
Flower bouquet made of threads
To create this model you will need additional accessories: metal wire and glue. Step-by-step instructions on how to make a craft from threads:
- A wide base for the bud is glued to a metal wire at one end. You can use old balloon trays, metal or plastic circles as a base.
- A pompom of any chosen color is glued to the base.
An improvised stem can be supplemented with a satin ribbon, wrapped in corrugated paper or covered with a layer of paint.
We recommend reading:
- Crafts flowers - 125 photos of the best ideas from craftswomen. Instructions on how to make it yourself from A to Z. Simple and complex options for crafts + video tutorial
- DIY crafts: TOP-200 photos of the best ideas. Schemes, master classes, modern design, new products, instructions with descriptions
- Crafts from plaster - 120 photos of the best ideas for creating original crafts with your own hands. Master class for beginners with examples and video lessons
Unfading flowers
Artificial flowers are created from fabric, ribbons, pieces of leather, and paper. Flowers made from threads look no less beautiful. Light, airy, incredibly beautiful crafts can be created from ordinary cotton threads, floss, iris, yarn.
The first method consists of wrapping threads around a ball of paper and covering it with glue. After drying, divide the ball into two bowls and cut out the base with petals of roses, lilies, tulips, dahlias, asters or other flowers. By combining several clippings into one bud, you get very beautiful flowers.
The second method of making flowers is based on a wire frame. To create wonderful flowers you need to do the following:
- wind the wire tightly onto a thin knitting needle
- from the resulting spiral, create an outline of the petals, in the middle of which stretch a straight wire and leave the end of the wire at the base of the flower
- wind the threads, weaving crosswise through the middle of the petal, catching the thread on the spiral line
- fasten the filled thread petals into one bud using the ends of the wire.
Make leaves in the same way. Wrap a stem of stronger wire with green threads or yarn, at the same time attaching the leaves.
From leftover threads, needlewomen can create cases for glasses, a teapot warmer, cup holders, baskets, boxes and many other useful souvenirs. Balls of yarn, unsuitable for creating large things, can be useful for creating interesting and useful crafts. The products will not require additional finances, but will delight you with their originality and uniqueness, highlight the individual style and taste of the master, and will arouse admiration for your talent.
Pig in the form of a refrigerator magnet
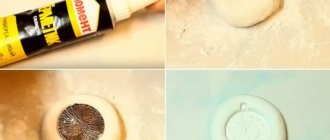
A pig craft made from thread is an original handmade souvenir. To work, you will need to prepare additional accessories: a metal cell or setting for framing the magnet, the magnet itself, especially strong glue.
Step-by-step instructions for the master:
- From pink yarn you need to weave a strong braid approximately 50 cm long.
- From thick cardboard, cut out a pig figurine from the front.
- Apply a thin layer of glue to the cardboard.
- Roll the braid in a circle, forming a pig.
- Bead eyes, a patch of pink felt and bugles are glued on top of the muzzle, and ears are cut out of fabric.
- Now the main task is to attach the magnet. To do this, the pig on cardboard is placed in a metal base, gluing the underlying layer.
- There is a magnet on the back of the metal frame.
The master received an original souvenir in the form of a refrigerator magnet.
Knitted crafts
Together with your child, you can knit interesting and beautiful crafts for school and home.
Octopus
For the craft you will need bright plain yarn, padding poly, two black beads. For the octopus's head, you need to cast on three air loops, close and knit a small circle with a diameter of about 1.5 cm. Then gradually stop adding loops and continue knitting without increases.
Break the thread when the desired head size is reached. For the bottom, knit a separate circle, do not break the thread, but continue knitting: cast on a chain of 15 chain stitches and make a spiral from the chain, knitting 3 double crochets into each loop.
Stuff the head with padding polyester, attach the circle to the head using 2-3 single crochets, depending on the length of the circle. Re-cast the chain of air loops and tie a spiral. There should be 8 spiral legs in total. Thus, the spirals are simultaneously knitted and the bottom is attached to the lower part of the head. At the end, sew on eye beads.
Knitted jewelry
Knitted earrings and bracelets are excellent options for DIY yarn crafts for children 10-11 years old. What mother wouldn't be happy to receive elegant knitted earrings as a gift for Mother's Day?
For original earrings you will need thin yarn with lurex, a hook and simple smooth earrings without a jewelry alloy pendant. The pendant is knitted in the form of a spiral chain, its length can be any. The spiral is additionally decorated with beads and attached to the base of the earring using the same thread. From such a spiral you can also make a bracelet for a complete set.
You can see handmade yarn crafts on our website dnevnikmastera.ru below. Many of them can be made from photos and without instructions.
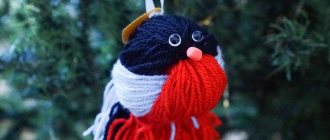
Bird made of threads
A bullfinch craft made from threads, placed on a dense base, can serve as a decorative bookmark for a schoolchild. A voluminous bullfinch made of lush yarn will decorate a shelf in the living room.
Materials for work: yarn, cardboard blanks, metal wire, decorative elements (beads, eyes). Threads are wound according to the general principle onto cardboard blanks of three sizes: for the head, body and tail.
The parts of the titmouse are connected using glue, according to the diagram or the selected pattern of the bird. The legs and beak are formed from metal wire. The beady eyes are glued last.
Openwork webs
What could be simpler than randomly wrapping threads of one or several colors around a ring (for example, a hoop)? By securing the threads to the ring with glue so that they do not slip off, you will get a nice cobweb.
Decorate it with pearl or transparent beads and a couple of artificial or dried leaves - and the composition is ready. You can hang it in the living room or nursery - it will preserve the light breath of golden autumn and remind you of walks in the park under the canopy of golden and crimson crowns.
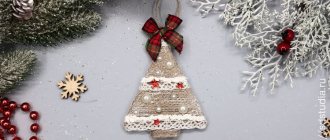
New Year's toys
New Year's crafts made from threads can be made from both pompoms and woven braids. The first method is used more often, since voluminous fluffy balls are excellent decorations for a bright holiday.
Today, thread crafts for children are a very popular technique for extracurricular creative work.
And as an original accessory for the interior, models made from threads are used more and more often - the popularity of the method determines the minimum financial investment, ease of work, and interesting appearance.
Snowman
The snowman's body is made in the same way as spider web balls:
- An adhesive mixture with white yarn is prepared.
- Two balloons of different diameters are inflated and wrapped with threads, only a little more than on a regular balloon.
- Drying will take about ten hours. Then pierce the base and remove. Sew two pieces together.
- For hands, use two sticks of the same size or make your own by wrapping a plastic or aluminum rod.
- The eyes are sold in pairs at craft stores. They are made independently from circles of black and white paper. Nose and mouth made of colored orange or red paper. The nose is made in the form of a cone.
- You also need to sew mittens, a scarf and a hat. The snowman is ready.
This toy is suitable both as a gift and as a room decoration for the New Year holidays.
Photos of crafts made from threads
Did you like the article?
1+
Avoiding basic mistakes
In order not to spoil the finished design, we will analyze several errors in the work that lead to failures.
- The ball must be tied tightly so that it does not deflate during the drying process. Otherwise, the design will “behave” from this.
- You cannot inflate the balloon to its maximum size; it can burst even from a slight impact and ruin the work.
- Fully synthetic threads do not hold their shape and are not attached to the ball; it quickly becomes unusable.
- To avoid knots on the ball, use whole balls of thread rather than sections.
- Excess glue on the threads harms the structure - the threads get tangled and gather in knots.
- When wrapping the ball with film, do not forget to leave the “tail” of the ball free so that it can be deflated.
- The optimal drying time for each ball is 6-7 hours.
- You need to dry the balls by hanging them by the tail using a clothespin. To prevent the glue from the balls from staining everything around, it is recommended to lay a cloth or paper under the drying area of the balls, just in case. If the ball is dried on the surface, the glue partially flows down and the appearance of the ball.
How to make a chandelier from threads
You will need:
- a thread
- hoops or circles made of wire (you can make it yourself)
- scissors.
1. Tie two pieces of thread to the hoop in a cross pattern.
2. To hang the chandelier, you need to cut off another piece of thread and tie it to the place where the threads cross from step 1.
3. Cut many pieces of thread and attach them to the hoop.
4. If necessary, trim the hanging threads so that they hang evenly.