Every year nature gives us a lot of natural materials suitable for creativity, completely free of charge. The process of creating crafts from natural materials with your own hands develops the child’s artistic taste, thinking, and memory, strengthens sensory skills, and cultivates perseverance. But the most important thing is that you can have fun and usefully spend time with friends, delighting yourself and others with crafts.
Preparation and storage of natural materials
Any natural materials are suitable for crafts. You can store them in large quantities in the fall so as not to get bored in the winter. During the harvesting process, items should be collected as clean as possible. Materials of plant origin must be healthy, not damaged by pests and diseases.
Art supplies collected outside must be washed and dried immediately. Some of them may need processing. For example, branches and twigs can be washed with a weak solution of potassium permanganate.
- Leaves, flowers and herbaceous plants can be conveniently dried and stored in large books.
- To store your supplies, it is convenient to adapt various containers with lids.
- It is important not to overdry the cones and acorns; they will become fragile and unsuitable for work.
- Ideal conditions for storing natural materials are a dark, cool room with good ventilation.
Rope weaving
It is characterized by high strength, therefore it is used in those products or their parts that experience significant loads. It is known that the ribs and edges of wicker items suffer most from mechanical damage.
It is in these most critical places that the basket or bag is necessarily braided with a “string” in several rows.
Simple weaving is also alternated with “rope” to give the walls of the product additional strength. Slippers and flip-flops made of reeds must have woven soles, since they are the ones that experience the heaviest loads.
The strength of the “rope” is due to the fact that each of its strands, during the weaving process, is tightly twisted and overlapped by the same tightly twisted strand. The transverse reeds, called racks, are firmly clamped in each successive turn. There is reliable adhesion between all weaving elements.
The “rope” is also indispensable when performing openwork weaving. It is performed in the following sequence. The reed is bent around the outer post so that one end is approximately 8-10 cm longer than the other (Fig. 47h).
The left end is twisted counterclockwise and slipped under the adjacent rack (Fig. 47i). Then they twist the other end, but counterclockwise, and pass it under the third post.
The first end is twisted again counterclockwise and brought out to the outside of the lash (Fig. 47k). They continue to weave in this way until the shorter end ends.
It is extended by twisting simultaneously with the new one (after it is firmly fixed), the end of the old one is cut off and weaving continues in the established order. After two or three racks you have to extend the second end. Thus, due to the fact that the ends of the strands have different lengths, they do not have to be extended at the same time, and therefore the strength of the weaving does not decrease.
Leaf Crafts
Applications
You can make applications on various themes from beautiful autumn leaves. Such crafts are especially interesting for children. From the leaves of different trees you can collect different insects, birds with bushy tails, an elephant or a hedgehog on a sheet of paper. Leaves can be used to complement the design, resulting in very original panels.
Roses from leaves
It's easy to make beautiful roses with your own hands from gorgeous maple leaves. To work, you need fresh maple leaves; dry ones are not suitable.
The leaf must be folded in half and rolled into a roll; it will be the center of the rose. The roll is placed in the middle of a large sheet, the edges of the sheet are folded outward, like rose petals, and the roll is wrapped in this sheet. Then another large sheet is added in the same way. Everything is fastened together with threads. The rose is ready.
These “maple” roses can be used to make an autumn bouquet or use them in various compositions. The color of autumn maple leaves is so diverse that it allows you to make very beautiful bouquets.
Checkered weaving
This is one of the most common and simplest types of weaving.
It is a simple interlacing of reed stems at right angles to each other. The wicker obtained by this method is not very strong, therefore it is used most often in those areas of the wicker product where there are no high loads, as well as when braiding round and oval bottoms of wicker products - trays, bread bins, baskets, stands for hot dishes, etc. P.
Of course, you can intertwine, say, six reeds with six similar reeds at right angles to each other without any special knowledge.
But over the years, craftsmen who constantly work with marsh grasses have developed rational techniques for performing even this seemingly very simple weaving.
Six stalks of reeds are placed parallel to each other on the table. To make the weaving process more visual, take three green and three white reeds (Fig. 47a). The stems are pressed on top with a board and three green reeds are bent upward (Fig. 47b).
Then a transverse reed is placed between the lying and raised reeds (Fig. 47c). At the next stage, the green reeds are lowered (Fig. 47d), and the white ones are raised.
A second transverse reed is placed between them (Fig. 47d). The white reeds are lowered (Fig. 47e), after which it is the turn to raise the green ones. Weaving in this sequence is continued until all six transverse reeds are woven (Fig. 47g).
It should be noted that a loom works on the same principle.
Just like green and white reeds, the threads of the so-called warp rise and fall in it after another weft thread is threaded between them using a shuttle.
Since weaving is much older than weaving, there is no doubt that this principle was borrowed by weavers from weavers.
Crafts from pine cones
One of the most favorite natural materials for creativity are cones. They make fairy tale heroes, animals, original compositions, and New Year's decorations.
Basket of pine cones
Such a basket would be a good idea for children's creativity. To work you will need pine cones and wire, as well as various decorative elements.
- The cones are tied with wire in the middle and made into a closed circle. You need at least three such blanks. The size of each circle directly depends on the total number of cones. The optimal number of cones is about 15 per circle.
- The circles are carefully fastened together with wire.
- For the handle of the basket, a semicircle is formed from cones and wire.
- You can place small plywood, cardboard or thick fabric at the bottom of such a basket.
The basket is ready. Depending on the design, it is decorated with different elements. The autumn theme will be emphasized by leaves, berries or fruits. The winter one can be emphasized with tinsel, spruce or pine branches and Christmas tree decorations.
A basket of pine cones is suitable for interior decoration, for creating a New Year's atmosphere at home, and for a school exhibition. This work can be done collectively, with the whole class. Or at home, in a family setting.
Pine cone toys
The child will be happy to make such crafts himself. You can fasten the cones together using plasticine.
Cones are good for simulating the torso of any character. To make additional elements, paper, plasticine, acorns, leaves, twigs, and so on are suitable.
Cones can be painted in different colors. Silvery cones will perfectly decorate a New Year tree or complement a Christmas composition. You can make an imitation flower bouquet from pine cones painted in bright colors.
Decorative flower pots
Decorative flower pots are designed to decorate simple ceramic (terracotta) flower pots. Unlike stands, dishes and other similar products, the bottoms of the flower pots must have special holes for water drainage. Therefore, the bottoms of flower pots are woven somewhat differently.
The reed trunks are laid on the table in one row and their ends are intertwined with a “string” (Fig. 51a). Then, spreading the reeds with a fan, they form a closed circle from the “string” (Fig. 51 d).
In order for the racks to be held securely enough in the lash, they are braided in a spiral with two or three more rows of “rope” (Fig. 51e). The remaining rows can be made with simple weaving, and only the edges of the bottom are again braided with a “rope”.
Next to each old post, one additional post is threaded through with an awl (Fig. 51e). A flower pot is placed on the finished bottom, which will be used as a template.
Openwork weaving is a grid of parallel or inclined lines, as well as their combinations (Fig. 51b, c). The method of making openwork weaving is the same as that used to make the openwork walls of a decorative dish.
To seal the sides, in addition to the already known methods, others are also used. The simplest of them is that each rack is sequentially placed behind the adjacent one. In this case, the ends of the racks should be inside the cover, where they are carefully cut with scissors.
If they want the edges of the sides to be decorated with identical protrusions in the form of small loops, they are sealed using an awl-lace and a wooden block template (Fig. 51g). The awl is inserted next to the next post, the end of the adjacent post is inserted into the eye and pulled through the lash. But so that the loops that rise above the edge come out all the same, before tightening the loop, a template is inserted into it.
Crafts made from nuts
Interesting crafts can be created from nuts. Any nuts and their shells are suitable for work.
Walnuts are always in demand for crafts. You can make small boats from shells. It is enough to secure a mast with a sail in the middle of the shell half. It is not difficult to make funny little mice from such halves. It is enough to glue the ears, tail, eyes and nose.
Whole walnuts, painted in different colors, can decorate a New Year tree and become an original decorative element.
Pine nuts are easy to work with. They are not very hard and can be easily pierced with an awl. Excellent for imitating animal paws, they stick well. They can be used in wall panels.
Hazelnuts are quite hard and difficult to pierce. For this reason, they are used entirely in crafts.
Hazelnuts can be used to decorate a photo frame, decorate a mirror, or use them as a complement to various interior decorations or toy elements.
Pistachios are also suitable for various crafts. The shape of their shell resembles the petals of a flower.
Compacted edge weave
If it is necessary to make the edges of products more durable and rigid, a special method of sealing them is used. But before you start embedding objects woven from reeds using this method, you should carefully study weaving techniques on the simplest model.
Several wires with multi-colored polyvinyl chloride insulation (white, green and gray) have knots tied at the end and inserted into holes made with a sharp awl in a piece of cardboard.
Having arranged them in a certain order (Fig. 52a), they begin to interweave all the racks in sequence. The gray stand is placed behind the white one (Fig. 52b), and the white one behind the green one (Fig. 52c).
The end of the gray post is placed on the white one (Fig. 52d) and both posts are twisted together clockwise so that the gray one is at the bottom (Fig. 52e). Now the third post (green) is inserted behind the fourth post (gray) and, placing the white one on the green one (Fig. 52e), twist it together clockwise.
As a result, white appears at the bottom (Fig. 52g).
At the next stage, the gray stand is placed behind the white one, the green one is placed on top and also twisted clockwise (Fig. 52h). Now the green one is at the bottom (Fig. 52i), the white one is brought behind the green one (Fig. 52k). Further operations are repeated in the same order.
The weaving of a two-row compacted bead is described in such detail only because it is not so easy to master its techniques right away. Meanwhile, this type of sealing of the side edge is used by craftsmen quite often.
In Fig. 52 shows what a two-row bead looks like on a model and on a wicker product made of reeds. It should be recalled that the ends are always tucked inside the finished wicker product, where they are carefully trimmed with scissors.
Chestnuts
Strictly speaking, chestnut is not a nut. The shiny and smooth surface of chestnut makes it a very attractive material for creativity. Both children and experienced craftsmen love to work with chestnuts.
The skin of a fresh chestnut is not thick and is easily pierced. You can make a variety of children's toys from chestnuts: funny caterpillars, spiders, birds, fairy-tale characters.
Chestnuts are actively used as decorative elements when creating wreaths, baskets, and original compositions for interior decoration.
Master classes on creating a bird
Today we will get acquainted with the following original models of birds from scrap materials:
- Tit made from salt dough.
- Eggshell peacock.
- Composition “Birds in the Garden” made of plasticine.
- Relief applique made of millet groats.
- Birds made of cones.
Each model presented has step-by-step instructions describing how it works. However, if you wish, you can first watch the video tutorials on how to make original birds with your own hands.
Tit made from salt dough
For work we will prepare the following materials:
- Flour.
- Water.
- Starch.
- Salt.
- Paints.
- Brushes.
- Decorative elements for our bird's eyes.
Next, we work in our prepared place, using the instruction diagram:
- Knead the salt dough: the starch is soaked in water and then poured with boiling water. The base is mixed with salt and flour in equal proportions and stirred thoroughly. The dough is ready to work.
- We sculpt a titmouse on a plastic bird blank, paying special attention to the details: head with beak, tail, legs. During the work process, it is better to use a ready-made template image.
- The product is dried in the oven for an hour. The temperature should not exceed 55 degrees.
The bird is coated with paints in accordance with the chosen model, and to add gloss after drying, the craft is coated with transparent varnish.
Eggshell peacock
An original and bright representative of the fauna will decorate a child’s room or a shelf in the hallway. To work you need to prepare:
- Chicken or goose egg.
- A thick needle.
- Paints, brushes.
- A few feathers.
- Durable glue.
- Clear nail polish.
For convenience, you should download a ready-made mock-up picture, which you will use as a guide during the work process. Next we follow the instructions:
- Using a thick needle, pierce the egg on both sides and pour out the yolk.
- Dry the workpiece with light movements so as not to damage the shell.
- Apply several layers of paint to the surface of the egg and let dry. Cover the product with clear varnish over the paint.
- Now you can start creating the tail - paint the feathers in beautiful bright shades, decorate with beads or small beads.
- We attach the feathers to the shell using strong glue.
- The beak is made of plasticine, and the eyes are made of beads or dark rhinestones.
If desired, such a bird can be hung, or you can make legs from plasticine and place it on a shelf.
Composition “Birds in the Garden” made of plasticine
Working with plasticine is a great idea, especially for children. Modeling crafts develops fine motor skills of children's fingers, allowing them to develop faster. To create a decorative composition you will only need a modeling board, a plasticine knife, a set of colored material and a plastic base. Actually, anyone can choose a design for their composition as they wish: forest birds on a branch, chickens or pigeons. Today we will work on a bright painting in the form of a brood of chickens. Next we follow the instructions:
- On a plastic base, you can make an original fence from small branches and plasticine, and “plant” several green bushes under it.
- Using a knife, cut the yellow material into strips on a board. We form the rounded bodies of our chickens from the strips and place them on the base.
- We decorate the head of each bird with a corolla of yellow fluff, and make the eyes from beads.
To decorate the craft, you can make a wicker nest from branches and plasticine at one end, and place several eggs made of white material in it.
Relief applique of semolina
Millet groats are a material that allows you to work with a huge number of models and paintings. To create the craft, we will prepare the following materials:
- The basis for the applique (most often it is thick cardboard).
- Glue.
- Paints, brushes.
- Millet cereal.
- A template according to which we will form images.
During the work you need to check the drawing. The template can be found ready-made in any craft magazine. Next we follow the instructions:
- Apply a layer of glue to a sheet of cardboard.
- Based on the drawing, we place millet cereals on the cardboard. We outline the edges of the figures with a needle or tweezers.
- After the glue has dried, you can paint the product according to the chosen design.
Some craftsmen propose making real appliqués from several types of cereals, where the basis of the ornament is not paint, but the contrast of the materials used.
Birds made of cones
The most original among crafts made from fir cones are beautiful penguins. To work we will need to prepare:
- Cones.
- Plasticine.
- Toy eyes.
- A thick sheet of cardboard for placing the figures.
First, let's prepare a sheet of cardboard; to do this, paint it in any chosen color and let it dry. Next, follow the step-by-step instructions for the wizard:
- Make a head, legs, and wings from black plasticine.
- Attach them to the cones.
- Make the abdomen from a thin layer of white plasticine.
- For contrast, the beak is best made of an orange-colored material.
- Doll eyes will make our craft more realistic.
For additional decoration, use a hat and scarf tied over the penguin's neck. Make several birds and place them on a decorative base in the form of snow-white ice floes (made of foam plastic and clear varnish).
The presented options are far from the only models. Very often, needlewomen make birds from scraps of fabric, crochet them in the Amigurumi style, and cut them from plastic bottles in the form of huge decorative peacocks. Today there are a huge number of creative ideas that anyone, even a novice master, can bring to life.
Acorns
Along with pine cones, acorns are one of the most popular natural materials for crafts. Both the acorns themselves and their caps are used.
It's easier to work with fresh acorns. They do not need to be overdried during storage. You can make various figures of animals and fairy-tale characters from acorns, fastening them with matches, toothpicks or plasticine.
Acorns perfectly complement cones and nuts in various compositions. Both the acorns themselves and their caps are suitable for decorating photo frames and various compositions.
Interesting ideas can be brought to life by using peeled acorn halves.
Plastic bottles for simple figures
Penguin, parrot and owl are the most suitable images that can be easily realized using small plastic containers.
The base can be painted, covered with paper or fabric. The parrot's head can be made by cutting off the rounded part of one of the bottles and attaching it to the neck of the other.
To make a base for an owl, just fix the bottle upside down. You can get a penguin figurine by masking the neck with a cap or top hat.
By looking at photos of ready-made crafts on the topic of recycling various containers, you can create a unique and fantastic bird with your own hands.
The hollow base made of bottles provides an important advantage - the head, wings and tail attached to the through axis can be made moving. To stabilize the figure, the bottle can be weighted with sand in advance.
Twigs and twigs
The use of twigs, branches and twigs allows you to create very interesting versions of various original products. This material is actively used not only in children's creativity, but also in the creation of designer items.
bird's Nest
An interesting theme for decorating the interior of a country house is making bird's nests. This could be an imitation of a stork's nest or a small bird's nest.
The step-by-step instructions are the same in any case.
- Cut a circle out of cardboard or plywood, the diameter of which is equal to the diameter of the future nest.
- Twist twigs or twigs, fasten them with wire and lay them in layers along the edge of the base.
- Fix the layers with wire or cord.
- Complete the product with moss, pine cones, bird figures, and feathers.
Bread bins and crackers
The bottom of products with a square or rectangular bottom is made by simply weaving a certain number of reeds at right angles to each other. In addition to simple weaving, “checkerboard” weaving is used, when not individual trunks are intertwined, but several at once.
When starting to make a bread box or cracker with a square bottom, three reed trunks are sequentially intertwined at right angles at once (Fig. 53a). You can use a cardboard box or plywood box of a suitable size as a template.
If there are none, then the template is made from plywood and planks, focusing on the dimensions of the bottom (Fig. 53b). The wattle is nailed to the template with small nails. Having secured the lash on the template, the posts are pressed against its side walls and intertwined with a “rope” in 3-4 rows.
The openwork sides of the bread bin will be a grid of twisted racks running parallel. When starting to weave them, each pair of adjacent posts is sequentially twisted (Fig. 53c, e).
Then, at a certain distance from the bottom, each stand is intertwined with a “rope”. The second tier of openwork openings is woven in the same way. The edge of the sides is sealed using one of the known methods (Fig. 53d), discussed earlier.
Another bread box or rusk bowl has a rectangular shape. Its bottom is obtained by interlacing strips consisting of two and three reeds (Fig. 53e). The openwork openings on the sides are located in one tier and are obtained by simply twisting two adjacent posts (Fig. 53e). The edge of the sides is made double-row.
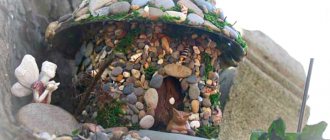
Pebbles
A variety of pebbles are convenient and interesting to use for crafts. This is a very textured and varied material.
Pebbles can be used as an addition to other materials in crafts and as an independent creative object. You can draw on them. Pebbles are easy to paint in different colors.
Flat stones from the seashore make interesting three-dimensional paintings and compositions. The stone is durable, so it can be used as elements of board games, creating garden decorations, and original art objects.
Weaving coasters
Stands woven from reeds and cattails are durable and comfortable. You can safely place hot dishes on them without fear of damaging the oilcloth or tablecloth - after all, cattail and especially the porous reed trunk do not transmit heat well and are excellent heat insulators.
In addition, the dishes are placed on such a stand without that annoying clanging noise that metal stands usually emit. It is also important that a hot kettle or pan will not slide off the stand even if the table suddenly shakes for some reason.
The service life of a reed and cattail stand, of course, if treated with care, is at least 10-15 years.
They begin to make a stand using simple weaving. Twelve reeds are intertwined at right angles to each other. Then they take a new reed and go around one of the outer posts of a simple wattle fence (Fig. 48a).
Alternately, they braid with a “rope” all 24 free ends (called racks), trying to form a regular circle as a result (Fig. 48b). In order for the “rope” to lie in a circle, it is pulled as tightly as possible at the corners of the lash.
Shells
Shells are a very diverse and textured material. They are used to decorate photo frames, homemade boxes, and create thematic panels.
You can use shells to complement jewelry and make interesting toys.
Natural materials are free, easy to use and have a very interesting texture. By taking a creative approach to making crafts from them, you can spend your time profitably and make excellent items to decorate the interior of your home.
Squirrel costume
The New Year's party will be a great opportunity to start creating a funny squirrel costume. Making a squirrel costume for a girl is not a labor-intensive process.
To work you need to prepare:
- 1 meter of bright orange tulle, about half a meter of brown to decorate the tip of the tail,
- elastic for belt,
- for sewing a tail, a bib and making ears about a meter of fabric or fur,
- wire,
- scissors,
- sewing supplies,
- children's hairband (for attaching ears).
Step-by-step master class
- The skirt is made by tying tulle ribbons onto an elastic belt. The more ribbons, the more magnificent the tutu skirt will be.
- The bib shirt is sewn from fabric or fur.
- The tail is an important element of the costume. For the base you will need a wire frame. Square pieces of tulle are attached to it, folded four times (the folding pattern is similar to the folding pattern of paper for cutting out a snowflake).
- The ponytail is attached to the belt of the skirt.
- Triangular-shaped ears are glued to the hairband.
The suit is ready.
For convenience, the tail can be additionally attached to the back of the T-shirt with a few neat stitches. If there is no tulle, the skirt can be made from another fabric. But in this case, a fluffy tutu will not work; it is more convenient to cut out and sew the details of a classic children's style skirt.
It’s also easy to sew a suit for a boy. Instead of a skirt, you can use orange shorts as a base and attach a tail to them. If desired, the shirtfront can be replaced with a short vest.
A creative approach and the desire to make something with your own hands will help diversify your home leisure time with maximum benefit. Joint crafts bring family members closer together and help the child develop harmoniously in all directions.
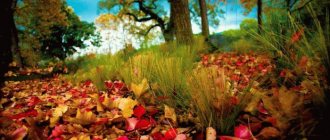
Trees - a source of autumn inspiration
Leaves and beautiful tree seeds will decorate any decorative item or autumn panel. Using various shapes and colors of fallen leaves, you can create entire pictures from their combinations, complementing with them pictorial drawings, appliqués and reliefs made of nuts. From the leaves you can collect flowers or entire autumn wreaths, with dried flowers and pine needles.
In order to keep the leaves even and bright for a long time, they must be kept as a herbarium, between sheets of paper or cardboard. The floral decoration of the models is grass and moss, which can be easily glued and painted.
From parts of a tree trunk, twigs, beautiful pieces of bark and trunk cuts, with their pattern of annual rings, are used for crafts made from natural materials. When collecting bark, you must follow the rules so as not to harm living trees. For example, birch bark is collected during the spring-summer season and from those trunks that have dried out or been cut down.
The removed birch bark, the width of a notebook sheet, should be steamed in boiling water and then dried under a press. Not only toys, but also paintings were traditionally made from it. Interesting branches with a picturesque structure can become an original part of any composition if they are dried and painted.
How to make a bird craft yourself?
To remove bird crafts with your own hands well, you need to find suitable instructions on the Internet and decide what materials will be used.
To begin with, you should choose the most affordable and simple options for crafts, so that the materials for them are inexpensive and easy to find.
Next, you need to find suitable instructions on the Internet or rely on your own preferences and experience if you have previously made other crafts.
How to make a craft correctly?
There are several important rules that should be followed when creating crafts:
- strictly follow the instructions if it is made on the basis of a ready-made solution on the network;
- if all materials are not available, then you should look for analogues that are similar in appearance and properties, otherwise all the work may be done in vain;
- It is recommended to make blanks that will help you make not one, but several crafts at once, and will also “insure” in case one of the birds is damaged while working on it;
- If you want to learn how to make a bird craft for the first time, then it is best to look for options using the corresponding request on the Internet.
Paper birds
If you want to make beautiful crafts from bird paper, then you should choose a simpler option. There is one good solution - to make an owl out of paper. It's very simple and can be done in a few steps:
- Wrap a piece of colored paper to form a cylinder;
- On one side of the cylinder you need to make bends inside it and connect the edges of these bends with glue so that the inner space is hollow, and there are two high peaks, equally distant from each other. The result should resemble the head and ears of an owl;
- Next comes decoration, which is considered the simplest process;
- It is enough to cut out white circles for the whites of the eyes, black circles for the pupils and connect them together so that the black circles are on the white ones, but at the same time located on their lower part;
- Next, you need to cut out 10-20 identical circles of a different color to decorate the chest of the owl;
- These circles should be closely spaced next to each other or even overlap each other. You can also cut out the tail and glue it to the back of the cylinder;
- The craft is ready.