Home House and cottage Do it yourself
All boys love watching films about Iron Man, heroic adventures and interesting pastimes. Many young men dream of feeling like they are in the shoes of the main character, Iron Man Tony Stark. To become one, you need to have a super suit like the main character. Of course, the costume has no real analogues yet. Such uniforms are a figment of the author’s imagination. Every father wants to give his son a fairy tale and make a similar set like Tony’s. To start making it, you need to understand its unique structure.
To start making heroic uniforms according to detailed instructions, you need to study the structure of the original in detail. This is necessary to draw up a detailed sketch.
A brief tour of the structure of Iron Man's super equipment
The energy source is fusion reactor technology. Tony also has an indispensable weapon that he constantly uses throughout the film - these are gloves with a jet beam. The hero rises into the air thanks to a powerful stream of energy gushing from under the hero’s feet. In reality, there are no analogues of jet shoes, but there is a jetpack jetpack. In addition, when Tony was inside the armored structure, a holographic screen lit up; similar technologies are already being prepared for implementation. Now let's try to make a simple version of heroic equipment.
Simple instructions
First, you need to familiarize yourself with the works of the masters who succeeded in this and created a similar iron man design. A resident of Norway, John Beckensten, managed to recreate the heroic equipment; he used fiberglass and plastic as the basis for its creation.
State resident Anthony Lee managed to make another successful copy, using polyurethane slabs to create it. To create the helmet, he needed a special mixture of resin and sculpting clay. Rivets, old auto parts, LEDs, and servomotors were used to connect the plates. They all added realism to the image.
If you decide to become a design fanatic and join their ranks, then you will need fresh ideas and a unique approach to the choice of metal (thin foil, durable aluminum or tin), endless inspiration.
To begin creating equipment, you need a detailed plan of all components, taking into account the dynamics of movements in it. You can create an image from a helmet; to form it we use soft metal or tin.
After cutting out the parts, it is necessary to process the edges so that they are not so hard and do not injure the owner of the costume.
When designing a helmet, leave functional gaps, use ready-made drawings that are available online, or create them yourself. We connect the parts with strong staples or rivets, this is less dangerous. For ease of wearing, we glue the frame inside the helmet with soft fabric, and insert special lenses into the eye slits to reflect sunlight. As the basis for the costume, we take any jumpsuit made of thick fabric. We will fix the armor onto the fabric. For convenience, we attach metal plates to the fabric on the mannequin. The body frame must be completely cut out and all slots for attaching auxiliary components must be provided.
One of the simplest ways to create a mask
Sometimes it happens that there is not enough time for painstaking work for your child, and it is not possible to buy a ready-made helmet. In this case, it is not at all necessary to send the child without a headdress.
An ordinary men's hat with collars will come to the rescue. It is worth paying attention to the fact that tight-fitting products are best suited. Holes for the eyes are made in the headdress, and the surface is turned into armor using food foil, paper to create relief and paints.
Detailed instructions on how to make an iron structure
After the release of the film of the same name, he gained many enthusiastic fans around the world. Hero equipment has become very popular. To make it, we perform the following sequence of actions:
- We form a helmet - to do this, we accurately depict the helmet diagram, cut out the parts, and fix them together with safe connections. Cover the entire mask and lower jaw with tape for strength. To add rigidity to the structure, treat it with a small amount of epoxy glue. After drying, the inner side is glued with safe fiberglass;
- Next comes the manufacture of the back, this also needs to be done based on the drawing. To firmly fix the back parts, we use special clamps. The finished back is glued with a layer of epoxy glue for strength;
- Now we begin to form the chest shell, cut out small semicircular strips, circles of such a width that you can insert the reactor. We form the limbs according to a similar pattern as the previous parts;
- When all the parts of the costume are covered with epoxy glue, wait until they are completely dry, then start painting the uniform. To make the design look spectacular, apply acrylic paints evenly, trying to ensure that there are no white spots left on the surface;
- The complete assembly of important components begins: we glue a wide, dense elastic band to the moving parts of the suit, a thin elastic band is needed to the fingers;
- To firmly connect all the parts to each other, we use a snap hook; it goes to all parts of the iron equipment in the following places: shoulders and forearms, chest armor, lower torso, sides, lower limbs;
- Since all parts must move without creating obstacles to movement, fix them together using ordinary nuts. Shape the lower limbs so that your shoeed foot fits into it;
- To support the mask so that it does not fall at the wrong time, glue magnets and iron strips to the inside;
- Don’t forget about lighting: mount a compact flashlight or battery-powered night light in your chest. Have flashlights in your hands, place the computer mouse buttons under your thumb, and secure everything together with a soldering iron.
One of our versions of the miracle design is ready for use.
We form heroic equipment from scrap materials for your child
The children's design should be simple and highly safe, so you should not install all the accompanying electronics there in order to recreate glowing eyes or other elements of the hero's image. You can create simple equipment for a child using paper, thick cardboard, and strong gluing using special technology. To make the design and helmet more realistic, you need to use diagrams or drawings to create it.
You can find ready-made patterns, take the child’s measurements, then adjust the patterns to the child’s specific parameters. Finished diagrams can be printed on a printer, then transferred to thick Whatman paper. To create hero gear for your child, you will need:
- A good stationery knife;
- Special cutting mat;
- Dense fiberglass;
- Awl;
- Glue or glue gun;
- Scissors;
- High quality epoxy resin;
- Respirator;
- Latex gloves;
- High-quality acrylic paints (red and golden colors);
- Transparent plastic;
- Sandpaper.
Let's begin the step-by-step assembly:
- First comes the making of the helmet. To do this, we print out all its details. Then we cut out all the parts from thick cardboard and secure it all tightly with glue. The back of the mask, which is pulled out, does not need to be glued;
- When the helmet is completely assembled, coat it with a mixture of epoxy resin and hardener. We fix all the components of the helmet on the back side using office clips and cover it with glue. When assembling, we maintain the correct proportion so that the product can dry and be suitable for use;
- We reinforce the helmet from the inside with fiberglass. We cut the material into thin strips, and glue several layers of this material from the inside of the product. Cover the top with epoxy glue. After the glue has dried, we sand the helmet so that it looks like it’s cast, so that small parts are not visible;
- Next comes painting the finished product. Since you need to use all the colors, you will have to secure with tape those places where you are supposed to paint with a different color. Paint red, leave those areas where there should be gold;
- We do the back part separately. Ears on paper are simply round in shape, but you can make them out of wood and then glue them to the helmet. To make the helmet easy to take off and put on, you can use magnets or a simple manual mechanism;
- Similarly, we assemble the neck, chest, back, shoulders, arms, legs, and other parts of the iron man’s body. It is necessary to constantly do fittings to make sure that all parameters are in order. When painting, make sure that no gaps or gaps appear;
- We carry out the general assembly of parts and give them mobility. For this purpose, a glue gun will be useful, and you will also need wide and narrow elastic bands. Plastic snap fasteners are also required for large parts;
- If desired and possible, additional luminous elements can be formed;
- To make the chest of the iron man glow, you need to glue a battery-powered LED flashlight into it, and for the hands we use a small flashlight. Place a mouse button on the side of the index finger, then the wearer of the equipment can easily create a glow at will;
- The eyes are made using glowing LED lights. You will also need a switch, batteries, and wires. Cut two pieces of clear plastic and place the lights just below the eye holes.
Assembly Features
- When creating a layout in a special program, all parts will be numbered, and this numbering must be strictly observed .
- It is also important that all parts fit tightly and evenly to each other, otherwise one inaccuracy can displace all other connections.
- When assembling and fixing each element of the costume, it is important to try it on. Otherwise, it may turn out that there was an error in the initial calculations. Because of this, wearing the product will be impossible.
- It should be remembered that the glue and paint must dry completely. Firstly, it is harmful, and secondly, the suit will be damaged in the very first minutes of use.
Thus, you will get a real Iron Man suit. Of course, you can't fly in it; it's not as durable as the character's. But it will look almost like the original.
The process of making it is complex, so only diligent craftsmen can do it and is unlikely to be suitable for small children. Nevertheless, if desired, it can be created by the whole family, and in the process the child will try himself in several areas at once.
The disadvantage is that such an image is only appropriate for costumed events, which means that the costume cannot be used in everyday life. But for those who love making amazing creative things with their own hands, this will not be a problem.
What to wear with a blue hat
How to sew a lining to a knitted hat
Hero equipment made of paper and aluminum sheets
If you decide to make an excellent outfit of your favorite character for your child with your own hands, then first you need to be patient. The work will require a lot of time and some perseverance. Study all the details of the main character, look through the comics. All these actions will help to create a detailed picture of the future outfit. It will be impossible to create real equipment, but every parent can imitate a similar design.
Video master class
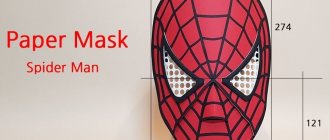
Iron Man mask, step by step work. Patterns here: https://goo.gl/pJFr6C
A slightly simpler option is to create a papier-mâché mask using the same principle, and cut the costume itself and sew it from fabric (yellow or golden turtleneck/jacket and pants, and the rest of the details are red: vest, panties, gloves, knee socks, shoes) . Relief can be given to some parts of the body using foam rubber.
If your child dreams of being a real superhero, help him make his dream come true and create a miracle for him in the form of a costume of his favorite character. Or make a cool costume for yourself :)
DIY legendary hero: material for equipment
Creating heroic equipment with your own hands is quite a difficult task. After getting acquainted with the character, you need to decide on the material from which the superhero outfit will be made. There may be several options:
- Paper or cardboard is the most practical, pliable material. It is easy to cut out the necessary parts from it and glue everything into a single structure;
- Aluminum sheets are also an interesting option. Due to the texture of the metal, a realistic effect is formed. Parts need to be painted with automotive paint. It is necessary to take into account the safety of the connections for the child, otherwise he may get injured;
- Foam rubber is also a pleasant material that is easy to work with. The only downside is that this design is quite hot. It is quite difficult to stay in a foam outfit for a long time;
- Fabric is a material that any parent can work with. To do this, you need to find a sports uniform that serves as the basis for future equipment. Next, sew the volumetric parts into the appropriate places. We use thin foam rubber as padding. Acrylic paints will give the costume an interesting effect and realism.
Let's get to work: assembling the famous helmet
In order for the equipment to fit perfectly, it is better to use drawings adapted to the size of your child, otherwise he will experience inconvenience and quickly tear his outfit. Of all the proposed options for creating heroic equipment, thick cardboard and aluminum sheets are suitable. You need to start working with the helmet. In this way you will gain the necessary skills, this part needs to be redone. We cut out each part separately, making indents from the edge of about 1 cm.
Forming a hero's body
The back and chest are made separately and require a separate drawing. We measure the size of the chest. A specific lamp should glow in the middle. It can be imitated using a basic night light of a suitable diameter. Just walk through the hardware store, you will definitely pick up the necessary decorative element. You can use foil, which will shimmer perfectly.
Upper and lower limbs
Arms and legs are the most mobile parts of our heroic equipment. In places of direct bending, transitions or gaps need to be formed. It is important to take into account that children are quite mobile; nothing should hinder their movements in this design. For convenience, you can make shields and gloves in addition to them. You can use sneakers or sneakers as shoes. Only separate shields can be glued to the calves, this will ensure mobility.
An important point is the rigidity of the structure
After the equipment is completely assembled, you need to add rigidity to the structure. For this purpose, you need to purchase epoxy glue, apply it in an even layer to all parts and wait until it dries completely. To ventilate and dry completely, leave it for a day. Only after the glue has completely dried do we begin to apply paint and other decorative elements to the structure.
Second outfit option for a child
This option will be more complex, and you will have to tinker with it longer. To make an Ironman outfit, you will need: yellow and red cardboard, scissors, good glue.
Manufacturing process:
Again, red pajamas must be used as a base. But this time the design will not be applied using paint - the armor will be made of hard cardboard. Cut out a bib from cardboard that will resemble Ironman's suit. It is not necessary to make it in relief, just giving it an approximate shape is enough. Now you can glue this part to your pajamas. If you don’t want to spoil your pajamas, you can use temporary Velcro, which can then be easily removed.- To make the costume more similar, we need to make two more shoulder pads and two parts for the legs. This will be enough to make Tony Stark’s costume look impressive on a child. To make shoulder pads, take a sheet of cardboard and place it on top of the child’s shoulder, and then glue it. There is absolutely no need to crumple the cardboard - it needs to be shaped into a rainbow and applied to the shoulder, and then glued.
- We make parts for the legs using yellow cardboard. We roll it up so that it takes the shape of a cylinder. Make sure that the child’s leg can fit perfectly into this part. After this, we attach the part to your baby’s leg, and then use glue or Velcro. Tony Stark's reactor is manufactured using the same technology as in the previous version.
- We also make a paper helmet with our own hands. You can complicate the option with a mask - again make a cylindrical shape from red cardboard, but now in such a way that the child’s head fits into it. We close the hole on top with cardboard, which was previously cut out in the shape of a circle, and apply notches onto it with scissors, wrapping in one direction. You subsequently need to apply glue to these notches and glue them to the finished cylinder. Now we cut out a hole for the eyes. When the main part of the helmet is ready, we find the Ironman mask on the Internet, print it out, and then place it on our cylinder and make holes for the eyes in the right place. The mask should look very impressive.
Tips for parents
It is necessary at the initial stage to assume that the construction will take several days. You want to make your child some real hero gear, not dress him up in appliance boxes. A robot should not be confused with an iron man. If you are not sure about the presence of some details, then just ask your son about it, because he knows almost everything about his favorite hero. If you have a vague idea of what Iron Man looks like, pictures of the costumes will help you finally understand the image of this hero.
As you begin the creative process, remember that you are not the first person trying his hand at designing heroic equipment for the first time. Many craftsmen have been able to recreate realistic Iron Man uniforms for themselves and their children. This means that you can make your child happy too. You just need to arm yourself with enthusiasm, be patient, and the joy on your child’s face and satisfied smile will be the best reward for your titanic work and diligence. When creating a model, remember that the design is safe for the child; nothing should scratch his delicate skin or create obstacles to movements.
You can involve your child in a common cause; this creative process is a great way to get closer to your child. Nothing brings people together more than the fun process of creating cool hero gear. Our simple guide will help you create your own version of the heroic equipment, or you can create a similar copy of it. It is quite easy to create such a design, since in order to make it, you do not need to purchase expensive materials and equipment. All you need is thick cardboard, which will form the basis of our costume.
After you learn how to make uniforms from paper, you can switch to soft aluminum or tin. These metals will help increase your skills in crafting iron equipment. Then you will be able to create more realistic images, and your child will be able to appreciate the result.
You can see the step-by-step creation of realistic iron equipment in this video, namely the assembly of a helmet.
How to create a costume for an adult
Superheroes who save the world from imminent death on screens are popular not only among children. Adults also sometimes want to be someone unusual and extremely strong.
In this case, it will not be possible to make an Iron Man outfit out of paper. The production of such an outfit will require several months of painstaking work on the production, strengthening, polishing and detailing of the costume. It will also require the use of modern technologies that are not widely used.