How and from what to make a brownie figurine?
There are many styles and methods of making figurines. A fabulous guest can be accommodated in any interior style. Today we will share the main methods and techniques for creating brownies.
Decorative dolls are made from different materials. Threads, colored cardboard, burlap, tin cans, natural and other available materials are used. Try making them yourself using our tips, and you will see that this is a very exciting activity.
Preparation of bast
It is believed that it is best to collect material in the forest for weaving bast shoes in the spring. At the same time, the most suitable type of bast for such products is linden. In the forest for harvesting material, you should find trees 3-4 m high with a trunk diameter of 5 cm at the ground. Such sticky trees usually grow very densely in the thicket itself, like reeds.
Such trees are cut with a hatchet. Next, the bast itself is removed from them:
- Use a knife to separate a narrow strip of bark near the butt;
- with a sharp movement they tear it off the trunk;
- separate the bast tube (fibrous part) from the bast.
Just before weaving bast shoes, the material prepared in this way in the spring during sap flow in the trees is soaked in water for a day and then steamed. Next, the bast is priced, that is, it is cut into narrow strips, while simultaneously clearing the remaining bark.
Making a brownie from threads
We offer a step-by-step guide to making a brownie craft from threads for a technology lesson in 2nd grade. School-age children will be happy to spend their time creating a cheerful fairy-tale character. They will cope with their work without much difficulty. At home, you will be interested in working together with your child.
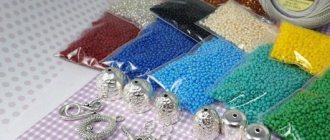
Minimum materials required:
- pre-prepared templates;
- a set of colored cardboard and paper;
- white cardboard;
- any yarn;
- glue;
- scissors.
Difficulties may arise when creating a pompom from yarn. You'll have to try a lot here. If your child is involved in the process and has no experience, your help will be needed.
Take colored paper and draw on it several patterns for eyes, ears, tongue, arms and legs. If colored paper is not available, use cardstock. Make the tongue a little rounded to make the doll seem cheerful.
Now we will create a pompom. On cardboard, draw two round disks with a radius of 5 cm. Inside them are circles with a radius of 2 cm. Cut out so that you get a pair of “wheels”. Place them together and wrap a thick layer of yarn around them.
Carefully cut the threads between the rings along the outer perimeter. Make sure that the rings do not move so that the yarn does not fall apart. Tie the middle tightly with yarn and tie with two knots. Now get rid of the cardboard and fluff the pompom without cutting off the tying knots.
The resulting pompom will serve as the body of the brownie. Glue the prepared parts onto it using PVC glue. We got a brownie boy. For a girl, just stick a cute bow or flower on top.
Usage
Bast shoes were worn with foot wraps (onuchs). From the bast shoe up and around the shin, in the manner of an ancient Greek sandal, there was a bast cord, which at the bottom was attached to the shank of the bast shoe and kept the footcloth from unwinding. Nevertheless, when walking for a long time, I periodically had to change my shoes and rewind my stray footcloths.
Weaving bast shoes was a winter activity for peasants in Rus' when there was no field work. Bast was harvested during a certain summer season, when the bast had the necessary strength characteristics.
Academician of the St. Petersburg Academy of Sciences I. Lepyokhin wrote at the end of the 18th century that to make one pair of bast shoes, two large and three or four small linden trunks were required. A peasant wore out 50 to 60 pairs of bast shoes per year. According to the calculations of the historian L. Milov, a family of 4 people sometimes required up to 150 pairs of bast shoes (worth about 1.5-2.5 rubles). The peasants went to such lengths of labor because the required amount of money to buy leather shoes was too large. To buy boots for himself, the peasant had to sell a quarter of the collected grain, and another two quarters for his wife and children.
Brownie made of burlap and filler
Toys made diligently and with love always attract attention and look beautiful. Handmade crafts are very common. For example, a brownie made of burlap. Let's consider two options for its manufacture.
The first option is with filler.
Prepare the following materials:
- burlap;
- scissors, threads and needles;
- any strong rope;
- filler;
- plastic eyes;
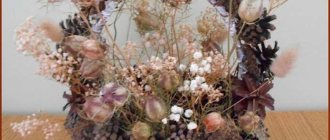
- decorative elements (cones, artificial leaves, flowers, etc.);
- corrugated cardboard;
- plastic cover;
- heat gun.
- Cut a rectangular shape from the burlap, approximately 25 cm by 30 cm. Fold it in half. Pull 15 - 20 threads from one part of it.
- Carefully fold the threads together and make a beard and nose out of them. First tie them in the middle. Then, to form a spout, tie them with strong rope (for example, jute).
- Fluff up your beard.
- Next, take a piece of burlap and sew it along the sides. The bottom corners should remain rounded.
- Turn the resulting bag right side out. Just below the top fringed edge, sew with regular stitches.
- Now fill the toy with any filling, sew and tighten it on top.
- Draw four leg shapes on cardboard, cut them out and trace around the edges with a red marker. From burlap, cut out shapes for each leg that are slightly larger than their dimensions.
- Glue the fabric to the cardboard parts with a heat gun.
- Glue each piece together on the inside. Apply jute around their perimeter. Decorate the legs with jute bows and glue them to the body.
- Using a heat gun, glue plastic eyes on top of the body, and a beard made of threads between them.
- The hat is also made from jute. For its crown, use a transparent plastic cover.
- Make a braid out of jute and twist it in a circle. Then glue it to the center of the lid. Continue pasting the lid until you reach the end of it.
- At the end of the cap, the pigtail is glued so that the brim of the cap begins to form. Carefully glue the end of the rope with hot glue.
- Sew the hat to the body, and on its sides - a few pine cones and green leaves.
Instructions for weaving different models
Craftsmen who make these shoes use birch bark, bast or more modern raw materials to create them. For example, very beautiful bast shoes are made from newspaper tubes, knitted yarn, and jute twine.
From newspaper tubes
This raw material is very common as a material for weaving bast shoes. The finished product looks beautiful and resembles shoes made of natural material.
For weaving you will need:
- newspapers;
- scissors;
- PVA glue;
- some water;
- knitting needles 2-3 mm in diameter (both metal and plastic are suitable).
Before weaving bast shoes, you need to prepare the material. This process is not particularly difficult; even a beginner can easily cope with this task:
- An ordinary double sheet of newspaper should be folded in half and carefully divided into two parts along the fold. The resulting material must be bent lengthwise and cut. So, from one part you should get 4 long narrow pieces.
- After this, you will need to dilute the glue in a ratio of 1:3. Place a knitting needle on the corner of the strip and wind the paper onto it in a spiral. When the sheet is completely curled, you need to secure the piece with a glue solution. After which you can remove the knitting needle.
To prepare the segments, it is recommended to cut a whole stack of newspaper sheets at once.
Before you start weaving, the tubes need to be slightly moistened without flattening. How to make bast shoes step by step can be found in the following instructions:
- Place one tube horizontally.
- Place the second one on it, having first bent it into the shape of the letter “L”.
- Put on the third one parallel to the second tube.
- They need to be intertwined on one base, one leg at a time, in a cross.
- In the same way, you need to put 5 more newspaper straws on the base.
- Pass the leg of each of them with a regular pigtail into the bases that were secured earlier.
- Screw the lowermost parts of the parts into the resulting fabric to the middle of the product, having previously grabbed the side.
- Secure the remaining free edges in the same way.
- This way the back fragment of the bast shoe will be formed.
- After every fourth crossing, additional tubes must be attached to the sole of the future shoe. In a similar way, with the letter “L”.
- According to this pattern, the bottom of the product is woven. Since additional tubes are woven in, closer to the toe of the shoe the required expansion is obtained.
- The sole should be tried on the foot, if everything fits, you can begin making the upper part.
- For the top of the bast shoes, two bent tubes should be left in the central area. The straws at the edges of the middle ones are secured with calico weaving.
- Do the same with the remaining tube, bringing it to the center.
- The weaving bends the fabric upward, thereby forming a cape. You should do the same with all the tubes, lifting them up.
- All that remains is to close the edges of the bast shoe and form the sides. For this purpose, the tubes from the middle should be intertwined one with the other and brought to the reverse side, stretching each one separately to the edge.
- Then they should be threaded through the nearest hole to the side of the sneaker and attached with glue to the sole.
- All remaining tubes must be intertwined in each direction and glued to the sole part.
This weaving pattern is one of the simplest. Thanks to her, even a beginner can figure out how to weave bast shoes.
Brownie made from burlap and tin cans
This method uses a large coffee tin as the inner base. From other materials, take:
- burlap;
- heat gun;
- button;
- plastic eyes;
- scissors, threads and needles;
- decorative elements (broom, ladybugs, artificial leaves, etc.);
- plastic cover.
- According to the previous technique, make a mustache and nose and form a hat. Set them aside for now.
- Place a coffee can on a piece of burlap. There should be enough material to completely wrap the base. All excess is cut off.
- Wrap the jar completely and make a strong knot at the top.
- Additionally, glue this connection so that the knot does not come undone.
- Take a heat gun and use it to glue plastic eyes onto the body.
- Tie the button-nose with jute material and also glue it just below eye level.
- Add a mustache.
- Cut out the legs from colored cardboard and glue them under the bottom.
- Glue or sew the pre-prepared hat on top.
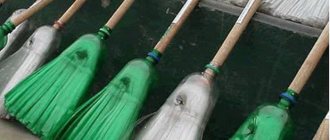
- As in the previous version, you can use various decorative elements. Glue a small straw broom and a bag to the side of the brownie.
Product Description
Many historians and local historians claim that the bast fishery goes back more than one millennium. This is confirmed by archaeological finds related to different time periods. Bast shoes were simple and widely available.
Shoes were woven from materials of plant origin, which began to be harvested in early spring during the period of sap flow from the trees and continued until mid-summer. Bast shoes were called birch bark, linden, broom, oak, depending on which tree the bast (thin long strips of bark) was obtained from.
Elm bast shoes were considered the most valuable - they lasted longer. An interesting fact is that shoes for girls and women were woven differently. Girls' holiday bast shoes were neater and were made from narrow bast.
The shoes were fastened with a rope made of flax fiber, similar to Greek sandals: it was wrapped around the feet over foot wraps (foot wraps). In case of getting wet in spring and autumn, special wooden blocks were hemmed, and for strength, the sole was woven with wicker, rarely hemmed with leather.
Beautiful craft made from natural materials
There are many original ideas for creating amulets dolls. For example, with your own hands you can create a cheerful brownie Kuzya from natural materials. Prepare everything you need:
- a cookie box for the base;
- colored fabric for the background;
- birch bark;
- tinder fungus;
- small sunflower flower;
- dried aspen and lily of the valley leaves;
- Jerusalem artichoke flower;
- leaf-shaped sequins;
- colored gouache and brushes;
- glue;
- needle and thread;
- scissors and stapler.
- Staple the colored fabric to the bottom of the box. Sew along the length so that it does not sag when the box is placed on its side.
- Take birch bark and cut out arms and legs from it. Additionally, make bast shoes from white birch bark.
- Make a hole in the left handle and insert Jerusalem artichoke into it.
- Attach bast shoes to each leg so that they can move.
- Cut out the facial elements from paper: mouth, nose and eyes. Attach them inside the sunflower flower.
- Sew the arms and legs to the fabric base. Then attach the tinder body. Sew the head on top.
- Our fairy-tale hero must be dressed in a shirt. To do this, paint over the body with red gouache. Make the trouser legs blue and the oxen yellow. The shirt can be decorated with large white polka dots.
- Cover the edges of the hut with logs made of colored paper.
- On the front side, use dry leaves and decorative sequins for decoration.
- Cover the reverse side with paper of any color to hide the seams.
Excursion into history
Lapti first appeared in Rus'. These shoes were made from bast and birch bark, and later twine began to be used.
Bast shoes were light and comfortable shoes, but with a low service life. On average, per year a peasant trampled from 50 to 60 pairs of bast shoes.
Families at that time were quite large, so all generations, from small children to old grandmothers, began weaving shoes. If a person did not have weaving skills , then they said about him “he can’t knit,” that is, he is not able to do even the most basic things. Although in the modern world this saying has undergone several changes and is used to refer to very drunk people.
The preparation of material for making shoes began in early spring. The bark was peeled from young linden trees, after which it was soaked and a thin layer was scraped off, exposing the bast. The weaving of bast bast shoes differed in different settlements, so by studying the features of a person’s shoes, it was possible to roughly understand what area he came from. The foot prints were attached in the manner of Greek sandals.
Today these shoes are a thing of the distant past, but they are sometimes remembered when making Slavic-type dolls.
Brownie Kuzya
We all know this funny cartoon character, it’s time to make a Kuzya brownie craft with your own hands so that it becomes an ideal amulet for your home.
- To do this, you will need white calico, dark-colored textiles and bright ones for sewing a brownie shirt.
- Cotton wool is suitable for filling.
- Also prepare beige or white wool threads, a pencil, acrylic paints with a brush, you can’t do without scissors and a sewing machine (although you can sew by hand).
Where is bast used?
Bast is not just washcloths. From time immemorial, bast was used to weave bast shoes, household utensils, baskets, boxes, and so on...
Lyko became so firmly established in the lives of Russian peasants that it would be difficult to imagine their life without him.
There are quite a lot of proverbs and sayings associated with bast. For example, our everyday saying: “The bast does not knit.” This means that a person is drunk to such an extent that he cannot cope with an ordinary, simple task.
Shoes and household items made from bast were considered a sign of the poor and of simple origin. When they said about a person: “Girded with bast” or “Woe is bast” - this meant that the person lived in poverty.
The bast washcloth is one of the oldest. These are the types of washcloths that have replaced “disposable cleaning agents.”
Manufacturing technique
The first thing you need to start with is drawing and cutting out models to create patterns. These are two parts for the future shirt, four from which you will sew the brownie’s arms, four parts for the panties, one for the nose, five for the head, two parts for sewing the brownie’s body and, finally, four for making the legs.
Once you have cut out the pieces from the paper, trace them onto the back of the folded fabric. Cut out as many pieces as you need for the job. After sewing the elements along their contours, turn the resulting pieces inside out.
Stuff the body parts of the future brownie with cotton wool, especially filling the head with it so that it is even. Gather the pieces and sew them together by hand. The circle that is cut out for the nose is gathered around the edge, filled with a small piece of cotton wool and pulled together, and then sewn to the head.
Stage No. 9
The finished clothes are put on the brownie. First, the pants are sewn to the body by hand. In the waist area, the fabric on the pants is folded inward - no more than 1 cm. The bottom of the pants is manually stitched with thread, which is pulled together. Next, the fabric is folded inward 1 cm and sewn to the legs.
The brownie puts on a shirt. There is no need to sew it to the body.
Those craftswomen who are able to knit can make woolen bast shoes for a brownie.
Brownie costume and face
Draw eyes and a mouth on Kuzi's head, and then paint them with acrylic paints.
- Cut out the parts for the shirt from bright fabric, and from dark fabric for the pants.
- You can sew a small button onto your shirt.
- Sew them and put the pants on the toy, hemming the fabric on the stomach and legs along the bottom edge.
- Then dress the brownie in a shirt.
- The head is sewn on, the seam should be hidden so that the finished product looks neater.
Stage No. 2
The parts are cut out from the fabric. Allowances of 5 mm are taken into account. They must be marked with a pencil or a special disappearing marker.
It is recommended to fold double fabric when cutting double pieces. Everything is cut according to the direction of the threads in the fabrics. Only the head part is cut out along the oblique direction of the threads in the fabric. The leg parts are cut from white cotton fabric.
For ease of use, the parts are attached to each other using tailor's needles.
Stage No. 3
Each piece must have a hole for turning the fabric right side out.
At the sewn head, notches are made above the seam on the outside, as in the picture.
The edges of the parts are processed with special zigzag scissors. Otherwise, the edges need to be processed using ordinary scissors.
Brownie hairstyle
Take the yarn and wind it onto a piece of cardboard. Carefully remove the wound threads and place them on the paper. Sew straight down the center of the paper.
- Select one half of the stitched yarn and sew two more stitches on it.
- Cut into several pieces.
- Sew the hair to the brownie's head (shorter at the bottom, longer at the top, placing it in a circle).
- Comb and distribute to create a parting.
- All that remains is to make twine from wool and weave bast shoes from it.
When is the best time to harvest bast?
It is best to prepare the future washcloth from bast in the spring. At this time, the tree is gaining spring sap, its bark is tender and soft. But when it dries, it coarsens, becomes hard and tough.
Therefore, when the bast is cut, it is soaked in water to make it more soft and flexible.
Then the strips are collected into a bundle, which can be tied - this is how you get a washcloth. Agree, everything is quite simple...
Brownie made of threads
If you are wondering how else you can make a brownie craft, in the presented photo of crafts on the theme of brownies, you can see a brownie craft made from threads.
You will need colored cardboard, colored yarn, some glue, scissors and paper.
- Draw on cardboard and cut out eyes, legs, arms and a circle for the body.
- Then glue the yarn onto the cardboard circle, placing the threads from the center.
- It remains to fasten the button in the center as a nose, and closer to the edges of the legs and arms.
- The basis of the workpiece will be a sheet of paper, transfer the brownie onto it.
- You can cut out a hat from cardboard and decorate the craft as your imagination dictates.
- This technique is quite simple, if you are looking for an idea for a brownie craft for grade 2 and younger, your child can easily make such a product.
Step by step weaving
Before you start making bast shoes, the newspaper tubes should be slightly moistened. There is no need to flatten them. Actually, there are several techniques for assembling shoes from such material. For example, to weave bast shoes from newspaper tubes, you can use the following simple technique:
the first tube is placed horizontally;
place a second tube on the resulting base-side, bending it in the shape of the letter “L”;
in exactly the same way, parallel to the second “strap” in the shape of an “L”, a third one is installed;
intertwine one leg of each tube in a cross;
5 more “straps” are placed on the base in the same way.
The stem of each subsequent tube is passed in a simple pigtail into all the previous ones. Next, using the same method, the outer legs are woven into the resulting fabric to the center, capturing the side. Do the same with the following free ends. The result should be the back of the bast shoe.
After every fourth cross in the center, additional tubes are inserted into the sole of the bast shoe (also with the letter “L”). In this way, the lower part of the product is woven to the end. Thanks to the presence of additional tubes, closer to the toe of the bast shoe, the necessary expansion will be obtained. Having tried the sole on the foot, they begin to weave the upper of the shoe. Do this part as follows:
leave two tubes bent in the letter “L” in the center;
the first “straps” at the edges of them are also intertwined with calico weaving;
do the same with the next tubes, bringing them into the middle.
With this weaving, the fabric will begin to bend upward, thus forming a toe. You need to lift all the tubes up using the method described above. Next, all that remains is to mask the edges of the bast shoe and at the same time make the sides. To do this, the two middle tubes over the toe should be intertwined and bent in the opposite direction, reaching each one to the edge. Next, the material must be passed through the nearest hole from the side of the bast shoe and carefully glued to the sole.
The remaining tubes of each side need to be intertwined in their own direction. Next, they should be hidden and glued on the side of the sole. You can learn more about this technology of weaving bast shoes from tubes, which is very suitable for beginners, in the video below.
Brownie molded from plasticine
An educational and exciting activity for a child.
- Plastic plate,
- Board and plasticine.
Take pink plasticine, parts of the brownie's body will be molded from it.
- Now you can move on to the boots - they are made of black plasticine.
- Move on to the face - make the nose, as well as the eyes and beard.
- The plate will serve to draw any background on it, and then place the brownie on it.
A beautiful composition is ready!
Stage No. 7
Face painting. The shapes of the eyes and mouth are drawn on the fabric with a pencil. It is recommended to draw the mouth with a smile.
The resulting eyes are completely covered with white paint. After the paint has dried, the iris is made for the eyes. You can choose any color you wish. The color in the picture is blue. After it dries, a black pupil is drawn.
After the paint has dried, the eyes need to be given a realistic look. For this purpose, the upper blue part of the eye is slightly shaded with black paint. Exactly as in the picture. And the top of the white paint is obscured by gray paint before our eyes.
The bottom of the iris, which is blue, is lightened with white paint. White highlights are drawn onto the eyes. Thus, the brownie’s look turned out to be very lively.
An outline is applied to the eyes with brown paint. Eyelashes and thin eyebrows are made. A smiling mouth is outlined. The paint is given time to dry.
Use pastel colored chalk to tint the area around the eyes. Blush is applied to the cheeks. The nose is also blushing.
The head is put aside for now.
Brownie from a jar
There are probably empty coffee or tea cans in your house. Don't throw them away, they make great decorations for your kitchen!
In addition, a talisman in the form of a brownie, made with your own hands, will bring you prosperity and well-being.
- To start, you will need a tin can.
- Then take flax hemp, which will need to be wrapped around this jar.
- Treat the edges of the hemp with a heat gun so that the product is durable and does not unravel.
- Now take the wool threads and make a tassel out of them, the ends should be long.
- Tie the top of the hand to create a nose.
- The edges are the beard of a brownie, they need to be fluffed up.
- Attach the resulting element to the decorated jar.
- Now add the eyes by gluing the finished plastic hell nose.
- Now take the lid and wrap it with twine made from colored yarn.
- This will give you a brownie hat.
You can decorate it with an artificial flower on the side. This product can be used as a box.
How bast shoes were woven in the old days
Bast shoes have always depended on the place in which they were created. Externally, shoes from different provinces could be distinguished by the type of weaving and materials. They were woven from all types of bark suitable for knitting, but bast shoes made from linden bast were more prized than others. In the northern regions they used birch bark; in the south one could find shoes made of elm and oak. Willow models were considered the cheapest. The names of each type of bast shoes came from the material: elm, broom, hair. Another type of everyday bast shoes is feet. It was convenient to work in the yard in them, as they were easy to put on bare feet and did not require tying. Such bast shoes stood at the threshold of the hut and made it possible to quickly go to the hay barn, barn or chicken coop.
Burlap brownie
This craft is perfect as a children's toy. You will need a square shaped piece of burlap.
- Sew a circle on it, using the seam forward with a needle, and place a piece of cotton wool in the center.
- Then pull the thread and hide the edges inside.
- Now you need to make the arms, legs and shoes.
- Twine made of yarn is perfect for this, from which these parts will be woven.
- They are attached with glue or sewn with thread.
The finishing touches are decorating the toy. It could be a headdress, a flower and much more.
These interesting and beautiful products in the form of a brownie can be made from a wide variety of materials. And most importantly, this is a very interesting and useful process that will develop fine motor skills and imagination of your child. There are many techniques of varying complexity, everyone can find something for themselves.
The finished product will serve as a decoration in the room, a talisman, as well as a toy or box if it was made from a can.
Source
Lapti - peasant shoes
One of the most common types of shoes in Rus' were bast shoes. They can be made from almost any material. Any peasant could make bast shoes for himself and his family. Their advantages are obvious: they “breathe,” they don’t rub your feet, and you can’t get calluses in them. And the festive painted bast shoes were also beautiful. Their only drawback is their short service life. The bast wore out and was worn out quite quickly. The bast shoes became unusable in 3–4 days.
Peculiarities
Amigurumi toys are knitted in a spiral using single crochets (st. b/n.). The knitting must be tight so that the filler does not subsequently come out of the finished toy through the spaces between the posts. The most suitable yarn for knitting a brownie is acrylic from various manufacturers. Acrylic yarn has a wide range of colors, ideal thickness for knitting toys and an affordable price. At the beginning of the work, the so-called amigurumi ring (KA) is knitted: wrap the working thread twice around the index finger of the left hand. Insert the hook into two circles on your finger, then grab the working thread and pull through. Grab the working thread again and knit the first loop. Next, we tie the amigurumi ring with single crochets. Continue knitting according to the pattern counterclockwise.
What to do with the amulet if it is damaged
During long-term use, the amulet may lose its attractive appearance: the color of the threads will become faded, and cracks will appear on the clay figurine. This means that over a long period of service, the brownie successfully fulfilled its protective function. Further use of the amulet makes no sense, since its magical power has dried up. You need to get rid of such a talisman.
It becomes obvious that the brownie is a bright spirit who will happily serve a person. Of course, sometimes brownies play pranks, but there is never any malicious intent in their pranks
By their actions they draw a person’s attention to the fact that home and family are the greatest values, therefore the apartment must be kept clean and tidy, and family members must live in peace and harmony
Stage 2: Component Assembly
This is where the head is assembled first. To do this, move 1 cm away from the extreme side of the pattern. Using a needle, make a stitch. It should go along the entire diameter. Pull the material together, leaving a small hole. It is needed for stuffing. Filling for the head – padding polyester. It is distributed evenly in it. Then the hole is tightened and the thread is fixed.
Assembling the nose follows the same principle. The nose is attached to the center of the face with a needle or glue gun.
Eye positions are outlined. The eyes are glued. These are small buttons.
After this, you can collect the components of the arms and legs. Holes for stuffing are preserved. The filler is the same as in the head. The sole is attached to the foot components. The holes are sewn up.
Then the torso is lined up, filled and sutured. Its filler is padding polyester.
After this, you can form the arms and legs.
Buttons are used to form joints. They are attached to the body. Then the head is sewn on.
Decor variations
Regardless of what material the bast shoes are made from, they can be decorated in an original way. For example, if newspaper tubes were used in their creation, they require mandatory processing. For example, they can be painted using acrylic paint or covered with stain. The shade is selected taking into account the purpose of the product and personal preferences.
Info! You can even create original designs and ornaments on shoes and decorate them by painting. Paper products can also be coated using acrylic varnish. Thanks to this, they will look much more attractive and their service life will be extended. In addition, with such a coating, cleaning shoes will not cause even the slightest difficulty.
Models made from yarn can be dyed by using fabric intended for fabric. Options created from jute ropes can also be decorated in various ways. For example, beads and ribbons are often used for this purpose. It is appropriate to use glass beads and fabric flowers, as well as appliqués and embroidery. Such products can become a spectacular decoration and an original souvenir that can be presented to loved ones for a holiday or just when visiting. Such gifts are of particular interest to foreigners.
There are many more variations in the decor of such products. In fact, everything is limited only by the imagination of the needlewoman herself. For example, created shoes can be artificially aged. At the same time, it will seem that they have reached our days from ancient times. Naturally, such things simply cannot go unnoticed. Options with modern decor are also appropriate. In this case, traditional Russian shoes will look stylish and original. For example, for this purpose, images in the form of logos of famous brands and popular cartoon characters can be applied to it.
Creating bast shoes from birch bark and all other materials is not at all difficult. The process of making them is incredibly exciting and may well become a favorite hobby that can bring profit. Such souvenirs are incredibly in demand and will definitely find their buyer. In addition, bast shoes will be an ideal gift for people close to your heart and can be safely used as house slippers. To create such extraordinary products, you just need to decide on the appropriate technique, prepare the materials and strictly follow the master class.LiveInternetLiveInternet
KUSYA'S HOUSEBORN. Description: Svetlana Rumyantseva. 1.
Happiness to the home! Brownie Kuzya and his friend Kitty. Legend: Ch - air loop KA - amigurumi ring Pr - increase Decrease - decrease Sc - single crochet Sc2n - double crochet (1 sc, inc) * 6 = 18 sc - single crochet, increase, repeat 6 times. HEAD 1)6 sbn in KA 2) 6pr=12 sbn 3)(1 sbn, inc)*6=18 4)(2 sbn, inc)*6=24 5)(3 sbn, inc)*6=30 6 )(4 sbn, inc)*6=36 7)(5 sbn, inc)*6=42 8)(6 sbn, inc)*6=48 9)(7 sbn, inc)*6=54 10-17 )=54 sbn 18)(7 sbn, dec)*6=48 19)(6 sbn, dec)*6=42 20)(5 sbn, dec)*6=36 21)(4 sbn, dec)*6 =30 22)(3 sc, dec)*6=24 23)(2 sc, dec)*6=18 24)(1 sc, dec)*6=12 25)6 dec=6 Sew on the head last! BODY red color 1) 6 sbn in KA 2) 6 inc = 12 sbn 3) (1 sbn, inc)*6 = 18 4) = 18 sbn 5) (2 sbn, inc) * 6 = 24 6) for the back half loop =24 sbn 7)(3 sbn, inc)*6=30 8)=30 sbn 9)(4 sbn, inc)*6=36 10)(5 sbn, inc)*6=42 11)(6 sbn, pr)*6=48 12-15)=48 sbn 16) for the back half-loop=48 sbn 17)(6 sbn, dec)*6=42 18)(5 sbn, dec)*6=36 19)(4 sbn ,ub)*6=30 20)(3 sc,ub)*6=24 21)(2 sc,dec)*6=18 22)(1 sc,dec)*6=12 23)6 dec=6 Pull To the 6th row - sc with a white thread for the front half-loop (collar) To the 16th row - join the front half-loop, sc in a spiral with a red thread, knit the hem of the shirt to the desired length LEGS with the color of the bast shoes Knit 7 ch 1) from the second loop: 5 sc, 3 sc in last loop, turn, 4 sbn, inc = 14 sbn 2) inc, 4 sbn, 3 inc, 4 sbn, 2 inc = 20 sbn 3) inc, 5 sbn, inc, 1 sbn, inc, 1 sbn, inc, 5 sbn, inc, 1 sbn, inc 1 sbn = 26 4) 1 sbn, inc, 5 sbn, (1 sbn, inc, 1 sbn) * 3.4 sbn (1 sbn, inc, 1 sbn) * 2 = 32 5) for the back half-loop = 32 sbn 6,7,8) = 32 sbn then we make decreases in the middle of the front, the loops can not be counted. 9)…dec, 1 sc, dec…=30 10)…3 dec…=27 11)…4 dec…=23 12) behind the back half-loop, another color…5 dec…=18 13-18)=18 sc 19 )(1 sc, dec) * 6 = 12 20) 3 dec sew on Tie a ribbon for bast shoes 37 ch, tie around the leg. HANDS flesh color 1)6 sc in KA 2)6 cr=12 sc 3)(1 sc, cr)*6=18 4)=18 sc 5)3 dc2n with a common top in one loop (finger), 17 sc= 18 sbn 6) = 18 sbn 7) 2 dec on the sides = 16 8) = 16 9) 2 dec on the sides = 14 10) 4 sbn, go to the red thread, 10 sbn = 14 sbn 11) = 14 sbn 12) for back half-loop = 14 sc 13,14,15) = 14 sc 16) 2 dec on sides = 12 17-22) = 12 sc 23) 6 dec = 6 sc To the 12th row: behind the front half-loop in red we knit cuffs: 2 sc , inc = 18 sbn 2 more rows - 18 sbn in red and 1 row in white Return to the head SPOUT 1) 6 in KA 2) 6 ind = 12 sbn 3,4,5) = 12 sbn USHKO 1) 6 in KA 2) 6 inc = 12 sc 3 (1 sc, inc) * 4 = 12 sc - not a complete row Sew on the ears and nose, embroider the mouth, make hairs. CAT Legs, head, body - one piece. Legs 1)6 in KA 2)6 pr=12 sc 3,4)=12 sc 5)2 dec,8 sc=10 6,7)=10 sc Do not cut the thread on the second leg Connect the legs (BODY) 1)By to the second leg 4 sc, connect to the first leg with two chain loops, 10 sc, 2 chain stitches, 10 sc. 2) 2 inc (front in the middle), 10 sbn, 2 inc (back in the middle), 10 sbn. 3) 15 sbn, 2 inc (back), 11 sbn = 30 sbn 4-8) = 30 sbn 9) (3 sbn, dec) * 6 = 24 10) = 24 sbn 11 ( 2 sbn, dec) * 6 =18 12)(1 sbn, inc)*6=12 Head 13)(1 sbn, inc)*6=18 14)(2 sbn, inc)*6=24 15)(3 sbn, inc)*6= 30 16)(4 sbn, inc)*6=36 17-20)=36 sbn 21)(4 sbn, dec)*6=30 22)(3 sbn, dec)*6=24 23)(2 sbn, dec)*6=18 24)(1 sbn, dec)*6=12 25)6 dec=6 sbn, pull Handles 1)6 sbn in KA 2)6 pr=12 sbn 3)=12 sbn 4)=11 sbn 5)=10 sbn 6-12)=10 sbn 13) decreases Tail 1)6 sbn in KA 2)=6 sbn 3)6 inc=12 sbn 4-10)=12 sbn 11)=11 sbn 12)= 10 sb 13) decreases Spout 1) 6 sb in KA 2) 6 inc = 12 sb 3,4) = 12 sb Ears 1) 6 in KA 2) = 6 sb 3) 6 sb = 1 2 sb 4,5, 6) = 12 sc Knit a bag according to the size of the cat