Patchwork technique
What's the first thing that comes to mind when it comes to using scraps? Of course, patchwork, also known as patchwork.
This technique is truly the most popular way to dispose of fabric scraps around the world. Moreover, contrary to popular belief, the ability to sew on a machine is not at all necessary for patchwork - with the help of hand sewing you can also create a masterpiece. The only thing needed is patience.
Patchwork comes in different types, the main ones being:
- classic : creating patterns of squares and triangles according to certain patterns;
- Japanese : along with patchwork, there is appliqué and stitching;
- crazy (crazy patchwork) : one of the simplest techniques. It is suitable for beginning needlewomen because there are no strict rules (pieces of fabric can have the most incredible contours; nearby there are scraps of fabrics that are completely different in texture and properties; fabrics are complemented with ribbons, lace, buttons, etc. - in a word, complete freedom for creativity).
Not only patchwork quilts, familiar to many from childhood, are made using the patchwork technique. It is used for sewing bags, home textiles, clothing and even for creating furniture. Modern products made using this technique have long ceased to be associated with the “rustic” style. Now patchwork is fashionable and stylish.
Tools
First of all, if you decide to do this permanently and professionally, you need to take good tools right away and spare no expense. For beginners, you can take inexpensive supplies.
Of course, we should start with the basics. This is a sewing machine. Next, you need to purchase special patchwork feet. They are necessary at work. This foot must have a spring. You will also need a BSR stitching foot.
Sewing machine
For patchwork, you can use regular universal sewing needles.
A patchwork mat is an indispensable tool. You will also need a circular knife for cutting fabric.
Important! The circular knife is available in several basic diameters.
It is worth purchasing a ruler for sewing from scraps. Also scissors, needles for hand sewing, pincushion, safety pins and basting pins. That's basically all you need to get the job done.
Kinusaiga technique (patchwork without a needle)
Another great way to put fabric scraps to good use is the Kinusaiga technique, which originated in Japan. Moreover, if patchwork requires at least minimal sewing skills, then in kinusaiga this is not required. This technique is called “patchwork without a needle.” Even a child can master it.
With the help of kinusaiga they create paintings, decorate boxes and boxes, make New Year's toys and Easter eggs. Furniture, lampshades and other interior items are decorated in this way.
To make a painting using the Kinusaiga technique you will need:
- polystyrene foam at least 1-2 cm thick (the Japanese use wooden boards as a base);
- sketch;
- pieces of fabric: it’s easiest to work with fairly thin, non-flowing fabrics that hold their shape well (the Japanese prefer to use silk);
- a nail file with a thin sharp edge, a ripper, an awl or other similar tool;
- stationery or breadboard knife;
- glue: some prefer glue sticks, others prefer PVA, experienced craftswomen work without glue at all.
Work begins with creating a sketch. If your drawing grades have always frustrated you and your parents, then find a picture you like on the Internet. For the first works, it is better to choose drawings without small details.
Using carbon paper, transfer the design onto the foam. Instead of foam plastic, you can use ceiling tiles, but working with them is somewhat more difficult, because... it's quite thin.
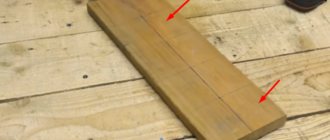
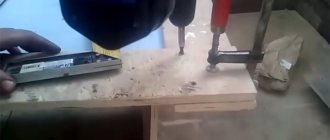
Using a breadboard or stationery knife, go over all the lines of the drawing (photo 1 in the collage). Your goal is to cut shallow grooves - 2-3 mm (if the foam is thick, then up to 5 mm is possible).
And now the most interesting part begins - the actual creation of the picture. However, in kinusaiga, fabrics, rather than paints, are used for painting. Cut out a piece of fabric of the desired color and size (it should be several millimeters larger than the actual contours of the picture) and attach it to the desired place in the picture. To make the fabric non-slip and easier to work with, spread the surface of the foam with a glue stick. Push the edges of the fabric into the grooves (Image 2).
Do this with each piece until you have “painted” the whole picture. Glue a sheet of cardboard onto the back of the painting and frame the work (photo 3).
Goby
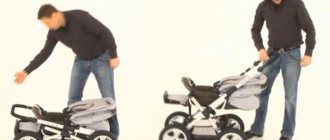
And now the time has come to find out: how to sew a toy, the symbol of this year! We offer a pillow bull pattern for beginners.
- Scale this toy pattern for yourself.
- Transfer to fabric.
- We decorate the upper decorative part of our pillow. We sew all the elements on top of one upper part of the body: muzzle, spots, tail, paws with a decorative seam or stitch. It is advisable to use fabric for all small parts that does not require additional processing.
- Separately sew and stuff the ears, leaving the bases open.
- We connect the two main parts of our pillow toy, not forgetting to sew ready-made ears near the head. We turn it inside out, steam the seams, and close the holes for stuffing with hidden seams.
Rugs made from pieces of fabric
Fabric scraps can be used to create soft rugs for the bathroom, hallway, bedroom, etc. You don’t need to have any skills to do this – anyone can do this kind of work. Rugs can be made plain or colored, round, rectangular or square, the ribbons in them can be placed randomly or create a specific pattern - it all depends on the fabrics you have and your desire.
To create a rug from scraps you will need:
- strips of fabric;
- plastic mesh (the most affordable option is construction mesh) with square cells, the most convenient cell size is 10x10 mm.
Cut the fabric into strips 10-15 cm long. The width of the strip depends on the density of the fabric: if you have thin knitwear, then make it 5 cm wide, and if you decide to use leftovers from a thick terry robe, then 2 cm is enough.
To create rugs, it is better to use non-friable, slightly stretchable fabrics; the ideal option is old knitted T-shirts.
After the strips are cut, get to work:
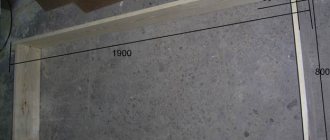
- Cut a piece of the desired length and width from the mesh: add 3-5 cm to the desired size of the rug on all four sides.
- Tuck the edges of the mesh (3-5 cm) inward along the perimeter. They need to be fixed so that the mesh does not fray over time. To do this, tightly cover the rug around the edges with a long strip of fabric (photo 1 in the collage).
- Proceed to the main part of the work. Your goal is to secure the strips in the cells (you need to move from the edges of the mat to the center). This can be done in two ways: either tie regular knots (photo 2), or make a fastening with a lock, which is used in macrame (photo 3).
If you don't have a mesh, you can use matting or burlap instead (photo 4). However, in this case, it is better to take thin fabric for the stripes and pull it through the holes not with your hands, but with a crochet hook.
Leopold the cat
During all the problems and crises, I always want to sing: “We are going through this trouble!” And to make this happen easier and faster, we can sew a toy with our own hands.
- Trace the templates, not forgetting the seam allowances.
- Let's start with the legs. We have 4 identical parts. We sew, turn, stuff. Leave the bottom open to connect to the body.
- We also separately assemble the tail and ears, which we sew into two folded parts of the head.
- To assemble the lower part of the cat, place one body piece face up. On the lower part we attach the finished legs and tail with pins, towards the center. Place the second piece on top and sew with one seam, without sewing up the neck.
- We insert the filler very well and tightly into the body and head of our textile toy.
- We connect them together with hidden, hand stitches in the neck area. We tie a bow, like in the cartoon, to cover the seam.
- All that remains is to design the face and Leopold is ready! It was such a pleasure to sew it.
Dog toys
You can, of course, buy a dog toy at a pet store, but why spend money on it if you can make it from leftover fabrics. To make a toy for a pet, it is better to use strips of fleece or knitwear (for example, from old T-shirts).
- Take 3 long strips of fabric.
- Make cross-shaped cuts in the tennis ball on two opposite sides. Pass fabric strips through them (photo on the left in the collage) and tie knots on both sides. If you still have a ball from your dog's previous toy, you can use it (photo on the right).
- Weave braids about 20 cm long on each side. Then connect them together and braid one braid from all the strips at once.
- Finally, tie the fabric tightly and trim off the excess.
From the remnants of the fabric, you can also weave ropes for the dog and tie them at the ends with knots (central photo).
Volumetric hippo
Another adorable character who won the hearts of all the kids! We often see these toys in themed clothing: a hippo policeman, a hippo fashionista.
Instructions:
- fur, suede, or soft fleecy fabric (you can take fabric in a contrasting color for the tummy);
- needles, threads, pins;
- beads, buttons.
1. Decide on the size. If you want a little cutie for the palm of your hand, the pattern should be miniature in the area of 7-10 cm along the back of the body. If you want it to be the size of a pillow, take this into account when cutting.
2. Place the parts of the legs right sides together, sew them at a distance of 0.5 -1 cm from the edge, leaving the bases of the legs unsewn. Iron the seams, turn them inside out and stuff them with filling.
3. Assemble the head. We fold the ears right sides together, stitch them, turn them inside out, and stuff them. Sew the head part along the darts to create a voluminous face. Sew the resulting blank into the front part of the head. Place both parts of the head right sides together, not forgetting the ears. Sew, leaving the base unsewn. Turn it out and stuff it evenly.
4. We sew the tummy detail into the body.
5. We connect all the parts, distributing the stuffing well.
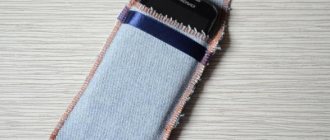
Bags for storing items
From fabric scraps you can make bags for storing all kinds of items. These bags will come in handy anywhere:
- in the nursery - for toys;
- in the kitchen - for cereals and storing bags (you can, of course, store bags in a bag, but they look more interesting in bright bags);
- in the workshop - for yarn, creative tools, etc.;
- in the bedroom - for aromatic herbs;
- in the hallway - for combs, gloves, keys;
- in the bathroom - for creams, shampoos, etc.
You can also sew small gift wrappings from leftover fabrics.
Baskets made of cord and strips of fabric
If you don’t know how or don’t want to sew, it doesn’t matter! To create baskets from fabric scraps, you can do without sewing. To work you will need:
- thick cotton cord;
- narrow strips of fabric (3.5-4 cm wide);
- glue gun
Find a shape for the future basket. It could be a salad bowl, a round box, a bucket - anything. After that, get to work:
- Wrap the cord along its entire length with a strip of fabric (increase its length by simply placing a new piece under the end of the old one). To ensure that the fabric adheres well to the cord, glue it with hot glue every 5 cm.
- Start shaping the cord into a basket shape. First make the bottom, and then gradually move on to the walls. As you work, constantly use a glue gun, gluing coil to coil in several places.
- Finally, secure the edge of the cord with hot glue to prevent it from fraying over time.
If you wish, you can make a lid for your basket in the same way.
General rules for needlework
In order for a thing to create a pleasant impression, it must be made accurately in geometric terms and be neat. To do this, you need to follow some rules:
- To prevent an item processed using patchwork technology from shrinking after washing, the purchased fabric must be washed and ironed.
- If a previously used fabric is used for work, it must be treated with a solution of water and starch and ironed.
- To mark the fabric, use only soft crayons or, in extreme cases, a bar of soap. Ink pens and pencils will not work in this case.
- The fabric should be cut in the direction of the grain thread. This will help avoid unwanted deformations when stitching.
- To avoid deformation, strips and flaps of fabric must be smoothed across.
- All patches with images must be ironed in the same direction.
If you plan to manufacture a large item, you should first create a smaller sample of it in order to correct all the shortcomings in advance and finalize the design.
Kitchenware
The kitchen is the place where almost anything can be done using fabric scraps, especially if it is a country kitchen. We list the main kitchen items made from scraps:
- potholders,
- tablecloths,
- covers for stools and chairs,
- hot coasters,
- serving napkins,
- aprons,
- organizers for cutlery and kitchen utensils.
And this list can be continued. If you decide to dispose of excess pieces of fabric, then the first thing we advise you to do is go to the kitchen. Your imagination will have room to run wild there.
Panels and paintings
Decorating your apartment with unnecessary fabric scraps is another way to put them to good use. For example, make original paintings and panels. The simplest option is to cover corrugated cardboard, foam plastic or other dense base with a piece of fabric of a suitable tone. Several of these panels, arranged in a group, will become the highlight of your interior.
Panels can be made not only from large cuts, but also from small pieces of fabric. It's very easy to make. Glue your favorite scraps in random order onto a thick fabric stretched over a base (lower right photo in the collage) - and the interior decoration is ready. Such a panel would look appropriate in a children's room.
If you are an artist at heart, then try creating paintings from fabric scraps. Textile products of this type are most often created using the appliqué technique: pieces of fabric are sewn to the background by hand or using a sewing machine.
However, a picture from scraps can be made even without the ability to sew (central photo in the upper half of the collage). You will need a large number of scraps of different sizes and colors, PVA glue, a brush and a lot of patience.
The process of creating a picture from pieces of fabric:
Draw the outlines of your future painting onto the base fabric. If you have large fabric scraps, cut them into smaller pieces. Apply glue to part of the base and place a piece of fabric over this area. Smooth everything down with a dry brush. Glue all the pieces in the same way. If the painting is multi-layered, then after applying each layer, give it time to dry. Frame your artwork and hang it where you can see it.
Original, bold, unconventional: sewing from scraps of unusual things
Do you want to stand out and emphasize your individuality? You don't have to change your entire wardrobe to do this. It is enough to complement the look with one or two accents to give the image uniqueness. Bags, shoppers, clutches, brooches, hairpins, bracelets, earrings, necklaces - these are just a few that can be woven, glued, sewn from scraps and scraps of different fabrics.
Various textiles are suitable for jewelry and accessories: denim, linen, cotton, silk, brocade. Scraps of braid, buttons, lace, beads, laces, stones and much more will be used. All the accumulated junk can be turned into a unique thing that will add color to your image.
We hope that fabric crafts will captivate you into the world of handmade crafts. After all, you will not only give a second life to old things, but also acquire a new hobby, involve children in creativity, solve the problem of comfort and arrangement of your home, gifts for all occasions. And for some, the opportunity to earn additional income will open up. Dare, try, create!
Protective masks
It goes without saying that in this difficult pandemic year we could not ignore the topic of protective masks.
Just a year ago we believed that a mask was a product of white or bluish (greenish) colors. Now it turns out that masks can come in all colors and shades. They are sewn from fabric with polka dots, checkered, striped, floral, plain, colored, etc. To make a mask, you don’t need large cuts - rather modest pieces are enough, so leftover fabrics will come in handy for this work.
Masks sewn using the patchwork technique look very original. To make them, first a blank is made from scraps, and then a mask is cut out and sewn from the finished patchwork fabric.
Another interesting option for masks is masks with appliqué. Children wear them with great pleasure. Even small pieces of fabric are useful for making appliqués. Fabric patches can be combined with embroidery, sequins, beads, etc.
Step-by-step example of performing patchwork
Blanket
Before starting work, you need to purchase fabric of various colors, filler and make a template.
Execution algorithm:
- Based on the template, you need to cut out the required number of square flaps from the fabric.
- All elements are connected to each other. This turns out to be the front side of the blanket. Iron thoroughly.
- For the base of the blanket, it is best to use fabric of the same tone. Sintepon, or any other filler is laid out with a reserve.
- All three layers are folded together and stitched.
Patchwork is a fairly simple type of needlework that allows a person to reveal their creative abilities and create.