Opening the trunk of a car from a button in the cabin will no longer surprise anyone. Today, such an option on a car can significantly facilitate human labor. Domestic cars have only recently begun to be equipped with such useful options from the factory. But this does not mean at all that this option is not suitable for owners of VAZ-2107 injection and carburetor versions. If desired, you can make a semblance of a foreign car out of any domestic car and vice versa. In this material we will pay attention to the question of how to open the trunk from the button of a VAZ 2107. This procedure is not particularly difficult, especially if there is such a goal.
Trunk lock VAZ 2107
The luggage compartment lock of the VAZ 2107 has a simple design and fails extremely rarely, but sometimes it may be necessary to adjust or replace the mechanism.
Trunk lock malfunctions
Malfunctions of the trunk lock on Zhiguli cars of the seventh model are usually associated with malfunctions of the cylinder. In this case, the lock will need to be removed from the trunk lid and disassembled to replace the part. As for the adjustment, it is carried out when the luggage compartment lid does not close well or knocks while driving.
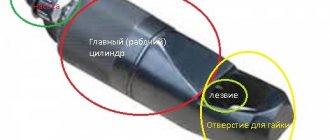
The trunk lock of the VAZ 2107 consists of the following parts: 1 - rotor axis; 2 — housing cover; 3 — drive extension; 4 — lever; 5 - spring; 6 - rotor; 7 — body; 8 — clamp; 9 — retainer plate
Trunk lock repair
To carry out repair work on the trunk lock, you will need to prepare the following list:
- wrench 10;
- installation;
- pencil;
- new lock or cylinder;
- Litol lubricant.
How to remove
To remove the luggage compartment lock, perform the following procedure:
- Mark the position of the lock on the lid with a pencil.
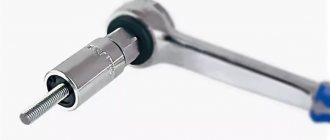
- Using a 10mm wrench, unscrew the 2 nuts securing the lock.
- Disconnect the mechanism and remove it from the car.
- By pushing the larvae inside the lid, it is dismantled.
- Remove the cylinder together with the spacer bushing.
- If necessary, remove the seal from the lock.
Replacing the larva
If the need for dismantling is due to replacing the cylinder, then before installing a new part, the mechanism is cleaned and lubricated with Litol. If the lock is completely replaced, the new parts of the product are also lubricated.
How to put
After lubricating the lock, it is installed in the following sequence:
- Insert the sealing element into the luggage compartment lid.
- Place the lock cylinder in the spacer sleeve.
- Mount the cylinder together with the bushing into the lock.
- Install the lock on the trunk lid in accordance with the previously made marks.
- Fasten and tighten the mechanism with two nuts.
How to adjust the trunk lock
If the trunk lid lock on the “seven” closes with difficulty, it needs to be adjusted relative to the locking element. To do this, loosen the fasteners and change the position of the mechanism so that the latch easily fits into the body and the lever secures it well, and there is an equal gap between the luggage compartment lid and the body over the entire area.
Adjusting the trunk lid
Sometimes it becomes necessary to adjust the trunk lid. It happens that the part is located above the rear wings or is shifted to the right or left. If the trunk lid can be moved to the sides by unscrewing the fastening nuts on the hinges, then with an incorrect height position the situation is somewhat different.
The trunk lid is adjusted using hinged mounting nuts.
To adjust the lid in height, you will need to open it completely and, holding the edge of the lid with one hand, apply force in the hinge area with the other. A similar procedure should be repeated on the other side.
If the trunk lid is not positioned correctly relative to the rear wings, the hinges must be slightly bent
The main thing is not to overdo it. Then close the lid and check the tightness of its fit. If necessary, repeat the procedure. To adjust the force of opening the trunk lid, the edges of the torsion bars of the springs are shifted to one of the teeth of the luggage compartment hinges.
How to open a car if the battery is dead?
Quite often, motorists cannot open their car for another reason - the battery is dead. And in this case, a new battery that you installed recently does not guarantee absolutely anything. To completely discharge it, it is enough to leave the car with the low beam headlights on. The battery is discharged, the alarm is turned off and the door is blocked. What to do in this case?
Most often, the lock can be opened with a key, after which a new battery is installed in the car. But often it is not possible to use a mechanical lock. It can simply freeze in the cold. And there are plenty of other reasons why a mechanical lock refuses to work. And if so, then you cannot do without special methods that allow you to open a car with a dead battery.
Video: Opening a Renault with a dead battery
Method No. 1
A special pad will help us out again, which this time needs to be inserted between the body and the hood of the car. If you can use it to make a small gap, then all that remains is to connect, for example, the positive terminal of your car’s battery with a wire to the positive terminal of another car, having previously secured the “negative” wire to the wheel rim, and at the moment of connection press the button on the key fob. It is more convenient to do this operation together.
Method No. 2
If there is no special pad, and most often this is what happens, then you will have to crawl under the car and try to gain access to the generator. On some models this is very easy to do, but it is possible that in your case you will have to tinker and, for example, remove the engine compartment protection. If access to your car’s generator is open, then all that remains is to find a fresh battery and two power wires with a cross-section of about two square centimeters, each of which must have alligator clips at its ends.
When you have all the necessary equipment, find the positive bolt of the generator and connect it to the positive terminal of the battery. The negative terminal of the battery, as in the first case, is connected to any metal part of the car, which in this case will serve as a “ground”. Please note that the positive terminals are closed first, and only after that the ground is connected. If everything is done correctly, then immediately after connection the car alarm should work, and the car itself can be easily opened using the key fob. Naturally, to get under the car you will need a jack. Read how to use a jack in a safe manner here.
Method No. 3
This method seems too obvious, but for some reason it is most often forgotten. If the locks on the doors of your car are frozen or refuse to work, this does not mean at all that the lock on the trunk lid is also faulty. Check it out.
If you manage to open the trunk, then all that remains is to squeeze out the folding part of the rear seat and get into the cabin. It is done. All that remains is to open the hood and charge the dead battery.
Well, the easiest way is to observe basic caution and turn off all energy consumers before parking the car. It doesn't hurt to keep a spare set of keys with you. In this case, you will never have to solve problems with a car that has suddenly become inaccessible to you.
How to open a car without a key due to a dead battery
Most car owners have probably experienced situations where, for some other reason, the car key ended up being locked in the car itself and was completely lost. How then can you open a car without a key? We will try to find the answer to this common rumor question. The main thing is not to despair. You are far from the first person who, after clearing snow or, in other words, pumping up a wheel, suddenly realized that the car was locked and the key to it was inside.
Thresholds
The main purpose of the thresholds is to protect the vulnerable sides of the car body. For this reason, thresholds are often susceptible to damage. In addition, when getting in or out of the car, passengers and the driver periodically come into contact with them, scratching the elements with their shoes. As a result, the paintwork comes off from them, which causes corrosion and rotting.
On the “seven”, the classic replacement or repair of a threshold begins with adjusting the door hinges. If this is not done, then it will not be possible to replace the threshold correctly due to the gap.
After this, the following is done:
- The doors are removable;
- The threshold is cut off (first the outer part, then the amplifier);
The new amplifier is welded through the holes on it, as in the photo below;
A new threshold is set.
The price for a set of thresholds for VAZ 2107 starts from 200 rubles. The thickness is usually 2-3 mm.
The remaining body parts of the VAZ 2107, such as doors and trunk lid, also have a significant place in the design of the body and its geometry.
Each of the body elements of the “seven” has its own ID number, casting pattern and thickness. So, for the roof - 0.9 mm, and for the rear wheel arches - 1 mm.
Optimizing space in the seven
It is not at all necessary to have an apiary for twelve hives or a serious homestead, so that sometimes you need to transport a fairly large load or a lot of small items. Situations are different, and especially when going on a trip in a VAZ 2107, not everyone wants to burden themselves with a trailer. This is why there are additional luggage racks.
But first, let’s deal with the standard, ordinary trunk of the seven. It is far from the ideal of rational distribution of space, in fact, as in all classic Zhiguli cars. The side members, wheel arches, niches, gas tank and rear suspension cups form a kind of labyrinth for dumping all sorts of rubbish. Only the size of the trunk of a VAZ 2107 is quite difficult to measure with a tape measure. It turns out to be an intricate figure, however, there are heroes who did it. The photo shows the dimensions and geometry of the trunk.
Kit selection
Installation will not be possible if you do not have at your disposal a set of equipment necessary for installation. Buying it is not difficult, but you need to think about which specific option is best for you.
In total, 2 solutions to the current situation are being considered. Namely.
Safety kit
Category: Light trailers
- Factory set. Purchased from trusted and reputable manufacturers. The kit contains almost everything you need, so you don’t have to assemble different elements. But the price is naturally higher;
- Amateur kit. Here we are talking about independently preparing all the necessary components. The motorist is faced with the question of where exactly to get them and how to choose a set so that everything fits. It is difficult to do this without relevant experience and certain knowledge. But you can save a lot of money financially.
I don’t know what exactly you will choose, but I want to give one piece of advice. Buy an electric drive equipped with an inertia mechanism. This will allow you to turn off the drive when an obstacle appears in the path of the luggage compartment lid. Roughly speaking, the drive will not pinch your hand or head when you poke around in the trunk.
So the inertial mechanism is a very useful thing.
If we talk about assembling a homemade kit, then it is important to collect several basic elements. These include:
- power window module 2 pieces;
- 2 mechanisms for lifting glass;
- wires;
- diodes;
- electromagnetic relay;
- five-pin relays;
- four-pin relays;
- Relay connection block;
- springs for the lid lock;
- power tools;
- wiring;
- nuts, bolts;
- Bulgarian, etc.
As you can see, the set is quite impressive. Therefore, consider whether it is worth trying to assemble the kit yourself. Sometimes it is much easier and even more economical to purchase a ready-made factory kit with a guarantee and all the associated benefits. Price does not always play a key role.
Subtleties of choice
When choosing a trunk, carefully study the types and information about the load capacity. If the trailer has a spring suspension of any design, which facilitates maneuvers over bumps and holes, then in the case of a roof rack on a car, with a shock-absorbing suspension of the car, it is separated by that very roof. It does not have pronounced properties to level out vibrations and take on the vector impacts of the load mass. But a body with inter-window pillars is a damper between the road and an additional high center of gravity. Therefore, they attach the trunk as low as possible to the roof, even one centimeter is important.
Trunk design
The golden rule: if the car has a pair of roof rails, then the corresponding cross members are selected. The dimensions must correspond to the distance between the rails
This is critical for even distribution where most of the weight is on key fasteners
If there are no elements, a set of fasteners is used to establish a connection between the trunk and the top of the car. The components of a basic trunk are few:
- Longitudinal arcs.
- Cross bars.
Support struts, which consist of:
- Brackets.
- Corners.
- Plastic platforms.
- Bolts, nuts and washers.
In practice, car racks come in different forms. The material used and the mechanical properties of the fasteners, together with the performance of the vehicle’s roof, determine the design and future purpose of the device.
Easy luggage rack selection
When purchasing a roof rack for your car, you should check:
- Vehicle make.
- Roof and body type.
- Year of manufacture of the car.
These parameters will help you avoid mistakes when purchasing. Subtleties follow
It is important to know what the roof rack supports and roof mounting rods are made of. They are made of steel and aluminum
When using the trunk for a short period of time, they stop with steel fasteners. With prolonged use, they become unusable and worsen their aerodynamic properties.
Advantages of aluminum racks:
- Anti-corrosion coating. With it, the service life increases significantly, therefore, the car owner saves money.
- Improved aerodynamics. The lower the air resistance, the more fuel the car saves.
- The aluminum basket is lighter. Installation and dismantling occurs quickly.
- An important parameter is the size of the structure. It is better to use a car trunk with adjustments.
Trunk mounting methods
Let's look at ways to attach a car rack to the roof:
- Full-time. When purchasing a car, the luggage rack fasteners are already included. And the mounting holes are hidden behind the door seal. This option is convenient and allows you not to waste energy searching for the necessary equipment. To ensure that the racks hold tightly, the set uses special bolts.
- Universal. Also called door. Installed using universal fasteners, fixed in the area of the body's counter-relief, which follows the bend of the door. This option is expensive to install and takes time. Only a specialist can select the exact model of a universal trunk.
- Use of roof rails. A large number of vehicles have roof rails. These are devices that run parallel along the roof on both sides, made of plastic or metal. With their help, even installing a car rack yourself is much easier. Sometimes roof rails are equipped with mounting points to facilitate the installation process.
Important points
Even after the above information, the economical driver will say: “So what? A special trunk is expensive, the box is small, and an expeditionary one is certainly not needed. I will assemble from different sets.” Today there are all luggage racks with all the components, but if such a car owner manages to assemble the suitable parts separately, after the fifth time, he will pass on his experience to his colleagues in the garage:
- Crossbars and roof rails are selected by measuring the roof.
- Simple supports are made of cheap plastic. Therefore, they are susceptible to destruction, since they cannot tolerate both heat and cold.
- It is more practical to use stands made of aluminum, steel or ABS plastic. They will last much longer without losing their properties.
- The larger the volume of the trunk, the more things it can hold.
It’s convenient to have a large trunk and not think about how much space is left in it, but:
- You will have to pay extra for the volume.
- Increased fuel consumption.
- The design will have deteriorated aerodynamic properties.
Any model has a permissible load. When purchased, an incorrectly selected car rack will lead to deterioration in vehicle control and rapid wear of the structure. The roof of the car also has a permissible load capacity.
Pros and cons of homemade products
The most common types of homemade roof racks are a car box and a welded structure consisting of aluminum or steel profiles.
The box on the roof of the car has a rather attractive appearance and, most importantly, does not interfere with the aerodynamic performance of the car. But making it yourself is quite difficult and expensive. It is included in the factory equipment, which is developed for a specific car brand, most often for SUVs.
The roof rack rack is a more functional design. The volume of the rack compartment on the roof of any VAZ model is two to three times greater than the volume of the car box on a Toyota SUV.
The main disadvantage is that fuel consumption increases to 1-2 liters per 100 km with a load of 50 kg.
The average speed of a car with a load of 50 kg on the roof should not exceed 70-75 km/h.
How to install a power lock on the tailgate
Before installation, you should prepare a set of necessary tools and additional materials. So, we will need:
- Connecting wires.
- Terminals.
- Insulating tape.
- Safety fastenings.
- Set of wrenches.
- Several screwdrivers (flat and figured).
- Wire cutters.
- Pliers.
To begin self-installation of the electric trunk lid drive, you must dismantle the plastic lining located on its inner side, which blocks access to the lock. Almost always, when purchasing this device, sellers offer to additionally purchase a lock that has already been modified for it. You should not ignore this offer, since purchasing it will allow you to avoid a number of trivial problems when installing the entire mechanism and will additionally save a lot of time and nerves. The next stage of installation will be laying the wiring to the lock from the cigarette lighter power supply. The choice of a cigarette lighter is justified if this element is almost never used. In addition, if necessary, the device can withstand increased loads. In order to power the electric lock, it is necessary to disassemble the cigarette lighter input to install a fuse between it and the drive start button.
The drive button can be installed in any convenient location. After this, we move on to laying the power wires along the thresholds of the car. This will require about 3.5 meters of cable. The final stage of installation will be the installation of a modified trunk lock, followed by its connection to the network and configuration
When connecting the electric drive, it is important not to reverse the polarity, otherwise the armature of the electric motor will rotate in the opposite direction, as a result of which the mechanism will not function. It would also be advisable to install a fuse in the circuit directly in front of the electric motor in order to avoid its possible failure
What external “symptoms” indicate that the damper is dirty?
Problems in the operation of the throttle assembly do not always arise only due to the formation of deposits on the valve. These can be caused by failure of the position sensor, malfunctions of the drive and other malfunctions.
Even if you are not sure that the cause of the malfunction lies in the throttle valve, it is worth checking this unit and cleaning it in order to delay as much as possible the moment of formation of deposits, which sooner or later destabilize the operation of the engine.
If a problem arises with the electronic throttle, it is better to contact a service center - specialists will help you figure out its causes without the risk of damaging the mechanism.
What do you need for work?
A similar connection diagram for the trunk button attracts many.
To realize your idea, you need to prepare materials and tools.
The set consists of:
- electric drive (activator) of the luggage compartment lock;
- universal 4-pin relay;
- fuse blocks;
- fuse;
- wires;
- female type terminals;
- trunk opening buttons;
- heat shrink tube;
- electrical tape;
- plastic clamps.
The block is placed for safety reasons. Mounted on the positive wire. The fuse can be taken as standard, 10 Ampere. Do not need anymore.
Determine the length of the wiring individually. But practice shows that 5-6 meters is enough with a margin.
At any car market it will not be difficult to buy the entire set. It will cost 600-800 rubles. Maximum 1000 rubles.
Preparation for installation
We purchase a lock kit. There are a lot of manufacturers of auto parts on the market now, but there are no special differences between the kits
It is important that the device has a warranty card and instructions for use and connection. Also in the box you will find:
- Activator;
- terminal;
- Wires;
- Relay.
Additionally, you need to stock up on a set of standard tools: pliers, screwdriver, screwdrivers, multimeter, drill with carbide drill bit. In addition to the standard accessories, immediately buy additional wires; it is quite possible that the length of those you find in the box will not be enough for you. Black heat-resistant insulating tape, corrugated tubes, and clips for fastening the trim will also be useful, since very often the trim of car elements is attached to disposable ones.
Device set
Equipping a domestic car with an electric trunk drive
If you install an electric drive for opening and closing the trunk on a domestic car (for example, a VAZ), the basic elements of the mechanism alone, which are already far from cheap, will not be enough. You will also need to install a trunk closer. Therefore, this method of improvement is irrational.
To bring this idea to life, you need to buy two ESP mechanisms (for example, consider products costing about three thousand rubles), a trunk lid control button (type 21100-3710620, cost 50 rubles) and a car window closing module (brand DenUp-RWC702m, price – 500 rubles).
In our example, power windows are installed in the luggage compartment of the Lada Priora using a simple connection. The rear edge of the ESP rail is connected by a threaded connection to the crossbar at the back of the seat, on which the shelf rests. The front end of the window regulator bracket with a welded nut is screwed to the rear window mounting beam. To do this, a groove is cut in the beam into which an M6 nut would fit.
As a result, the assembled structure works without problems when you press a button specially located in the interior or on the remote control.
The mechanism of two ESPs is free of these troubles. In some cases, the lock position will need to be adjusted.
System TIDA-01424
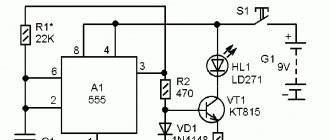
The block diagram of the TIDA-01424 reference project is shown in Figure 3. The main elements of the board are two PGA460-Q1 ultrasonic rangefinder microcircuits, which perform all the main work associated with analog signals.
Rice. 3. Block diagram of TIDA-01424
The measurement results, which are essentially the distance to each object detected by the sensor, are compared to user-defined optimized threshold levels and used to make subsequent decisions. The flexibility of the system is due to the ability to receive digital data directly from the PGA460-Q1 rangefinders via the USART serial interface and use them as input data for the gesture recognition algorithm.
The main components of the analog part of the system, including two rangefinder chips PGA460-Q1 with matching ultrasonic transformers and other necessary wiring, a 3.3-volt LDO stabilizer TPS7B6933-Q1 and a TPS3700-Q1 monitor with a power intelligent power switch TPS1HA100-Q1 are mounted on a compact double-sided BoosterPack format board. A special feature of this form factor is the presence of a 20-pin connector, which carries USART signals and several standard input/output ports (GPIO). This connector is fully compatible with LaunchPad microcontroller boards manufactured by Texas Instruments. It is on such a board, running the MSP430F5529 microcontroller, that the rangefinder signal processing algorithms are implemented, the source code of which is available for free download on the Texas Instruments website.
The system is powered by a standard 12-volt battery. At the same time, the system has protection against polarity reversal, undervoltage and overvoltage, and can easily withstand overvoltages of up to 40 V, which arise, for example, during problems in the vehicle’s on-board network.
In passive mode, with the ultrasonic emitters turned off, the current consumption of the system is less than 100 μA, which allows it to be connected directly to the battery without the risk of significant discharge of the latter.
All system components are designed for use in automotive applications and have a corresponding temperature range of -40...105°C.
The overall system consists of two boards (analog signals and a microcontroller), indicated in blue in Figure 3, and requires the connection of only three external components: two ultrasonic sensors and a power supply. The main technical characteristics of the system are given in Table 1.
Table 1. Main technical characteristics of TIDA-01424
| Parameter | Meaning |
| Number of ultrasonic transceivers | 2 |
| Type of ultrasonic emitters | Sealed with transformer control |
| Operating supply voltage range, V | 6…18 |
| Permissible supply voltage range, V | -20 (reversal of polarity)…40 (sharp loss of battery load) |
| Current consumption in operating mode, mA | no more than 40 |
| Current consumption in off mode, µA | no more than 50 |
| Object detection range, mm | 200…500 |
| Gesture duration, s | 1…4 |
| Sampling rate, samples/s | 5…40 |
| Printed circuit board | Double-sided, BoosterPack form factor |
All about the roof rack VAZ 2107
Cars of the VAZ “classic” family enjoy well-deserved love, including as economic “horses”. These cars carry trailers, building materials stick out of the windows, and, of course, every self-respecting summer resident has a special roof rack for transporting oversized and long cargo.
First of all, you need to decide on the dimensions of the VAZ 2107 trunk in order to know what maximum dimensions of cargo can be placed in the trunk with the lid closed. Here they are:
Everything that extends beyond these dimensions must be placed on the roof of the VAZ 2107 and transported on the top, removable trunk. This is especially true for long items. Materials such as boards, sticks, floor slats, if they do not exceed 4.5 meters in length, may not be marked with red marker flags. In the event that they protrude beyond the front and rear bumpers, they must bear the oversized load mark. This is especially true at the rear end.
There is an explanation for this: the front end is clearly visible to the driver, and he himself makes sure not to drive too close at the traffic lights.
The roof rack of the car is designed for a weight of no more than 50 kilograms. If the driver is sure that the road will be perfect, without the slightest holes, bumps and vertical vibrations, then you can put 75 and even in extreme cases 80-90 kg, but no more. Carrying heavier loads will cause deformation of the body structure, and this leads to disruption of the opening and closing of doors.
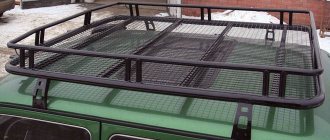
The photo shows an old trunk that was produced in the USSR. Its weak point is its “bowl-shaped” shape with raised edges. On such a trunk it is difficult to transport barrels placed on the roof, sheets of cellular polycarbonate rolled into cylinders due to the small number of points of contact.
Currently, all “classics” have high-strength and lightweight roof racks that fit all car models, from VAZ 2101 to VAZ 2107. They are made quite durable and lightweight, and are coated with anti-corrosion powder paints.
The supporting system itself, as a rule, is hollow box-shaped bars made of strong sheet metal, square in cross-section, which are located in a single row, in the amount of 6 - 8, connected at the ends by supports that give rigidity to the structure. Four support mechanisms, which have different designs, are attached to the supports. Most often they are made using eccentric - tightening screws.
In order not to scratch the profile of the VAZ 2107 drain, to which the trunk is attached, the contacting parts are equipped with inserts - polyethylene liners.
When installing a trunk on a VAZ 2107, you must follow two rules:
- The edges of the trunk should be at an equal distance from the windshield and rear window - this ensures correct alignment and distribution of the load on the roof;
- When tightening, you must maintain uniformity. There should be no unevenly tightened eccentrics;
It is even more important to follow the rules for securing cargo on the trunk.
The most important thing is that the loads are securely fastened in the anteroposterior direction
When the vehicle brakes in an emergency, heavy loads occur and cargo can be torn off the trunk. When driving with a loaded rack on roundabouts and long turns, you need to drive slower than usual and evenly, otherwise the angular acceleration may be too strong and the load will be torn to one side. When transporting long boards and whips, you must be very careful when starting, accelerating and braking, as the ends of the whips “play” and rock the car, causing vibration. Particular attention should be paid to transporting bulk cargo in strong winds - if possible, you should avoid this and wait for calm weather; Loads with a large area and resistance (rolled covering material, empty barrels) must be secured especially carefully; While driving, listen carefully to the sounds on the roof. Take the time to go out several times and check the reliability of the fastening of the cargo and the trunk itself.
By applying these simple rules, you can avoid troubles associated with a sudden drop and damage to the load, or - even worse - creating an emergency situation on the road.
Luxury or necessity
The automatic trunk opening feature is found in many new cars. Drivers like this feature, because you quickly get used to good things. To open the luggage compartment in a car, just press a button in the cabin. The lock comes into operation as a result of the operation of the electric drive.
This feature may seem like a small thing and an insignificant addition until the cold weather arrives. In cold weather, the lock on the trunk often freezes, making opening the compartment a difficult task. You have to spend time defrosting the mechanism. In the case of an electric drive, such problems will not arise. Also, such a mechanism makes car hacking more difficult, which is also an important advantage.
Mostly imported cars are equipped with this function, and not all of them. Domestic manufacturers have only recently begun to equip their models with such functionality. Every car owner can equip his car with an electric drive for the trunk. This will not be difficult to do, but you will still have to tinker.
Let's figure out why the throttle gets clogged
Like any vehicle component, the throttle valve must be serviced periodically. A common problem with this unit is blockage.
The throttle can become clogged for several reasons:
- Dust on the roads. Despite the location of the damper after the air filter, dust particles still enter the throttle air duct. If the filter itself is already dirty, then larger dust fractions enter the choke.
- Crankcase ventilation. On many modern cars, crankcase gases are cleared of oil in the oil separator and enter through the throttle into the intake system along with ordinary air. This principle is being implemented to comply with environmental standards.
- Exhaust gas recirculation. This system began to be used relatively recently, but has already become popular among automakers. The exhaust gases from the exhaust manifold again flow through the throttle into the intake for afterburning.
Now imagine that oil particles from the crankcase gases combine with dust and/or carbon particles from the exhaust gases. A dirty, oily film is formed, which constantly settles on the damper. After tens of thousands of kilometers, a layer of this dirt will disrupt the operation or completely disable the throttle assembly. Therefore, periodic cleaning of the throttle body is important for proper engine operation.
Alternative trunk opening for VAZ 2107
Many owners of domestic cars, due to the lack of opportunity to purchase a more expensive vehicle, are trying to make their cars more comfortable. One of the options for improving the functionality of the VAZ 2107 is to control the trunk lock from the passenger compartment. This can be done either using a button or using a cable, which eliminates the need to open the mechanism with a key.
Opening with a button
As the owner of the “Seven”, equipping the car with a device for opening the trunk with a button will not be difficult. The positive aspects of the electric drive include the following:
- convenience;
- practicality;
- following fashion.
Installing a trunk lock control button allows you to control the mechanism from inside the car.
Some motorists believe that such an option on the VAZ 2107 is useless, but it’s still worth trying and seeing the usefulness of such a device. If you have decided to install an electric trunk drive, then first you will need to prepare the necessary parts:
- four-pin relay and a special terminal for it;
- activator;
- wires;
- button;
- female and male connectors, as well as electrical tape and heat shrink.
To install an electric lock on the trunk lid you will need an electric drive, wires, connectors, terminals and a button.
The activator is an electric drive, the operation of which is based on retraction or repulsion, depending on the installation diagram. First you need to remove the lock and install the drive rod. In order to be able to influence the lock tongue, you need to drill a hole in the side of the mechanism and bend the rod itself slightly. Once the rod is secured, the lock can be put in place. To avoid adjusting the mechanism, you should first mark its location with a marker or pencil. Next, you need to secure the electric drive, which will require 2 screws and a plate included with the device. Having fixed the product on the lid, proceed to the connection stage.
To be able to control the trunk lock from a button, you will need to connect the electric drive rod to the tongue, and attach the activator itself to the trunk lid
Before starting electrical work, remove the negative terminal from the battery and study the connection diagram.
Installation of the electric lock is carried out according to the electrical diagram
The electric drive device is supplied with power directly from the battery or through a fuse. Electrical installation consists of the following steps:
- Voltage is supplied from the battery to the relay in accordance with the diagram.
- Relay contact No. 86 is connected to the electric lock control button. The button is located on the dashboard in a convenient place.
- Using a wire, contact No. 30 of the relay is connected to the green conductor of the electric drive using connectors.
- The blue wire of the electric lock is connected to the vehicle ground.
- Check the operation of the device.
Video: installing an electric trunk lock on a VAZ 2107
Exiting the trunk lock cable to the passenger compartment
The trunk lock on the “seven” can be opened using a cable pulled into the car’s interior. To implement this idea you will need:
- cable 4 m long and 1.2 mm in diameter;
- braid 4 m long from bicycle cables;
- braid ends and cable clamps.
In order to be able to unlock the trunk lock using a cable, it is necessary to make holes in the mechanism to thread the cable and secure it to the tongue. Then they lay a cable from the lock to the driver's seat through the trunk lid, and install a suitable lever to open the mechanism. As a lever, you can use the hood opening mechanism from the VAZ 2109, on which the cable is attached. All that remains is to check the operation of the design.
Photo gallery: installation and routing of the cable to the trunk lock
To control the trunk lock using a cable, you will need the cable itself, a braid and some components
The cable is attached to the tongue of the trunk lock to control the mechanism
The cable from the trunk lock is laid to the driver's seat
The cable control lever is installed near the driver's seat
Self-installation
First of all, it is necessary to secure the electric drive to the trunk lid and provide it with a mechanical connection to the lock itself. To do this, you will have to make two cuts on the lock, and bend the resulting free “tongue”. Thus, we gained access directly to that part of the lock, by pulling which the trunk lid will open. Now we attach the long metal stick from the kit so that the lock can close when the system is operating. It is quite possible that you will have to cut off extra centimeters of this pin.
Now our device is installed properly and all that remains is to connect the electrics. To do this, we will use the diagram below.
Important! When working with electrical equipment, remove the battery!
In most cars, electrics operate on 12V positive voltage. However, if you doubt that everything is the same for you, it is better to check with the car dealer and not use this diagram for connecting
It is very important to make the correct connection of the wires, since the proper operation of your car as a whole depends on it. At best, some options will simply not work correctly; at worst, a short circuit will occur.
And it is not always possible to restore the electrics and electronics of the car after it. And this work will cost a lot of money. In addition to the above, lay wires where standard wiring is already laid. In difficult places, for example, when you have to pull the wire from the passenger compartment to the trunk, it is necessary to use protective corrugated tubes.