The article describes in detail how to make a wood milling machine with your own hands with all the details of the working platform - bed, tabletop, base plate, additional protective devices. Step-by-step technologies for converting a drill and washing machine engine into a milling machine are presented, as well as the main points of manufacturing a machine with numerical control.
Features of wood lathes
In a number of cases, a hardworking owner has a desire to make furnishings and utensils that have a circular cross-section throughout their entire length.
Most often these things are:
- Holders for hammers and files;
- Stair posts, flowerpots, handles for railings;
- Rolling pins, potato presses, grape crushers;
- Vertical pencil cases;
- Cups, mugs, saucers, plates, trays, stoppers.
It will be impossible to cut such things with planes and saws. In this case, you will need at least the most primitive machine.
Safety precautions
When installing a milling table, it is necessary to ensure grounding of the equipment and the outlet into which it is plugged in. The current must correspond to that specified in the passport. Before use, connect the vacuum cleaner. It not only removes chips from the cutting area and makes processing cleaner, but also cleans the air from wood particles, dust, and resin that are harmful to humans. The spindle must be locked when installing and changing tools. Use cutters with a shank diameter that matches the collets included with the router.
Each master makes a milling table for himself, inventing his own design or altering the drawings of others. The more work will be performed on the device, the stronger and more reliable the base should be. Lovers of order, who have everything in a strictly defined place, should make a machine from a desk or make the base and cabinets with drawers yourself. In a workshop with a large volume of carpentry work, a combined device with additional space for a jigsaw and a circular saw is suitable. For those who periodically make crafts for the home, a portable table is suitable, which can always be set up in a few minutes and a router screwed to it.
Buying a lathe
Today you can purchase such a device with a click of the mouse by going to a specialized online store. True, such a purchase will hurt your pocket, especially if you choose a high-quality model and not a cheap Chinese craft.
However, this does not mean that the idea of founding a miniature workshop will have to be given up. The problem of high cost can be solved by taking a different route. A simple and durable electrical unit must be made by hand.
Turning round architectural decorations
Such a mechanism will be an excellent help if you need to make inexpensive repairs to a cottage equipped with
- Flights of stairs with wooden balustrades;
- Decorative trims;
- Carved shutters;
- Window earrings.
How to use a sewing machine?
It's hard to believe, but it can also be converted into a jigsaw. How can this idea be brought to life?
- We remove the part that ensures weaving of threads (the lower part of the machine).
- We remove the cotter pin and drive shaft.
- We remove the upper part, which protects the mechanism from mechanical damage.
- We expand the part for the needle for the file.
- Let's modernize the file. The file should not be longer than the needle.
Such a device perfectly replaces a jigsaw for shaped work on plywood and will become a homemade jigsaw that can surprise all your friends and acquaintances.
It allows you to create even the most complex patterns and turns. However, this design has its drawbacks:
- The leg may get tired from working with the pedal;
- Vibrations may occur that complicate work.
If it is not possible to purchase an expensive design, you can get by with small losses. A jigsaw - a machine made independently can be an excellent solution. The main thing is to follow the instructions exactly when working and conscientiously fasten all the elements together.
Consider a table base so that it becomes a reliable support for the mechanism. It is important that the table does not rock or vibrate when the mechanism is running.
The more static all elements are in the end, the easier it will be to work, avoiding unnecessary movements and mistakes. And mistakes in such a matter are most often not acceptable.
A slight change in the angle or position at which you work, and the part may not fit into place or lose its shape. In any carpentry, the most important thing is the accuracy and measuredness of all actions.
A homemade jigsaw machine with your own hands is not such a complicated story as it might seem at first. After studying the article, understanding the basic elements and how to create your own tool, you can get to work.
It is worth noting that very often such a homemade machine is much more convenient than a purchased one. This saves money, but most importantly, this table is personalized. It will perfectly suit your workplace, your height and weight.
Such a design will fully meet the objectives, because the most convenient mechanism can be created only by the person who will use it in the future. In addition, in case of minor breakdowns, it will be clear how to repair and what can be fixed.
For a purchased sample, you will have to look at the instructions and study forums in search of a specific model and its characteristics. Have fun creating, and let the new jigsaw give you confidence and the desire to start a new renovation!
Profitable and promising business
Having gained some experience in the production of decor, it will be possible to move from banal savings to a profitable business. This could be the production and sale of chess pieces. If you sell them through online auctions or retail chains, then an additional source of income will appear in the family budget.
Handmade items quickly find demand, especially if they are offered for sale at a reasonable price.
In the future, this hobby will develop into full-time commercial employment, giving you a chance to acquire professional tools and start earning very good money.
Types of circulars
According to the method of performing the work, circular saws are divided into two types:
- Stationary;
- Hand tools.
Each type has its own characteristics, advantages, and disadvantages. The main difference between a stationary machine and a hand tool is the object of movement. On a stationary machine, the sawn material is moved along the saw blade; the hand tool is moved along the stationary workpieces.
A circular saw is chosen depending on the type and amount of work performed. To make a shelf for books, a stool, or a flower stand, all you need is a hand saw.
For mass production and sawing of long, dimensional workpieces, a stationary installation is used. Many experienced craftsmen have both types of circular saws at their disposal.
Main components
The most important components of such a device include
- Bed;
- Electric drive;
- Front and back headstock;
- Stand for accessories.
Support frame base
The bed is a frame that allows you to connect all the parts into a harmonious mechanism. The strength and reliability of such a support directly determines the stability and durability of the entire device. It is better and easier to use a steel angle to make the frame; another suitable material is a rectangular profile.
First of all, it is necessary to mark the dimensions of the assembled automatic sharpening machine. These parameters are determined by what exactly this machine will be used for. As a rule, a stand for an apartment or garage modification does not exceed eighty centimeters in length.
Frame manufacturing process
The slats selected for assembling the frame must be laid so that their upper edges are strictly in the same plane. The parallelism of these guides is checked by measuring the distances between their ends on each side.
- Longitudinal fragments are secured with clamps. The transverse parts are made from the same profile.
- There will be three crossbars in total. Two of them are fixed at the edges of the device, and the third is placed a couple of tens of centimeters from the left end.
At the next stage, all components are joined by welding into a solid composition. It is important that the resulting connecting joint is strong and smooth.
Option 1. Instructions for making a table for a manual router
Materials for making a milling table
To build a milling table you will need:
- 4 square bars;
- chipboard and plywood scraps, the dimensions of which are determined when constructing the table drawing;
- hardware (nuts, bolts, screws, hinges, etc.);
- jack;
- metallic profile;
- six-millimeter steel plate;
- aluminum guides;
- movable carriage-support (guide from the saw);
- manual frezer.
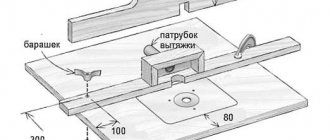
Drawing of a homemade milling table (option 1)
In any case, before you start making any such table, the drawing must be completed indicating all dimensions and determining the location of the working elements relative to each other.
Step by step assembly
Let us consider in detail each step in the manufacture and fastening of each element of a homemade milling table.
1st step. To make a stationary base for the table, you will need bars and chipboard cuttings, from which we twist the legs and further strengthen the rigidity with the help of horizontal connecting panels made of plywood. In the right side part we cut a hole for the start button, which will be connected to the hand router.
2nd step. The table top is made of chipboard. We make it liftable together with a router, for which we install hinges and make an additional support base from 15 mm plywood.
3rd step. To move the workpiece smoothly along the table, for example, to cut a groove in it, a moving carriage-stop is used. We cut a groove in the tabletop for the guides of the movable stop and install a metal profile into it. You can use a guide from an old saw as a stop carriage.
4th step. We also make the longitudinal stop from chipboard and make it movable to adjust the gaps around the cutter. To ensure mobility, we cut perpendicular grooves in the upper part of the stop and fasten the stop to the tabletop with clamps. We cut a small groove in the middle to suck out chips and other milling waste.
5th step. From thin plywood we make a box with a hole for connecting a vacuum cleaner hose, which will remove dust and shavings formed during the milling process. We fasten the box behind the perpendicular stop.
6th step. We take a six-millimeter steel plate and screw it to the tabletop flush with the surface. During the fastening process, we make sure that its edges do not protrude above the tabletop, otherwise the parts being processed will cling to them. A manual router will be attached to the plate from below.
7th step. We attach the router by the aluminum base to the bottom of the plate using bolts, but do not forget to pre-drill holes for the bolts in the base. Attaching the hand tool to a removable plate rather than directly to the table saves routing depth and allows for easy cutter changes.
8th step. We are building a router lift. To do this, we use a car jack, which allows us to change the height of the cutter with maximum accuracy.
9th step. We remove the handles from the router and instead screw in aluminum guides, which we connect to the jack mechanism.
Design and video of a homemade milling table for a manual router
Before you start making a milling table, you need to accurately determine its design features. This article provides instructions on how to make a simple router table. For other details of the first assembly option, see the video below.
We check the reliability of fastening of all elements - and the milling table is ready with your own hands!
We offer several more models of wood milling machines made by yourself for your taste.
Selecting an Electric Powertrain
When choosing a motor to power the turning system, it is necessary to clarify how powerful it is. For the construction of a homemade self-heating unit, an indicator in the range of 1.2 - 2 kW is quite sufficient. In this case, you should find out exactly what scheme the connection is made according to.
For desktop woodworking, a motor from a household centrifuge is sufficient. Although he is not able to provide turning of a massive workpiece, he will definitely master the processing
- Miniature souvenirs;
- Kitchenware;
- Various types of furniture accessories.
Functional front lock
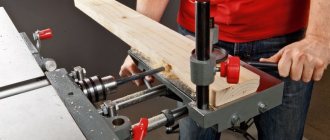
For figured turning, the workpiece is fixed between two clamps, which are usually called headstocks. At the same time, torque from the electric motor is transmitted to the front, and therefore it will be somewhat more difficult to assemble it.
The front clamp of a home lathe is an iron U-shaped structure, between the sides of which a shaft and a pulley system are mounted on bearings. The body is assembled from thick rolled steel segments.
Preparatory stage of work
Figure 1. Machine drawing.
The simplest version of a table for a circular saw is a structure assembled from boards and fairly thick plywood from which the tabletop is made. In this case, the tool itself is fixed at the bottom of a stationary (non-rising) tabletop. There is a special slot in the frame cover for the disk. A drawing of such a machine is shown in Fig. 1.
The dimensions for the bed can be changed so that it is convenient for you to work. The average table height is taken as an example. It is 100-115 cm. But much depends on the height of the person who will work with the tool. In addition, the length of the tabletop can also be changed as desired. If you plan to work with boards whose length exceeds 2.5 m, then the table top should be larger. Then it is necessary to make changes to the structure itself and add an additional pair of supports (legs). Otherwise the bed will vibrate too much.
For the countertop, you can take plywood, whose thickness should be at least 50 mm. But you can also use fiberglass slabs and plexiglass. But experts do not recommend using chipboard, since this material is not strong enough.
The table top can be polished and coated with several layers of varnish. This will ensure sufficient sliding of the sawn materials. But it is much wiser to strengthen a sheet of iron on the tabletop. Then the surface of the bed will be much more reliable, and the machine will last you longer.
Required materials and tools
For a woodworking machine, it is necessary to provide guides. They will help you cut the material accurately. This structure is welded from a metal corner and secured to the tabletop with clamps.
It is not recommended to install stationary guides, because in the future you will not be able to change their position.
Checking the circular saw.
To make a table you will need the following materials:
- sheet of plywood (countertop made of another material);
- sheet of iron;
- board with a section of 5*10 cm;
- timber with a section of 5*5 cm;
- clamps – 2 pcs;
- metal corner for guides;
- hand circular saw.
In addition, it is wiser to prepare in advance all the tools that will be needed to make the table:
- jigsaw or hacksaw;
- electric drill, screwdriver;
- milling machine or hand cutter (you can do without this tool);
- measuring instruments (ruler, square, tape measure).
When everything you need is ready, you can proceed directly to assembling the table. Some craftsmen make frames from old kitchen or dining tables. But such a design is unlikely to last long enough. Therefore, it is much more reasonable to make all the parts yourself. At the same time, you can take into account your individual needs.
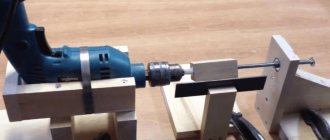
Installation of the second clamp
The purpose of the rear analogue is to support the conditional cylinder to be sharpened and provide it with freedom for rapid rotation. The more firmly the tailstock holds the workpiece, the better the final result will be.
- An indispensable condition for proper installation of the second clamp is maintaining alignment with the first.
- Faced with great difficulties at this stage, it makes sense to significantly simplify the task by purchasing a completely finished unit.
The use of an electric drill chuck will allow you to significantly modify the engineering solution. A shaft is clamped in it, the end of which must be pointed.
Convenient turntable
All that remains is to make a tool rest, where needle files, jigsaws, sandpaper, planes and hacksaws will be laid out during work. Its outlines are not regulated in any way, but it must be completely comfortable.
It is better to design such a table with the participation of the master who will become the main user of the automatic sharpener.
The best option is a swivel stand in the shape of a trapezoid. It is cut out of a thick iron sheet, after which it is mounted on a rotary hinge with a large two-way angle. It will be easy to move such a table in order to bring files closer to you or move them away for a while.
How to improve the design?
Of course, a manual jigsaw is not perfect, but it can be modified and brought to perfection.
- A rocker is being made. This type of structure will be tensioned using springs on one side and secured to the file on the other.
- We fasten the file between two rollers. Their function is to be guides.
- We use a factory jigsaw as a drive. A file is pulled between it and the rocker.
Note!
- Do-it-yourself compressor: TOP-130 photo reviews of finished compressors. Step-by-step instructions + diagrams and drawings
Do-it-yourself wind generator: TOP-170 photo reviews of finished devices. Detailed DIY instructions for beginners
- Do-it-yourself spot welding - the best master class on making homemade spot welding with step-by-step photo diagrams of do-it-yourself work
Cutters of different calibers
Cutting attachments are sold in every major hardware supermarket. At the same time, it is possible to buy both single cutting parts and sets.
With a wide selection of cutters available, the turner will create any complex and intricate configurations, including
- Grooves;
- Chamfers;
- Cones;
- Dashed lines;
- Edging;
- Wavy lines.