It often happens that the nut cannot be unscrewed in the standard way - using an open-end wrench or an adjustable wrench. For example, if it has become stuck or is very rusty.
In such situations, a device such as a nutcutter or nutcutter can help out.
Despite the fact that screwdrivers are sold in stores, home craftsmen prefer to make them with their own hands.
In general, it is logical - there is nothing complicated here. And the necessary materials can be easily found in the desk drawers.
The device itself is lightweight and compact in size, which allows it to be used even in hard-to-reach and inconvenient places.
The peculiarity of the nut splitter is that when splitting a nut, it does not damage the threads on the bolt or stud on which the nut “sits”.
In this article we will look at three design options for a homemade impact wrench. The devices are very easy to make - any craftsman can make them. And they will always come in handy on the farm: in the garage, workshop, at the dacha and even in a private house.
Types of nutbreakers
Mechanical manual
Suitable for car enthusiasts and household needs. The forces generated by the tool are enough to unscrew a soured bolt or stud. It is inexpensive, sometimes they make it themselves. Sold in stores separately or as part of sets of 2-3 items. Prices for a mechanical nut breaker start at 200 rubles. and reach up to 3000. The main disadvantage of the device is that working with it requires significant physical strength, and therefore the maximum diameter of the nuts is limited to 27 mm.
The design and operating principle are extremely simple. The tool is a steel ring of sufficient thickness and rigidity with a welded handle pipe through which the cutting element enters the ring area.
The cutter is connected to a bolt that pushes it forward through a steel ball bearing.
Hydraulic compact
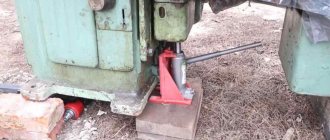
Such a tool looks little different from its mechanical counterpart. During the operation of a hydraulic nut cutter, the screw is also turned, but the pressure is not transmitted directly to the cutting surface, but through a hydraulic booster, due to which the person strains less. A compact hydraulic nutbreaker develops forces of up to 5 tons and costs in the range of 2000–7000 rubles.
Hydraulic manual
In appearance, a hydraulic manual nutbreaker is similar to a plastic grease gun. The tool has two handles - a holder and a hydraulic lever. The piston system is responsible for increasing the force in the device, thanks to which it is possible to obtain a significant 35 tons. A hydraulic nut cutter costs more than 9,000 rubles; there are models for 30,000. Such nut cutters find their use in construction and other professional fields. The undoubted advantages are high power and independence from external energy sources.
Hydraulic with separate drive
This type of nut cutter is connected to an external power source. Pumps that create pressure operate on electricity, gasoline or the muscular power of a worker. The hydraulic nut-breaker develops enormous force with the help of an external drive; nuts up to M36 are cut inclusive.
Application – construction, railway transport, industry.
The price of the nut cutter itself is about 15,000. The cost of the tool together with the drive reaches 500,000 rubles. Choosing an electric pump saves about half this amount, but makes the installer dependent on the network.
Nut cutter or how to unscrew a nut (bolt). / Blog named after. AntiFlash / BikePost
Hello, Baykpostovchanin. It seems you are using AdBlock. BikePost develops and exists due to advertising revenues. Add us to the exceptions.
open letter how to disable
Mileage
votes: 21
Blog named after AntiFlash
Denis
6479th place in the ranking of bikeposts Good afternoon, I would like to touch on the topic of one seemingly (and by name) useful tool - a Nut Cutter. A little background.
It all started with the fact that the nuts on my cylinder head were licked off, one was on the side and, in principle, it would not have been difficult to cut it off, but I wanted to preserve the thread, and I didn’t want to destroy the head...
After surfing the Internet for a long time, I read a lot, didn’t understand anything, and eventually decided to write an article. There are two types of nut cutters: 1. Hydraulic 2. Mechanical And so on in turn.
The hydraulic nut cutter works like this: you pump the pump and the liquid pushes the blade, which in due course cuts the nut. I will provide a video on how it works.
I liked the hydraulic nut cutter, but I didn’t manage to try it, I couldn’t find it in my city. So I have nothing more to say about him. Now I’ll tell you about what I was able to experience. This is a mechanical nut cutter, it is simpler. You twist the bolt and it moves the blade.
I went to the auto parts store and bought it, and then headed to the garage. I put it on the nut and began to twist the bolt, at first everything went well, but as soon as the blade hit the nut, then with the next turns of the bolt the blade began to crumble. But don’t despair, I haven’t lost faith in the tool, I just bought a cheap nut cutter for 200 rubles and when I got home I started flipping through RuNet and realized that it’s better not to save money here and a normal nut cutter will cost 1500-2000 rubles. (so that’s my mistake, I bought it from China) Using a nut cutter, I still couldn’t remove the nut, so I had to use the old-fashioned methods of heating it and tearing it off or demolishing it with a chisel and hammer. Well, I started to heat it up and heated it almost to red, I started to pick it, but it didn’t work (then I tried it again). But in the end I gave up on it all, took a chisel and a hammer, and off we went. After 12-20 minutes of chiselling, it took so long because one nut was near the timing chain tensioner and it was simply out of reach. Here is the result.
Conclusion: 1. A nut cutter is a useful tool, but if you are going to buy it, then buy a normal one. (preferably the company in the video) 2. If you couldn’t or didn’t want to buy a nut cutter, then heat it up and try to tear off the nut (bolt). 3. And if the nut (bolt) has become completely round, as in my case it was, then use a chisel and a hammer, just don’t overdo it and break the bolt on which the nut is on or tear off the bolt head (if the bolt head is rounded, then it’s better to weld the nut on top and try to pick for her). PS Better yet, try not to lick the edges on the nuts and bolts.
Source: https://bikepost.ru/blog/49349/Gajkorez-ili-kak-vykrutit-gajku-bolt.html
Purpose and principle of operation of a nut cutter
The nut hammer is intended for removing nuts that are stuck, rusted or with broken threads. In this case, the bolt remains undamaged. Different models of nut cutters are widely used in auto mechanics, construction of buildings and engineering structures, fastening of industrial equipment, power plants...
According to the principle of operation, the tool is similar to a chisel, only it cuts the nut, creating constant pressure of the cutting edge on its surface, without impact. The ring holder ensures a secure grip of the fastener.
Device and characteristics
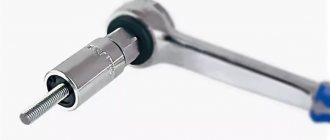
Regardless of the specific model, the nut has the following parts: body, drive, cutting element.
The body of the nut splitter, like a spanner wrench, is installed on the nut, for which it is made in the form of a half or full ring. The diameter of the hole determines which nuts the tool can work with. The handle with the screw in mechanical models also serves as a stop for the cutting part. The drive creates the force necessary for cutting metal.
Due to the fact that each tool has an acceptable range of nuts, it makes sense to take a set of nut breakers when purchasing. So the desired option will always be available.
Material
The main material is steel, and for the cutting component - more durable and wear-resistant alloy metal grades. The handles are covered with chemical-resistant rubber for greater comfort and a secure grip, even with oily hands.
Dimensions and weight
The dimensions and weight of the nutbreaker vary from model to model and depend on the working range of nut diameters. Simple mechanical devices about 100 mm long weigh approximately 200 g. Hydraulically reinforced nut splitters for nuts up to 24 mm can weigh up to 4 kg. In terms of dimensions, this hydraulic nut will be similar to a car jack.
Classification
By method of use
Impact chisels
Immersion is ensured by light blows on the end part. The handles are equipped with metal rings on the back. It prevents the handle from breaking.
Hand chisels
Immersion into the tree is done by hand effort.
By shape
The purpose and appearance are determined by the name:
| Name | Working part width (mm) | Handle size (mm) | Longitudinal section type | Cross-sectional shape |
| semicircular | 12 | 145X25 | smooth | ͝ |
| semicircular | 16 | 145X25 | smooth | ͝ |
| semicircular cerasic | 4 | 145X21 | smooth | ᴗ |
| eismus | 8 | 145X21 | smooth | ˅ |
| cranberry | 12 | 145X25 | spoon | ͝ |
| curved cranberry | 4 | 145X21 | spoon | ᴗ |
| cranberry-cerasic | 4 | 145X21 | spoon | ᴗ |
| semiclucarza | 12 | 145X25 | curved | ͝ |
Among classifications, national traditions can be taken as a criterion. For example, Japanese craftsmen proposed their own unique form of chisel. It is equipped with a shorter blade with a thick, long cone-shaped neck. This makes the tool comfortable, easier to hold and control while carving.
Thanks to a special recess on the back side, sharpening is more economical and faster. The combination of the shank and the conical cup makes the connection to the handle the most durable.
Thanks to two layers of the metal part (soft iron and high-strength steel), the sharpness is maintained for a long time, the blade is easily and quickly sharpened.
According to work purpose
- Plotnitsky. Allows rough processing of workpieces of different types.
- Carpentry. Used for neat, delicate work. Suitable for carving linden, spruce and poplar.
- Lathes. Cutters used for working on a lathe.
- Klukarzy. Thanks to the curved working part, they allow material to be removed from deep grooves.
- Multifunctional. Combines a nail puller and a frame lifting device. It's called "European".
- Looped. They have a special device. Used for rounding corners, preparing hinges and locks.
- Scrapers. Made from plastic. Needed for cleaning irregularities, repairing wheels, removing burrs and protrusions.
- Pocket. They have a folding blade.
- Mini chisels. Purpose: fine thread. These include rivets (miniature models with a narrow blade similar to a sharp leaf, allowing you to create a neat, high-precision design), marigolds (designed for cutting out thin elements with rounded shapes).
- Chisels. Used when knocking out unnecessary elements in the material.
- Jambs. Cutters equipped with an oblique blade for decorative work on relief. Used for sculptural carving.
- Shtiheli. They are distinguished by mushroom-shaped handles and an oblique cutter. Used for preparing grooves.
By type of longitudinal section
- Direct. The most common. The blade and blade are completely smooth.
- Curved. A special feature is the noticeable bend of the blade and blade.
- Klukarzy. They are distinguished by a sharply curved blade along the entire length. Used for punching wide pieces of wood.
- Reverse. The presence of sharpening on the other side of the blade and a notch on it allows you to create relief elements above the main surface. Such specimens are called “reverse cranberries.”
By cross section type
- Flat. The difference is the straight profile. Available in many sizes.
- Angular cerasics. The cross section resembles the letter "V". Its angle is 60-90 degrees. Convenient for three-dimensional carvings, for example, images of hair.
- Radial. The cross section resembles a semicircle. Allows you to carefully and smoothly bury the tool into the wood. Used for contour carving. The working part can be sloping or flat.
- Stapled. The smooth cutting part is equipped with sides of various sizes, placed at certain angles. Gives a narrow, even sample.
- Cerasics are round. Similar to the radius version, with a smaller thickness. Purpose – figured carving.
According to the shape of the working part
- Straight (the blade is perpendicular to the blade, used for rough processing in even stripes).
- Oblique (the beveled blade makes it easier to penetrate the wood).
Tips for choosing
To select the optimal nut breaker, they focus on the list of future tasks. The buyer must be clearly aware of the difference between domestic and industrial use, understand the diameters of the fasteners and understand what forces are required from the tool, and whether a mechanical drive will be sufficient. For those who purchase a nut cutter for household tasks, it is recommended to adhere to the following rules:
- Before purchasing, dimensions are taken from the nuts to be removed; it is also important to measure the free working area around the nut if it is limited in some way. This way you can choose the right screw.
- If the tool will be used very rarely, for example, the need to cut off fasteners is one-time in nature, and when the nut will be needed again is unknown, it is better to buy an economy class product. In this category, STAB and FIT are considered worthy representatives.
- It often makes sense to choose a set of several tools, especially if the overpayment is small. This type of purchase is more forward-looking.
- You should avoid purchasing nutbreakers from unknown ones; as a rule, they better monitor the quality of their products.
State standards
The shape of the cotter pins complies with a number of standards. This not only makes it easy to find the correct shape, but also ensures that you get fasteners of the same quality and standard sizes. The following standards are available and are currently in use.
- GOST 397-79 corresponds to ISO 1234 - German standard DIN 94.
- ISO 7072 - DIN 11024.
There are also a number of specially shaped cotter pins available for specific requirements that are not regulated by standards. For example, as shown in the pictures, pins, wire or pins, round, guide springs.
For standardized ones, the following types of markings are used:
- Standard (adjustable, flexible) - DIN 94;
- Spring (needle) - spring clamp DIN 11024;
- Quick release with ring (folding tire, folding plug (DIN 11023)).
How to make a nut with your own hands
If you have the tools and the proper skill, you can make a nut cutter with your own hands.
List of tools:
- welding machine;
- bench vice;
- lathe (optional);
- drill and bit;
- grinder and grinding wheel for metal;
- threading device;
- grinder.
First, find the base for the nut cutter ring. Unnecessary spare parts with thick steel circles, for example, a steering wheel tip, are suitable. If these are not available, the element is made from metal round timber on a lathe. The center of the hole being made is mixed by placing a small plate under one of the cams. The hole size is checked against the maximum nut that the tool will pierce. When a recess of sufficient diameter has been obtained from the round timber, a thick ring is cut off. Its width should be enough to weld the handle and drill a through hole to accommodate the cutter.
A hollow steel rod is suitable for the handle of the nutbreaker; you can use part of the same steering tip. The advantage of this option will be the finished internal thread. Alternatively, the handle is made on a lathe by drilling through a metal rod and then applying the threads.
The ring and handle are welded. The workpiece is fixed in a vice and a hole is drilled in it, connecting the cavity inside the handle and the working space of the ring. Sometimes part of the circle is cut off to create a C-shaped nut.
For chisels, choose durable metal rods such as a drill, tap or rubber. The required sharpening is created on a sharpening machine.
The two remaining important parts are the bearing ball and the bolt. The cutter is placed in the frame of the nut cutter, then the ball, then the bolt is tightened. Sometimes, for additional fixation of the chisel, I drill a hole in the handle assembly and screw another one in there. If necessary, grind with a nut, giving the handle the desired shape.
Manufacturing
We take an unnecessary tie rod end from a passenger car and saw off everything that is not needed from it.
Next, drill a hole in the center with a 10 mm drill.
We weld the M12 nut to the base of the tip so that both holes coincide; to do this, you can insert a 10 mm rod into the hole of the nut, which will center the two workpieces.
We grind and polish the finished part (optional) giving a more aesthetic and beautiful appearance to our workpiece.
Now, to make a piercing element for our nut splitter, we use a piece of the shank from a 10 mm drill. We cut a piece of drill 35 mm long and sharpen it on both sides like a chisel.
Next, we take a sharpened piece of the drill and insert it inside the nut, after which we screw in the bolt. It is advisable to use a bolt with a hardness of at least 8.8 units, so your device will last much longer.
How to use a nutbreaker
It's time to try out our homemade nut cutter in action. We install the working end on the jammed nut, fix the tool with one key, and tighten the bolt with the other, pressing the cutting element on the nut. The fastening metal begins to gradually move apart until it cracks. Afterwards, the rusted nut is easily screwed off.
The hydraulic nutbreaker is even more convenient to use, thanks to the optimal design and arrangement of the handles. And since the force is developed by fluid pressure rather than muscle force, the tool allows you to dismantle a large number of connections without experiencing much fatigue.
A nut cutter allows you to disassemble a bolted connection without unnecessary labor without damaging the threads. Welding on additional large nuts and the use of sulfuric acid is slowly being pushed out of practice, and today is already considered a thing of the past. The ease of use of nutbreakers is appreciated by both car owners and industrial enterprises; fortunately, the range of tools allows you to choose the optimal option in terms of power and cost.
Comparison with other methods of unscrewing nuts
Traditionally, the following methods are used to remove jammed nuts:
- Heating with a gas burner. Under the influence of high temperature, the metal expands, after which it is sharply cooled with machine oil. The soldering of the parts weakens, after which the nut succumbs to the force of the wrench.
- An effective, but unsafe, way to remove oxides and weaken the connection is to apply sulfuric acid. Requires exposure for several hours. In addition to concentrated sulfuric acid, other chemical solutions are used: kerosene, white spirit, WD-40.
- Sometimes, in order to unscrew a nut, another one of larger diameter is welded to it. This allows the use of a wrench with a large leverage.
- The jammed fasteners are sawed off with a hacksaw or grinder.
- In some situations, an impact screwdriver is used, which converts the force from a hammer blow into torque.
Advantages of a nutbreaker:
- Working time is reduced. There is no need to wait a long time before directly disassembling connections.
- Work with acid and open flame is excluded, which expands the possibility of using the method. At the same time, the risk of injury is reduced.
- The bolt or stud is not damaged as a result of work and can continue to be used quietly.
- The tool is simple in design, takes up little space and does not require special storage conditions.
Homemade impact wrench from an old spanner
Often you have to deal with a non-standard situation when you need to unscrew a nut, but it doesn’t want to turn at all - it’s rusty. As a rule, a regular open-end or socket wrench will not help in this situation.
We have to resort to more radical and effective methods. For example, some craftsmen use a grinder with a cutting disc, while others pick up more accessible tools: a chisel and a hammer. However, the first method is too noisy, the second is inconvenient.