Paper origami is an ancient technique for creating different figures. Moreover, this skill reaches incredible heights and allows you to create stunning figures. But you still need to start with the simplest.
The origami biter dog is a very funny and interesting figure that looks cute and will be great fun for a child.
It is very useful for children to make such origami, because it is not only about an interesting and exciting pastime. Creating origami develops a child's motor skills, attention, logical thinking, and memory.
How to cut a mosaic
Novice mosaic makers often have a question: how to cut (prick) mosaic, with what tool. Even experienced professionals cannot always answer this question. Even now there are still builders who use an ordinary grinder as a cutting tool. But with such a tool, in addition to the mosaic, you can cut off something else “necessary”. Sometimes ordinary glass cutters are used to reduce the cost, but you can’t do much with such a tool, and it’s not convenient.
Professionals who value their time and the quality of the work performed should have a high-quality professional tile cutter that can also cut mosaics. But this option will cost a pretty penny, and it will be problematic to make figured elements on them.
A tile cutter like this with a mosaic mat can be used to cut quickly and a lot, but this type of cutting is not suitable for artistic chopping.
Therefore, for those who do not know how to cut a mosaic, we hasten to share a list of tools and methods designed specifically for this activity. Almost any master can learn this, whether he is a beginner or a skilled worker with experience.
Mosaic cutters
Mosaic cutters , or mosaic tongs, are used to cut mosaic tiles straight. Hold the pliers in your cutting hand and use your other hand to hold the mosaic with your thumb, index and middle fingers as still as possible. Place the mosaic between the cutting surfaces of the pliers. The tile and the cutting part of the nippers should not overlap completely; the nippers should protrude approximately half beyond the tile.
The direction of the break is set by turning the head of the pliers. To increase cutting force, hold the cutters closer to the ends of the handles.
Using a grinder
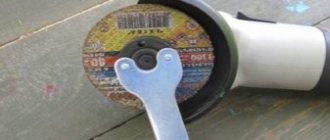
This tool is very often used in construction and finishing of premises. Many craftsmen use it to cut tiles for floors and walls. The tool can also effectively split a mosaic into two component parts. However, the process must be done carefully as the material is fragile. And there is a possibility that the tool may damage it. Therefore, when working with an angle grinder, it is recommended to give preference to material on the mesh. These products are distinguished by the strength of fixation of all elements.
To carry out manipulations, it is necessary to secure the material on a flat surface. This can be done using tape. The scoring disc must be positioned strictly perpendicular to the surface on which the mosaic is located. Cutting should be done smoothly and carefully so as not to damage the product. Some craftsmen mark the line with a cutting wheel. In any case, the procedure is easier to perform in the middle of the product. The closer to the edge the cut is made, the higher the likelihood of cracks and splits.
Thus, to cut the product, you will need the following tools:
- Bulgarian;
- special disk;
- scotch;
- a sheet of plywood or other flat surface.
After completing the work, the structure can be detached from the tape. When using a grinder, you should avoid imprecise movements. The tool can damage not only the mosaic, but also injure the master. The resulting strip of material is fixed with a special glue to the desired area of the room.
Cutting tools are available tools. They can be purchased at any hardware store. Some owners do not know how to do the procedure themselves. They are forced to resort to the services of specialists. But the use of such materials and methods allows you to install and cut the tiles in the shortest possible time.
Roller cutters (tongs) for mosaic
Roller cutters (tongs) for mosaics are the most convenient and functional tool for cutting. This tool can combine the functionality of a glass cutter and, in fact, the mosaic cutters themselves. Externally, this tool is somewhat reminiscent of a modern can opener. The tip of the pliers consists of two strong, sharply sharpened discs. A piece of mosaic is inserted between these discs, and by squeezing the handles under force, the discs cut the mosaic in half. If you are well trained in handling this tool, you can make not only straight cuts, but also figured cuts, giving the mosaic different shapes. When the cutting rollers become dull, you just need to turn them a little, having first loosened the screws with which they are pressed to the body of the pliers. Once the desired position is selected, tighten these screws again.
It is worth noting that when working with any of the tools described above, safety precautions should be observed. Because, for example, using roller cutters, when cutting, a piece of mosaic can hit the performer in the eye. Therefore, when working, wear safety glasses, and you can put gloves on your hands so that fragments do not get under your skin. This way, you will protect yourself and be able to act confidently and accurately.
Master class for beginners: weaving simple patterns
You have studied the theory, now practice creating pictures from the forms described above.
Before turning the rollers, you need to outline the right path - draw a contour. You need to work carefully and slowly, because the final result depends on the quality of the drawing.
For example, a tree on paper. Understand what color palette will work and choose stripes that match. What shapes will help to correctly convey the texture, mood and shape of the drawing. The crown of trees is green rolls or leaves. The bark is an eye or diamond-shaped brown color. But you can do it in a more original way.
Image taken from pinterest.
First, you can apply a color representation of the figures directly on top of the drawing - how many, what size, what color. Look at the result in the drawn version, and if you are satisfied with the chosen style, make it out of stripes.
On the Internet you can find many patterns for crafts using the quilling technique, there are even sites completely dedicated to this topic. Let's look at a few simple jobs step by step so you can practice.
Snowflake made from rolls
A snowflake is the simplest fake that you can quickly make with your own hands from a sheet of printer paper.
- Cut it into strips 5 mm wide.
- Roll them into rolls - some tight, some loose.
Glue the rolls onto blue cardstock or colored paper to create a 6-pointed snowflake. Maintain symmetry.
Eg:
- There is a tight roll in the center.
- There are 6 free ones of medium density around it.
- 6 rays from two loose rolls of low density extend in different directions.
- At the tips of the rays there are three tight rolls folded into a triangle.
The output will be the following picture.
But in fact, it’s better not to repeat the snowflake step by step, but to try to come up with something of your own. There are a variety of snowflakes, so it’s hard to go wrong.
simple flower
For this fake, use colored paper. You can make each element a different color, or make the core one and the petals another.
- Make a core from a tight roll.
- Make enough droplets so that the petals can completely surround the center.
- Four more leaves.
- The stem is made from a simple green strip glued to paper.
- Now put the shapes together.
- First glue the strip for the stem.
- Make a small indent from its top and glue the core of the flower.
- Place the petals around so that they, like the rays of the sun, emanate from it in all directions.
- Attach petals on different sides in the middle of the stem.
It turns out a simple but beautiful flower using the quilling technique for beginners.
Butterfly
Use bright colors to create a beautiful piece. It would be ideal if they contrast with each other. For example, the example uses yellow, pink, red and black.
- Make an oval roll - this will be the middle of the butterfly, to which the wings and antennae will cling.
- Connect two multi-colored strips together, and then make a drop out of it. Make 4 similar structures - these will be wings.
- Twist two small tight rolls and insert two drops inside.
- Attach the wings to the body of the butterfly.
- Make a V-element - these are antennae, attach them on top.
You will get a bright and colorful butterfly.
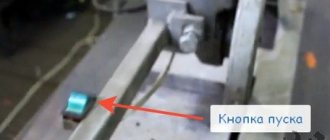
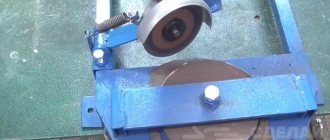
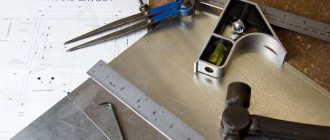
How I cut the mosaic to lay it in the corners of the pool bowl.
In order to lay the mosaic in this corner location, the mosaic must be cut. and if such an angle goes from top to bottom, then a large amount of mosaic will have to be cut.
First I tried to break the mosaic using pliers or pliers. With some skill and using paper as spacers, I began to succeed, but the labor intensity was high and the productivity was low. A lot of mosaics went to waste (to be thrown away). It could break diagonally, or anything else, but not as needed. And at the same time, laying a single mosaic, in the absence of a base, one small tile at a time, takes a lot of time.
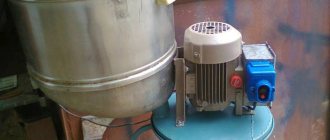
Then I decided to try cutting with a grinder using a diamond wheel. The experience turned out to be successful. On a flat board, with transparent tape we glue a pre-cut strip of mosaic glued on a paper base. Next, we cut through this mosaic at the desired angle with a grinder, depending on how wide the mosaic tiles are required in one or another corner of the pool.
You need to hold the grinder straight, not jerk it, and move it evenly. Please pay attention to the safety rules when using this tool.
Peel off the tape that held the mosaic strip in place. Be careful after such work, small particles of glass remain on your hands. Rinse them off with water.
Next, we place this strip on the glue where it is required. With this method of cutting and subsequent laying of mosaics in the corners, things go faster. Mosaic waste with this cutting method becomes less.
What is quilling technique?
When working using the quilling technique, needlewomen fold thin strips of paper in a special way to create a complex design. They connect with each other to create a beautiful picture.
In common parlance, quilling is called “paper rolling.”
Initially, goose feathers were used to fold paper, but now it is more convenient to use needles, toothpicks, or even special devices.
Quilling existed even before the invention of paper - thin metal wire was used in the work.
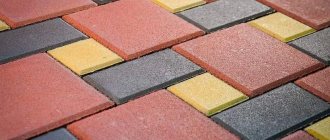
Properties and applications of glass mosaic
Glass mosaic has three main advantages:
- waterproof
- durability
- strength
Glass is one of the most wear-resistant materials; it does not absorb moisture, easily tolerates any temperature changes, and does not scratch during additional processing.
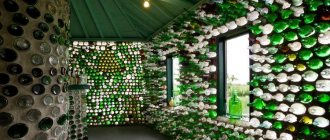
There are no restrictions on the use of glass mosaics; everything depends only on the designer’s imagination. This material is used for :
- rooms with high humidity (saunas, bathrooms, baths, halls with fountains, etc.);
- offices, bedrooms, halls, cafes, shops, restaurants to improve the premises;
- to enliven the interior (mosaic visually expands the boundaries of the room, enlivens and makes furniture, stairs, window slopes and window sills “airy”).
Mosaic laying technology
Before you start laying the mosaic, prepare the base. If the surface is loose, it must be primed, all roughness, irregularities, cracks and any other defects must be removed. The base for the glass mosaic should be plain; any imperfections will be visible through the decorative material.
Then you can start marking the finished surface, the sheets with mosaics are laid in one line, three pieces in length, then we repeat this procedure until the surface is completely marked.
Next, let's start working with glass mosaics.:
- We prepare the walls for gluing the mosaic: dilute the glue in a plastic bucket with warm water, stir until a homogeneous viscous mixture is formed. Once the mass is ready, it is applied to the wall using a spatula. Watch the layer of the substance, it should be even, but not too thick, otherwise the mosaic will not hold on and will crawl.
- We glue the mosaic on the grid to the wall in accordance with the drawing, carefully pressing the sheet to the surface for good adhesion. This can be done by hand or with a roller.
- We remove the film from the surface of the mosaic. When the work is completed, you need to leave the film alone so that the glue dries completely. This will take at least one day.
- We rub the seams . We apply grout to the seams and carefully distribute them along the joints. It’s easier and more convenient to do this with a small spatula. When the putty fills all the seams, the remains must be quickly removed so that the composition does not have time to dry.
- The fifth stage is the concluding stage . We will remove all dirt from the mosaic with a damp sponge; it is important that the grout does not go away with the water. If you cannot remove cement dust, you can use a sulfuric acid solution
Before starting work, remember a few more rules:
- The temperature of the room in which the mosaic is laid should be between +5 and +30 degrees.
- If the mosaic is glued on a mesh, then you need to choose white glue.
- For colored mosaics, it is better to immediately determine its place for each sheet and only then apply glue.
Making a dog using a template
The simplest option is to make a dog according to a template. To do this, you need to draw a stencil on thick paper, outline it on the selected material, cut out and glue the dog according to the template. For the work you will need: colored cardboard, a stencil, a regular pencil, a marker and scissors.
Cardboard dog template
When making this craft, we recommend inserting the neck into the body, already coated with glue, and drawing the parts of the dog, preferably with a marker.
How to glue (glue) glass mosaic on a mesh
The process should start from the bottom and go to the very top of the sheet. Apply the adhesive to the tiles and the prepared wall or drywall, and not in a thick layer, which is leveled with a spatula. You should not press with your hands, as the base may lose its integrity and the pattern will become “crooked.” For this purpose, use a flat spatula or a large sponge, which is used to iron the sheet.
Which adhesive for glass mosaic on mesh to choose
If you want to glue the mosaic with your own hands (instructions below) or do the installation in a different way (the cost of such services is quite reasonable), then you will need a special adhesive composition. It must have a high level of adhesion for cement, ceramic, metal and wood coatings. Pay attention to the packaging, as it must contain information about the possibility of its use during temperature fluctuations and high humidity. Also know that they only come in white and gray in color.
How to lay (lay, lay) glass mosaic on a grid and laying technology
It is recommended to lay glass mosaics in the same way as ceramic tiles and for these purposes you will need similar tools. Some details of the process have already been given earlier in this article.
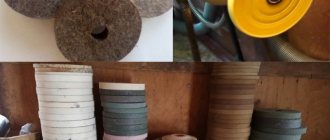
Tool storage
In manicure studios, instruments are sterilized in special craft bags, and they are stored in them after the procedure.
To store tools at home, use craft bags or some kind of maximally airtight container, for example, a container.
White sterilization bag 75*150 mm ParisNail 100 pcs
Kraft sterilization bag 100*200 mm ParisNail 100 pcs
Flat self-sealing sterilization bags 60x100 mm DGM Steriguard 100 pcs
We looked at the methods and stages of processing tools, as well as the principles that must be followed. Unfortunately, not all craftsmen comply with sanitary standards. What mistakes do they make?
Continuation of the funny image
Next, you need to create the funny image of the dog itself. To begin, bend one half of the bottom of the triangle upward.
A small part. Then draw the dog's eyes on a piece of paper. Glue. This will make your dog's eyes look more alive.
Cut out a circle from black paper, the tip of the nose. Use this circle to seal the triangle folded at the bottom. The dog's funny nose takes shape.
To enhance the image, a strip is cut out of red paper to represent the tongue. This strip should be glued to the bottom of the triangle, under the curved triangle of the nose; it is desirable that the tongue hangs down and is even curved upward. This will give the impression that the dog has his tongue out and is breathing hotly. At least that’s how it will appear to the child’s imagination.
Cone dog
A paper cone dog is an interesting and easy craft. Children love making it. It can be installed on a shelf, table, or used as a Christmas tree decoration.
To make a cone dog, we need:
- set of colored cardboard;
- moving eyes;
- stencil with circles of different diameters;
- scissors, a simple pencil, glue, a black felt-tip pen and a compass.
It’s already clear what material is needed, now we’ll tell you how to make a dog out of paper.
Making a cone dog:
- Making the body. Draw a circle on paper with a compass, then cut it in half. If you don’t have a compass, you can use any object with a round bottom. After cutting out half of the circle, roll the workpiece into a cone, glue the edges and cut off the excess parts. So the conical body of the dog is ready.
- Now we make the dog’s muzzle, ears and tummy. We cut out long ears from cardboard in 4 copies. 2 of them should be smaller since they will be the inner part of the ear. Now they need to be glued.
- Let's make a face. To do this, we cut out circles and glue them together to create a muzzle. Now you need to glue the nose and tongue at the bottom onto it. Now we apply a pencil to the bottom part and draw a long line, attaching the ears to the top part.
So the dog is ready. If desired, you can add limbs to it.
Classic model "Bites"
This fun, dynamic "bark, bite and keep out the house" toy is built using the basic House shape. For it you will need a square sheet with a side of 21 cm, preferably two-color - this will allow you to better navigate during assembly. It is recommended to use either office paper or “kami”; craft paper is also suitable, it also has increased strength. Since the toy will move frequently, it is important that its folds do not fray.
Step-by-step instruction:
- For the basic “House” shape, you need to bend the square in half from top to bottom. Then turn the resulting rectangle into “Doors”. And, returning the last two folds to their original position, open the side “pockets”, carefully smoothing them out. The "house" is ready.
- Turn the figure over to the reverse side.
- We bend the side flaps towards the middle line “valley”. And then the lower right corner to the center, capturing only the near layer.
- Make the next fold along the dotted line as shown in the figure. We still do not touch the second layer.
- Raises the lower left corner until it touches the upper right.
- Repeat steps 3 – 5 for the reverse side.
- This is what we get in the end.
- Rotate the workpiece 90° counterclockwise.
- Open the free edges on the right and insert your fingers into the resulting “pocket.”
- Carefully fold the workpiece in half, simultaneously pushing the middle part inside. We iron the fold line on the reverse side to make it as clear as possible.
- We close the mouth of the “biting dog”, adjusting the resulting creases as necessary.
- At the same time, the “ears” of our animal go up.
- Now we have our own finger puppet, which can be easily made into a glove puppet by choosing a matching “robe” for the hand. We draw the “biter” eyes and nose for more realism. Some craftsmen even glue in teeth and tongue.
For children, the origami “biters” diagram may not seem entirely clear, so it’s worth clarifying the difficult points in the video:
"Fortune teller" that can bite
No matter how good the “biting dog” is (or the fox, whichever option you like best), this model can hardly be called universal due to its characteristic protruding ears.
For a puppet show, you will need other characters. You can make a wide variety of origami “biters” for any plot from your children’s favorite paper “fortune teller”. This unusual toy, with the help of simple manipulations, helps you “look” into the future. It is enough to ask an exciting question, and then reveal one of its facets and read the answer written there. Not only children, but also adults are not averse to “trying their luck” by turning to a paper prophetess.
It's very easy to fold. The process begins with the basic “Pancake” shape. It is best to take a blank 21x21 cm so that the “fortune teller” does not turn out to be too small.
Step-by-step instruction:
- Bend the square diagonally in both directions.
- Open and fold all four corners towards the center.
- Turn it over.
- Fold the corners again in the same way.
- We bend the workpiece into a “mountain”. Place the free edge up.
- Let's reveal. Fold from left to right and return to original position.
- We bring the corners to the center of the figure, as if forming a bag.
- We “walk” our fingers along the fold lines, pressing the sides of the workpiece to each other.
- Turn the product over to the reverse side.
- We straighten the cells.
- Turn the workpiece over again.
- The basis of the “fortune teller” is ready.
If you glue adjacent cells of the toy together, you will get a wonderful “biter” made of paper. All that remains is to paint origami, depicting a dog or any other animal, as desired. You can also print ready-made templates, of which there are now many on the Internet, and then fold the future paper actor from them. For example, like this:
The shark is ready to pounce. Or just talk?
And here is the origami “biting dog”, made in a new way:
Wooden crafts
Dogs have been made from wood since ancient times. These can be simple, flat symbols or real carved figurines. The following options can be distinguished:
Children's flat craft. Ears, nose and tongue made of plywood or thin board are attached to the board. Dyeing is in progress. Carved figure. The figure shows options for the execution of carved wooden figures. This can be a simplified craft in which the main elements are only symbolically formed. If you have the skills, you can carve a real wooden dog
In this case, it is important to find good craft wood. Linden is best for cutting
Toys. Children are interested in dogs with articulated elements. All parts are made flat, from boards. The paws, and, if desired, the ears, can be twisted. This is achieved by connecting using a wooden rod (niggel). First, a through hole is drilled through the paws and body. Then the rod is tightly inserted, and it is fixed on the paws with glue, and inserted freely into the body.
Another option is a rolling dog. It also has a flat design which makes cutting easier. Instead of paws, it has wooden wheels. The fastening method is similar to the previous option. To give the toy a natural look, it must be painted in the desired colors to form a muzzle.
Craftsmen with wood carving skills are able to make more complex crafts from wood that can be displayed in a prominent place in the house. The most common figures are sitting dogs. You can often see animals in other poses. For example, hunting breeds freeze in a characteristic waiting position. A mother dog with puppies looks beautiful.
Modular dog look
A similar type of origami dog is already done by children in elementary school. It is premature for preschool children to make such constructions.
But for schoolchildren - just right, for the development of intelligence and memory development. Moreover, peculiar somersaults with geometry on paper are produced here.
Now the paper turns this way, then in the other direction. Then bend it one way, then the other. There is a reason to be confused at first. And then, after two or three dogs are made, everything becomes familiar.
Then you can move on to other forms of execution. And so with all types and forms of origami. There are original forms of execution, modular type.
This requires not only memory and attention, but also great patience. Because modular origami is made from hundreds of identical modules connected in a special way.
Crafts for a given shape. In this case – to fit the dog’s figure. This kind of work requires patience and a lot of ready-made modules.
Another option
Here are step-by-step instructions on how to make origami paper dogs that are a little more complicated than the previous craft. Take a sheet of paper. The square is also performed.
Then everything is done differently. Diagonals are made on both sides of the square and straightened again. The result is a square with a clearly defined center. All four corners fold towards this center. It turns out to be a square envelope.
Then one corner turns outward so that there is a gap under the leaf. And on the other side, opposite, the petal turns away completely and part of it is wrapped inward up to half the petal. The line is ironed.
Then the petal is wrapped inward. Then the workpiece is folded inward in the center so that the dog’s tail is already visible on one side.
Pet house
Dog craft
Every dog needs its own kennel. You can make a box in the shape of a pocket so that the animal can be hidden inside.
Sequencing:
- Make a small dog.
- Select a piece of cardboard the size of it and draw an outline.
- Cut along the line and glue the blank onto a thick base.
- Let's start creating a house.
- Prepare a paper square that will be larger than the pet.
- Cut a round window in it.
- Attach the roof to the cardboard base, but do not completely glue the booth itself, but only along the bottom and side contours.
- Through the upper opening, you can put the dog inside so that it looks out the window.
There is another option from which you can make a game for a child. Make several houses of different colors and the same number of doggies. Glue them scattered on a large sheet of paper and give the little one the task of drawing a leash from the animal to the kennel in its color.
An example is shown in the figure.
There are also non-functional types of crafts on this topic.
Older children will be interested in creating a three-dimensional booth. We provide a template as a tutorial. The master class has been translated and adapted for your convenience.