Let's see how to make a stand for an angle grinder with your own hands?
Since the sizes of grinders from different manufacturers vary within any limits and do not coincide with each other down to every millimeter, the number of racks for attaching the tool will be many and different in design. In this case, a personal approach to the design and adherence to the main principles of stand production is important.
- reliable tool fastening ;
- the presence of a counterweight;
- reliable stops and clamps;
- work in compliance with safety regulations, availability of protection.
Let's look at these points in more detail to decide what kind of rack we need.
Secure tool mounting
Many people, inspired by the idea of making a stand, look for drawings on the Internet, without thinking that there may not be any for their instrument, since each model is individual and the fastening to it must be done according to the situation.
I propose to look at different examples of how people made fastenings, and we will take the best from each. Here are a few photos of the location and fixation of the angle grinder based on the needs and desired functionality.
As you can see from the photographs, the mounting of the grinder is individual for each, but the most important thing is that the tool is securely fastened in each of them. In the first photo, the tool is inserted into the frame and secured with bolts at the handle attachment points.
The second example is similar to the first, only the frame has an individual design and a control handle has been added to it, in the form of a welded 20x20 pipe to control the cutting force and ease of operation.
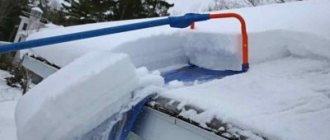
The third option generally captivates with its simplicity and minimalism. Bulgarian
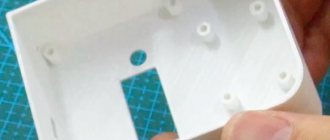
It is attached to a protective casing, in which holes are made for bolts and the entire machine consists of a minimum number of parts.
So, we decided on how to mount the tool. In our case, this is the third option - attaching the tool to the protective casing. It's extremely quick and easy to do.
You will need two 10mm bolts and two self-locking nuts, only the nuts must be attached to the outside of the casing. A couple of plates and a pipe on which everything is attached. I suppose it won't be difficult to find such parts.
Features of application
You most often have to use a key for an angle grinder when you remove and change the disc. And such a need arises mainly due to the appearance of cracks in the disk itself. Before using the key, you must stop the equipment and turn off the power. Failure to comply with this rule can result in big trouble.
After de-energizing the device, use a wrench to tighten the lock nut. Sometimes it happens that the disk is jammed to the limit, and a standard tool does not help. Then you can use a powerful gas wrench. The remaining part of the disk can be cut off with a regular hacksaw; After replacing the disk element, the lock nut is returned to its original position.
Presence of counterweight
It is up to you to decide whether the rack should have a counterweight, but its presence makes the work easier and serves as an indirect element of safety. In theory, if you let go of the tool, it should rise to a vertical position and stop cutting material.
I would advise you to turn off the end switch in the uppermost position so that when the angle grinder comes into it it will simply turn off; this measure will strengthen the security measures of your homemade device.
If you look at the photo above, you can see that two of them have counterweights, in the third case there is none. Which, in my opinion, is a drawback of this design. Here are some more examples of how you can make a counterweight. It is enough to install a spring, matching it to the weight of your tool, a simple and effective solution.
We figured out the counterweight, so as not to make the structure bulky, it is better to install a spring as in photo No. 5. The stand is easy to manufacture and allows you to tilt the angle grinder more than 90 degrees, unlike the one in photo No. 2, this property can be useful when working with large objects .
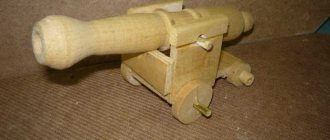
For this puller we will need:
- The handle for the disc puller can be of your choice (the main thing is that it can be welded to the base);
- The base length is 2 cm;
The legs are 0.5 cm thick and 0.8 cm high, there can be 3 pieces or 4.
The distance between them is 2 cm. In order to do it, you will, of course, need tools. Everything is described in detail in the photo.
Thank you for your attention. Author of the article “Homemade grinder disc puller” Edik Maryanyan
Author of the article “Homemade grinder disc puller” Edik Maryanyan
Modern angle grinders (angle grinders) are equipped with a wide variety of attachments. Designers are trying to ensure the successful use of their developments for grinding, cutting and polishing dissimilar materials. But changing the nozzles does not happen manually, but using special devices.
We’ll talk about the features of choosing keys for an angle grinder in our article.
Reliable stops and clamps
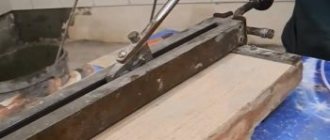
All five photographs show various devices for clamping a part, all of them are good and convenient in their own way and, nevertheless, from them you can choose the most correct solution. The most reliable and reliable fastening option is a vice.
- They securely fix the workpiece.
- You don't need to hold it with your hands.
- If the disk breaks during a cut, it is extremely difficult to hold the part in your hands, and if it is in a vice, the risk of injury is reduced.
- And if you purchase a rotary vice and make a longitudinal groove at the base of the stand to move the fasteners along the cutting line, then you will be able to make an oblique cut, which increases the functionality of your machine.
Read also: Res9 rs4524 200 characteristics
Summarize
What you need to
make a stand with your own hands .
- 2 meters of profile pipe, provided that you don’t have the base for your stand lying around anywhere, an ordinary metal frame measuring 400x300.
- A spring for creating a counterweight can be bought in a store or taken from an expander.
- A couple of bolts and a few tubes to make some kind of bearing, if you don’t want to suffer with the rotation unit.
- Metal sheet 400x300x3 for a reliable base.
And in conclusion, several video examples of how to make a frame for an angle grinder in an hour with step-by-step instructions and a detailed description of the dimensions. Since everything is clearly explained in the video with explanations of the dimensions of the parts, you can do without a drawing.
Simple, quick, from improvised means and the rubbish that is in almost every garage. Remains of a profile pipe, a metal frame and several bolts. Yes, you can’t do without welding during manufacturing.
But this is not a hindrance either; you can cut the workpieces and ask a welder to weld everything for a small price. In any case, it will cost much less than an expensive stand from a store, and the quality is no worse.
Work in compliance with safety regulations, availability of protection
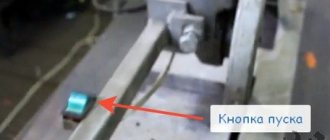
In all the examples considered, the cable from , a must be secured to the moving part of the rack, and in the last case, photo No. 6, it generally stretches across the working area behind the operator’s back, which makes our rack extremely dangerous; avoid such omissions during design and operation.
I recommend that before starting work, you should secure the power cord with regular plastic clamps in several places to avoid it getting under the cutting tool and, in general, it will simply not get in the way.
If it is inconvenient to work with glasses, do as shown in the video below. An example of an excellent device for protecting against debris flying while cutting metal. Simple, easy to use and quick to remove.
Sorry for my French, but I can’t express myself differently. I screwed up the key for the grinder. Went shopping: Stroitel, K-rauta, 220 volts. Everywhere I was denied love and affection. And at 220 volts they recommended buying the cheapest grinder, because... Keys for angle grinders are supposedly not sold separately. In connection with this, the question is: is this the TRUTH.
and I almost never use such a key - only a gas key with a standard one constantly confuses your hands. If you want, I’ll see if there’s a couple lying around in the garage somewhere.
go to local markets and repair shops
I have the same 4 pieces, although I will be closer than FF Group by 700 kilometers
..that's right..
FF_Group wrote: key for grinder.
.. maybe buy a keyless nut and forget about the key forever.
super-krot wrote: at 220 volts they recommended buying the cheapest grinder, because... Keys for angle grinders are supposedly not sold separately
The key that comes with the cheapest angle grinder may turn out to be bad. Probably the best advice is from helmutivan:
helmutivan wrote: buy a keyless nut
They are for sale, I have seen them more than once, and even a universal one - with extendable “mustaches”. I twist it myself by hand and it tightens as I work. When I bite, I unscrew it with a gas valve.
2FF_Group Walk around the SC, it’s usually there.
I've seen keys like this on sale somewhere! So they sell. I could be wrong, but try it at "Metiz"
There is no shortage of them in Joburg; they often catch your eye.
What kind of ushm? Maybe I have such a key, I’ll send it if you don’t find it.
FTOPKU. Their prices are through the roof!
**** is generally inadequate.
super-krot wrote: And at 220 volts they recommended buying the cheapest grinder
hey, I guess your Hammer?? The maxidom had KWB keys for different nuts. rubles under 200 pcs. Another option is to do it yourself, because... For example, my Makita and Cress keys don't have very hard fingers. Option three is to ask at a flea market.
super-krot wrote: Everywhere I was denied love and affection
Stop by tomorrow at the Hilti Center on Fuchika, 4B, there is one thing there, article number 93932. Unless, of course, you don’t mind 148 rubles.
Hilti_Team Maybe the author has a 230th angle grinder.
And they have the same keys, both 125, and 180, and 230. At least, this is the case with Hilti. I think 35mm between pins.
Only Metab keys do not fit Bosch. you need to take the nut with you
I made it myself from an open-end wrench, drilled and welded hardened fingers (3 pieces). Hood. Dear such x.
Hilti_Team wrote: And they have the same keys
No reticence. The nuts are the same for all Hilti angle grinders. You can buy it there, M14, art. 93935, about 175 rubles.
Hilti_Team wrote: No reticence
I don’t know how to “unfold” pages, but there’s an extra. information marked: Characteristics Additional information 125mm/150mm and that's it. as if implying that the key is different for 180 and 230. Yes, God bless him, identical and good
FF_Group wrote: if you want, I’ll take a look, there’s a couple lying around in the garage.
Thank you, comrade, but honestly, our “villages” are too far from each other))
R8ven wrote: I have the same 4 pieces, although I will be closer than FF Group by 700 kilometers
I am ready to move to the specified coordinates at any time tomorrow!
helmutivan wrote: maybe buy a keyless nut and forget about the key forever.
What kind of thing is this? However, I’ll ask differently. It suits everyone's ears. Although, why ask, you have to go to the store.
sledoput wrote: hey, I suppose you have your own hammer??
Yes, h.z., land. I was simply speechless from such a “brilliant” proposal, and the thought of clarifying what was meant by “the cheapest earphone” did not occur to me.
Tundra wrote: I tighten it myself by hand, they tighten up when working.
Novosib
Read also: How to drill out a hardened broken bolt
2Hilti_Team
Hilti_Team wrote: Stop by tomorrow at the Hilti Center on Fuchika, 4B, there is one thing there, article number 93932. Unless, of course, you don’t mind 148 rubles.
Where does this “farsightedness” come from?
Suever wrote: What the hell? Maybe I have such a key, I’ll send it if you don’t find it.
In general, thanks to everyone, guys! For your responses. Here, as Shura Karetny said, the last hairs on my ass stood on end with frustration (the key went with those frairs - although the frair in this situation is more likely me. (( - who did my repairs, and this was just the last straw for me , control in the head :cool, and the fact that you reacted to my post clearly shows me that there are still more good people in the world than freaks of all stripes.
How to make a key for an angle grinder
Tools sometimes get lost, especially for small items. So, today we will talk about how to make a key for an angle grinder.
- dense durable material of wood origin;
- drill;
- pencil;
- saw;
- Sander;
- two bolts.
As for the material of manufacture, we recommend using thick plywood.
First, drill holes in the workpiece you prepared. For marking, use the mounting part of the grinder.
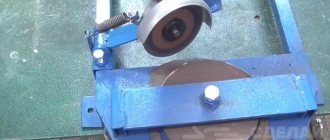
Trim off the excess. You need to make a handle. You will need a jigsaw.
Round the product. As you can see, in our case the master has a large assortment of machines. We assure you that you don't need all this. A jigsaw and a grinding machine or an emery machine will be enough.
Mark the locations for drilling holes.
Drill them with a slightly smaller diameter drill, then cut the threads. Of course, you can do without cutting, this is not at all necessary.
Screw the bolts into place. If necessary, tighten the nuts on them if they are too long.
Perform final sanding.
As a result, you should get something like this key for an angle grinder.
In principle, everything is easy and simple. Once again, we note that it is best to use plywood.
Replacing a disk in normal mode
When operating an angle grinder regularly, you need to constantly change the wheels, which are consumables. If the tool is no longer comfortable to work with, then the worn abrasive wheel should be replaced.
Important! Be sure to check the electrical disconnection to avoid personal injury.
Step-by-step algorithm of actions
The circle is secured to the spindle head with a locking nut having an M14 thread. The standard configuration includes an open-end wrench with special protrusions for engaging with the holes of the fixing flange.
To unscrew the nut, you need to fix the spindle. For these purposes, there is a special lock located on the back of the angle grinder. By pressing the button, you will secure the gearbox with a cotter pin, eliminating the possibility of its rotation.
Insert the key into the holes. Hold the latch with one hand, and with the other turn the wrench counterclockwise, moving the nut.
The direction of movement of the disk is usually clockwise. However, there are models that may have something different. In any case, unscrewing occurs in the opposite direction to rotation.
Once the nut is in place, it can be unscrewed by hand without any effort.
Remove the retainer and the old circle.
Remove the bottom flange.
After intensive work with a tool with metal inside the casing, you can find a layer of burnt scale with abrasive. Use a steel brush to remove residue.
After cleaning, install the lower flange in place, aligning the grooves of the spindle with the grooves of the flange. A gasket is placed on top.
If your model does not have additional spacers, then such washers can be prepared from plastic or thick cardboard. Next, you need to correctly place the disc on the grinder and cover it with a similar gasket.
Important! Installed spacers allow you to easily unscrew the nut, even if the disc is pinched or broken. Use your hand to tighten the top clamp counterclockwise (counter-rotation), supporting the cutting wheel.
In this case, you also need to tighten the spindle lock and tighten the flange until there is noticeable resistance. Use the open-end wrench to tighten it with a little more effort. Do not over-tighten the fastener, otherwise you can overtighten the circle and it will warp
Use your hand to tighten the top clamp counterclockwise (counter-rotation), supporting the cutting wheel. In this case, you also need to tighten the spindle lock and tighten the flange until there is noticeable resistance. Use the open-end wrench to tighten it with a little more effort. Do not over-tighten the fastener, otherwise you can overtighten the circle and it will warp.
Now you can continue to work. However, problems arise from time to time and it is simply impossible to unscrew the disc on an angle grinder. Let's see below how to change the disc on an angle grinder in such cases.
How to change a disc on an angle grinder: 4 unconventional methods
An angle grinder is a universal power tool. With its help, you can cut steel profiles and wood, process concrete and stones, perform grinding and roughing work, and sharpen hacksaws. And for each operation there is a specific circle. For example, you cannot grind surfaces with a thin cutting wheel for an angle grinder - it will quickly break. How to properly place a disc on a grinder when grinding and breaking a wheel or switching to another type of work?
According to the instruction manual, replacing the disc on an angle grinder should be done as follows.
- Unplug the power tool cord from the outlet.
- Press the spindle rotation lock button.
- While holding the grinder's stop button, use an open-end wrench to unscrew the flange nut. You need to turn the angle grinder wrench in the direction of rotation of the disk. If it is difficult to press a button with one hand and operate the key with the other, ask someone close to you to help.
- Remove the old disk from the spindle shaft.
- Install a new disk.
- Secure it with a nut manually or using the same universal wrench. At this moment, you need to hold the stopper with your other hand. Do not overtighten the nut.
- Plug in the grinder for 30 seconds at maximum speed. If the disk rotates freely, without beating, without touching the protective casing, you can start working.
The delivery set of the angle grinder must include an open-end wrench. Cheap grinders often come with a poor quality key. It can quickly break (however, this also happens with tools from leading manufacturers). In the end, the key can simply be lost. How to properly install a disc on an angle grinder in this case, without having a suitable tool at hand?
Read also: Why do you need to move the wire during EDM cutting?
The most reliable way is to simply buy a new key. You can take a standard one, for a specific flange for an angle grinder, or a sliding one, with the ability to adjust the jaws. But keys for angle grinders are not sold in all hardware stores, and finding the right tool can be difficult. We bring to your attention several tricks with which you can change the disc on an angle grinder without a universal key and save nerves and money.
How to change a disc on an angle grinder without a key?
Method 1. Use a gas wrench. Use an adjustable pipe wrench to grasp the nut and carefully unscrew it without applying much force. Disadvantage: you can crush the nut and break the rotation lock.
Method 2. Make a homemade key for the grinder. To do this you will need a long nail (at least 100 mm). You need to cut off the head, the point and give the nail a U-shape. It should be bent in such a way that the “tool” posts fit into the holes in the flange. If the nut is tightened tightly, insert any metal rod between the posts of the nail and, holding it with both hands, rotate the structure in the direction of movement of the circle. At this time, you need to press and hold the spindle lock button. The method is safe, but it requires time and additional tools - a hacksaw, a vice, a hammer.
Method 3. Tapping with a chisel. Before changing the disk, you can treat the spindle shaft with WD-40 and wait at least 15 minutes. Then place the tip of a thin chisel at an angle to the hole of the flange nut and gently tap over the entire surface of the hole with a plumber's hammer. Sooner or later, thanks to gentle tapping, the nut will move, and it will be possible to unscrew it manually. The disadvantage of this method is that the holes can be damaged and the flange can be damaged.
Method 4: Heat the nut. If it is difficult to unscrew the angle grinder nut by hand, you can heat it a little with a gas burner or autogen. You need to wear gloves when unscrewing the flange to avoid getting burned. This is the riskiest of the proposed methods. It is possible to overheat the bearings and oil in the gearbox of an angle grinder.
Finally, I would like to mention a few important points regarding replacing a disc on an angle grinder.
- You need to install wheels of the appropriate size on your angle grinder. It is necessary to strictly observe safety precautions and under no circumstances remove the protective casing to install a disc of a larger diameter. When choosing a disk, you need to take into account the model of the power tool, its power, and spindle speed.
- Due to the disk rotating at high speed, hardening forms on the protective casing of the angle grinder. Therefore, when changing a disk, remove and clean the casing.
- Some models of angle grinders are equipped with washers to prevent the disc from getting stuck between the flanges. At the very least, the support flange can be equipped with a rubber washer. Instead of factory fasteners, you can cut gaskets from cardboard, rubber or plastic. It is necessary to use 2 gaskets: between the support flange and the disk, between the disk and the nut.
- Do not forget: if the circle rotates clockwise, then the nut is also unscrewed clockwise and tightened counterclockwise.
- If you don’t want to buy a new key, install a Bosch quick-release nut on the angle grinder - you can easily unscrew it by hand.
The main thing is that when changing a disc on an angle grinder, do not violate safety precautions and perform all manipulations with the tool unplugged.
What causes the disc to jam and why is it impossible to unscrew the disc?
Most often, a malfunction occurs upon contact with the material. In idle mode, such problems are not observed, since the number of tool revolutions remains stable. But, when we start grinding or cutting metal, then the number of revolutions begins to increase, which is reflected in the operation of the disk and the angle grinder.
You can recognize a jammed disk by the following signs:
- the number of revolutions of the tool circle sharply decreases and braking and jamming can even be observed;
- the disc may be deformed due to even stronger clamping of the nut;
- increasing the diameter and depth of cutting.
In this case, you need to react to the current situation in time and take action. In this case, you definitely need to remove the jammed disk from the grinder and try to solve the problem with the least amount of time and effort.
One of the most common reasons for a jammed nut is that you have not used the angle grinder for a long time, and the nut, bolt or washer is rusty. Consequently, this causes the tool to malfunction. If you encounter this situation, you need to perform a number of actions:
- To begin, unplug your angle grinder.
- Spray the structural parts of the angle grinder with an anti-corrosion agent or a special solvent liquid. The product must get on the washer, nut, and bolts.
- After this, you can proceed to removing the protective casing and individual parts that can be unscrewed.
If special means do not help to cope with the problem, then you need to move on to the second method. Its essence is to preheat it with wax, after which you can use a wrench to unscrew the nut. Control the force so as not to break the sanding disc.
Sometimes the wheel cannot be unscrewed due to the wrong direction of unscrewing the nut. Make sure you are unscrewing in the correct direction. If the nut cannot be unscrewed with a simple wrench, then you can apply force with a hammer
But, in this case, it is important to carefully adjust the force so as not to damage the parts of the angle grinder.
The method by which you can unscrew the nut and fix the problem largely depends on the type of grinder. The method of fixing the disc on the grinder also plays a role. Most often, in order to remove a disc from an angle grinder, you will need a wrench or a screwdriver.
If you decide to remove the disc from the angle grinder yourself or replace it, be sure to think about the security system. Grinding machines and their cutting parts are very sharp, so you need to be extremely careful and do not forget about protective equipment. In addition to overalls, safety glasses will be required. If a wheel breaks, particles can fly off and hit your face. If the wheel is stuck and you cannot solve the problem, you will have to resort to more labor-intensive methods.