I was doing some simple woodworking and needed a router. But since I was not sure that this tool would be needed often, I did not buy it and made the router myself from an angle grinder. I thought that this experience would be useful to readers, and then I will tell you how to make a wood router from an angle grinder with your own hands.
Hand tool
So, how to make a milling cutter from a grinder... It is important to use a vice or clamps to securely hold the workpiece. Otherwise the part will not be stable. Using various methods, you can make a milling machine from a grinder. I'll tell you about one of them.
You need to start by developing drawings of the basic base of the tool. The best solution is to make a metal base. It must have sufficient thickness and weight. All this affects how reliable the device will be. Let's move on to creating a plate for fixing - a bracket for attaching an angle grinder. The same material is used as the base. It is also important to make connectors for the back of the instrument. They should be made in the place where the handle is located. Blanks can be made of any shape.
Parts of square pipes are welded to the edges of the fixture. Products that are longer and have a smaller diameter will be guides. They must be welded to the base. In order for the tool to be fixed as securely as possible, you will need to create and weld metal “ears”. To fix the tool at the required height, you need to make a mount. To do this, you will need to weld two nuts and place threaded rods in them. Wing nuts must be attached to them using welding. Thanks to this manipulation it will be easy to fix the tool in the required position.
Source uk-parkovaya.ru
As an adapter, you need to place a drill chuck on the attachment. To install it, you need to cut the thread in advance. It is cut from the inside and must match the angle grinder shaft. After which the drill chuck is screwed onto the shaft and the necessary cutter is installed in it. Next you need to assemble the machine and secure it in the bracket.
How to make a start button for a pendulum machine from an angle grinder
The angle grinder works when you press a button. Moreover, the spindle rotation speed depends directly on the pressing force of the button. This means that an adjustment mechanism is built into the button, the operation of which facilitates the operation of the tool. When operating an angle grinder on a stationary machine, it is necessary to consider the starting system so that you do not have to hold the handle with one hand and press the button with the other.
If the tool is equipped with a regular button, which automatically locks when it is turned on, as for example in the first version of the machine, then no difficulties arise here. First, the tool is turned on, and then you can perform work. However, most angle grinders are equipped with self-off buttons that must be held by hand while operating. There are two ways out of this situation:
- Use ties (for example, plastic) or clamps of the appropriate diameter. They fix the button in the pressed position. In this case, it is also necessary to take into account the latch, which is responsible for turning the tool on automatically. Both the latch and the button must be tightened with a clamp, tie or other similar materials. In this case, the principle of operation of the device will be as follows - if you need to start the tool, you need to plug the plug into a socket or make a switch
- It is rational to remake the starting system if the tool is planned to be used more often as a cutting machine than as a stand-alone angle grinder. To do this, it is necessary to route the wires from the angle grinder to a separate switch, which will turn the tool on and off if necessary.
The power button, if it is displayed, is best located on the handle. A homemade machine does not require large expenses for its production, which, in fact, is its main advantage.
Stationary tool
The design includes the following elements: a table top with a lined rail, a drive and a solid base.
Source crydee.sai.msu.ru
The following types of such devices are distinguished:
- fixed table top – movable tool;
- movable base – stationary tool.
Design Features
A standard router consists of the following components:
Base or frame.- Work stand.
- Electric drive.
- Electric motor.
- Working mechanism.
If the base and work table can be made from scrap materials, then the working head, electric motor and cutters are a little more difficult to build.
When considering the option of using a grinder to make a machine, it is important to provide for the presence of a stepper motor in the design. The drawings take into account that the installation of the cutter requires the use of stepper motors. Creating a working head is not an easy task. These characteristics immediately affect what abilities the machine will have.
The following technical characteristics are important:
- Electric motor rotation frequency.
- The power of an electric motor.
- Desktop scale.
- Maximum weight of workpieces.
Movable base - stationary tool
It is necessary to make sure that the tabletop is mobile and the grinder is motionless. So that the tabletop can be moved under it, you need to build a structure of guides. It is important that the tabletop is securely fastened. We fix the angle grinder on the vertical bed. It should be strictly to the side of the workbench.
Algorithm of actions:
- make a wooden frame (you can also make it from corners);
- install plywood to the frame;
- to make a good milling cutter from an angle grinder, you need to create connectors specifically for the shaft of this tool;
- using clamps you need to fix the device in the frame itself;
- Make guides on the tabletop so that the part can be moved freely;
- the surface needs to be sanded and painted.
As a result, you will make a device with a vertical attachment..
Source bifai.ru
Self-tapping screws should not be visible above the surface of the countertop. As for the guide rails, it is important that they can be easily rearranged and removed. The best option for fixing them is self-tapping screws.
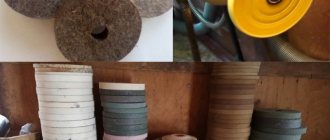
To use all the capabilities of a homemade milling machine, you will need to buy additional attachments - cutters.
You can clearly see how to make a router from an angle grinder in this video:
A slightly different look at the question - about the advisability of making a router from an angle grinder, see this video:
Algorithm for making a milling cutter from an angle grinder
The manufacturing algorithms for a stationary milling installation and its manual counterpart are different. The latter option is easier to implement: less labor and materials are required.
Stationary machines
The milling machine consists of the following structural elements:
- strong, stable frame;
- drive;
- table for performing work with a ruler (slat).
Accordingly, when creating a working model of the installation, you will need to make these parts and then connect them together. An angle grinder will be used as an electric drive. It will need to be securely fastened to the table top.
The stationary machine can be made in two versions: with an angle grinder fixed on the table or with a movable installation of an angle grinder. The first one is quite easy to implement practically with your own hands. It should be taken into account that the working tool can be secured so as to perform processing in horizontal or vertical planes. The order in which the installation is assembled depends on this.
A machine for processing a workpiece in a horizontal plane (with a vertical cutter position) is assembled in the following sequence:
- make a frame from metal corners (they are connected by welding) or wooden blocks (fastened with self-tapping screws);
- sheathe the frame with chipboard or plywood, securing the sheets with bolts;
- a hole is cut out in the tabletop for the angle grinder shaft (larger in diameter than its cross-section);
- using punched paper tape or clamps, attach the grinder to the table top with bolts from below, approximately as shown in the photo below;
- on the surface of the tabletop, planks are installed from wooden slats (pieces of chipboard or plywood), which act as guides along which the workpiece will move;
- wooden and metal parts of the structure are painted (after having been cleaned with sandpaper);
- For ease of operation, attach the toggle switch for turning on the grinder.
The bolt heads located on top of the tabletop must be flush with its surface. Therefore, you will need to drill holes of the appropriate size for them. The guides are removable structural elements. They need to be rearranged for each workpiece. They are often fixed using self-tapping screws.
It is necessary to provide such access to the grinder so that it is convenient to change attachments.
Using a toggle switch, you can supply power to the power tool by simply locking its button in the on position. A more difficult option would be to remake the electrical circuit of the angle grinder.
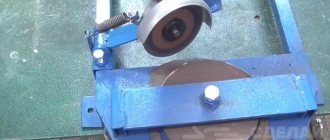
The option with a horizontal cutter arrangement is implemented in a similar way, only the grinder is fixed to the side of the structure, resulting in something like a circular saw. The appearance of the created machine is demonstrated in the photographs below.
To use the machine, you need to install cutters. There are varieties of them on sale that resemble ordinary cutting discs, which are fixed to the shaft using a clamping nut. An adapter is required to use key bits. Moreover, on one side it has a threaded seat (for screwing the grinder onto the shaft instead of a nut), and on the other, for fixing the cutter.
Manual frezer
With a movable version of fixing the angle grinder, it is easier to remove it if necessary in order to use it for its intended purpose. It is much easier to make a manual router than to create a mechanism that allows it to move back and forth, as well as left and right. Working with such a tool will require securely securing the workpiece so that it does not vibrate or move, for example, in a vice or using clamps. This will largely determine the quality of the work performed, as well as the convenience (speed) of its implementation.
There are many options for making hand-held tools from angle grinders for milling. At the same time, different materials are used in the work. The method for creating a hand-held wood router from an angle grinder is demonstrated in the video below.
Manual devices are more reminiscent of attachments for an angle grinder, allowing you to use it like a router. The simplest models do not provide for vertical movement of the cutting attachment. They are designed to perform simple operations.
If we compare the manual and stationary versions of homemade milling cutters, it should be noted that the quality of processing of the latter is higher. But the first ones are easier to make, and the grinder can be easily removed if necessary. The tool must be handled carefully, following safety precautions. It’s great when an angle grinder has a speed controller. This allows you to set the desired rotation speed of the cutter while working with different materials.
Dictionaries
Shows the frequency of words used. It is not necessary to indicate the word in the infinitive. In Russian, you can search by phrases and set phrases like “Like soot is white.” Video advertising and banners are a bit of a nuisance.
Classes.ru
Selects similar expressions. You can also find out the accents, declinations and in what context the term is used so as not to make mistakes. It is necessary to search in the initial form.
iSynonym
No advertising. Convenient minimalistic interface. It is necessary to search by infinitive; by declensions it gives bad results.
Text.ru
Doesn't find similar words if you search in the inclined form. There is an alphabetical search. Shows what part of speech the found word is. Works with idioms.
Jeck.ru
The initial form must be specified. Poorly searches by declensions of nouns and verbs. Doesn't match anything to phrases or phraseological units.
Synonymonline.ru
Consists of +220,000 words. Doesn't search by declination. Enter only the infinitive or use the alphabetical index. Doesn't look up anything using phraseological units.
Copy milling machine
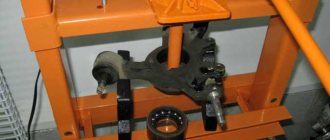
Nowadays, copy milling machines based on 2D and even 3D technologies are moving into the category of standard equipment. In the first case, milling cutters with a tabletop or mounted pantograph are manufactured. The desktop version is simpler, but the copying accuracy is only 1 mm. A mounted pantograph makes it possible to ensure high precision processing and even engrave.
Necessary materials
In order to make a milling bed for an angle grinder with your own hands, you will need the following parts, which every craftsman probably has in his workshop, garage or dacha:
- two steel profiles (one must be wider than the other so that it fits freely into it) of square or rectangular cross-section for the manufacture of support structures for the frame;
- sheet of metal (steel or stainless steel) 7-9 mm thick for the sole and other structural components;
- an angle grinder or a drill with the grinding wheel and half-casing removed (and the drill with a chuck, respectively, so that the axial shaft is open);
- an old drill chuck (it will have to be modified, after which it can no longer be used for drills) - it will be a “nozzle” for the cutter;
- fastening elements: bolts, clamps, nuts.
Important. To work on metal, the workshop must have a vice, a saw blade (with teeth for cutting metal), an electric drill (hand or machine), a grinding wheel, electric welding, drawing instruments for preparing models (including a chemical pencil, crayons or markers).
Carpentry workshop equipment
A few more interesting suggestions on how to make equipment for home carpentry using a regular screwdriver.
Wood lathe
When making wood products, it is difficult to do without a lathe. You can build it yourself. A flat wooden workbench is ideal for the bed. A screwdriver can be used as a headstock and rotation drive. You need to place the tool in a wooden bed made from a block in the shape of a screwdriver and secure it with a clamp. The block can be secured with a clamp, and if the machine is constantly used, screwed with self-tapping screws. A tooth mandrel must be inserted into the chuck. The tailstock is made of two bars with an adjusting screw, which is sharpened to a cone. It is installed opposite the fixed screwdriver so that the axis of the tool coincides with the axis of the tailstock adjusting screw. The back support structure is secured with a clamp. If you plan to process large parts, then the fastening should be more reliable. The tool rest can also be made from a block, securing it to the workbench with a clamp. A primitive lathe for the home workshop is ready.
Bench Drilling Machine
Another equally important piece of equipment is a drill. It can also be made from a screwdriver. To do this you will need a used screwdriver. From it you need to take a motor with a gearbox and a cartridge. Now you need to make two clamps from textolite, which will perform the function of fixing the drilling head of the machine. To achieve maximum alignment of all holes on the clamps, it is better to process them together, in one installation. Then you will be able to avoid distortions.
Bushings with internal threads are used as limiting posts. They must be the same size, corresponding to the distance between the clamps. After this, another clamp is made from textolite and two bosses from caprolon. They are drilled off-center, resulting in two eccentric bushings. The clamp is installed on the rod and the backlash is selected using eccentrics. After this, install a wooden lever on a spring so that the drilling head returns to its original position. To supply power, you must use a transformer with a power of more than 150 watts and an output voltage similar to the screwdriver you are using. After this, you need to install a diode bridge and a capacitor, and install the drilling head on the frame.
Manual router from a screwdriver: step-by-step instructions
It can be converted into a hand router. To do this, you do not need to purchase expensive materials. Everything you need can be found in the workshop or garage, practically under your feet. To make a manual router from a screwdriver, you will need pieces of thick plywood or chipboard, a clamp for attaching the tool, fasteners in the form of bolts and self-tapping screws, plumbing tools and a feather drill for wood. In the latter case, you can use a drill bit.
Assembling a homemade router is quite easy. To do this you need:
- From pieces of the selected material, cut out a base, a vertical stand on which a screwdriver will be attached using a clamp, a stop and a gusset to impart rigidity to the structure. The dimensions of the parts are chosen arbitrarily, in relation to the dimensions of the power tool.
- Using a pen drill, drill a Ø 40 mm hole in the base for free access of the cutting tool to the processing area.
- Make a clamp according to the diameter of the hand tool.
- Using a clamp, secure the screwdriver to a vertical stand so that its chuck is a few millimeters from the base.
- Install the stiffener.
- Secure the screwdriver with the stop on the vertical stand.
- Install the cutter into the tool chuck.
The screwdriver cutter is ready for use. Such a machine cannot become a full-fledged replacement for a manual milling cutter due to its low power and low spindle speed, but it will solve the problem of milling small parts in a home workshop.
Circular Saw
In addition, for your carpentry workshop you can make a circular saw from a screwdriver. To do this, you need to make a working surface using a sheet of chipboard or thick plywood. You need to make a cut in the tabletop to allow the circular saw to exit. The screwdriver must be securely fastened to the underside of the work surface using metal or wooden clamps. In the same way it is necessary to mount the shaft
It is important that the saw blade extends above the working surface of the table by no more than a third of its diameter
General information
Tools and accessories
A vertical router, unlike a standard drill, has a flat base, namely a sole on which it will stand and move along the table or part being processed. The body will be fixed and begin to move vertically along the guides. In order to make a homemade router based on a drill, you need to make a stand and attach an electric drill to it.
If you wish, you can replace the plywood with laminate or chipboard of the same thickness. A cutter made from an electric drill will be much more convenient for work if the sole, that is, the base, is made of organic glass with a thickness of 1 to 1.2 cm. In this case, the work area will be clearly visible, as well as the markings on the board. Metal clamps and fittings should be used as simple as for water pipes.
The size should be selected according to the diameter of the drill body, just above the chuck. Secure the wood router with screws 0.5 cm in diameter and 2 cm in length. Self-tapping screws of this size are very often used to make crafts from wood. They can be used to attach brackets, shelves and hooks. Often, after repairs, screws remain, and they can be replaced with self-tapping screws, the diameter of which is 0.55 cm and the length is 1.8 and 2.2 cm.
In order to make a wood milling machine from an electric drill, you need the following:
- Wrench.
- Electric drill.
- Drills 0.4 and 0.8 cm.
- Spade or core drill.
- Electric jigsaw.
- Screwdriver.
As a rule, in a home workshop or garage you can easily find all the necessary tools, and a screwdriver can be replaced with a Phillips screwdriver, a jigsaw with a hand hacksaw for wood.
Milling design based on a conventional drill
Considering the power and speed, you can only make a light cutter from an electric drill. For high-quality processing of wood and boards, the working tool must be fixed on the table and the workpiece must be moved. The design with the top arrangement of tools will make it possible to make parts with complex configurations. Each home craftsman comes up with his own design, and they all differ in fastenings, as well as the placement of the electric drill.
Rules for cutting wood
Milling with a grinder requires compliance with certain rules:
- the attachment on the grinder must be designed for wooden products;
- removal of the protective casing is unacceptable;
- using a large tool can lead to it being pulled out of your hands;
- work must be performed with gloves or with a rigid fastening of the device;
- the speed of the grinder should be minimal;
- before starting operation, you should make sure that the material does not contain nails, screws or other metal parts;
- the tool must be kept in one plane, avoiding distortions;
- it is impossible to lock the button in operating mode;
- The nozzle is replaced when the power is turned off.
Sometimes following these recommendations may not affect the guarantee of safety when cutting wood. The decision to use a grinder when processing wood should be made by the master himself. If you have a large amount of work, it is better to use a circular saw or electric jigsaw.
Cutting and processing of wood can be done using a popular tool - an angle grinder. A do-it-yourself milling machine made from an angle grinder will help you cope with a small amount of work with wood. Only in such situations should safety precautions be strictly observed.