Modern crafts involve the use of an auxiliary material such as epoxy resin, which you can make yourself. The material exhibits its unique properties when combined with a hardener. So how to make epoxy resin at home?
- How to dilute epoxy resin with hardener - proportions
- How to check the quality of the resulting composition
How epoxy resin works
The solution belongs to the two-component category, for the preparation of which two ingredients are used that are mixed together. We are talking about resin and hardener. Based on the chemical characteristics of the elements used, they both belong to polymers. Their molecular weight is small. The joining process involves a polymerization process. This means that small particles combine to form larger molecules.
The entire solution is subject to the process, so after hardening, the resin is a single element. Epoxy is a mass-forming element. The hardener is responsible for starting the polymerization process. Both elements should not be mixed with each other before preparing the solution. This process is irreversible. As the temperature increases, the process accelerates. Increasing the hardener in the solution will also give a similar result. To achieve the opposite effect, the temperature is lowered.
Precautions when working with resin
The chemical composition of epoxy resin is specific and implies the presence of toxins. However, the resin itself has amazing properties, since after hardening the product turns out to be absolutely harmless to others.
When working with the composition, you should use protective gloves, and the room chosen for work should be thoroughly ventilated.
If the composition gets on the skin, it should be washed off with a soap solution and a sponge. You should use a respirator during the grinding process.
Transparent hardeners, non-coloring compounds
When buying a can of epoxy for future use and keeping in mind its future versatility, you need to immediately take care of the crystal transparency of not only the epoxy compound, but also the component B that comes with it to start the polymerization reaction, and this can be either TETA (triethylenetetramine) or a hardener from the 921 series OP, 921 T.
Such a hardener can be laid in a layer of up to 10 mm without compromising the quality of pouring or castings, and there will be no change in the properties of the material. They are quite possible if the hardener is not intended for diluting large volumes of epoxy resins.
How to work with epoxy resin
In order to frame a hand-made craft, you should mix both components - epoxy and hardener - in the correct proportion (it is given in the instructions). Afterwards the composition is thoroughly mixed.
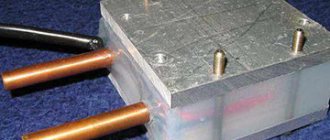
A disposable syringe will help you quickly and without noticeable damage measure the amount of hardener and resin. Epoxy resin is poured into silicone molds (carbuchons can also be used). The material will completely harden within 24 hours if the temperature is maintained at +25°C - +50°C.
Applying epoxy resin to a table
If a non-dried product is left in a cool room, a specific coating will form on the surface. To achieve the maximum permissible strength indicator, the product is then heated to a temperature of 100°C. The reaction between the components that has begun is irreversible. It is not possible to reuse frozen resin, so it must be used after first calculating the exact amount.
Table treated with epoxy resin
Epoxy resin is used to bond or create a protective layer between non-porous materials such as porcelain, ceramics, earthenware, dense woods and metals. Ultimately, the composition can turn out to be both elastic and incredibly hard. The resulting composition is applied in a thin layer to the work surface, then the two separate elements are compressed and glued together. Remaining glue is carefully removed. It is possible to add auxiliary components such as aluminum powder.
How to dilute epoxy resin with hardener - proportions
Different percentages of the ratio of hardener and resin will make it possible to obtain a wide variety of compositions. Once the reaction has started, it is considered irreversible. The resulting resin cannot be melted, dissolved or reused.
The standard ratio of hardener to epoxy resin is 1:10. That is, for 1 part hardener there are 10 parts resin. An overdose of hardener is allowed, up to 1:5.
The quality indicator is directly affected by the ratio of hardener and resin:
| Excess hardener will appear on the surface of the product after it has dried. | If you do not add enough hardener, the composition will be too sticky due to the resin that has not reacted |
You can learn more about the mixing process and proportions from the video:
Volume of resin, shape of the vessel and their effect on heating the mixture
The mixture of components A and B, that is, the resin compound and the hardener, self-heats to one degree or another when mixed. Moreover, the degree of heating can be such that the composition spontaneously ignites or smokes, or, in any case, boils, quickly hardening before our eyes, which will make its use absolutely impossible.
Without exception, all epoxy resins, regardless of whether they are polymerized hot or cold, work as thermosetting compounds, that is, the polymerization reaction with gradual thickening and then hardening of the mixture occurs with a large release of heat, that is, it is classically exothermic. In this case, the shape of the vessel in which components A and B are diluted has a huge impact on the rate of temperature increase and its magnitude, as it may seem incredible. The closer it is to cubic or, especially, spherical, the faster and stronger the heating.
Useful to know > What fillers are used for epoxy resin and why they are needed
Full analogy with nuclear fissile materials, the critical mass for plutonium and uranium-235 is about two kilograms. But a fission chain reaction with this mass is only possible if this metal is given the shape of a ball. Roll it into a pancake 5 mm thick, and a plutonium or uranium casting can be made up to 10 kg, without nuclear fission reactions occurring.
Something similar happens with epoxy, only not at the physical level, which affects the very foundations of matter, but at a lower, chemical level. Just as in plutonium free neutrons increase their concentration with equal weight, but in a more compact volume, which causes a chain reaction, so thermal quanta in the mass of epoxy, which is close in shape to cubic or spherical in its liquid state and mixed with a hardener, also increase their concentration per unit volume and initiate rapid self-heating. And of course, the output of energy, monstrous in its volume intranuclear or simply thermal in the case of a chemical reaction, is incomparable.
If you need to dilute a lot of resin at once in order to fill large surfaces, you should simply use a container with a wide bottom and low sides, that is, in a shape that is far from a cube or ball. The large surface of contact with air will serve as a kind of cooling radiator. This technique is used if the floor area to be filled requires the simultaneous dilution of a large volume of epoxy resin. You can also additionally place such a vessel in a larger area and volume, but partially filled with ice water or even ice.
Another way to prevent boiling and premature curing of the epoxy mixture is to do discrete, intermittent pours. They poured a 1 cm layer, waited for it to harden completely, only after that a new portion of resin was diluted and the next one was poured, and so on until the casting of the required volume and thickness was obtained. True, this method requires a particularly clean workplace, the absence of dirt and dust, and it is also necessary to prevent moisture, and especially water, from getting into the workpieces.
How to make epoxy resin with your own hands
When making epoxy resin, it is customary to use clean and dry containers and tools. The compound uses different amounts of ingredients, depending on the manufacturer. The use of domestic raw materials implies a proportion of 10:1, where ten parts of resin are taken and one part of the hardener is added. Depending on the manufacturer's brand, the indicated proportion may differ. Before you begin kneading a large volume of material, you should knead a small (test) amount.
The manufacturing instructions will look like this:
| To begin with, all components used must be carefully measured. A medical syringe is best suited for these purposes, after which the ingredients are placed in different containers | |
| Mixing is carried out alternately until a homogeneous mass is obtained. You can use wooden sticks for stirring. | |
| The composition should be heated to a temperature of +50°C - 65°C. | |
| After reaching a certain temperature, a hardener is added to the epoxy resin. | |
| The finished composition can be used for one and a half hours. |
You can also watch several master classes on working with epoxy resin to understand how to work with it:
How to check the quality of the resulting composition
In order to check the quality of the resulting composition, you need to take a little of the finished mixture into a small spoon. You should use a metal product - the composition is heated in it until it boils.
After cooling, the quality of the composition is visible to the naked eye. If the material remains viscous in the spoon and looks more like rubber, then little hardener was added to the composition. The option of purchasing a low-quality product should also not be ignored. If the hardening went well and the result is excellent, then you can use the product for its intended purpose.
Secrets and useful tips
To make an ornament that is as beautiful as jewelry, break off wooden blocks by hand. This will create asymmetrical stripes and lines that give an original design. If bubbles appear, you can place the composition in a container of hot water so that they come to the surface. Cut the resin to resemble a crystal. It is best to frame the product with metal fittings.
Those new to the hobby are advised to try several different compounds to see which works best. First, you should learn how to cast the base and process it, and only after that combine epoxy with wood and other materials. For this purpose, special forms are ideal, which can later be replaced with homemade acrylic formwork.
Handmade jewelry made from epoxy resin and wood always looks fresh and original. It is exclusive, since it is impossible to repeat exactly this or that product. Creating such jewelry will be a great hobby or a way to earn a little extra money.
How to make colored epoxy resin
Epoxycone, a type of special paint for epoxy resin, is excellent as such pigments. Dry colors used for enamel, alcohol stains, aniline dyes, toner from a printer and paint from fountain pens are also suitable. The use of stained glass paints is allowed, but only water-based. Green color can be obtained using pharmaceutical brilliant green. Additives will also affect the consumption of the composition in addition to coloring it a certain color. The colors available are:
- white;
- dark gray;
- black.
In order to color epoxy resin, a variety of pigment additives can be used. However, they should be added only in dry form, or in combination with a nitro solvent.
Features of giving color
Epoxy resin is a transparent material. It can be made colorful by adding special dyes.
Types of paints for epoxy resin and their properties can be considered in the table.
|
The appearance of the finished product will depend on the amount of paint added to the mixture. If you add 2-3 drops of dye to the resin, it will acquire a translucent shade and will transmit light.
To get a more saturated color, you will need more color. To obtain a deep and rich color, epoxy resin is pre-painted white and then color is added. Epoxy resin can be painted not only with special compounds. A good dye can be obtained using non-trivial methods.
Epoxy resin (you can make a coloring pigment of an unusual shade at home by mixing the components listed later in the article) can be painted with materials such as:
- Ink from ballpoint and gel pen refills.
Epoxy resin paints
Oil paints
Be careful when using pigment from ballpoint pens. Sometimes they can give unpredictable results. For example, green paste gives a brown tint when mixed with resin. It is better to test the dye on a small amount of material in advance.
- Oil paints (artistic). They should be used drop by drop before the hardener is added to the resin.
- Paints for polymer clay. Gives bright and rich shades.
- Alkyd paints. They mix well with the resin and do not react with it.
- Powder toner for printer. Useful if you need to get a thick black color.
- Talc and colored powder. With their help you can obtain delicate, pastel shades of resin.
- Crushed graphite from colored pencils. Difficult to mix with resin, but produces rich colors. It is better to use pencils with soft lead.
Dry pastel
Water-based stained glass paints
- Dry pastel. The result is a rich, matte color.
- White cosmetic clay or chalk. These substances will help give the resin a snow-white color.
- Zelenka. Gives the resin a rich green color.
- Water-based stained glass paints. The best option for coloring resin at home.
How to use dyes correctly:
- Oil and alkyd paints should not exceed 8% of the total weight of the mixture to be painted. An excess of these dyes affects the hardening process of the resin. It may remain in a rubbery consistency and not harden any further.
- When adding other dyes, it is not recommended to exceed 5% of the total mass of the composition.
Add paint to the epoxy resin little by little, stirring vigorously
- Paints should not be diluted with water. It can negatively affect the hardening process of the mixture.
- The temperature of the material to be painted should be about 25 degrees.
The paint needs to be stirred vigorously so that it quickly gives the composition the desired color.
Epoxy resin curing stages
The epoxy composition goes through several stages of hardening . Conventionally, they can be divided into the following stages:
- At the very beginning, the consistency is liquid, it will drain well, which is very convenient at the pouring stage. Thus, the composition will get into even the smallest cracks.
- Over time, the mixture will become thicker. It can only be used for filling forms that do not have a pronounced relief.
- The third stage is the most difficult to work with. The density of the composition will resemble honey, which will allow it to be used only for connecting large elements together.
- Afterwards, the mixture becomes very thick, which will make it impossible to separate even a small piece from the total mass.
- The penultimate stage is often called the rubber stage, since the composition no longer sticks to your hands, after which it can be crushed and bent at your discretion. However, the resulting figure needs to be secured. Otherwise, the material will return to its original form.
- The very last stage of hardening implies a finished product, which is extremely difficult to even scratch. It will tactilely resemble a plastic mold.
Filling the pendant
Having prepared everything you need, you can start working. But first you should cover the work surface with a layer of polyethylene. It is almost impossible to wash the resin from the materials to which it adheres. The wizard's step-by-step actions look like this:
- Installation of homemade formwork or open mold (as options - ice or chocolate molds). The form must be placed perfectly evenly. This is not a picture where every millimeter is critical for harmony, but it’s still better to try.
- Securing the wood slices inside. You can attach the pieces to the bottom with hot glue so that they do not float up in the resin.
- Mixing resin. The solution must be mixed exactly according to the manufacturer's instructions. There are no universal proportions - they vary from company to company. If the proportions are indicated in mass, you need to use electronic scales (kitchen scales are suitable). If in volume, a syringe is perfect.
Note! The hardener is always added to the resin, and not vice versa. If the composition is planned to be colored, the coloring pigment is diluted in the resin before adding the hardener. Maintaining this sequence is extremely important.
- Before pouring, the container with the resulting solution can be placed in another one with warm water (its temperature should not exceed 60 degrees). Outwardly, it will look like a steam bath. This life hack allows you to get rid of air in the composition faster and better.
- It is necessary to carefully mix the solution in a circular motion. It is important to walk tightly along the walls. If possible, expel all remaining air bubbles. Mix in this way for at least two minutes, it is better to do it longer.
- Carefully pour the resin into the mold. At the first stage of hardening, it is liquid and will itself be evenly distributed over the surface.
- Cover the product with a dome to protect it from dust. If dust particles fall on the surface, the product will suffer aesthetically.
- If the shape and size of the pendant are critical and everything must clearly correspond to the sketch, after 6-8 hours you will need to add the mixture to the formwork. The fact is that the resin shrinks slightly during curing.
Hardening time may vary. Depends on the resin itself and working conditions. The average duration of the curing period is one day. In any case, after this time it is better to check the readiness of the decoration.
Additives for epoxy resin
For the production of small quantities of putty, purchasing specialized fillers is impractical.
You can use improvised materials as a replacement. These include:
- Wooden sawdust of different fractions. A sandpaper attachment for an angle grinder will help prepare the required amount of material. Once hardened, it is extremely difficult to process.
- Remains of rubber. Used only as a last resort.
- Asbestos. This filler belongs to the category of fibrous, which gives it reinforcing properties. The adhesive seam will be much stronger. It is permissible to work with such material only in a protective suit and a respirator, as it is a strong carcinogen.
- Finely chopped fiberglass. In this way an excellent thixotropic filler can be obtained. It is very problematic to prepare in large volumes, and the material itself causes severe skin itching and irritation. An alternative is carbon fiber and carbon fiber.
- Baby powder - talc. However, before use, it is recommended to calcine the material in order to remove excess moisture. When frozen, it is easy to process, which is an undeniable advantage.
- Rye or wheat flour. It is easy to sand and used for making a wide variety of crafts.
- Sand. Fine and sieved material is suitable as filler. Makes the composition incredibly hard. As a result, the product turns out to be incredibly heavy, which should also be taken into account.
- Any cement is suitable. Once dry, the material becomes incredibly durable.
- Alabaster or plaster. The total weight will be high, which should be taken into account.
- Tooth powder or chalk. It can be used as a filler, but is not recommended. This is due to the ability of the material to absorb moisture. As a result, the material becomes white.
Kinds
Wood and epoxy resin make it possible to make a large number of all kinds of jewelry; rings, pendants, pendants, bracelets, and earrings are made from them. Any combination can be selected and is limited only by the imagination of the creator. The tree can act as a base or a decorative element. Additionally, you can add to such jewelry:
- real flowers and berries;
- metal elements;
- stones;
- rhinestones and sparkles.
Useful to know > How to make earrings from epoxy resin
Wood treated and filled with resin forms an unusual pattern, which is actively used in the creation of rings and earrings. Epoxy mixed with colored paste or glow-in-the-dark pigment (luminophore) looks beautiful.
Epoxy resin fillers
In order to seal several small joints or crevices, ordinary epoxy resin will not work, regardless of whether the surface is sloped or vertical. The material should be replaced with epoxy putty , which is less fluid.
Epoxy putty
To do this, use powder filler. This is what it looks like:
- Titanium dioxide. It is possible to use exclusively a white additive (10% of the total mass of epoxy-based adhesive). A thickener and dye are used simultaneously (30-50%). Titanium white is almost entirely made of titanium dioxide. The same composition can be observed in some toothpastes and cosmetics.
- Graphite powder. With its help you can paint the material in a rich black tone. It is used for coating the bottoms of sea vessels, adding the necessary streamlining to uneven surfaces. The composition does not tolerate direct sunlight.
- Silver or aluminum powder. Makes the material electrically conductive and gives a gray tint. Excellent skinning. Powder stains everything around, so it’s inconvenient to work with.
- Wood flour. Used when working with wood. Affects the viscosity of the epoxy composition and impairs the ability to impregnate porous surfaces. Some experience is required to work with the material.
- Aerosil. It is colloidal silicon dioxide. The composition is not much different from quartz sand. You can buy it at the pharmacy.
- Phenolic microbeads. Hollow elements containing inert gases. Specific gravity is low.
- Quartz microspheres. Used to reduce the density of the final epoxy resin composition. Subsequent processing may be difficult.
4/5 — (3 votes)
Three amazing properties
Epoxy resin (epoxy) is a polymer material that imitates glass when hardened. However, the weight of the polymer is several times lighter than glass. Epoxy resin is actively used to create decorative items and, of course, jewelry. This is facilitated by three of its most pronounced properties:
- Plastic. In appearance, the resin is similar to glass, but it is much easier to influence. Therefore, you can make jewelry of different shapes and sizes from it, sharpen the edges and give the appearance of crystals.
- High adhesion to various materials. Epoxy adheres well to wood, metal, glass, plastic and other surfaces, which allows it to be combined with almost any substrate.
- Resistance to negative influences. When frozen, it does not allow moisture to pass through, does not fade in the sun, and does not break when dropped. Jewelry made from epoxy resin will last a very long time, there is no doubt about that.
Note that this resin is environmentally friendly and completely safe for the skin. Another important feature of epoxy is its affordable cost. It is purchased to create jewelry for sale or as a hobby. On the Internet you can even find entire kits for creating interesting items with your own hands.
Basics of safe work
Although the name of the substance contains the word “resin,” it contains no natural components. If you come into contact with epoxy, there is a danger of being harmed by the fumes released. Therefore, it is necessary to observe safety precautions:
- work with gloves;
- wear a respirator to prevent inhalation of vapors;
- arrange ventilation in the room;
- limit access of household members to the place where the work process takes place, especially children and animals;
- do not be distracted while working.
In order not to spoil the surface of the table, you need to place a special board or film.
Epoxy kitchen apron
The kitchen apron is designed to protect the wall panel from moisture, greasy deposits, and the development of pathogenic microorganisms.
To equip this area, only high-quality and durable materials are always used, including epoxy resin.
The basis of the apron is wood, which is poured. In this case, the resin is applied like acrylic varnish. Instructions for the master:
- Wooden panels are either removed from the apron area or a new base is prepared.
- The bark is removed from the surface of the tree, the cuts are cut and sanded, and the jagged edges are removed.
- The first layer of resin acts as a primer.
- Immediately before the base and finishing pours, you can add dyes or luminous pigments to the epoxy mixture.
The pouring process itself is carried out using a universal method. Only after the resin has completely hardened can finishing materials be attached to the wall panels. This coating is particularly durable and resistant to all external influences.
Work after hardening
When the resin becomes completely hard, it is time to remove the workpiece from the mold or disassemble the formwork. Simply press down on the silicone mold so that the product falls out of it. The formwork can be carefully broken using a thin screwdriver and a hammer if this cannot be done by hand. If the mold was made of plasticine, it is enough to simply tear it off along with the polyethylene.
Next, you can begin finishing the workpiece. Using a special technique, the entire surface is polished - the front, back sides, and it is also worth paying attention to the edges. In general, if you don’t have a tool, the polishing step can be ignored. But the appearance will lose a lot. Of course, no one will buy a machine for one-time use. In this case, you can use fine-grained sandpaper.
A hole is drilled in the upper wood part of the pendant so that the fittings can be threaded through. It also needs to be processed. It is better to give preference to professional grinding paste.
If the sections, as intended by the author, are completely immersed in resin, the work is completed. If they remain on the surface, it is worth treating the wood additionally. For this purpose, vegetable oils or waxes are used. This move will not only improve the appearance of the jewelry, but also protect it from moisture.
Creating jewelry from wood and epoxy is a hobby, the interest in which is constantly growing. Using the described technique, you can make not only a pendant, but also a complete set for an original look. It would be a good idea to get acquainted with the works of world-renowned masters, whose works are truly inspiring.