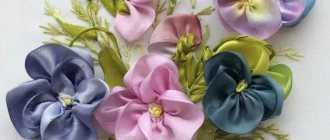
A popular hand-made craft technique using crystals is diamond embroidery. In the photos of the finished works you can see various thematic paintings - landscapes, still lifes, abstractions, images of people and animals. A special feature of needlework is skillful embroidery without needles and threads.
Unlike other techniques, even a novice master can handle the creative process of mosaic laying. Before you start filling the picture with diamonds, you need to familiarize yourself with the existing types of sets, instructions, algorithm, as well as the features of laying out the elements.
a brief description of
Diamond embroidery, or artistic mosaic, is the process of filling patterns partially or completely using acrylic crystals. For comfort and simplicity, beginning needlewomen can use ready-made patterns that are also suitable for cross stitch.
Unlike classical embroidery techniques, diamond mosaic does not require a needle and thread, and less time and effort is spent on production. As a result of laying out the pattern with rhinestones, the picture turns out to be voluminous, textured, and the diamond shine gives the finished work a special luxury.
The stones are attached directly to the surface of the canvas, onto which a thin adhesive layer has previously been applied. The algorithm for such unusual painting with colored rhinestones has its pros and cons.
The main advantages of the technology include:
- ease of execution, which allows you to create a hand-made masterpiece without prior preparation;
- short turnaround time compared to traditional cross stitch or satin stitch;
- the spectacular shine of finished paintings, which is achieved through a special cut of rhinestones;
- volumetric appearance and texture;
- ease of storage, since finished paintings do not need to be protected with glass.
Relative disadvantages include the following:
- the process of laying out crystals is long and painstaking and requires skill;
- the price of ready-made kits with diagrams and materials is quite high;
- the presence of defective elements with mismatched shapes, inclusions of other shades, air bubbles inside the crystals.
Despite some shortcomings, the technique is distinguished by creative novelty and simplicity. In order for diamond painting to be enjoyable, done professionally and have a neat appearance, you need to familiarize yourself with the layout algorithm, as well as select the optimal set with a ready-made diagram.
Applying stones
Having come up with a unique version of the future masterpiece, we find the drawing we like and print it out
When printing the diagram, pay attention that it has squares, like cross stitch
Prepare the gems and PVA glue. The printed drawing is placed under backlit glass, the base is placed on top and execution begins.
| Illustration | Step-by-step instruction |
| Take a syringe with a needle. The needle breaks off. | |
| The syringe is filled with PVA glue. | |
| Using a syringe, glue is applied to the gem. | |
| Using tweezers, place it and press lightly. | |
| We lay out each pebble until the selected masterpiece is ready. The finished product is framed with glass. |
What shape are rhinestones?
Diamond embroidery (photos of finished works can be seen below) is a modern type of needlework, where rhinestones are the main element when creating paintings. Manufacturers offer material in various bright and nude shades, textures, effects and shapes.
Depending on the effect that you would like to achieve in the end, you must first of all choose the optimal shape of the shiny elements. It should be noted that finished paintings created according to the same pattern, but using diamonds of different shapes, will look different.
The shapes of crystals for painting are:
- square;
- round.
In addition to the main shape, there is a separate type of material - 5D and 3D square or round. There is no clear answer as to which form is best for the job. Experienced craftswomen recommend that beginners familiarize themselves with all types of rhinestones to determine a more convenient option.
The choice of shape and texture is individual, depending on the effect that you would like to achieve in the end. Round and square rhinestones have their own characteristics that novice diamond mosaic masters need to know about.
Square
Diamonds have a regular square shape, so this type of material is best chosen for beginners. The elements are easily grabbed with tweezers and laid in even lines, tightly adjacent to each other.
Each element has a small cut. The material is made of high-quality durable plastic and is presented in a varied palette of shades, which allows you to create beautiful visual color transitions in the paintings.
Round
Round rhinestones are intended for paintings that need to be given a special shine. These can be landscapes depicting the sea, sun glare, dew on flowers, sparkling winter landscapes. All round crystals are cut with 9 or 13 transverse and diagonal faces.
Thanks to their special texture, round rhinestones have a reflective property, which allows you to create a beautiful lively shimmering effect. The elements are made of acrylic, similar to glass, and therefore have a special transparent-colored structure.
With 3D and 5D effect
Diamond embroidery is a type of creativity where diamonds are laid out on a canvas according to a given design pattern with a layout of shades. In the photo of the finished work you can see the differences in the layout of round and square elements. In addition to classic diamonds for painting, manufacturers offer material with a special 3D and 5D texture.
The elements are brilliant 3D Glass Diamond and 5D Round Diamond with a foil base. The marking indicates the number of measurements. The 5D indicator includes several measurements that determine width, height, convexity, several types of bevels, and mosaic crystal cuts. 3D diamonds have fewer dimensions, so the work appears less voluminous.
A special feature of the material is that D-type crystals of the same color have different orientations of the edges, creating the effect of beautiful geometry, making the flickering of the picture more natural. This material is used to fill mosaics with partial lining.
This allows you to give the product a special brightness and voluminous effect. For manufacturing, 3D and 5D crystals with sizes from 2.7 to 3 mm are used, stitch size is 9 ST.
Diamond embroidery: Useful life hacks TOP 10
- It’s better to start with small formats like postcards (sizes from 15 by 15 cm), gradually moving to larger ones (up to sizes 125 by 80 cm). The advantage of the first option is fast execution, the second is the realistic image and presentable appearance.
- Finished or unfinished mosaics are stored rolled up. It is important to roll only with the pattern facing outwards. Otherwise, there is a risk of making creases and squeezing out individual crystals. You can fix creases by ironing them through gauze.
- The finished canvas is left flattened until completely dry. To secure it tightly, it is recommended to roll the canvas with a rolling pin and then cover it with something heavy.
Special sets
For beginners and experienced craftswomen in the diamond painting technique, manufacturers offer ready-made sets with schematic drawings applied to a plastic or fabric base. Working with such a kit is simple and convenient; the whole process is streamlined with instructions and a ready-made diagram.
Each creativity kit necessarily includes 3 elements:
- Canvas with a printed color key scheme.
- A set of colored acrylic or plastic elements, selected in a special palette of shades and textures for a given painting.
- Instructions for making a mosaic with a “legend” - a list of shades of crystals by number, as well as corresponding symbols.
To simplify the process, an adhesive layer is applied to the canvas in advance, securely covered with a protective film. According to the instructions, the color number is marked on each package with decorative material, and the corresponding symbol is indicated on the diagram.
The main flagship products for diamond mosaic embroidery are considered to be manufacturers from Korea, China, and Russia. They may differ in the quality of the material, complexity, and cost.
The most popular manufacturing companies are presented below:
| Brand name | A country | Equipment | Price |
| Granny | Russia | The set includes a roll of canvas, key diagrams with full filling, and a set of shades of square rhinestones. | 2000 – 4000 rub. |
| "Diamond painting" | Russia | The set includes a linen base, a key with full or partial lining, and a set of round or square textured decorative elements. | 500 – 2500 rub. |
| Snow White | China | Sets are offered with canvas without a stretcher or on a solid base, with full or partial lining, various shapes and textures of diamonds. | 1500 – 2000 rub. |
| ANYA | Korea | The budget set includes a canvas roll, diagrams with partial or full laying, a set of round or square diamonds. | 800 – 1100 rub. |
| Color Kit | China | A wide range of kits for making paintings using any layout method and all types of diamonds to choose from. | 1400 – 2800 rub. |
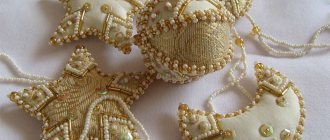
| Transformed | Russia | Thematic kits for making icons with thermal rhinestones. The kit includes a solid base or canvas in a roll, a set of hot-melt and sew-on rhinestones. | 500 – 1800 rub. |
Among the wide range of prepared sets, you can buy key diagrams with different motifs, with any types of mosaic crystals, for complete or partial filling of paintings.
Some companies offer services for creating diagrams based on the customer’s sketch - family photos or any other subjects. When choosing, it is important to take into account not only your own taste and wishes, but also the degree of complexity of the future mosaic.
The manufacturer matters
Painting – Coconut beach, diamond mosaic
The sets, varying in configuration and cost, are produced by both Russian and foreign companies.
- Popular brands are “Bright Faces” and “Diamond Painting”, which operate in Russia.
- They use high-quality raw materials and supply interesting kits to the market from Chinese and Korean, YIWU Pengdao Arts&Craft, Jane Diamond Painting, Timkee Diamond Painting, Color-KIT, Sddi Anya.
- Ukrainian sets are also valued.
Materials and tools
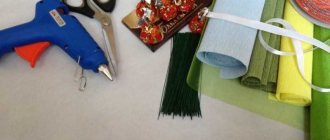
To make panels using the diamond embroidery technique, you need to prepare the following arsenal of tools and materials:
- Stylus. A special stick is used to place rhinestones on the adhesive layer. This can be a wooden stick with a sharpened end or a plastic pencil with a metal tip. For professional work, you can use a tool with a soft nozzle.
Illuminated stylus for diamond embroidery. Photo - Tweezers. It is recommended for use by beginners; the tool provides a firm grip on the decorative element. It is especially convenient to use the tool for filling plots with square crystals. These tweezers have a thin, curved grip. Metal devices are more convenient to use and hold the element better. Plastic tweezers are inconvenient because the parts slide off the smooth surface.
- Stationery knife. It will be needed to fragmentarily remove the protective film on the painting. This way the adhesive layer can be protected from premature drying.
- Container for decoration. This could be a saucer or any other container. It is better to use a special plastic tray with high sides, the bottom of which has convex stripes for easy turning over of diamonds.
- Glue. The kit often includes a special adhesive solution, which will be required in situations where the adhesive coating begins to dry out. You can also lubricate the base of a stylus or pencil with glue to better pick up small elements.
- Rhinestones. The main element of the picture, depending on the choice you can achieve one or another decorative effect. Rhinestones can be round, square, glossy or matte, plastic or acrylic, color filled or translucent.
Ready-made kits include all the necessary tools and decorative materials. Having prepared everything you need, you can start working on diamond painting.
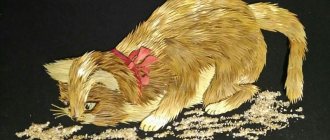
Master class “The Scarlet Flower”
If you are engaged in diamond painting, then you can make another diamond painting without buying a special kit, and Irina Zmeeva’s master class will help us with this.
To work you will need:
- crystals from previous works;
- simple stitching pattern with a small number of colors;
- double-sided transparent tape;
- tweezers.
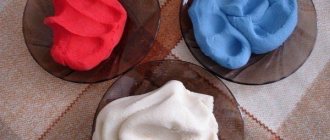
First, let's sort the diamonds by color.
Next, take the paper pattern from the already embroidered work.
We completely cover the surface of the circuit with transparent double-sided tape.
We cut off the excess exactly along the edge of the diagram.
Remove the protective layer from the first section of the circuit.
We begin to lay out the picture using the usual technique. Next, remove the protective layer from the next section of the picture and lay out the crystals to the end.
The picture is ready.
The result is waste-free production.
Basic execution steps
Diamond embroidery, photos of finished works of which can be seen below, is a step-by-step process. In order for the work to be neat, voluminous, and to convey all the shades and color transitions as naturally as possible, it is necessary to follow the layout algorithm.
Main stages:
- Preparatory.
- The main stage with laying out the elements.
- Varnishing the finished painting.
- Decoration of the painting.
Each stage has its own implementation features, so beginners are advised to strictly follow the instructions.
Preparing for work
At the preparation stage, it is necessary to properly organize the workplace, prepare materials and tools, conveniently arranging them in the order of use. It is also necessary to create good natural lighting, since painstaking work with small details may tire the eyes.
It is advisable to arrange all the pebbles in a special organizer, sorting them by color; on the sorters you can sign numbers and symbols according to the placement scheme. It is important to read the instructions before embroidering.
Main stage
Having prepared the workplace, materials and tools, you can begin the creative part - filling the canvas with diamonds. To do this, you need to remove the protective film by sectors of the painting, and then lay out the elements according to the algorithm and in accordance with the key.
Having completed one fragment, the flap of the protective film is removed again, and the work is repeated according to the given algorithm. If the adhesive layer does not provide a sufficiently tight adhesion to the diamonds, it is necessary to additionally apply a little glue to the base.
When laying out rhinestones, you do not need to press hard on the elements, so that in case of an error you can replace the rhinestone. You need to press the diamonds well only after completing all the work.
Varnishing
The finished diamond painting must be varnished. This technique is necessary to create aesthetic completeness, as well as to securely fasten the rhinestones to the canvas.
For varnishing you can choose:
- artistic varnish with a matte effect;
- glossy acrylic coating;
- craquelure varnish.
Gloss is most suitable for diamond embroidery, as it will further emphasize the spectacular shine of cut diamonds. The basic rule when varnishing a painting is to apply the composition in a thin layer, picking up a little varnish on the brush. Otherwise, it will flow between the elements, forming air bubbles between the diamonds.
Decor
At the final stage, the painting can be framed or stretched on a stretcher. This can be done in a special workshop or independently, leveling the finished canvas on a solid base and securing it on the sides with a stapler. To make your work look richer and more beautiful, you can frame it with a mat - a special insert between the work and the frame.
How to collect correctly
The technique of making diamond mosaics is a simple process that is addictive and at the same time calming. In my opinion, it even slightly resembles meditation. In order to correctly assemble the mosaic, you must follow the following algorithm step by step:
- The first thing I do is place the canvas on a flat surface.
- After this, I remove the protective film from a small part of the circuit. Having previously thought through which fragment I could post. For right-handers, it is best to start the layout from the upper left corner. Thus, during further work, the finished area will not be damaged by hand.
- Next, I find in the image the designation of the color that I will post first. I determine the designation of colors using a scheme of letters and numbers, the number of the package with stones, and find it.
- I pour the rhinestones into the tray and, shaking it slightly, get them to turn over with the faceted part facing up.
- Then I use a stylus to collect the silicone mass and pry off the crystal. And I transfer it to the diagram.
- It is better to finish the area from which the film was removed immediately so that the adhesive base does not dry out. Otherwise, the sticky layer may lose its properties, become covered with dust and lose its adhesiveness.
Working with large paintings is complicated by the fact that it is difficult to keep a canvas of this size constantly unfolded. In such cases, part of the canvas is left rolled up and during the work process, the diagram is unfolded and the laid out part is carefully rolled up.
Methods for laying out a diamond painting
Diamond paintings can be standard or in the form of a triptych - 3 separate parts that form an integral composition. Beginners should initially choose smaller-scale paintings in order to gain experience and dexterity in working with small details. According to the method of laying out, diamond embroidery is divided into 2 types - partial and full filling.
Each type of work has its own characteristics:
- Painting with partial display. The peculiarity of this technique is that the diamonds are laid out in separate areas of the canvas, and the picture itself is already printed in advance. Beginning craftsmen can begin their acquaintance with creativity by performing partial diamond embroidery. Round translucent rhinestones are often used as the main elements for partial laying out, which make it possible to give the finished work additional volume.
- Fully filled embroidery. This technique involves completely filling the pattern with rhinestones. Such paintings look especially luxurious, visually reminiscent of beadwork. To achieve uniform, complete filling, sets often use square-shaped diamonds.
In addition to standard kits, manufacturers also offer ready-made patterns with a combination of handicraft techniques. In such paintings, individual fragments are filled with diamonds, while others are embroidered with a cross, ribbons, beads, and French knot.
Working with round diamonds
Round rhinestones are often used for partially or fully laid out paintings. As a rule, the material is made of transparent acrylic, so the rhinestones have the appearance of sparkling crystals. Manufacturers offer a varied palette of translucent shades, as well as chameleon rhinestones that change color.
There are also elements with a matte, opaque structure made of plastic. Paintings with partial laying out can be chosen by beginners, since full laying out of round elements requires special skill. Diamond embroidery with round rhinestones, made in accordance with the instructions, always looks impressive, sparkling and shimmering with the edges of the crystals.
Step-by-step instruction
Work must be carried out on a perfectly flat surface. As a rule, this is a desk. Working with rhinestones is painstaking and time-consuming, so you need to take the equipment of your workplace seriously. Particular attention should be paid to lighting. The workplace must be sufficiently lit. The technique itself is not complicated, but in any case you need to read the operating instructions.
Working with square rhinestones
Painting with square rhinestones is a more convenient way to fill out schematic drawings. The correct shape of the elements allows them to be laid in even, neat rows, which is why they are often used in fully filled techniques.
Square-shaped rhinestones are made of durable plastic, which is given the desired shade to create a finished composition according to the color key. The key diagram is included in the kit. The peculiarity of such paintings is the effect of a three-dimensional image, as well as an exquisite glossy shine and textured surface.
Tips for Beginners
Diamond embroidery, photos of finished works of which will help beginners get acquainted with creativity, is a labor-intensive and painstaking process. To make it easier for beginning craftswomen to choose their first diamond embroidery kit, you should follow a few simple tips:
- You can start with works where diamonds partially fill the design.
- For your first creative experience, you can buy a set with square rhinestones; working with them is easier and more convenient.
- As a motive, it is recommended to choose simple plots with a minimal set of shades.
It is ideal to start your acquaintance with diamond painting with landscapes. Natural lines are initially devoid of symmetry, so small mistakes of beginners on such canvases are less noticeable. The base can be of 2 types - plastic or canvas. It is easier to work with a hard plastic base, but on canvas the painting looks richer and more natural.
Handling the Canvas
Any kit for diamond embroidery must include a base. It can be plastic or canvas. Working with canvas pre-stretched on a stretcher is much more convenient. After finishing the display, the work is ready to decorate the interior.
But there is also a significant disadvantage: during work, the stretched canvas can be damaged, stretched, deformed by pressing the fabric with tweezers or a stylus. If the set contains canvas without a stretcher, rolled into a roll, it must be prepared for work. The fabric should be ironed from the wrong side with a slightly heated iron or placed under the weight of books for several hours.
Subtleties of working with protective film
Protective film is the main element in the production of diamond mosaic. Its main function is to protect the adhesive layer applied to the canvas from drying out and dust particles. It is not recommended to remove the film in advance. The layer is removed gradually and fragmentarily, carefully cutting off with scissors or a stationery knife in the area that is filled with crystals.
If the film has been removed with reserve and the adhesive layer has dried, to fix the decor you must use a glue gun to securely fix the rhinestones using a thermal method. If dust particles get onto the canvas during the process, they must be removed with a cotton swab dipped in water. Rhinestones are attached to this area using glue, applying it to each element one by one.
How to take a rhinestone correctly
Faceted crystals are easy to hold with tweezers. Smooth round parts are more difficult to work with. They can be grabbed with a special stylus stick with a soft end.
In a beginner’s kit, you must have not only tweezers with a thin metal grip, but also a glue stick with a sticky tip, with which you can easily bring the element to the desired filling area.
How to choose a diamond mosaic tray
The diamond embroidery kit includes a tray for rhinestones. It is more convenient for beginners to work with a special organizer - a plastic box divided into separate compartments for storing rhinestones of different shapes and colors. To work with this technique, there are special trays with a textured bottom to make it easier to turn the crystal over during the picking process.
How to align rows of rhinestones?
If the adhesive layer applied to the canvas is of high quality, it will firmly hold the stones. The base is plastic, so individual elements can be easily moved during the laying process. At the beginning, the row may not be even enough. To straighten them, you can use a ruler as a construction trowel and move the slipped stones into an even straight row with the smooth side of the tool.
What to do if you run out of pebbles of the desired color?
The set includes a sufficient number of crystals of each color; manufacturers put them in reserve. In rare cases, if you run out of stones of the desired color and the area is not yet filled, you can use elements from the set that are similar in color.
If you don’t find any, you can buy more rhinestones at an arts and crafts store.
Process Features
During work, the finished fragments must be immediately aligned with a ruler until the glue dries. To do this, apply a ruler horizontally and vertically, correcting stones that are out of line. This way the work will be as neat as possible. Thus, the entire diagram should be laid out.
It is easier to lay out large areas in one shade using the attachment on the stylus for several rhinestones. Instructions for use with this type of pencil:
- First you need to pour the rhinestones into the tray and, shaking it, align the stones in a row.
- Then use the nozzle to press on the mass to pick it up.
- Then carefully grab a row of rhinestones lined up in the tray and glue the rhinestones onto the diagram.
- If any stone is out of line, you can easily correct it with the back of the stylus.
This technique significantly speeds up the layout of the picture. At first it seems that this is impossible. But after a short training the process goes much faster. It is important to carefully inspect the stones before gluing. Defective crystals can be thrown away without regret. As a rule, more stones are included in the set. And one damaged stone can ruin the whole picture.
Do you need protective glass?
Diamond embroidery (photos of finished works can be seen below) is a fascinating needlework process. The special structure of the crystals and the material from which they are made create a finished look without protective glass. Diamonds are not afraid of ultraviolet rays, and shades do not fade.
To care for the painting, just wipe off the dust from the surface. If you cover a painting with glass, you can ruin the aesthetics of the work, since the noble gloss and shine will be hidden under the coating. Protective glass may only be required when making matte mosaics. This technique will create a radiant effect.
Diamond embroidery, which is easy to perform, allows you to create beautiful subject paintings, still lifes, and original abstractions without using a needle and thread. For beginners, photos of finished works can become motivation and a visual aid for making mosaics.
Article design: Vladimir the Great
Why do so many people like her?
The work is similar to bead weaving, only the beads will be larger than beads. Advantages of diamond embroidery:
Ease of use when it comes to ready-made sets or small paintings;
Tools for work
- Does not fade under UV rays and does not lose its shine over the years;
- The pattern is not flat, but convex and tangible;
- You can decorate the interior of your home well;
- The completed panels look life-like, due to the play of light.
Note! At the end of the work, the product can be varnished or placed in a frame. Doing the work requires a high concentration of attention, so it is not advisable to do embroidery after a hard day or when you are very tired
Before you start, you need to watch several video tutorials on how to properly glue diamonds onto a base. The room in which the process will take place must be sufficiently lit so as not to damage vision
Doing the work requires high concentration, so it is not advisable to do embroidery after a hard day or when you are very tired. Before you start, you need to watch several video tutorials on how to properly glue diamonds onto a base. The room in which the process will take place must be sufficiently lit so as not to damage vision.