Any wedding accessory is an important part of the celebration. Therefore, the couple begins to choose them long before the event itself. Jewelry should fit perfectly not only with the image of the bride, but also with the groom. As you know, the main accessory for a man is a boutonniere.
In the modern world, this decoration can be made not only from fresh flowers, but also from many other materials. Recently, foamiran boutonnieres have become popular. The main advantage of such an accessory is that it retains its original appearance for a long time.
What is foamiran?
Foamiran is a decorative material that can easily be given any shape. You can actually find it in the store in the form of ordinary colored sheets.
Foamiran is classified as one of the varieties of suede. It makes beautiful fakes and boutonnieres.
Working with such material is not difficult at all. All you need is to prepare materials that will serve as assistants in the process of creating a boutonniere.
Another advantage of foamiran is that even a beginner in this matter can work with it.
History of the accessory
This accessory came to us from France and is translated into Russian as “flower in the buttonhole.” It was first worn in the 19th century during the French Revolution as a symbol of determination. Then it was a live red carnation. And in its present form, the boutonniere began to be worn at the beginning of the 20th century, as part of a men's dandy suit. But over time, it was left only for festive occasions. At the wedding, this detail became a reflection of the bride’s bouquet, in a miniature version.
Boutonniere for the groom from foamiran: master class on how to create it yourself
First you need to learn how to deal with this material. Therefore, it is recommended to practice for several days and only then start creating the final version of the accessory.
Most plants are made using the same method.
The first step will be to create a template that will allow you to make blanks. And from them you can collect roses, peonies or tulips.
Next you need to create a boutonniere design. To do this, you should make a sketch of the composition.
DIY foamiran boutonniere.
The process of creating it will look like this:
- You need to prepare plant templates from cardboard. It will have six petals.
- The cardboard blanks must be attached to the foamiran and a part of the flower must be cut out from it.
- Each petal should be curved to give it a natural appearance.
- The role of the leg will be played by a piece of wire. But the core will need to be made from the tip of the stem.
- Now you need to pierce all the petals with an awl and thread a wire through them. Then you need to apply glue to the loop and squeeze the leaves.
- Similar manipulations should be done with all workpieces.
This is interesting: Dressing the groom - how to make the right boutonniere with your own hands
As a result, you will get a small flower. If desired, you can make several of these plants. Then just collect all the flowers in a bouquet and wrap it with ribbon. Thus, you can make absolutely any type of plant.
Options
Previously, only fresh flowers were used for boutonnieres, but now the situation has changed. Most of the options can be kept as memories from your holiday. There are several types:
- From fresh flowers. The classic detail is usually made up of the same flowers that are used in the bouquet. It is enough to choose just one or three buds and a little greenery, which are fastened into a buttonhole. Roses, wildflowers, anemones, peonies and any other variations look beautiful.
- Made from artificial flowers. Some species cannot be distinguished from real plants. It all depends on the choice of material from which the products are made.
- Unusual boutonnieres. They may look completely unexpected. It all depends on your imagination. For example, from satin ribbons, in the form of a composition of watches and mechanisms in the steampunk style or some kind of figure. This option should emphasize some of the man’s interests, things that are significant to him.
How to choose jewelry for the groom
Any detail of the image of the groom or guests should be harmoniously combined with the color scheme of the celebration. The same requirement applies to boutonnieres. The easiest option would be to purchase an accessory of the same type as the bride’s bouquet.
But do not forget that the decorations cannot be the same. The same flower can be used in the boutonniere, but the design method should be slightly different.
A good option would be boutonnieres and a bride's bouquet made of foamiran . You can make them yourself or order them from a specialist. Moreover, this accessory option is perfect for both guests and the groom.
What looks is it suitable for?
In a modern look, the boutonniere looks appropriate with almost all variations, as it is made from various materials and colors.
- A tuxedo flower is the most classic and strict option. A white or beige accessory looks impressive on black clothes.
- A classic suit with a jacket can always be complemented with a bright small detail. The main thing is that it matches the bride’s bouquet.
- For an outdoor wedding, people often don’t wear a jacket, but leave only a vest. And in this case, the flower boutonniere looks as harmonious and stylish as possible.
- The freest option is to hook a bright piece onto suspenders or a shirt. An original and easy way to decorate a men's outfit.
Attention! Perhaps your look would be better suited not to a boutonniere, but a butterfly. She can look very fashionable too.
Where is the best place to attach a boutonniere?
Boutonniere: master class from foamiran.
If you order such an accessory from a specialist, he will think about this issue in advance. Most often, each piece of jewelry has a special fastener or pin at the back.
The newlywed should attach his boutonniere next to his heart. This suggests that he is faithful to only one woman, his bride.
If we talk about how and where it is better to attach the accessory to the couple’s friends, then there are a lot of options. Men can arrange the decoration in the same way as the groom.
But bridesmaids have more options. You can use an accessory that fits on your hand or attach it to your clothing.
Necessary tools for work
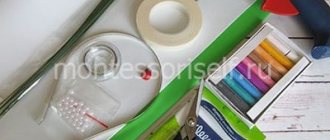
It is easier to work with decorative foam sheets with special tools. You will also need to follow some rules and stock up on stencils and templates. To create various elements in the form of flower stems, petals, leaves, you will need the following materials and equipment:
- Colored crayons, paints. Used for tinting and adding naturalness to various prefabricated elements. Dry, oil pastels are more often used;
- Tape. The main purpose is to process stems, decorate twigs and legs. Thanks to the adhesive base, when stretched, it is perfectly fixed on wire, wooden sticks, and plastic;
- Flock powder. Using a special powder, a velvety effect is created. It is useful in the manufacture of velvety sheets and anthers on stamens;
- Heating elements. To prepare the material for work, to thin it, use an iron, candle fire, burners, and your own hands;
- Scissors. Regular stationery or tailor's cutting tools will do. Small nail scissors are useful for cutting out small details. Sometimes edge processing is carried out with figured products;
- Molds. With the help of such devices, the workpiece is given the natural texture of living plants. Realistic casts are cast from plastic, giving them a deep, rough, rough surface;
- Shaped hole punches. They will be indispensable when working with small parts. They are used to make small flowers, leaves, and various decorations;
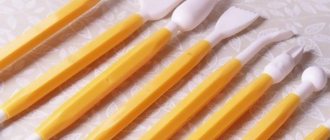
- Bulki. They help create deep petals, like those of peony plants and bush roses. The balls are perfectly smooth and come in different sizes;
- Floral wire. This is a special wire wrapped in paper. It varies in thickness, color and length;
- Glue. To collect voluminous bouquets or create crafts from many parts, you will need strong glue and a hot gun.
Craft ideas
Wedding boutonnieres made of foamiran:
Boutonniere made of foamiran for the hand of girlfriends
Wedding bouquets from foamiran, wedding
Master class: boutonniere with garden carnation from foamiran
Boutonniere for hand made of famiaran Good IDEA
Lush peony rose
To make the flower even more expressive, use foamiran for the petals in 2-3 different close shades. Cut out all the blanks from the diagram - in the same quantity and proportions. The form does not have to be perfect - this will only add realism.
It is convenient to warm up small petals and form them with a regular loop or any other similar tool. For larger ones, a ball of suitable diameter or a larger loop is suitable. But it is better to form the sepals and large petals by hand, carefully twisting and stretching. Take 4 pieces of wire and make a loop on each for the middle. Glue 3 small petals onto each, then 4 more larger petals. Gradually move the next 3 petals down so that the blanks look like in the photo.
Twist the parts together in pairs and connect them together into one large volumetric middle. Start gluing all the large petals from the bottom, so that each next one overlaps the previous one by at least a third, and at the very end add a sepal. Correct the shape of the middle using a toothpick or any other thin tool.
Tea roses for decoration
Small foamiran roses are ideal for decorating wreaths, hoops and hairpins. Choose foamiran of one or more adjacent shades and cut a lot of small round petals about 1.5 cm in size. You will need from 6 to 10 pieces for one flower - so count the number in advance.
Place each petal on the sole of the iron for a couple of seconds and immediately curl it. Then you need to straighten them and shape them with your fingers: bend them a little in the middle and stretch the edges. For the frame you will need a thin wire with a loop at the end - according to the number of flowers.
Begin to tightly wrap each wire with petals in a spiral and form buds. Glue each next circle less tightly and bend the edges manually, with a toothpick or tweezers. If necessary, you can then add small leaves and sepals.
Start of work
From marshmallow foamiran you get a lily with the rest. The option will require the following equipment on the table:
- sheets of cloth (green and white);
- acrylic paints;
- cardboard;
- heat gun;
- stamens;
- wire stem;
- felt-tip pen/pencil (brown);
- scissors;
- toothpick.
The procedure is initiated by drawing the contours of the prigonia - six centimeters long. They are carved. You need to attach the stencil to the main raw material, trace it, cut it out further. Get a total of six pieces.
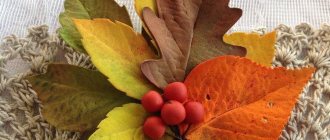
Next will be wavy curves to give realism, gluing the remaining particles. Draw three oblong leaves on the lily, then cut. Texture by heating the surfaces, then glue.
Complete the decor
Interior items can also be treated with soft material. It all depends on your idea, the amount of money for implementation, and the space in your home.
Popular designs include small items for the table, on the wall, and special designs for household appliances constantly used by humans.
It’s not often possible to decorate a room with a floral pattern due to limited space inside, but what happens if you process existing structures.
We will not recommend lamps for beginners, but for those who understand the craft, the task will be extremely easy. Choose one or several inflorescences - the optimal effect is achieved, creating a certain mood for the owner and guests of the house.
The work is carried out according to a similar principle, but here you must adhere to special rules - keep the lamp at a distance from the decorative sheets.
Recommendation - install energy-efficient (LED) illumination sources in your equipment - they do not produce high temperatures, which eliminates the risk of fire. The fastening occurs at a solid base (in the form of a tube: an electrical wire runs inside it).
An easy way to create a rose for beginners
A charming flower can be created in many ways. Beginning craftsmen can form a rose from several individual petals or prepared petal parts. The second method is simpler. The next master class will be devoted to exactly this method of collecting flowers.
To work you will need pink or red foamiran and a small green piece for the leaves. You also need a set of standard tools and several suitable paper templates. We prepare patterns for the petals - we cut out three different circles from paper, divide them into five parts, and form a rounded petal from each sector.
We apply the templates to the foamiran and outline the contours with a toothpick. Cut out one piece of each size. If desired, the edges of the petals can be tinted. Heat the iron and apply the pieces one at a time, using stretching movements to create a bulge, and curl the edges in the opposite direction.
We make a bud from several petals. Roll a ball out of food foil, put it on a toothpick and begin gluing the petals. We put the smallest petal part on a stick and glue it at the base. Now we fix the petals to the central bud in a checkerboard pattern. When one row is completed, we proceed to the next detail and proceed by analogy with the previous petals.
Useful tips
Foamiran is used in many areas. Each time, needlewomen try to expand the range of its capabilities by carrying out additional manipulations with multi-colored sheets. When working with this material, you must follow a number of simple rules - they will help you create a high-quality product:
- Application of paints. Despite the rich color palette, sometimes there is a need for an additional shade. It is best to use pastel, acrylic paints. Foamiran can be painted with gouache, watercolors, crayons, and glitter. It should be remembered that after changing the color, the craft becomes disposable. It is impossible to wash it from dust - the colors will run.
- Connecting parts. You cannot secure a foamiran product with regular PVA or an adhesive pencil. For this purpose, they purchase a “Moment”, a special pistol.
- Glue drying. The bonded parts must be given time to dry. After using the glue, you should leave the product for approximately 24 hours. Only then continue working.
- A similar option for fastening appliqués is to sew them together with a needle and thread. Neat stitches are in no way inferior in strength to glue.