A floating cup, or as it is also called, a flying cup, is an incredibly beautiful craft that is liked by many handmade craftsmen and lovers of original decor. As a rule, it consists of two components - a cup and a saucer, fastened together with a strong base. A variety of items can be used to decorate it: piece flowers, whole coffee beans, gold coins, butterflies, birds, etc. Today we invite you to familiarize yourself with a step-by-step master class on how to make a floating cup decorated with flowers using the simplest and most affordable materials.
Floating cup: step-by-step creation
To make this craft you will need the following materials :
- Coffee cup
- flat saucer
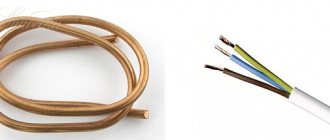
- two-core cable, about 18-20 cm long
- glue gun
- scissors
- artificial flowers
Progress:
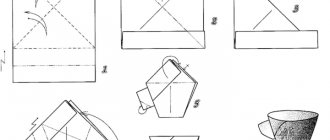
- Cut the wire to the required length. Bend it as shown in the picture.
- Attach the wire to the cup and saucer using a generous amount of glue. Allow to dry thoroughly.
- From individual flowers, first assemble the necessary composition and begin laying it out on a cup and saucer.
- It's better to start at the top and gradually move down. Glue all parts with glue. It is also important not to forget to decorate the back of the craft. After all, the craft should look beautiful from all sides.
Once the glue has dried, the floating cup can be considered ready.
Porcelain recipe
- 1 cup each cornstarch and PVA glue
- Glycerin, cream
- Mix all ingredients and leave for 15 minutes
- The mixture is ready to go!
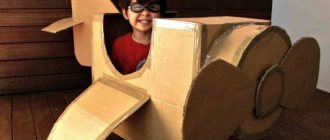
- Crafts from paper and cardboard - 110 photos of the best simple patterns for children and beginner craftsmen
- Crafts for girls: simple, beautiful and interesting crafts. The best ideas with explanations and step-by-step instructions for creation (70 photos)
- Coffee crafts: step-by-step instructions for creating three-dimensional figures from coffee (90 photos)
This type of modeling can be used to make decorative crafts and tableware decorations (flowers, petals). It is not suitable for food because it does not like moisture or direct sunlight.
Ideas for creating flying cups
- In addition to flowers, the cup is also decorated with eggs and chickens. Then it will resemble an Easter craft that will decorate any home:
- Also one of the popular options is to decorate such cups with coffee beans. In this form they can be used to decorate a home or even an office:
- In addition to wires, you can use an old plug as a basis for a floating cup. Here's what it looks like in practice:
- Another great souvenir is a floating cup with gold coins. According to some people, it contributes to the enrichment of its owners and is capable of filling the home with well-being:
- A flying cup in the form of a waterfall can also be a good solution. Making it is not so difficult, the main thing is to find a suitable base for creating “water” (this can be a special translucent glue):
- As for those with a sweet tooth, a very good option for them would be a craft in the form of a cup from which coffee is poured directly onto a piece of cake lying on a saucer:
You can create such beautiful and charming crafts with an old set of cups and saucers, glue and a couple of beautiful decorative items on hand.
If you liked at least one of the ideas presented above, be sure to try to repeat it at your leisure. After all, to create flying cups you don’t need to have any professional skills. It’s enough to have a strong desire and find all the necessary materials.
In this master class, the Creative Workshop “Barabashka” invites you to create a decorative composition in an ordinary cup. For her we chose a cozy rustic style. Google tells us that the French word rustique can be translated as “rustic” or “simple.” It is these principles that we will try to embody in our composition.
We will focus on rough natural beauty, for this we choose natural textures: jute, burlap, lace. Simple earthy tones embodied in coffee beans, cinnamon and star anise. Of course, don’t forget about the warm and cozy atmosphere. To get into the right mood, we recommend listening to the wonderful song by the French pop-rock band BB Brunes - I Love you.
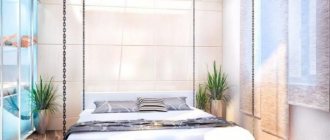
sea bowl
The marine theme is one of the most popular in various areas of hand-made creativity. You can please your family and friends with such beauty, especially if you have fancy shells and stones found on the seashore.
How to create a sea bowl
You will need:
- A cup and saucer, one or both elements can be replaced with a large sink that fits the shape.
- A piece of thick wire or a plug.
- Glue or heat gun.
- Elements of marine decor: shells, flat stones or stones with a hole, sticks polished in the sea, crystals, beads, pearls, blue ribbons, pieces of ceramics, bronze or ceramic figurines of an anchor, dolphin, mermaid, etc.
Bend the wire or plug into a Z shape, keeping in mind the recommendations above.
Using a hot glue gun or hot glue, connect the wire to the top and bottom of the future product.
Wait for the glue to dry completely and check the workpiece for stability.
Attach the decor to the base, placing large parts first and filling the space between them with smaller ones.
The marine style craft is ready.
To create a coffee composition in glass with your own hands, we will need:
- Mug with saucer
- Coffee beans
- Star anise
- Cinnamon
- Jute twine (2 types)
- Sackcloth
- Thick white thread
- Natural lace (2 types)
- satin tape
- Double wire
- Hot glue gun
- Styrofoam cylinder or cone
- Decorative elements
Decorating the saucer
- Mug with saucer
- Thick jute twine
- Sackcloth
- Hot glue gun
We take an ordinary saucer and very thick jute twine.
Tip: the tighter the twine, the easier it will be for us to wrap the surface of the saucer.
Using a well-heated heat gun, attach the twine from the center of the saucer. We make circular movements, occasionally fixing the thread. The less glue, the more accurate the result will be.
Reaching the edge, carefully move to the back of the saucer.
We glue burlap onto the bottom (the place of the bulge) and wrap the twine to its edges. Fix the edge well with glue.
Making a frame
First of all, we prepare the fittings for the future coffee waterfall. We take a piece of thick wire and carefully bend it in the shape of a flowing stream of liquid. Carefully bend 2.3 cm from each edge, bottom, top with crochet, top, bottom with crochet. As a result, our wire part slightly resembles the Latin letter “Z”.
Then we take a hot glue gun, firmly glue the lower edge of our letter to the center of the saucer, the upper edge to the cup from the inside, and take the tilt of the cup so that it is turned upside down at an angle of approximately 45 degrees. In this position, liquid will pour out from any vessel in an even thick stream.
Alternatively, instead of wire, you can take a soft metal fork, use pliers to bend its upper end to insert into the cup, bend the tines horizontally and glue it to the saucer. Don’t forget to decide in advance on the position of the cup handle, which, as in the first example, can be located on the side or on top.
Materials
1) tea or coffee pair (cup and saucer)
2) glue for connecting the “flowing” structure with the bowl and saucer. It is better to use the universal Moment gel adhesive for ceramics, plastic or glass. An alternative can be any other adhesive designed to work with smooth surfaces. A glue gun is also used, but it is intended mainly for working with rough surfaces. There is a possibility that the cup will come off in the near future after gluing.
3) thick wire or triple wires. You can use other flexible items, such as old aluminum forks or spoons, or a metal hanger.
4) polymorphus ( superplastic ) – self-hardening thermoplastic. When heated, it becomes plastic and convenient for giving it the desired shape. When cooled, it becomes hard, elastic and durable.
5) masking tape - it can replace superplastic
6) modeling mass , can also replace polymorphus. It resembles plasticine, but unlike it, it hardens well in air. Contains natural ingredients (dough made from cereal flour), so it is absolutely safe for children.
7) decoration items : coins, flowers, pine cones, feathers, candies, beads, buttons, ribbons and much, much more.
Peculiarities
A panel is a decorative flat decoration placed on the wall surface. It is made on canvas or other textured bases, placed in a frame, and sometimes trimmed around the perimeter with three-dimensional elements. Creating a panel from coffee beans is not particularly difficult, and the finished work looks truly impressive. For the production of decorative interior paintings, different varieties of this product are used: Arabica has a more elongated shape, Robusta has a rounded shape, it is easier to fit into the design of a craft, and the material is much cheaper.
To create paintings and panels from coffee, it is important to consider the scale of the product. It should be large enough, it is better to choose A3 or larger format
In addition, it is not recommended to glue grains in 2-3 layers. To create three-dimensional forms, papier-mâché, salt dough, and other elements are used, glued to the base and covered with coffee decor.
The degree of roasting of the grains is of great importance when creating beautiful panels. There are certain options.
- Unroasted grain. Has a natural green color.
- Weak. The grain is dull and has a light beige tint.
- Average or American. The coffee acquires an oily sheen and a rich brown color.
- Viennese. The color changes to dark chocolate, there is a pronounced tint.
- French or Italian. It is characterized by a very dark, almost black color.
When decorating coffee panels, other materials of natural origin are often used: star anise, cinnamon sticks, cardamom or black peppercorns. You can also use ground product. The combination of white beans and black coffee looks interesting. Heavy and massive elements: cups, spoons, are attached using cyanoacrylate-based glue. The coffee panel must be kept in a horizontal position for at least 2 days for the glue to dry completely.
To make panels you will need more than just coffee beans. Thick cardboard is used as a base, onto which canvas or other textured base is glued. Rough burlap looks impressive, but for interior paintings in a modern style, you can use a backing made of thick colored paper or plain fabric. You will need several types of glue: the grains themselves are attached with a hot-melt gun and compatible rods, PVA is used to fix the canvas, porcelain and earthenware parts are mounted with superglue.
A mandatory element of a beautiful panel is a frame. You can take a baguette or simply make it out of thick cardboard, and then decorate it with coffee beans and other materials to your liking. Stencils are elements that make it easier to apply a pattern to canvas. They are also very useful when creating base lettering. For finishing you will need a clear varnish.
You also need to fill in the blanks correctly. The gaps remaining when gluing the beans are filled with ground coffee or painted over with a marker.
Cup assembly process
The process of creating a floating mug is not at all complicated, but there are several important nuances that need to be taken into account when creating it.
The main secret in creating a flying bowl is to choose the right tea pair. The cup and saucer should not be too heavy. If you take this condition into account, it will be easier to create a flying bowl!
We construct the base of the floating cup; this is the element that connects the saucer to the cup. To do this, take a wire of the required length. It is important to note that the distance between the bowl and saucer should be approximately two cups. With these parameters, the flying cup will look most balanced.
Inside the bowl we form a loop from the wire, the diameter of which should be 2-4 cm. This will help to achieve better fixation of the wire in the cup. We twist the second end of the wire into a flat spiral in two or three turns. This way we will get a kind of stand, which we will fix in the saucer.
The tilt radius of the resulting structure should not exceed 45 degrees, otherwise the structure will be unstable!
Next we work with the resulting wire structure.
Polymorphus is the best material when making a flying cup.
Take a piece of polymorphus and immerse it in hot water for 20 seconds. During this time, the material is converted into soft plastic.
We stick the resulting plastic, like plasticine, around the base, giving it the desired shape. If the plastic hardens before you finish the job, simply dip it back into hot water. The prepared base will completely harden within 15 minutes.
Application
Applique as a decorative technique has been familiar to everyone since childhood. By gluing various colored paper figures onto a sheet of cardboard, children create their first creative works. Gradually the process becomes more complicated, natural materials are used:
- flowers;
- leaves;
- cereals;
- seeds.
Remember a skill you learned as a child and transfer it to your repertoire of handicraft tricks.
A sheet of cardboard is taken as the basis for the future craft. It can be painted, left natural or covered with burlap. A drawing is transferred onto cardboard, which is easy to choose from numerous photos of a cup of coffee.
If the picture is contrasting and clear, it is cut out along the contour and glued to the base. Grains are glued on top of the drawing, thus filling the entire space of the image.
ADVICE:- It is more convenient to glue the grains with the flat side onto the base. But if you place them with the rounded part down, you get a beautiful textured pattern. Of course, you will have to practice and spend a little more time.
- The grains cannot be placed close to each other - there will still be a gap due to their rounded shape. Therefore, the basic drawing is pre-painted with any brown paint. The most ordinary gouache or pencils, felt-tip pens - whatever is at hand will do.
Fragmentary applique looks amazing when only part of the finished image is filled with mosaic.
In this case, it could be a collage of a hand with a cup of coffee, where the dishes or their contents are lined with natural beans.
Note!
- How to make wooden shelves with your own hands - original design options
- Kinusaiga technique for beginners: what is it, a description of creating paintings from threads
- How to weave a figurine from rubber bands: how to learn to weave animals, toys and what you can make from rubber bands on a slingshot
All that remains is to frame the image in a decent frame. We received an element of stylish interior or a gift for a coffee lover that looks very expensive.
Even a small image, which is intended to take up space on the table, in addition to aesthetic pleasure, will give the owner an exquisite aroma for quite a long time.
Even if for some reason it is forbidden to drink the strong tonic nectar, no one can stop enjoying the smell.
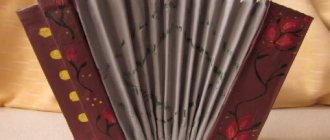
Flying mug of flowers
Flowers are the most popular decoration when decorating a floating cup with your own hands!
A cup decorated with paper flowers and monograms will look elegant. Pearls will add additional charm to this composition.
Creamy rose buds and white jasmine will help create such an airy, delicate cup.
Airy chiffon, snow-white lace, satin roses and pearl thread will perfectly decorate such a candle stand.
Using an old watering can and basin, you can create a summer flower bed with sunflowers. Breathe new life into old things!
The sunflower is a bright yellow flower that symbolizes wealth and prosperity. With its help, you can create such a sunny floating cup that attracts wealth into your home!)
Surely many people have a teapot from an old set that sits idle and gathering dust. Create a vintage DIY piece in the form of a floating teapot pouring out a floral drink!
Or a floating jug with flowers:
Daisies made using the kanzashi technique from satin ribbons will become a simple, but no less elegant decoration for a flying cup
Flowers made from polymer clay will also perfectly color a floating cup with a bright floral abundance.
Master - Alena Putyrskaya
A terry flying teapot watering a flowerbed with flowers! When creating it, you can simply knit terry cloth for an old teapot or cover the teapot with pom-poms made of thread.
Nata Liana tells how to make a floating cup “Summer Mood”:
Decoupage technique
We will need:
- napkin with a pattern,
- preparations for the site,
- white acrylic paint,
- acrylic glossy decoupage varnish,
- PVA glue,
- tassel,
- scissors,
- sponge.
Such original solutions inspire creativity.
Let's paint our base with white paint on both sides. For this we will use a sponge, with which we will apply layers until we completely cover the entire area. Let's wait until the workpiece is completely dry. Separate the top layer with the pattern from the napkin. Carefully glue it to the site, applying a layer of adhesive first to the base and then to the surface of the napkin. We also close and glue the edges of the workpiece. We wait until it dries completely. Cover with two layers of glossy varnish. To do this, it is better to use an aerosol can.
Botanical prints on a cut of wood.
A DIY cup stand is a great gift. This is a necessary little thing in everyday life that is pleasant to use.
Now you can take every sip of your favorite drink with pleasure.
Floating cup made of coffee beans
Coffee beans are still one of the most popular materials used in decoration. It’s very easy to create such a floating mug, but there are a few secrets .
1. When creating a flying bowl, it is better to wrap the base with masking tape. Next, the resulting “slide” must be painted in the color of coffee with acrylic paint so that the base does not show through between the grains.
2. Another option is to wrap the base with brown fabric.
After this, you can start gluing the coffee beans. There is also one important nuance here.
If you use hot glue, it is better to apply it to the grains themselves, and not to the base. This way, glue smudges will not be visible.
Coffee beans can be complemented with decorative elements such as cinnamon sticks, dried citrus fruits, and clove flowers.
Satin flowers using the Kanzashi technique will perfectly decorate your steaming coffee cup:
Master - Vera Litvinova
The tea pair can be decorated with simple twine. Twine can be used in either natural color or dyed or bleached.
An appetizing cake will perfectly complement your cup. The cake can be “made” from modeling mass by painting it with acrylic paint and pasting it with coconut shavings. Be careful, there is a high probability of not being distinguishable from the real thing!)
Kanzashi Needlework Video tutorials will clearly show how you can make a floating bowl with coffee decor:
Choosing polymer clay
Success in mastering a new type of creativity will largely depend on the choice of material. Polymer clay has several varieties. The “Tsvetik” brand from Russian manufacturers is often used. This substance is inexpensive, but has a high density and gets very dirty.
Among foreign brands, the German brands “Cernit” and “Fimo” are in greatest demand. Cernit clay is easy to use, as it is the softest, with a wax-like consistency.
It is distinguished by particularly bright colors and high quality. Fimo mass has several types, differing in density and softness. For example, the Fimo Classic variety is much harder and denser than Fimo Soft. Among the polymers from Germany you can find substances with mother-of-pearl, glitter or completely transparent.
Flying mug of fruits and berries
With the help of plastic fruits, berries, and mushrooms, you can create such an abundance of fruits and berries pouring out of a cup. Butterflies will perfectly complement your fruit and berry cornucopia.
A floating cup can be decorated with bright gifts of autumn. Dried leaves and flowers can also be used. The mug can be replaced with a wooden barrel made from simple ice cream sticks.
Flowers and fruits are harmoniously combined in a floating stream. Butterflies, dragonflies, and ladybugs will be a wonderful “live” addition.
Making hoops to hold the elements together
This product will be assembled completely without glue. Therefore, everything must fit perfectly. The only exception would be a handle mounted on tongues. However, the liquid in the mug will not come into contact with it.
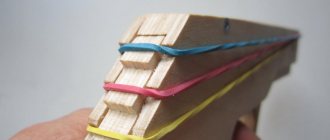
Next, you need to make metal hoops that will surround the outside of the mug, holding it in a compressed state. To do this, you need to measure the circumference, and then make them from strips of thin metal. It is most convenient to place the ends of the circle on rivets. The second, upper hoop should be a couple of millimeters smaller (around the circumference).
The ends of the strips are riveted, after which the hoop can be put on the mug. PHOTO: youtube.com
Installing hoops: how to do it correctly
In order to attach the lower hoop, you need to remove the upper plastic tie, then gently tapping it with a hammer through a wooden plank, gradually lower it as far as possible. The fact is that the bottom will slightly hold the wall elements from compression, as a result of which the neck will turn out a little narrower, as befits a mug. Therefore, the lower hoop will stand tightly.
The hoop is pushed in with a hammer and a plank until it stops PHOTO: youtube.com
The top ring is driven in the same way.
Floating money mug
A floating mug made of coins and coffee beans looks very stylish. The design technique of using an unfastening zipper will also add originality to your mug. Keys, bells, old small toys - everything can be used as decorative elements for your mug.
With coins you can also use imitation bills in which we pack candies.
The secrets of creating a money mug can be found in the Sveta DIY video tutorial:
The money tap is created using the same principle as the flying mug. Instead of a mug, we use a plastic tap, and a small chest or casket can replace the saucer. Coins will look more impressive if they are coated with gold spray paint or varnish.
Master - Anastasia Spitsyna
Cash flows can be depicted using paper bills.
Master - Oksana Ankudinova
You can see how to create a money tap in the DIY Gifts master class:
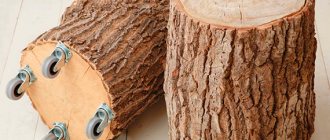
Woodpile rack made from pallets in 30 minutes!
To assemble the rack shown in the photo, you will need a pallet measuring 1200x1600 (1800). However, if you need to stack a small amount of logs, a standard pallet measuring 800x1200 will do. Actually, when making such a rack, it is enough to use the screws with which the pallet was twisted, but to give it additional strength, we recommend purchasing four 2 mm thick mounting plates and securing them on the inside of each corner.
Such a rack can be installed both outdoors and near the fireplace, filling the house with comfort and eliminating the need to leave the house for firewood.
Csja Gold Color Tree of Life Wire Wrapping Paper Water Drops…
154.51 rub. Free shipping
★★ ★★ ★★ ★★ ★★ (4.80) | Orders (1168)
QIFU Santa Claus Snowman LED Reindeer Merry Christmas Decor for...
I've been thinking about making some of the lovely hardwood floorboards left over from my uncle's house, it was a shame to see such a great material go to waste. After watching a lot of videos on the Internet on how to make a mug out of wood, I decided to make a larger mug, but improved the idea a little. I also had a piece of deer antler, and I decided that it would make a good handle for a mug.
This mug is suitable for anything - you can cosplay as a Viking and have it hanging on your belt, you can use it for butterbeer in a Harry Potter role-playing game, or just to impress your friends.
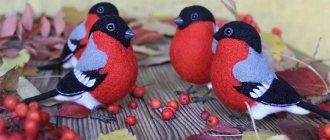
Flying mug with birds
The bird is a symbol of lightness and freedom; it is very often found in interior solutions in various styles and variations. This motif is also reflected in the decoration of the floating mug.
A floating mug can become a wonderful house for a nest of birds. The nest resembles a home and an idyll in it.
A cup with daisies and a bird with a nest looks like a real symbol of family, love and fidelity.
A bird with delicate roses, fluttering butterflies and other decorative elements will help create a summer soaring composition.
We design our “waterfall”
Then you should wait for the glue to dry completely and make sure that our cup is securely positioned in the air. Now it's time to mask the wire reinforcement with several layers of paper masking tape. This part should imitate a stream of liquid, and its width varies from the narrowest at the edge of the cup to the widest at the level of the saucer.
After this, paint over the stream with brown acrylic paint using a pre-supplied brush. This is done so that the white tape does not show through between the coffee beans. Masking tape can be replaced with modeling compound, in which case it will be even easier to form an even and smooth stream. Before painting, you should wait for it to dry completely.
After the paint has dried, we begin to decorate our stream with coffee beans. They must be carefully selected and placed tightly next to each other. The work should be done very carefully so that the base does not show through anywhere. Inside the cup you need to depict the coffee mass, for which we glue the beans thickly in several layers. You need to depict a coffee puddle on the saucer. It is laid out in the same way, with the grains tightly adjacent to each other. The surface must be strictly horizontal (so that the grains do not puff up).
Flying mug made of beads
Pearls are the most noble decorative element that will add festiveness and pomp to any craft! A simple white tea pair can be transformed into such a pearl miracle!
A very delicate floating bowl will be made from soft pink satin flowers and matching pearls. A white dove will perfectly complement the composition).
Beads of different colors will also help create a unique spill cup. Flowers and ribbons of the same shade as the mug will perfectly decorate and complete the image of your cup.
Master - Irina Khokhlova
Topiary with coffee beans: design tips
Topiaries made from coffee beans are all a little similar to each other, the differences lie mainly in the decor. But there are some nuances in the work that one master class takes into account, but in another master class they are not mentioned at all. Meanwhile, they are important for beginning masters.
Topiary made from coffee beans - nuances:
- It is preferable to coat the ball or heart (depending on what kind of blank you have) with brown acrylic paint;
- Small coffee beans can be placed in the first, inner layer of the bean crown;
- The top layer of plaster, which is to be decorated, can not only be decorated with layers of coffee, but also supplemented with “gold” coins.
The floating cup is made using a slightly different technology, which will be described in a detailed video by MK.
The stream of an aromatic drink is the frame that allows the cup to remain suspended. As a rule, it is made of thick wire, polyurethane foam and several types of glue.
You can find a detailed video master class that describes in detail every step of creating such a floating cup.
Coffee topiary in the shape of a heart (video master class)
Topiary made from coffee beans is not the most complex type of topiary, pleasant in appearance and fragrant. Usually the decoration method is chosen almost during the manufacturing process, as you look at the available decorative materials. Thus, you yourself adjust the master class, getting your own original coffee tree.
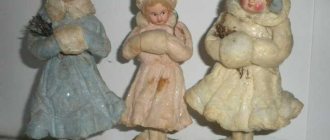
New Year's flying cup
A floating cup in New Year's style will become an original decoration of the New Year's interior. Snow made of cotton wool or padding polyester, a Christmas tree made of a pine cone or a cypress branch, a small figurine - what could be easier to create a winter New Year's entourage!
Christmas trees can also be made from New Year's green tinsel. White paint or a simple note corrector can imitate snow on them. You can determine the characters yourself when creating your New Year's story in a floating bowl!
A candle will add warmth and light to your cup
Winter cup with snow sparks
You can create decorative elements for a cup with your own hands from almost nothing; for example, making such small gift boxes will not be difficult. You can leave a note with your wishes in the form of a small envelope.
A flying cup decorated with Christmas-style candles, flowers and New Year's balls will give you a festive Christmas mood.
Reveals the secrets of creating a festive New Year's flying bowl in his master class by Nika Shvetsov:
Variety of crafts
All needlewomen know that each product is unique. It is also known that you can use various materials to make such a souvenir. A floating bowl with flowers, made by yourself, is an example of a craft that anyone can repeat on their own or make a similar one using other materials. You can see a photo of a floating cup with flowers, made by yourself, below.
The cup can be used for various activities. It is multifunctional. And who would have thought that a topiary could be made from it? Today, not only hand-made floating cups with flowers are especially popular. They make coffee cups, cups with money, kanzashi flowers, cream, etc.
How to properly make such a product? A step-by-step description of how to make a floating cup with flowers with your own hands is presented below.
Some tricks
In order for the process of creative activity to bring you only positive emotions, and for the products to turn out more beautiful, it is not necessary to have amazing talents for art. You just need to follow some recommendations.
- For your creativity you should use only high-quality materials. But this does not mean that you need to buy all the most expensive things in the store. Not at all, expensive is not always good. It’s enough just to study the composition, look at the country and manufacturer, and evaluate the overall quality by eye. This will be quite enough;
- You don’t need to limit yourself to just repeating other people’s work. At the beginning, you can watch various master classes and learn from them. But later it is advisable to create your own masterpieces. Other people's works should only inspire you, perhaps guide you towards a certain idea, but not be an exact copy of your idea;
- The key to success in any activity is love for work and dedication. If you feel that this is yours and you like to do this particular creativity, continue to follow in this direction. The work will be of high quality only when the master himself enjoys it.
Original tree
The coffee tree is also one of the most common crafts. It perfectly complements the interior space of any home, and can also become an unusual souvenir for every special event. You will learn how to make your own coffee souvenir at home from the description given in this article.
Take a small plastic ball and make a hole in it where you should insert a stick for the future trunk. All parts must be glued with silicone glue.
When the adhesive composition has dried, you need to take a napkin to wrap the ball and secure it with threads to the main part of the barrel, creating a couple of turns. The protruding parts of the napkin need to be cut off.
Paint the wrapper in a brown tone. Dilute alabaster to pour into a glass. Insert the base of the stem inside the glass into the alabaster until it dries completely.
Cover the ball in a brown wrapper with grains
It is important to stick the coffee beans with the convex side up to give the product maximum volume. It is advisable to place them randomly.
Decorate the glass by covering it with multi-colored felt, decorating it with beautiful ribbon bows, as well as other decorative details.
You should hide the alabaster using coffee beans. Decorate the tree with a bud.
You can clearly see how this type of coffee products look in the photo from Runet.