Plexiglas has recently found wide application in various sectors of life. Office partitions, advertising products, aquariums and other decorative items are made from it. This material is easy to work with at home. You can purchase it at any building materials sales department.
Good lighting in the house plays an important role in any design decision. An original decoration for your apartment can be a lamp made from plexiglass with your own hands. A little imagination and perseverance - and your room will sparkle with new colors.
Safety of night lighting
As is clear from the above examples, there are a huge number of designer models of homemade lamps.
There are different techniques for working with decorative materials to create a variety of lighting effects. Many home craftsmen believe that compact nightlights have minimal power and low voltage, which in itself should protect against problems. This is not entirely true. A voltage of 12 volts for a halogen light bulb or 3 volts for an LED power supply does not pose a threat to the human body. However, if a short circuit occurs, an electrical arc will form at the point of contact. At the same moment, a current will pass through the wires, which can heat the insulation to the point of fire. In this case, the power supply may operate in overload mode, but the shield will not react. That is why it is necessary to protect the wiring of such light sources with a fuse.
After the electrical wiring at the output of the power supply is protected, you need to pay attention to the electrical safety of the board itself
It is enclosed in a reliable housing, which is especially important for lamps in children's rooms, where children may try to disassemble the night light
Plexiglas: what is it?
But let's start with the basics: let's figure out what this material, plexiglass, is. It is also called acrylic, although it can also be based on polycarbonate or polystyrene. The latter is used for the internal needs of buildings; it is poorly resistant to the destructive effects of ultraviolet radiation and precipitation. However, the material is able to “work” in a wide temperature range: from minus 20 to plus 60 degrees.
As for polycarbonate, it is resistant to ultraviolet radiation, and the range of tolerated temperatures is even higher: from minus 40 to plus 120 degrees. Therefore, the material can be used outside.
Plexiglas is similar in quality to polycarbonate. Its operating temperature limit is from minus 20 to plus 70 degrees. For processing, you will need a sanding block and paper - to remove scratches and make smooth edges. Therefore, plexiglass for lamps is a good option.
Wide selection of luminous furniture made of plexiglass in
Our company offers a wide selection of LED interior and exterior items made of plexiglass at competitive prices:
- — LED benches of any size and configuration, which are perfect for arranging adjacent areas of country houses, organizing special events, corporate events, and performances of musical groups;
- — luminous tables with functional internal lighting;
- — LED cubes – designs that ideally combine coffee (cocktail) tables and lamps;
- - luminous multi-color cubic structures, which consist of several elements in the shape of a cube and equipped with backlights of different color shades;
- — luminous chairs that harmoniously complement the interiors of cozy cafes or bars;
- — LED sofas that add fresh colors to any interior;
- — luminous dressing tables that will become a bright accent in luxurious bedrooms and beauty salons;
- — LED bar counters;
- — luminous coffee tables and acrylic tabletops.
Our professional craftsmen produce high-quality and functional furniture with unique design properties according to standard or exclusive drawings in accordance with the personal requirements and wishes of customers.
You can order original LED furniture made of high quality German plexiglass by calling +7. Date of creation: 06 OCT 2022 Author "Akrilshik"
Important element: LED driver
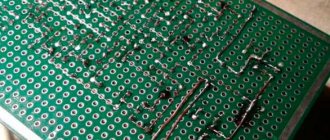
For the correct operation of a DIY LED device, you need to resolve the issue with the driver. The layout of this unit is quite simple. The operating algorithm consists of passing an alternating current of 220V to the diode bridge through capacitor C1.
The rectified current goes to series-connected LEDs HL1-HL27, the number of which can reach 80 pieces.
The driver for a homemade LED device is assembled according to the diagram below. You can also use ready-made elements bp 3122, bp 2832a or bp 2831a
To avoid flickering and achieve a consistently even color, it is advisable to use capacitor C2, which should have as large a capacity as possible.
Design features, operating principle of LED equipment
Before you start inventing an LED lighting device yourself, it is recommended to understand its design and operating principle.
- A diode is a semiconductor element that passes electric current through itself in one direction. In the process of electron recombination, energy is generated and photons are emitted, resulting in the release of light and heat.
In an LED device, the removal of thermal energy is the main nuance that you need to pay attention to when assembling the lamp yourself, since elevated temperatures can cause premature failure of the home-made structure. Therefore, a mandatory element of the design of such a lighting device is a cooling radiator.
The simplest design of a radiator is a substrate made of aluminum, on which LED elements are placed directly. But this is not enough for complete heat dissipation in equipment with more than three semiconductors. For such lighting devices, specialized steel radiator structures are provided. In household devices, this is the chandelier body itself.
The ice product is equipped not only with a radiator. Its design also includes a diffuser and a light flux reflector, which could well be a lens and a reflector. LED elements are most often produced in a ready-made assembly.
Important! To prevent the illuminator from irritating the organs of vision with sufficiently bright light emission, it is recommended to additionally cover the body of the product with a frosted bulb.
Types of lamps
Autonomous LED luminaires
All LED night lights can be divided into two groups according to the method of power supply. These include:
- Autonomous. Powered by battery or battery.
- Stationary. Plugs into an outlet.
Autonomous products can be moved and placed in any convenient place. The disadvantages include the expense of batteries, which need to be changed periodically. A model that receives electricity from an outlet can only be installed near a power point. There is no need to buy consumables for such a lamp.
Night lights with motion sensor
Wood lamp
Devices can be equipped with various sensors that make them easier to use. They do not need to be turned on; they activate independently. It is not recommended to place such night lights in the room, as they can detect any arbitrary movement and turn on. They are usually installed in closets, garages, and hallways. The sensitivity of the sensor can be adjusted to avoid false alarms on pets. The range of action is 3-5 meters.
Night light made of wood
This type of night light is completely safe. The wood is processed in such a way that there is no release of harmful substances when heated. Wooden LED night lights are even installed in children's rooms, as they are durable, environmentally friendly and difficult to break.
How to choose a purchased night light
Night lamp for a child's room
If it is not possible to make a lamp for your home yourself, you can buy it in a store. The range of products offered is wide, but you need to be able to understand the characteristics.
You should not take too cheap models. They are made from low-quality materials and may be unsafe. Also, you should not take too bright devices with neon colors. They are usually made from harmful materials.
For a children's room, a lamp in the form of a toy, sun, star, fairy-tale character or other original shape is suitable. It is better to take a device made of high-quality plastic and wood. A durable night light made of plexiglass and LEDs is also suitable.
You need to decide in advance where the lamp will be placed. It should fit into the interior and complement it. It is desirable that its design be similar to the style of the rest of the lighting fixtures in the room.
In terms of color, it is better to take a white night light. It will not tire your eyes, and it will fit well into any interior. It can be installed both in the nursery and in the bathroom.
Using an old power supply for a night light
Nowadays, so many mobile phones pass through the hands of each family member that you can easily find a couple of different chargers. You can make an LED night light out of them with your own hands. This circuit will be much better than a capacitor circuit:
- Ready-made housing with plug for connection to the network;
- galvanic isolation from the network - there will be no high-voltage potential at the capacitor terminals;
- stabilized values of output voltage and current.
We invite you to familiarize yourself with Traces of bedbugs on furniture
Underwater rocks
A story from practice: the manufacturer indicates on the charger body an output voltage of 5V and a current of 1A (may differ). When I made a night light for myself, I calculated the resistors for the LEDs for this voltage. The night light practically stopped shining after 2 nights. The LEDs dimmed, and the lampshade of the night light was always warm...
In addition, I initially, by mistake, soldered in resistors with a value slightly less than the required 100 Ohm. I became interested in why the LEDs were degrading and I measured the voltage. The charger gave out as much as 7 and a penny volts. Naturally, the LEDs were fed with twice the rated current.
Moral: do not believe what is written, but check the voltage and current of the LEDs with a multimeter.
Look at the diagram of an LED night light from a mobile charger.
As a result, you can get a similar LED night light. If desired, you can hide the diodes with a diffuser from a broken LED lamp.
More details on how to make a night light from LEDs and a smartphone charger are described in the video.
Many phones come with chargers with a USB connector. You can buy ready-made LED modules in USB flash drive format and get a simple LED night light. True, you will not get pleasure from designing, developing and assembling a custom night light.
A night light is the simplest and most harmless device that you can make with your own hands. On the other hand, its simplicity and lack of requirements for brightness make it possible to turn a simple and ordinary thing into a real work of art.
At the same time, you can implement many ideas, such as iridescent colors on an RGB strip, or turning on a night light when there is a clap or depending on the light level. Look at the LED acoustic switch diagram.
Resistor R3 sets the operating point of the transistor and, accordingly, the sensitivity of the circuit
Transistor VT2 is the second stage of the amplifier, and capacitor C2 is electrolytic, pay attention to this
Impact on the body
The blue peak around 450 nm from LEDs affects the entire body in addition to the retina. This happens through suppression of melatonin production.
Instead of rest and sleep, on the contrary, we want movement and action.
What is melatonin and why is it needed? This is a hormone that directly affects metabolic processes.
It is produced in the endocrine gland. Suppression of melatonin leads to early cellular aging.
Melatonin is an antioxidant that protects our mitochondria and DNA from damage, an assistant to the immune system, enhancing its function.
However, not everything here is so simple and it’s still not worth blaming the LEDs. As deeper research has shown, the dependence is primarily expressed in color temperature.
The higher it is, the more melatonin synthesis is suppressed. Moreover, this process occurs equally under different lighting sources.
That is, there is not much difference between LEDs and other types of light sources. Any artificial lamps with a temperature of 6000-6500K have an equally bad effect on melatonin production.
How to protect yourself from this?
1
It is better to leave incandescent light bulbs there, or install alternative night lights.
2
Don't sit in front of a computer monitor or smartphone screen.
3 4
Night light starry sky"
One of the most current and romantic night light models, to one degree or another, imitates an endless cluster of constellations in the night sky. You can make such a light source yourself from scrap materials. It does not need to be connected to the network, because a regular flashlight with little batteries is enough.
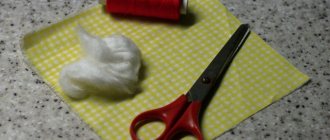
To create such a night light, you need a glass jar with a lid of any size, thick foil, scissors, an awl, a small flashlight and any surface that is not afraid of damage, for example, a tray.
- Draw a star map on the foil. You can arrange celestial objects schematically or following the real arrangement of stars. It all depends on your desires and level of effort. If you are making a similar night light for a child, you can limit yourself to the image of the constellations Ursa Major and Ursa Minor.
- Place the sheet on a flat surface and use an awl to make holes. These will be the luminous stars.
- Trim the foil so that its height matches the height of the jar. Roll the sheet into a tube and insert it into a glass container.
- Place a flashlight at the bottom of the jar and turn it on. The walls and ceiling will immediately be illuminated by the beautiful glow of the night light.
There is another option to make a children's night light that imitates the night sky. It can be made from an ordinary tin can. Such a container should be cleaned, the label removed, painted in any pleasant color and several holes made with an awl. Inside the jar you need to put a flashlight, a garland or a lit candle. It is advisable to cover the edges of the jar with a plastic lid so that none of the family members are injured.
What about the decor?
In fact, you can go wild in this regard on an unrealistic scale. On glass walls you can hang paintings by your friends or favorite artists, family photos, or beautifully decorate a glass shelf attached with special screws
Don’t stop your imagination, just pay attention to what kind of load the decorative elements will create on the shelf. If such a wall is a partition between two rooms, then the right decision would be to cover the transparency with curtains
Tip: the entire apartment is not always done in the same color, and some curtains may not match the interior of another room. Use materials of different colors on both sides or even cover the glass on the side of each living space so as not to infringe on the personal space of each of the apartment residents.
Own design of night lights
Modern stores offer a huge variety of night lighting devices of various designs, for different tastes and at any price.
And not in every case is it financially justifiable to create such devices with your own hands; however, their design gives scope for turning creative fantasies into reality without spending a lot of money. That is why anyone who wants to make their home interior original can create a night light with their own hands.
In the process of designing light, in comparison with basic lighting, where the same distribution of light flux is necessary, the main emphasis is on the competent combination of a number of factors through which visual perception is formed:
- device shade;
- light refraction, as well as its decomposition into shades;
- scattering and reflection of light flow;
- combination of colors and visual effects.
The most dangerous color and its effect on the eyes
Why is the spectrum of radiation from an LED light bulb so dangerous? If we break it down into its components, it is easy to see that at a wavelength of 480 nm there is a very large dip.
The left side of the hole is characterized by a blue LED, the right side is characterized by a yellow phosphor, with which the LED itself is coated.
No such dips are observed in natural sunlight.
Why is this “pit” dangerous? It has been experimentally established that light with a wavelength of 480 nm, falling on ganglion cells, is directly responsible for the speed of the reaction to reduce the diameter of the pupil, that is, its closure.
Thus, due to the failure of the LED lamp in this range, our pupil remains more open, letting in the rest of the radiation spectrum.
As a result, instead of focusing, a feeling of some blurriness appears. Next, the eye muscles are loaded and focus is restored.
Such constant strain on the eyes is the first sign of myopia.
In addition to the failure, the blue peak also has a bad effect. Due to it, retinal is synthesized in the eyeball - the chemical basis of vision, with the help of which the retina of the eye converts light into metabolic energy.
However, with excessive accumulation (the peak contributes to this), everything can lead to partial death of retinal cells.
Also, excess retinal provokes deformation of the eyeball and contributes to the development of myopia.
That is why all manufacturers long ago sought to develop an LED light bulb with a spectrum very close to that of the sun (without dips and peaks). And I must admit, they have made some progress in this matter.
Even its inventor Shuji Nakamura abandoned the outdated “blue crystal – yellow phosphor” technology. His recommendation is to switch to sources with biologically adequate light spectra as quickly as possible.
It’s nice to know that not so long ago mass production of such “solar” light bulbs under the Remez brand began in our country.
LEDs without diffusers are especially dangerous. Experiments were conducted that showed that fatigue and performance under such lamps were reduced by almost half compared to “naked” fluorescent lamps.
And they, in turn, are far from a gift. The diffuser increased efficiency in relation to luminescent ones by only 12%.
That is, you understand how important it is to have an analogue of the solar spectrum at home and at work
However, not everyone shares the opinion about the dangers of blue LED light. The main argument in the dispute is the low energy of photons.
Even if the pupil is narrowed less than expected, the energy of the light flux from the blue LED is supposedly insufficient to cause significant harm to the eye. Unless, of course, you put a 1kW lamp in front of you.
However, do not forget that the cumulative effect of prolonged exposure to such light has not been canceled either.
Materials for gluing
LED strip is cut through three diodes
The LED strip has a standard self-adhesive backing. But it is not suitable for long-term fixation on rough surfaces, such as wood. The list of materials that can be used to glue the LED strip is as follows: aluminum profile, tape for LED strip, aluminum tape, quick-setting glue. They improve properties and increase fastening efficiency.
Adhesive tape for LED strip
Serially produced tapes are a printed circuit board with LEDs attached to double-sided tape. Its free side, used for installation, is protected by a smooth transport film. For high-quality models, the 3M marking is applied to it.
Acrylic tape 3M for various applications
How to glue LED strip:
- Markings are applied to the previously prepared surface.
- Wires and a power supply are connected to the backlight contacts or using a connector; install a switch.
- Using a sharp object, separate the beginning of the tape from the protective film and release a section 15-20 cm long.
- Apply the strip with LEDs to the surface and press firmly.
- Gradually freeing sections of the tape from the film, completely glue the tape along the marked path. When making connections in the corners, do not bend it, but use corner connectors or solder it.
- Install the power supply in a convenient place protected from moisture.
The tape must be applied accurately to the markings. If it is placed incorrectly after detachment, the tape loses its properties. It will be difficult to reattach it firmly.
Aluminum profile
Aluminum LED Profile
The optimal mounting for LED lighting is aluminum profiles. They are used for extended, powerful models SMD 2835 and SMD 5630, 5730 and for the popular LED-based SMD 5050. For fastening structures with a power of more than 14 W, their use is mandatory.
Profiles can be overhead, mortise, or corner. LED lighting is glued inside the profile, and it is mounted on the selected surface.
Using aluminum profile for LED strip
Properties of aluminum profile:
- The self-adhesive surface of the tape fits perfectly onto a flat and smooth base;
- Easily and firmly attached to the mounting plane;
- the heat generated during the operation of LEDs is removed through the aluminum surface;
- The matte diffuser, which covers the front part of the profile, gives a pleasant appearance and makes the lighting softer.
Glue
Super glue is perfect for gluing LED strips
The right LED strip adhesive provides a quick-setting bond. Adhesives cope with this task:
- based on cyanoacrylate, called superglue, for example “Moment Super”;
- based on rubber or silicone, for example, liquid nails “Titanium” or “Moment Montazh”.
Recommendations for fixing with glue:
- Superglue is applied pointwise every 50 - 100 mm. This way the tape is securely fixed and, if necessary, it is easier to dismantle it than when applying a continuous layer of glue.
- The strip with LEDs is applied with its base to the surface on which the glue is applied and pressed firmly.
Adhesive joints are used on vertical, inclined porous surfaces. It is resistant to temperature and humidity. The tape adheres to a properly treated surface in 20-60 seconds. They completely glue together in no more than 2 hours. You can use glue to attach the LED strip to metal, wood, plastic, wallpaper, glass.
Aluminum tape
Aluminum tape is used instead of a profile for LED strip
If it is impossible to use the profile of LED strips of low and medium power (6-10 W), they are attached to aluminum or foil tape. Its surface has heat-dissipating properties and can serve as a light reflector.
Aluminum tape for the LED strip is glued to the surface according to pre-applied markings. To ensure a good connection, superglue is applied pointwise to it. Then a strip with LEDs is attached to the tape.
Other mounts
Mounting clip
If the LED strip is hidden or appearance does not matter, you can use the following to fix it:
- disposable nylon zip ties;
- plastic clamps.
Do not fasten the LED strip using staples with a construction stapler.
Two methods of gluing LED strip have become widespread: with tape and with glue. The tape comes off over time. The strength of this installation is increased by using superglue. It is optimal to mount the lighting using an aluminum profile.
Step-by-step instruction
Designing glass for edge lighting is within the capabilities of any homeowner. About the features of the process in order:
- We cut out a light panel of the required size and shape from plexiglass. To do this, we use a hacksaw, jigsaw, etc.
- We process the edges and make a recess at the end for the LED components.
- We apply the design to self-adhesive paper and glue it to the canvas.
- Using a scalpel, cut out the outline.
- Using an electric drill, we engrave the glass along the marked line.
Now you need to assemble the circuit. We take the LEDs and solder them to their positive terminals via a resistor. We insulate the contacts with heat shrink. Using acrylic glue, we attach the LEDs to the end holes of the canvas. To check the serviceability of the system, we connect the pluses and minuses along the wires and attach them to the battery holder.
The result is an excellent night lamp, assembled yourself.
You can make a beautiful lamp from plexiglass if you follow the instructions
Materials and tools
Have you decided to make your own edge lighting? Make sure you have everything you need at hand:
- acrylic canvas;
- aluminum profile;
- LED Strip Light;
- small 12V power supply.
If the panel is to be placed in a room with high humidity, a special tape is needed. Are you considering a false window as an auxiliary light source? Then you will need an LED strip with increased performance.
Tools usually include a hacksaw, electric jigsaw, drill, fastening components, etc.
To operate the plexiglass lamp you will need a 12V power supply.
Acrylic preparation
It is important to ensure uniform illumination of the panel. We will need high quality acrylic. A balanced, rich glow is guaranteed by diffuse components. They appear in acrylic sheets during its special preparation. It is impossible to perform such processing at home, so you need to purchase a ready-made canvas that meets all the parameters. The thickness of the plexiglass is determined taking into account the dimensions of the light panel.
The ends in acrylic fabric must be polished. In the piece where there are no LED components, we apply reflective material. During production, acrylic is covered with a protective film. It prevents damage to the canvas and redistribution of light. Remove the film before installing the structure in the profile.
Profile assembly
Aluminum profile components are at your disposal. We cut them to the required sizes at an angle of 45°. Then we connect the parts using the corners. Three sides are ready, now we install LED components throughout the entire interior. We connect the wires in advance to ensure contact with the power supply. The 12V adapter is capable of providing energy to a tape up to 5 m long. We screw at least 4 fasteners to the top of the profile for further installation on the wall.
Aluminum profiles for false windows must be mounted at an angle of 95°
Working with the light panel
Three sides of the profile are assembled and the LED components are secured, we begin the installation of the light panel. We need a reflector - a sheet that reflects light. Let's add it to your profile. We also add an acrylic sheet, a film with an image, and a protective coating to the design. We install the canvas above the LED components. This promotes good light scattering. At the end we attach the last side of the profile.
An important nuance: the poster must be printed on backlit film - this way good light transmission is achieved. To make the structure more rigid, a backdrop of sufficient thickness is inserted into it.
Wall mounting
The light panel is ready, now you need to secure it. Hooks are mounted to the wall using dowels. All that remains is to hang the false window and connect the power supply.
Using simple technologies, you will be able to create a modern design in any room on your own. Acrylic edge lighting will create a cozy atmosphere and, if necessary, perform a practical function.
Hello all brainiacs
.
In today's project we will make a 3D lamp
.
For this project you will need:
— Wooden plate 6.5 mm thick — Acrylic plate 6.5 mm thick — LED strip 10 cm long — Battery — Soldering iron — Switch — Solder — Glue
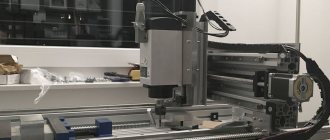
Step 1: Laser cutting
Start by laser cutting your workpieces. We used FSL Hobby Laser cutting.
The "base" file includes two parts. This allows solid and hollow parts to be stacked on top of each other. Cut along the red line and engrave along the blue line. Only one part will require a blue line to engrave.
Use 6.5mm thick material and cut the row 8 times. This will give you 8 solid pieces and 8 hollow pieces. Save one of the details. This will cover the base and serve as a guide for installing the LEDs.
For the acrylic plate, engrave the black sections. Cut along the red line.
Step 2: Gluing
Stack the slotted pieces on top of each other to create a solid structure. The slots will fit tightly onto the acrylic plate. Use an acrylic sheet to ensure all slots are aligned while gluing. If you plan to make the lamp interchangeable, then be careful not to glue the acrylic plate to the seat.
Once all the solid pieces are in place, start gluing the discs together to make a hollow cylinder. Glue this cylinder under the slotted pieces. This will create a recess for installing electronic components.
Step 3: Routing Wires
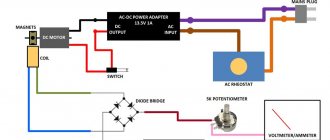
Make a diagram according to the attached diagram. We used a 9V battery and two sections of 12V LED strips. Other combinations are possible, but would require recalculating some of the circuit components.
Attach your LED strip to one additional hollow circle piece. Align the circle with the engraved rectangle to align with the base of the acrylic plate. Attach the battery and wires to the base. If using a switch, you can drill a section of the base to mount the switch so that it can be accessed from the outside.
Step 4: Completion
Sand the base to smooth out any uneven surfaces. If desired, varnish or paint. Insert the acrylic plate into the stand. Add the bottom circle with the electronic components to the base.
LED lamp made of wood and acrylic
Often, lamps and night lights made of wood are made using epoxy.
For these purposes, jewelry epoxy resin with a transparent texture is used, the cost of which is quite high. If the lamp is made for sale, the profit pays for the venture. But for homemade products, it wouldn’t hurt to reduce the cost a little and, so to speak, practice. Acrylic glass comes to the rescue. It's an inexpensive, unbreakable material that may not be as clear on the edge, but it conducts LED light very well. Working with acrylic is much easier than working with epoxy, and despite the limited capabilities, you can make a beautiful and high-quality product. In order to make an LED lamp from wood and acrylic with your own hands you will need:
Materials:
— cutting boards (the author uses a valuable type of wood); - acrylic glass 8 - 10 mm thick; — a metal inch pipe for making the inner casing; — a metal plate for making the base of the lamp; - wood screws with flat heads; - carpentry or epoxy glue; — quick-drying or natural oil for treating the surface of the lamp; - LED strip and cable. Tools:
— jointing machine;
— grinding machine; - drilling machine and Forstner drill; - sander; - circular; - Miter saw; — a pipe saw or grinder with a cutting wheel; - welding machine; — drill and metal drill with countersink; - chisel; - clamps; - sandpaper; — a paint brush or a piece of foam rubber; - lint-free cloth to remove excess oil; - screwdriver. Manufacturing process Step one: pre-processing of wood
The author uses a valuable type of wood. You can imitate the color of exotic wood using stain. To do this, use an oil-based stain.
The author processed the wood scraps on a jointer and then lightly sanded the surface. For high-quality assembly of the body, make sure that the thickness of the board is the same over the entire area or use lumber that has been pre-processed on a surface planer.
When purchasing bars and boards of valuable wood species, inquire about the degree of processing of the lumber. This wood, to put it mildly, is not cheap, and it would be a pity to mercilessly plan it in order to correct the curvature of the surface.
Step two: making acrylic and wooden elements
You can unravel the workpiece lengthwise using a circular saw, making several cuts on each side. After this, grind the surface of the workpieces on a grinding machine and level it before gluing the parts.
Since wooden blanks have a small area, it is difficult to pass them through the machine. The author glued wooden dies onto a sheet of plywood and in this form ran them through a sanding machine. He used wide double-sided tape to secure it.
Step three: assembling the lamp body
On wooden blanks, draw two lines from corner to corner and mark the center with a dot. Using a drilling machine, drill a hole for installing the LED strip with a diameter of 35 - 40 mm.
Do the same with the acrylic parts. Remove the protective film from their surface and begin assembling the case.
Assemble the body using glue, alternating layers of wood and acrylic, and place the workpiece in a vice for a while.
Step four: making a metal insert
Clean the metal workpieces with a grinder with a grinding attachment and connect them at several points by welding as shown in the photo.
Step five: processing the lamp body
The lamp body must be sanded using a fine abrasive - from 220 to 2000. Remove the chamfers using a sander. The author treated the body with tinting furniture wax. Wax that has not been absorbed into the wood fibers must be immediately removed from the surface of the workpiece. Polish the body by hand or with a sander. This will remove excess coating from the acrylic layers and make the surface perfectly smooth to the touch.
Step six: LED strip installation and final assembly
Become the author of the site, publish your own articles, descriptions of homemade products and pay for the text. Read more here.
Little tricks in making
- Favorite photos need to be printed on a printer using special paper. The paper should not be very thick, as it must transmit enough light.
- Cut out the resulting photographs and record them on transparent film.
- Attach a cut-out sheet of organic glass to the frame of the lamp, fix the film with the photo on it, then put more plexiglass on top.
- Fasten all the elements with screws, cut off the protruding edges of the film.
In addition to floor and table lamps, you can also make a ceiling chandelier with your own hands.
Additionally, you just need to provide special fastenings. Decorative thread is suitable for decoration, preferably linen. Choose the appropriate color to match the lamp or interior. It will look original in weaving.
Plexiglas for making lamps can be purchased at building materials stores. It is convenient to process at home. The material is easily cut with a circular saw. It is better to cut at medium speed to avoid melting due to overheating. You can drill it with ordinary drills. It is recommended to place plywood under the glass when drilling to prevent cracking.
If you don’t have the necessary tools at home, you can cut them in the store into the desired shape and size.
The light source is ready with your own hands. All that remains is to admire the results of the work. An original decorative product will not leave anyone indifferent.
In this article you will find a description of how to make decorative pendants with LED edge lighting with your own hands.
They are well suited for decorating children's rooms, as well as for any other room, for example, a hallway. You can put on plexiglass medallions images that are suitable for the occasion and age of the child - Santa Claus and a decorated Christmas tree for the New Year, angels for Easter, hearts for Valentine's Day, and illuminate them with LEDs. Use your imagination and you will get great results! If you have a laser cutter for plexiglass, you can skip the manual cutting and engraving section. And who knows, maybe, if you have such a machine, you will start manufacturing and selling similar products.
So let's get started! Download the PDF file to print the images used to make decorative lighting.
In the video you can see the process of making plexiglass figures. Required materials - AAAx3 battery compartment (1 pc.) - Wooden block with a cross-section of 2.5x5 cm, 30 cm long (1 pc.) - Wooden block with a cross-section 2.5x5 cm, length 15 cm (1 pc.) - 3 mm LEDs (6 pcs.) ) — 100 Ohm resistors (6 pcs.) — Square plexiglass pieces 7.5x7.5 cm (6 pcs.) — Eye bolt 1-¼″x5″ (1 pc.) — ¼″ washer with a diameter of 1-¼″ (2 pcs.) — Hex nuts ¼″ (2 pcs.) — Screws (2 pcs.) — Small nails 2.5 cm — Superglue or Moment glue — Solder — Self-adhesive paper (oracal vinyl film is best) — Wires (two-core)
Paint (optional)
Tools - Dremel (general purpose high-speed hand tool for drilling, grinding, engraving, routing, etc.) or other tool with engraving attachments - Dremel sanding drum or sandpaper - Soldering iron - Wire cutters - Wire stripper - Small hammer - Drill (it is better if a drilling machine is used) - 0.6 mm drill - 0.5 mm drill - 0.3 mm drill - Hacksaw or plastic knife - Hot air gun for heat-shrinkable tubes (can be replaced with a lighter)
Drill holes on the bracket bars (as shown in the photos).
Solder a resistor to the positive leg of the LED. You can shorten the LED leads a little to save heat shrink tubing.
Cut a piece of tube large enough to completely hide the LED leg with the resistor soldered to it. After this, put this piece of tube on the positive wire.
Solder the resistor to the positive conductor (white in the example) and, by sliding a piece of heat-shrinkable tubing from the conductor onto the resistor, shrink the tube by applying heat to it.
Solder another core (black in the example) of the wire to the negative terminal of the LED.
Cut another piece of heat shrink tubing large enough to cover the exposed core. Put it on the opposite side of the wire, slide it onto the exposed section of the wire and shrink it using a heat gun.
Remember that these LEDs are very sensitive to heat, so be as careful as possible when working. Better yet, buy them with a reserve in case you do make a mistake and ruin one of them while working.
Cut six square pieces of 7.5 x 7.5 cm from plexiglass.
Cut off one of the corners of each of them, departing 0.5-0.6 mm from the top of the corner to create a plane for drilling a hole for the LED.
Drill a hole in this surface with a 3mm drill bit. Using one of the LEDs, check the hole depth to ensure that the required depth is accurately achieved. It is recommended to use a drill press, but if you do not have one, use a smaller diameter centering drill first, and then, using a drill of the diameter we need, widen the centering hole.
Plexiglas can be cut perfectly with a jigsaw, a circular cutting machine, or even a hacksaw. The key to achieving a smooth surface where you cut is to use blades with more teeth. For example, when using a jigsaw, use a 30 teeth per inch (30 TPI) saw blade. The same goes for a cut-off machine - use a clean cut blade with a lot of teeth. Of course, the best tool is a mini-circular saw from Dremel. To protect against scratches, place masking tape on the plexiglass on both sides at the cut point and saw slowly. You can try using a knife to cut plastic, but it is likely that sheets of plexiglass with a thickness of more than 6 mm will not work for you.
Select several images that you would like to use for the LED mood lighting and resize them according to the cut out squares of plexiglass. If you are a good artist, you can draw something by hand. A PDF file was made for this article in Photoshop, which you can download above. Print them out on sticker paper (preferably vinyl) and cut them out.
Remove them from the adhesive backing and stick them onto the plexiglass squares.
Do not remove the protective masking tape on the opposite surface until you are completely finished. This will minimize scratches.
Using a sharp knife (such as a modeling knife), cut out all the black areas from the applied sticker. For this article, images with outlines were used. Of course, if you have a laser cutting machine for cutting plastic, you won't need a knife.
Using a Dremel, etch all the surfaces where you cut the decal from with a knife. If you don't have a tool, scratch the surface frequently with a knife, this method will also work. You can even sandblast the plexiglass if you have one.
The deeper the image is engraved, the better it will be visible when backlit.
Peel off the pasted paper and appreciate your creations. If necessary, you can take a step back and adjust the images in places where your attention has waned.
Sand the ends of the squares white and you'll get a nice outline around your image when the LEDs light up.
It doesn’t matter which crossbar, short or longer, will be on top, in the example the short one is placed at the bottom. The wood should be painted to give it a nice look.
Drive two nails into the sides of each hole. They will be used to wrap the wires so that they have a neat and tidy appearance.
Screw the nut onto the eye bolt until it stops and place one of the washers on it. Place the bolt in the hole in the center of the wood bracket so that the eye is on the same side as the nails driven in (this direction will be "up"). Place a second washer on the other side of the bolt, then screw on the nut, then tighten it. The pictures show that a wing nut was used for convenience.
Pass the wires of one of the LEDs through the hole in the bracket (from its bottom surface).
Determine the desired length of wires and cut off the excess from the opposite side of the hole.
Strip both wires a short length and wrap them around studs. This will secure them in place. Do this operation with the remaining LEDs, making sure that all the “pluses” are on one side and the “cons” on the other. Make the free ends of the wire of different lengths. Take the bracket and evaluate how harmoniously the colors of the LEDs and the length of the wires combine.
After the LEDs are at the required distance from the bracket and all the wires are twisted, you need to connect all the “pluses” and all the “cons” into the circuit using the same twisting method.
When finished, connect the battery and make sure everything is connected correctly and all LEDs are lit. Twisting the bare wires onto the nails makes good electrical contact so you don't have to solder everything before testing.
Once you see that everything works, take a soldering iron and solder everything. Remember that nails are great heat absorbers, so be patient and let the soldering iron do the work. This will require a little more solder, but they will solder well. Here, unlike LEDs, you don't have to worry about overheating.
The battery compartment used has two holes for attaching it. Fastening was carried out using screws. The wood used was soft enough that pre-drilling small holes was not necessary. If using hardwood, these holes may need to be drilled to prevent the screws from splitting the wood.
Place the battery compartment on top of the bracket and screw it in place. Solder the red wire to any of the “positive” connections, and the black wire to any of the “negative” connections. Insert the batteries and make sure everything continues to work. You may have noticed that a toggle switch was not used in this project. With an open battery compartment like this, you just need to remove or insert one of the batteries to turn the LED backlight off or on.
You might think that acrylic glue would work better than others in this case, but this is not the case. Use superglue.
Fill the holes in the plexiglass medallions halfway with glue.
Insert the LED into the hole and twist it slightly to ensure a secure grip. Carefully! If glue gets on plexiglass, it will leave marks on its smooth surface. Take your time! Make sure that enough time has passed for a secure bond. Let the medallions sit. Give them an hour or so before attempting to handle them.
In this case, you can connect them and get an idea of what everything will look like in the end.
Now you can hang decorative lighting and enjoy light lighting in the children's room.
Attention! Do not hang the structure above the child; place it in a corner or nearby, but not above the headboard. The quality of your workmanship cannot guarantee the safety of the baby. However, a DIY decorative
Hi all! In this tutorial I'm going to show you how I made an amazing colored LED light from acrylic glass and wood. This is a very modern and original design that will fit perfectly into your bedroom or into an expensive office. You can also watch the full video at the end of the article where you can find more details on how I made this lamp.
So let's get started! Materials you will need:
- Wood blocks - Buy from your local store or lumberyard.
- Acrylic glass can be purchased at your local hardware store.
- RGB LED strip with controller - .
- Epoxy resin.
Tools:
- High performance rotary dremel.
- Cordless drill.
- Soldering iron.
- Stripper.
- Jigsaw.
- Metal ruler.
- Scissors.
Night light safety
On various specialized forums there are examples of design ideas in the field of making decorative light, as in the photo of a night light with your own hand below. In addition, methods for working with various decorative elements and various techniques by which visual original effects are produced are described.
To get inspired, you need to visit such sites, however, first of all, wondering what you can make a night light from at home and how, you should worry about complete safety and build a power supply circuit designed for the light source.
There is a myth that the minimum voltage and minimum power of small light sources are the key to complete safety.
The power supply will operate for a long period of time during an overload, while the special protective circuit breaker will not react
When equipping night lights, as well as power supplies, on your own, it is important to provide the wiring with a protective system.
Features of false windows
The design of end lighting in combination with a false window is popular today. Framelight is a panel where a poster with an illustration is placed. Any landscape, photo or painting takes on a new look. In addition to its decorative function, the unique panel creates additional lighting.
The design is delivered ready-made; the user needs to insert a poster with an image. Often, an imitation of the view from a window, different landscapes, or photos are used as a picture.
The poster can be easily replaced at any time. A summer street can easily be replaced by an autumn park or a winter forest. Framelights are easy to use, as they are equipped with a click profile. Due to this, the upper part snaps off and the protective module is removed. A variant with a “Magnetic” design is also used. His system uses magnets to secure the canvas.
Using a false window, you can imitate any view from the window that you want
Necessary materials
LED matrix
To create a night light, you need to purchase LEDs or a matrix of diodes. The quantity is selected depending on personal preference. It is better to buy bright multi-colored LEDs. The current strength of each component should not exceed 20 mA.
You will also need to buy resistors. To create a circuit with a series connection, you need 1 current-limiting resistor. If the circuit is in series, all diodes must be of the same value. When wiring a parallel connection, each LED is assigned its own resistor.
You will also need a semiconductor diode and a plug to connect to the network. The case can be an old disk, a bottle, or other objects made of different materials. You can assemble the case yourself.
The tools required are a plastic plate, screwdrivers, a knife, heat-shrinkable tubing, a soldering iron, and pliers.
Calculation of the optimal power of LED lamps
It is recommended to calculate the optimal lighting power when repairing and installing lamps. So, you will always know what power you need to purchase lamps and how long they will last. In the event that you need to know how much power LEDs should have in one room, you need to know certain parameters:
- Light level;
- Area of one room;
- Number of lamps to be installed;
- Light flow;
- Room illumination level.
To calculate the luminous flux that comes from one lamp, you must use the following formula:
If you need to find out the level of illumination per square meter, then use the formula:
It is worth noting that when installing light sources, you need to know that the effective beam angle of LEDs is approximately 120 degrees. Therefore, calculate the location so that each square meter receives a sufficient amount of light.
If you are not using a chandelier, but light bulbs installed on the ceiling, then the light intensity level should be 1/2 times higher.
You can also use online calculators for calculations, where you need to enter certain parameters. After this, the system will automatically calculate the optimal level of room illumination.
Necessary materials
LED matrix
To create a night light, you need to purchase LEDs or a matrix of diodes. The quantity is selected depending on personal preference. It is better to buy bright multi-colored LEDs. The current strength of each component should not exceed 20 mA.
You will also need to buy resistors. To create a circuit with a series connection, you need 1 current-limiting resistor. If the circuit is in series, all diodes must be of the same value. When wiring a parallel connection, each LED is assigned its own resistor.
You will also need a semiconductor diode and a plug to connect to the network. The case can be an old disk, a bottle, or other objects made of different materials. You can assemble the case yourself.
The tools required are a plastic plate, screwdrivers, a knife, heat-shrinkable tubing, a soldering iron, and pliers.
The simplest scheme
Night light circuit
When creating a LED night light with your own hands, you will need a powerful 1 W white LED. The circuit is transformerless, stable and does not overheat. To ensure normal operation, you need to select a 250-630 capacitor with a capacity of 1 µF. The LED is soldered through a current-limiting resistor. A diode bridge is assembled from 4 rectifier diodes. The recommended current for each component is 1 A, the reverse voltage is at least 1000 V. An example of such diodes is 1N4007.
The entire circuit is attached to the housing using hot-melt adhesive.
Assembly algorithm
LED night light – fan
First of all, you need to solder a circuit of LEDs, resistors and other components. After soldering, the contact points must be insulated using heat shrink.
Next, the body of the future lamp is assembled. There should be a diagram inside. The body can be made from any available materials. For example, transparent plastic elements from CD boxes are suitable. They are glued together with strong glue, and a disk is placed on the bottom so that the light is reflected from it. The entire structure must be degreased with alcohol. If desired, you can glue the legs to the assembled lamp.
A lamp on a fan is perfect for the bedroom. You need to buy a large fan and attach a soldered circuit to it.
Night light starry sky"
Night light starry sky"
This night light imitates the night sky with constellations. To make it you will need a glass jar with a lid, foil, an awl, scissors, an LED flashlight and a tray.
On the foil you need to draw a sky with stars in any order that the master wants. Place the sheet on a flat surface and use an awl to make holes for the stars. The foil is cut to fit the height of the jar. The paper is rolled into a tube and placed in a jar. A flashlight is placed at the bottom of the can. When you turn it on, you can see the glow from the night light on the walls and ceiling.
In the same way, you can make a night light with your own hands from LEDs and a tin can. It needs to be painted, all stickers removed and holes made. A candle, lantern or garland is placed inside.
Night light in the shape of the Moon
You will need an LED strip and 2 transistors. They will regulate the device and turn the board on/off.
To make a night light from plywood with moon-shaped LEDs, you will need a sheet of plywood that is cut into a circle. You need to glue a printed image of the Moon on top. Then you need to drill 2 holes for fastening and pulling wires. The base of the lamp is glued to the plywood. After drying, the LED strip is glued around the perimeter.
1
2
3
4 5
6
Night light from an electric plug or fumigator
Night light made from LED strip and power supply
You will need LEDs, 2 resistors, 2 capacitors, a zener diode, and a heat shrink tube.
The grounding pins are removed from the plug. You also need to remove the clamp and grind off the rim on the LED using a file.
A night light is made from fumigator in a similar way. It must be disassembled, the heating element removed and the LED placed in the free space. The voltage passes through the capacitor. A rectifier bridge is installed at the output, which smoothes out ripples and equalizes the voltage.
You can put a lampshade on the fork, which you can make yourself or purchase in a store.
Cozy light in every home
Plexiglas is a unique material that distributes and refracts light. This property is used when creating luminous plexiglass with your own hands. An interesting and beautiful idea is based on the placement of an LED lamp at the end of the plexiglass. The rays reflected from the edges spread across the surface of the canvas and create interesting effects. For example, engraving on the surface of glass will form a line that repeats the image.
Illumination of plexiglass with LEDs is a convenient and beautiful interior solution using modern technologies. The diffused stream of light is pleasing to the eyes. In addition, this is a very practical and economical lighting option, since plexiglass lighting has minimal energy consumption. And this method is sometimes the only way to achieve the desired effect.
In the interior, do-it-yourself plexiglass edge lighting is used because of the unusual appearance of such decor, which creates a stream of diffused light. Aesthetics here combines very well with functionality. The picture, glowing from within, looks very impressive. The rays hitting the plexiglass are refracted in the engraving lines and reproduce the contours of the design with a soft glow.
Plexiglas is a type of plexiglass for LED lighting of lightboxes and advertising panels. Colorless particles in its composition scatter the rays going to the end part of the sheet. At maximum power, uniform illumination of the surface is created without distortion or darkening.
Manufacturers of plexiglass also produce acrylic sheets that are capable of excellent scattering of light rays directed from the ends of the canvas. Uniform dispersion over the surface of the sheet is ensured thanks to special reflective microparticles. As a result, they function as multiple light sources.
Places of application
LEDs illuminate structures for various purposes, for example:
- shelves,
- ceiling panels,
- false windows,
- stair railings,
- kitchen aprons, etc.
In cinema halls and apartments it is convenient to use framelight - a light panel where you can insert posters with any images that can be very easily replaced. A winter forest instantly turns into a summer street or easily gives way to an autumn park. Framelights are very convenient to use because they are equipped with a click profile.
To achieve good light transmission, the poster must be printed on backlit film. One thick backing that is inserted into it will help make the structure more rigid.
Items needed to make an edge light
First you need to develop a sketch of the picture and prepare tools and materials. You will need:
- plexiglass,
- wooden blocks for wall mounting, nails, bolts and nuts,
- LEDs, compartment for three miniature batteries, resistors, electrical wires and heat shrink tubing,
- glue, paint, self-adhesive paper,
- pencil, ruler, sharp knife,
- soldering iron, drill and wire cutters.
The video explains how to make plexiglass backlit with ledexlight LEDs:
Lamp from a can
Using available materials, it is quite possible to build a large homemade lamp that can decorate not only a nursery or bedroom, but the entire room. To create such a miracle, you will need an original tin or plastic tea can. You also need scrapbooking paper, stationery cardboard, a paper knife, acrylic paints, glue, sandpaper, and masking tape. And since in this case we are making not just a night light, but a lamp, we need to prepare a light bulb socket, an incandescent light bulb itself, a power cord and a switch.
Cut out a sheet of scrap paper that can be used to completely wrap the jar.
Please note that the bottom of the tea bag will be the top of the lamp. Remove the lid from the jar, lean it against a piece of paper, trace it with a pencil and cut it out. Connect the cut out template to the wrapped jar using masking tape. Trace a circle with a pencil. Cut out a window according to your markings
Sand the edges with sandpaper. Re-trace the oval template onto the cardstock. Draw stripes inside it and cut out some of them. Glue the cardboard to the jar on the inside. You can decorate the outside of the jar as you wish, using paper, cardboard, acrylic threads, lace, etc. At the back of the lamp, cut a circle for the power cord. You need to make a hole in the lid for the cartridge. Assemble a socket with a light bulb, a switch and an electrical plug into a circuit. Place the socket in the jar, screw in the light bulb. Assemble the lamp and check its operation by plugging it into an outlet.
Why do you need backlighting?
In the interior, edge lighting is used for several reasons. Firstly, it looks unusual, creating a diffused light flux. Secondly, this solution is practical: it is possible to organize high-quality lighting that consumes a minimum of electricity. And the final argument is the combination of aesthetics and functionality.
Edge lighting can provide a pleasant atmosphere in the home
Canvas lighting is used in tandem with the following designs:
- ceiling panels;
- false windows or framelights;
- kitchen apron panels;
- shelves;
- handrails of stairs, etc.
In fact, you can turn any idea into reality.
Is it possible to make an LED chandelier with your own hands?
LED strips and panels of varying brightness and colors are available for sale. Using them, you can assemble homemade lamps. But you will need knowledge of basic electrical engineering and some construction skills (soldering and others, depending on the materials chosen).
The shape of a LED strip chandelier can be:
- square or rectangular;
- round;
- more complex - for example, in the form of a structure made of slats, pipes, etc.
For the latter case, a flexible LED strip, which is glued to the base, is more suitable. The sticky layer is already applied on the back side; you just need to remove the protective film and press the strip to a clean surface.
For round devices, it is convenient to take a ready-made panel of the same shape. LEDs are attached to the base; often each has a miniature lens that magnifies the outgoing rays.
For a rectangular case, a ready-made module is also used. You can take the tape, cut it to size and place it in several rows or in a more complex pattern. A translucent plate that scatters light (made of frosted plexiglass or other similar material) is placed on top. Then the flow becomes uniform.
And for square models, you can take an LED module from an Armstrong cassette ceiling.
How to make an original lamp yourself?
If you have decided on the idea of making it, then it’s time to get to work. The product requires a container made of organic glass. Tools you will need: circular saw, scissors, pencil. Stock up on copy paper, stencils, and paint. You also need a cartridge and a wire with a switch.
Expert opinion
Ivan Zaitsev
Lighting specialist, consultant in the building materials department of a large chain of stores
You can buy a stencil, or you can make it yourself. There are quite a lot of different options on the Internet, you should choose the one you like and print it out. You need to copy the stencil onto vinyl paper using carbon paper. Cut out the stencil according to the applied pattern, remove the protective film and glue it to the plexiglass. Gluing requires care; the surface must be clean and dry.
The next stage in the work is painting the plexiglass. It is better to apply the paint from a sprayer: layer by layer. The number of layers is determined visually, depending on the quality of application. It is better to choose paint to match the home interior.
The paint should dry well, a day is enough. Remove the stencil carefully, without scratching the painted surface. You can use plexiglass as a material for the lamp, which can be either transparent or in different colors. Then there will be no need for painting at home.
All that remains is to connect the socket and wire with the switch, check how the lamp works.
A table lamp or floor lamp, in addition to decorating with a stencil, can also be decorated with photographs. Beautiful landscapes and city streets will create a unique look for the product. And children's photographs, family vacations and celebrations will remind you of happy moments. This plexiglass lamp will not leave anyone indifferent. How nice it is to receive it as a gift! Photos of friends, parents, grandchildren with grandparents - whatever your imagination desires!
LiveInternetLiveInternet
Quote from Rudenka's message
Read in full To your quotation book or community! Acrylic Beautiful Lamps. MasterClassAfter the New Year holidays, winter compositions can be replaced with spring, floral ones.
For lamps we use acrylic glass (a more common name is plexiglass, or plexiglass), which is sold in hardware stores or in advertising supply stores. Today, this is one of the most sought-after materials among designers all over the world. Due to its strength and light transmission, it is excellent for making aquariums, vases, shades and lamps. From a sheet measuring 1.2 m x 2.4 m and 1.5 mm thick, you can make two large lamps or three (or even four) small ones. We will also need double-sided mounting tape for gluing the acrylic - but instead, you can use a drill: drill holes and lace the acrylic frame of the lamp with rope. For the base on which the lamp will be mounted, it is necessary to cut two circles from a 3 mm thick MDF sheet: we cut one to the diameter of the lamp, the other should be 4–5 cm larger. We glue the smaller circle to the larger one using a glue gun - we get the base of the lamp, which must be painted over with white acrylic paint. Then you can place snowflakes, beads, balls on it...
Next you need to cut out the acrylic sheet. To do this, measure the diameter of the base, add 4 cm to it and transfer the resulting value to a sheet - this is one side of the rectangle. The second side will be equal to the height of the lamp. Using a sharp knife, use a ruler to cut out a rectangle from which we will roll up the frame of the lamp. Cutting a sheet of acrylic and gluing it with double-sided mounting tape is not an easy task for a woman’s hands, so I asked my artist friend to do it. Mounting tape provides a hidden, almost invisible connection, but this tape is not always of high quality. Some of our lamps were firmly attached, and some were unstuck. Then we came up with another method of fastening: we drilled holes (two rows in each edge), twisted the sheet and aligned the holes. This work is best done with an assistant.
All that remains is to lace the frame from top to bottom and secure the lacing at the end with a strong knot.
Pay attention to the small detail: a corner for the cord is cut out at the bottom with scissors
All that remains is to figure out how to fill the lamp, then place the finished composition inside the frame, put it on the base and secure it in several places with a hot glue gun. We prepared snow branches to fill the lamp, some decorated it with old toys...
...someone with New Year's beads and balls.
We bought cellophane and placed it in a lamp together with a garland - it created the impression of ice.
You can fantasize about different (New Year!) themes.
When you're done, you may have some small pieces of acrylic left over that can be used to make interesting wall clocks. Two identical squares are fastened with a clock mechanism, and on the inside of each there is an improvisation on any theme from wallpaper, paper, napkins...
source
Rudenka
Materials for self-assembly of the light panel
DIY acrylic edge lighting can be a fun project if you like to DIY at home. To install the light panel you will need:
- acrylic canvas;
- aluminum profile;
- LED line or strip;
- compact power supply (adapter) for 12V.
LED strip is a flexible printed circuit board on which LEDs are fixed on one side and an adhesive layer is applied on the other for attachment to an aluminum profile. If you intend to install an imitation window in a bathroom or other rooms with high humidity, then you should buy a special moisture-resistant tape. If you are using a false window as a light source, you must purchase a heavy-duty LED strip. You can calculate the power of the adapter using the formula: the power of the block is equal to the power of the LED strip multiplied by its length in meters.
Choose one-sided profile for the light panel
Pay attention to the following characteristics: profile thickness and lighting system. Profiles can be designed for fluorescent lighting or for mounting LED strips
Since the thickness of the panel is important for a false window, LED lighting is considered. For edge lighting, the most important thing is the type and characteristics of the material, so we will consider its choice separately.
LED night light
To make an unusual and beautiful LED night light that can be placed in a nursery, you need to prepare a pair of transparent plastic tubes with unequal diameters. You will also need LEDs with the desired brightness and color range. Also prepare glass pebbles, wire, a larger cork, superglue, pliers and a board for the LEDs.
- Bend the ends of the LEDs with pliers.
- Connect all LED bulbs with a piece of wire in a parallel circuit, observing polarity.
- Connect the ends of the wire to the board.
- Check the working part of the night light, if the LEDs get very hot, add a resistor to the circuit.
- Glue the tubes one into the other. Place decorative balls into the void.
- Place the LED plug onto the tube. If the diameter of the plug is larger than the tube, make a seal from a leather belt.
- The LED night light is ready, you can turn it on.
Making a hole in the bottom of the base for the controller
The controller will be placed at the bottom of the base. It's quite large, but I didn't have a smaller one, which means I need to find a way to fit it into the bottom of the tree. I only use hot glue to secure it. To make a square window for the controller, I drilled a hole 12 mm in diameter, and then inserted a jigsaw into the hole. I cut out the window and trimmed it with a file. Another thing I need to do is drill 2 holes on the back bottom. These will be the holes for the adapter and the infrared receiver. Since I have a controller with a remote control.
Installing the controller
Everything works correctly so I can stick the controller on with hot glue.
Now I can enjoy the beauty of this beautiful structure. This lamp is very simple and at the same time very modern. It was a very interesting and exciting process of creating a lamp. I hope that these detailed instructions will allow you to make your own lamp with your own hands. In continuation of all that has been said, I recommend watching the video instructions for making and testing the lamp. Plexiglas for edge lighting is a beautiful and practical solution for a home, apartment, or office. Light spreads and refracts evenly through the canvas. Thus, a cozy atmosphere is created in the room. The drawing on the wall looks organic, not only performing a decorative function, but also illuminating the space at any time of the day.