You can make a drink dispenser yourself, spending a minimum of time and effort. There are many ways that help achieve excellent results. The device itself is designed for comfortable and quick filling of glasses with drinks - juice, sparkling water, etc. The finished attribute will have a stylish appearance and functionality. It can be used in the design of a cafe, restaurant, or home minibar.
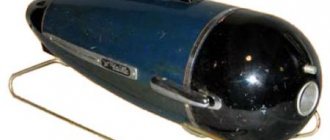
Homemade liquor cooler
The basis of the homemade product is a wooden beam with side dimensions of 100x100 mm - before using it for work, we cut off the edge on a miter saw or circular saw. Since trimming is performed in two passes, the cut will not be perfectly straight. This can be easily fixed with a sander. You also need to sand all four sides of the timber.
To give the workpiece a more aesthetic appearance, it can be processed with a manual milling machine. Then you need to saw off a small piece 25 cm long from the timber. Using an electric drill with a metal brush attachment, we brush the wood.
Manufacturing process
At the next stage, we mill a board 20 mm thick and 13 cm wide, after which we sand its front surface. After sanding, we cut a piece of the board of the required size - 25 cm long, and then we also do brushing. The result was a simple but beautiful stand for the timber.
At a distance of 14 cm from the edge, using a crown or drill, we drill a blind hole with a diameter of 29 mm in the timber. In the upper part of the beam (in the center) you need to drill a hole with a diameter of 32 mm. As a result, the two holes (horizontal and vertical) should intersect with each other.
At the final stage of work, we connect the couplings to each other through fittings using a simple silicone hose, onto which a spring is placed for greater flexibility. We insert the resulting part into the vertical hole and remove the edge from the second hole in the side of the beam.
OPERATING INSTRUCTIONS
CALIBRATION (SERVICE MODE)
- Apply power with the big button pressed
- Wait for the sign SERVICE
- The encoder controls the position of the tap, the angle is displayed
- The encoder button starts the pump and timer
- Holding the big button – exits the service to normal operation
MANUAL MODE
- Letter P on the left edge of the display
- Place the cups and click on the button
- During the filling cycle, a glass can be delivered and it will be filled
DIY drink dispenser
I think that this homemade product does not need any comments. This is not an original idea, but just one of its interpretations. Read below about how to make yourself .
Note: No matter how cliché it may sound, drinking alcohol is “harmful”. But if you still decide not to listen to these words, then use responsibly!
- The base is two wooden boards;
- Brass Straight Tee (3/4");
- Brass adapter from inch to 3/4 inch;
- 3/4" steel flange;
- 3/4 inch brass socket - socket;
- Threaded pipe, 3/4 inch long 5 inches (about 12-13 cm);
- Stainless steel tap;
- Wine stopper and 4 screws;
- Miscellaneous.
yuri_pashkovski
It takes a couple of hours.
What you will need: an adapter from 1 inch to 1/2 to 1/2, you can use a water socket, but I didn’t find one, but it would be better, the water socket can be immediately attached to the tree without fasteners. fasteners 1/2 faucet 1/2 two pieces of wood (I have an oak base and burnt pine stand) a pair of screws paint to give the faucet an old look sandpaper.
A few words about production. In general, everything is clear from the picture, but there are a couple of nuances. Firstly, you don’t have to buy brass and bronze fittings, but buy cast iron ones, they are much cheaper. Then paint them with black paint, and give them an aged look on top (this is how my faucet is made). It also looks very good.
I have the most ordinary ball valve. You need to remove the red vinyl from the handle and sand it. After this, the handle looks copper-plated and very old.
The stand was burned with fire and covered with varnish. You can do it differently.
The oak was simply treated with linseed oil.
Issue price: 15 dollars (cast iron will be 7-8).
DIY strong drink dispenser
It would seem, what else can you think of to have a pleasant time and relieve fatigue after a working week with a glass of wine or a bottle of cold beer? It turns out it’s still possible!
- We've rounded up 15 of the coolest gadgets that will take something as common as enjoying a cold beer in the evening to the next level.
- (Total 15 photos)
Source: diply.com
Airy wine stopper Did you accidentally throw out the stopper or are other wine stoppers not suitable? An air wine stopper is the most stylish and fun way to close a bottle.
Cocktail Umbrellas Summer is here in just six months and with these cocktail umbrellas your outdoor party will be a blast.
BAR10DER This all-in-one bartending kit will save you a ton of time.
Sonic foamer Yes, such a gadget exists. You will impress your guests so much that they may never leave.
Half a glass of wine When one of your friends asks him to pour a little wine, well, half a glass, give him exactly half a glass.
Whiskey Stones If you are a whiskey connoisseur, then you probably already have them.
Cocktail scales with the Scales app for the perfect cocktail, which will tell you not only new recipes, but also what exactly you did wrong.
Unusual champagne flute.
Soda Dispenser Everyone knows the story of how you end up with a bunch of stale Coca-Cola after a party? So, with this dispenser or dispenser you will no longer have to suffer.
Champagne Comet This champagne cork decoration is sure to add some fun to a romantic evening.
Beer Glass Holder Just because it's the coolest way to serve beer.
And with this device, drinking tequila will be even more fun!
Margarita Maker So the party never ends.
Buy devices for bottling drinks in Russia at low prices. Sale on Satom.ru
- Automatic filling machine. Review of the filling machine 15 / Closing device AU-210 / vibrating hopper / full review of all components / mechanics more reliable than pneumatics Review from the VendExpo 2022 exhibition: new vending products. Vending business with vending machines VendShop Drink machine review WATER TREATMENT. Water treatment systems overview Semi-automatic packaging machine. REVIEW Soft blowout on an air conveyor REVIEW Reverse tap - Russian review. pour beer through the bottom of the glass. Automatic line for blowing PET bottles 5.0 + filling 5.0 l REVIEW RINSE semi-automatic review Review of Unicum Nova Rosso coffee machine Semi-automatic capper. Capper overview
Beverage dispensing machines are a very common and sought-after product that is actively used both in ordinary houses and apartments, and in establishments with high traffic volumes - restaurants, cafeterias, bars and others. You can buy dispensers on the Internet by visiting the website of any specialized store of equipment for catering establishments. In the rich assortment of products you will find many machines for dispensing carbonated drinks, beer, water and juice, which, in addition to versatility and practicality, are known for their ergonomic design and, importantly, reasonable prices.
Dispensers for home use
Nowadays, Magic Tap beverage dispensing machines have gained wide popularity and are actively used both in catering establishments and at home. These dispensers are designed for automatic dosed dispensing of absolutely any liquid. You just need to bring the glass to the device and in a moment you can enjoy cool cola, soda or juice.
Comparison table of characteristics
Based on the rating presented earlier, we have organized a table within which the main technical parameters of all the listed dispensers are indicated. With its help, you can compare the models you like and choose the best one.
| Model name | Size(cm) | Weight, kg) | Volume (l) | Cost, rub) |
| GAS STATION | 12x19x45 | 0.7 | 1 | 1 000 – 1 600 |
| globe | 15x20x35 | 0.5 | 1.8 | 2 000 – 2 300 |
| Bradex SU 0013 | 23x25x42 | 3.5 | 3.5 | 1 000 – 1 800 |
| Retro gas station | 20x15.5x50 | 2.5 | 2 | 2 000 – 3 000 |
| Magic Tap Drink Dispenser | 6.5x11.5x33 | 0.14 | 1.2 | 400 — 480 |
Homemade carbonated drink dispenser
Roman Ursu showed how to use this method to make a homemade dispenser for conveniently and quickly filling glasses with carbonated drinks. We will need a tee, an adapter, a plug, a tap, a plastic bottle cap, fum tape, epoxy resin, and some kind of podium. The author will use a jar of pistachios.
Craftsmen buy inventions from the best Chinese online store.
What is needed for a dispenser
1. Regular plumbing tee; 2. A suitable plumbing plug for this tee; 3. Water tap with adapter; 4. Plastic bottle cap; 5. sealing tape for threaded connections of pipe joints (fum tape); 6. Epoxy resin; 7. Base;
All of the above can be purchased at a regular hardware store. It is not at all necessary to look for exactly the same parts that I bought to assemble a dispenser for carbonated drinks with my own hands and described in this article. Show your imagination! Buy something unique that suits you in color and design and you will get a completely different dispenser in appearance.
In order to successfully implement a project called “How to make a dispenser for carbonated drinks with your own hands,” you first need to prepare all the parts of the future dispenser for assembly. Since all the plumbing parts are already ready for assembly, all that remains is to slightly modify the plastic bottle cap and make the base.
DIY electronics in a Chinese store.
First, use a screwdriver and a 20 mm drill to make a hole in the lid. To avoid any burrs, we use a lighter to trim the edges. Mix two-component epoxy resin. We apply it to the lid and glue it into the tee.
We make a hole with a diameter of 32 millimeters in the middle of the bottom of the tin can. We process the edges of the hole with a file.
Now fum the tape onto the adapter. Let's twist it. We do the same with the faucet. The dispenser is almost ready. All that remains is to unscrew the temporary neck.
We screw a PET bottle filled with a carbonated drink to the new neck.
To prevent the drink from leaking where the lid was glued with epoxy resin, it is advisable to first make a couple of scratches on the lid with a stationery knife.
The only drawback to this homemade product is that you can only use carbonated drinks. Regular water without gas, unfortunately, will not work. This is due to the fact that a vacuum is created.
In drinks with carbon dioxide, the juice is pushed out last. Both they and the water come out, and a vacuum plug is not created.
With this simple DIY that's easy to make in just a few minutes, you'll be able to beautifully fill your glasses with beer and other drinks.
What do you need?
To make your own dispenser, you will need a minimum set of tools and materials. The necessary items can be purchased at any plumbing store. You should prepare:
- Glass container (with lid);
- Steel flange;
- Plumbing elements made of brass: tap, fittings, tee, plugs and connectors;
- Rubber gaskets;
- Flux, solder;
- A small piece of wire;
- Copper tube;
- Water meter;
- Anaerobic adhesive with average strength, good sealing against pneumatic and hydraulic threaded connections.
Homemade liquor cooler
The basis of the homemade product is a wooden beam with side dimensions of 100x100 mm - before using it for work, we cut off the edge on a miter saw or circular saw. Since trimming is performed in two passes, the cut will not be perfectly straight. This can be easily fixed with a sander. You also need to sand all four sides of the timber.
To give the workpiece a more aesthetic appearance, it can be processed with a manual milling machine. Then you need to saw off a small piece 25 cm long from the timber. Using an electric drill with a metal brush attachment, we brush the wood.
Manufacturing process
At the next stage, we mill a board 20 mm thick and 13 cm wide, after which we sand its front surface. After sanding, we cut a piece of the board of the required size - 25 cm long, and then we also do brushing. The result was a simple but beautiful stand for the timber.
At a distance of 14 cm from the edge, using a crown or drill, we drill a blind hole with a diameter of 29 mm in the timber. In the upper part of the beam (in the center) you need to drill a hole with a diameter of 32 mm. As a result, the two holes (horizontal and vertical) should intersect with each other.
At the final stage of work, we connect the couplings to each other through fittings using a simple silicone hose, onto which a spring is placed for greater flexibility. We insert the resulting part into the vertical hole and remove the edge from the second hole in the side of the beam.
Finishing touch
We drill a small hole in the upper flange into which we insert a copper air outlet tube. Then we coat the timber with varnish or mineral impregnation, attach it to the stand, and then screw a brass tap into the lower coupling. The result is a cool homemade cooler for alcoholic beverages.
Alcoholic beverage dispenser
Author of the idea: Nelly Fedosenko
I walk around the supermarket and am happy. You can take whatever you want from the shelves without asking the seller to cut off so many grams of butter (unlike the stores that existed before) and so many grams of sausage. Or hang more red apples and not listen to the answer “Who will I sell the green ones to then?”
Accessibility and the ability to decide for yourself what to cut off from what and how much - this feeling is akin to finding freedom after school.
But there are still places where a person cannot be replaced - for example, a bar counter. Today, only the bartender has the right to mix your drink. What if he skimps on something or overdoes something (as in one Moscow canteen they stubbornly put butter in my porridge, although I loudly asked “I’ll have my porridge without butter, please”).
Canadian student Chris Proulx decided to help all those who like to drink properly hand-made cocktails and came up with a dispenser for mixing alcoholic drinks:
9 specific cocktails are programmed into it - so that the buyer only needs to press one button - and the machine itself measures out how much is needed from one and from another bottle - accurate to the drop.
He spotted his idea near a beer tap in a bar, probably something like this:
Seeing that anyone could walk up to such a tap and pour as much beer as he wanted, he thought: why not do the same for stronger drinks? Moreover, with the possibility of mixing them. Thus obtaining the desired alcoholic cocktail.
In such a dispenser, bottles are placed upside down, connected by a system of tubes and controlled via a microcontroller. The touch screen allows a person to select the desired drink, and the bill acceptor allows them to pay for it.
Drink dispenser
Most likely, you have been lucky enough to attend a party at least once in your life, where snacks are organized in the form of a buffet and drinks flow like a river. In this case, hosts most often use drink dispensers - this is very convenient and increases the level of the event.
Operating principle of a drink dispenser
Everything is quite simple - liquid (drink) is usually poured into a container (container).
And in order to fill your glass, you just need to remove the gun from the hook, which is activated by the trigger.
This simple dispenser won't take up much space, but will be a great addition to any party. In such a dispensary you can serve a wide variety of drinks - from simple beer to multi-ingredient cocktails.
The work of the so-called post-mix and pre-mix dispensaries is somewhat more complicated. So, in the first, the concentrate is mixed with water and the drink is cooled, which makes it easy to prepare several types of juices and nectars. In pre-mix dispensers, ready-made juices are cooled and dispensed in portions.
The simplest dispensers for juices, water and carbonated drinks are a dispensing device with a long tube that needs to be inserted into large containers with drinks.
Moreover, you can adjust the required immersion length, tighten depending on the diameter of the neck (at least 30 mm) and use it as long as the batteries are working (the dispenser runs on 2 AAA batteries).
Since the batteries are used only at the moment of pouring the drink, which occurs when pressing the lever and ends when it is released, their action lasts for a long time.
You can use this dispenser for containers from 1.5 to 5 liters. The maximum immersion depth of the pump is 29 cm. The device is very convenient, since you no longer need to lift heavy containers with drinks to pour them into glasses, in addition, you and your children will not spill them over, which often happens with a wide neck and a large bottle .
Types of dispensers
Previously, we reviewed dispensers for cold drinks, in which the liquid was served chilled. However, automatic dispensers for hot drinks such as hot chocolate, coffee, cocoa, etc. are also widely used. These devices are equipped with a thermostat, which ensures that the required temperature is maintained.
Such devices are widely used in public catering establishments - all kinds of cafes, fast foods, etc. However, you can buy it for home purposes and successfully treat your guests and family with delicious hot drinks.
Dispensers for alcoholic drinks, such as wine, allow you to pour it into glasses directly from the bottle. The quality of the drink in the bottle when using such a device is preserved much longer than with the usual bottling method. Thus, you can maintain the quality of the wine unchanged for several weeks, which cannot be achieved with standard storage of an already uncorked bottle.
Dispensers for alcoholic beverages are widely used in bars, restaurants, and cafes. Although, if you wish, you can purchase such a device for home use. It will definitely become the subject of attention of your guests, and you will be spared the need to constantly monitor the filling of their glasses - now the guests will be able to do this themselves and at the same time enjoy the process.
By the way, any of the described dispenser options can be an excellent gift for a real gourmet and a fan of hosting parties at home.
RadioKot :: Water dispenser
Add a link to the discussion of the article on the RadioKot forum > Circuits > Digital devices > Measuring equipment >
| Article tags: | Add a tag |
Water dispenser
Often there is such a picture in some place...
A tap, a bucket is placed, water pours over the edge onto the floor, but the one who put it is not there, or, remembering all his close relatives, he rushes to the bucket, jumping over the puddles that he himself made...(NOT ONLY CATS MAKE PUDDLES! Note . HIPPOPOTAMUS.)
In the usual version, there are a bunch of counters, decoders, and, most importantly, “bag-bags-...” with 10 positions - I don’t know about you, but here in the Voronezh region - it’s very problematic... But if on a microcontroller...
The design is an IP-54 box (sealed distribution boxes work well, price 37-75 rubles) on which there are three buttons and an indicator with two numbers. 1st button – reset (call “reset” for all mortals), the second – preset, the third – start/stop.
The sensor for water is a factory one with a non-contact inductive sensor, or a homemade one, or something else that generates pulses in proportion to the amount of water flowing through this “other”... The circuit is primitive in essence, like the program for it, but it does everything necessary.
An electric valve for water (to the dry contacts of the relay) and the above-mentioned sensor are connected to the box.
When turned on, the number 01 lights up on the display. This is the minimum dose of water in liters. We set the required number of liters with the “preset” button (you can change the settings for the button in the program, so as not to press the button many times, by increasing the delay “delay” by 10 times and eliminating the wait for it to open.)
When you press the “start” button, the relay, ess, solenoid valve is turned on, water flows, pulses are counted, recalculated and displayed on the indicator. After the zeros are displayed, an extra liter is dispensed :((and the supply stops... To remove it :)), a correction of 1 liter is introduced, when you press “start” 1 liter is subtracted from the display...
What if we press the “stop” button during the process? That's right... The water will stop running and the count will increase by 1 liter (... So as not to violate reporting... see K. MATROSKIN, P.S.S., Cartoon “Three from Prostokvashino”).
If you press “Start” again, the count will again decrease by 1 and the water will reach the set point... During the pouring process, you cannot increase the counter - it’s blocked, sir. During a temporary stop - at least a hundred times!
- Accuracy - depends on the number of pulses per liter - the counter and the number of stops along the road - since the recalculation starts from the beginning of the liter :-((
- So the accuracy at several stops is + 1 liter (not -1) (IF YOU GET BEER FOR YOURSELF - GOOD!)
- Well, that seems to be all...
Automatic drip irrigation system
Such an automatic dosed underground irrigation system will be able to provide water not just for one, but for a whole group of plants or even all the plants on the site. If the plot has a centralized water supply, it will be able to work without your participation throughout the summer season, saving you from this labor-intensive work. You can do without running water by installing a water container on the site - an old bathtub or one or two barrels; With such a supply of water, the machine will work for a month.
The basis of a drip watering machine is a float chamber buried in the soil, consisting of any suitable container - a cut plastic or aluminum canister, pan, can, etc. - and a regular float valve from a flush toilet cistern attached to it. The container is equipped with an outlet pipe, which is connected with a rubber hose to dosing devices (as in the first option - small plastic canisters), soda bottles or (for watering fruit trees) plastic pipes used when laying electrical cables.
Excellent results for a do-it-yourself drip irrigation system are obtained by using a plastic hose as a dispenser, produced for watering the garden. You just need to melt small holes in it with a hot needle, bury it to the depth of a spade bayonet in the middle of the bed or in rings around the berry bushes and connect it to the float chamber. The free end of the hose must be plugged with a plug.
It is enough to open the water supply tap to the float chamber - and water will fill it until a certain level is established in it. As water is absorbed into the soil, the level will decrease, the float valve will open and the water level will be restored.