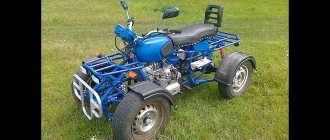
It may seem that making an ATV from the Ural is quite difficult, but it is not so. You will need to prepare the necessary parts and tools, and also review the assembly instructions. From one old but working motorcycle you can make a universal four-wheeler, which will be used both for off-road driving and on the farm.
It is worth noting that it is quite difficult to assemble a 4x4 Ural ATV with your own hands. To work it out efficiently, you will need to seek help from a team of professionals: you will need a turner, an electrician and a welder. Making the front suspension independent is more expedient than assembling a homemade 4x4 ATV from a Ural. Otherwise, control may be difficult. The fact is that to provide all-wheel drive, it will be necessary to supplement the system with a gearbox, which will lead to an increase in the weight of the ATV. To assemble a rear-wheel drive structure, you need to prepare the following:
- Work motorcycle "Ural".
- Steering rod of transverse type.
- One pair of front hubs from a rear wheel drive vehicle.
- Front suspension arms.
- Axle shaft or driveshaft.
- Thick-walled light alloy pipe.
- Rear axle.
It is worth noting that the rear axle and front hubs must be taken from the same car. This will avoid the procedure of adjusting the disks to the fixing holes. It is recommended to take these parts from Moskvich or VAZ. The work will require a set of hand tools, as well as an angle grinder and a welding machine.
How to make an ATV from a Ural motorcycle?
At the first stage of creating an all-terrain vehicle, you need to make a suspension. First, the old vehicle will need to be disassembled. The frame of the device must be freed from all elements; the technician needs to remove the shock absorbers and steering wheel. It is advisable to determine in advance what type of suspension will be installed for an all-terrain vehicle from the Urals, for example:
- Suspension on springs.
- Rigid design without shock absorber.
- Suspension with shock absorbers on springs.
Of course, it is best to go with a suspension with spring shock absorbers. They can be taken from an old motorcycle. Since the device will have 4 wheels, the missing mechanisms will have to be purchased. The pendant in this case will have the shape of the letter “A”. You need to correctly calculate the weight of the future ATV. In this case, shock absorbers will ensure a smooth ride when driving on hard off-road.
Motor
It is best to create an ATV with your own hands from a Neva walk-behind tractor. This self-propelled vehicle has a reliable and fairly powerful motor. But this is the most important part of any all-terrain vehicle. Depending on the walk-behind tractor model, the engine can have a power of 6, 6.2 or 7.5 liters. With. This is quite enough to move over rough terrain, transport small and medium loads, as well as carry out business operations, cultivate the garden, etc.
The motor may be from a walk-behind tractor of a different model, but its power must be sufficient to perform all the functions assigned to the ATV.
Frame
The frame for the all-terrain vehicle will have to be made from scratch. It is assembled from metal pipes, which must be both strong and lightweight. Some blanks can be taken from the Ural. Its frame is suitable for such purposes, since the weight of the structure is low. At the same time, the pipes taken from the motorcycle are characterized by good flexibility and strength.
But to assemble the frame, it is still recommended to take some more material. Such pipes should not be too thick. Otherwise, the motorcycle will turn out to be heavy, devoid of maneuverability and dynamism.
Installation on wheels
To install the structure on wheels, you need to decide on the choice of wheel rims. The best option for this are parts taken from the car. They should be designed for tires with a low profile, since such rubber has a wide bed.
When choosing tires for wheels, you should give preference to truck-type tires with an aggressive tread. Such an ATV will be able to drive through mud, bad and uneven roads. Tire pressure should be low to ensure sufficient contact area with the surface. This way the wheels will be able to overcome various obstacles on the road, and the ride will be smoother. These tires increase comfort while driving an all-terrain vehicle.
In some cases, the use of soft rubber with low pressure allows you to do without installing shock absorbers, since the tires will spring directly. The disadvantage of this solution is the fact that soft tires are less durable. Without additional protection, they will not be used for long. After all, you will have to drive off-road, where you may come across stones, thorns, branches and other sharp objects. In this case, it is much easier to puncture a soft tire than a hard one.
A homemade ATV is assembled not only from “Ant”: read how an ATV is made from a motorcycle “Ural”, “Dnepr”, “Ant”, from a scooter and Oka.
Engines and transmission
The Ural motor is most often used to create homemade ATVs. This engine is quite powerful and durable, which provides the motorcycle with high functionality. Such an ATV can be used both for off-road driving and for economic purposes.
It is worth noting that the Ural engine is quite powerful. This is a four-stroke two-cylinder engine with a volume of 750 cm³ and a power of 41 hp. With.
During assembly, it is recommended to use not only the engine from the Ural motorcycle, but also its transmission. In this case, the system will work smoothly. The presented motorcycle has a 4-speed gearbox and reverse gear. The standard equipment also includes a cardan drive for the rear wheel.
All-wheel drive Oka
To create this unique all-terrain vehicle, donors such as Oka, which habitually donated its body, UAZ, which donated strong axles to the SUV, and Niva with its durable transfer case, were used.
As for the features of the assembly, among them it is worth highlighting the wheels with tires from KrAZ, spaced from the body, mounted on discs with an offset, springs from the Volga cut into two leaves and its steering, which, although it did not give light turns, but cost zero, in contrast to the previously planned expensive hydraulic booster.
There were also weaknesses, which turned out to be CV joints that quickly fail, as a result of which the owner always has to carry a spare tire with him.
Body and wiring
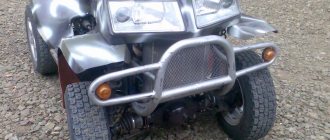
Attachments, a gas tank and other structural elements are attached to the assembled frame. Each node must be firmly fixed on the prepared platform. It is important that the vehicle remains stable after assembly.
For many motorcycle owners, it is important that the appearance of the ATV is spectacular. Therefore, the design must be thought out in advance, before assembly begins. You will need to install a driver's seat and lighting fixtures. Turn signals and headlights are also removed from the donor motorcycle.
Steering
Assembling an ATV with your own hands is not an easy task. And, perhaps, the most difficult thing is to make the steering. To do this, first weld the frame of the front part of the ATV. Then you will need steering knuckles from a car, for example from a Niva, but any others will do. After which you need to build the suspension arms. Pay special attention to the design of the mounting of the levers, since when they are connected to the frame, large loads arise, so additional stiffening ribs will not be superfluous. Levers are usually bolted through silent blocks. This is a rubber-metal joint that is an essential link in the suspension. It dampens wheel vibrations, preventing vibration from being transmitted to the frame. Levers can be made according to these drawings.
Go ahead. What is the front suspension without shock absorbers? Here you can use 4 motorcycle shock absorbers, one for each arm in the front, and two for the swingarm to dampen the rear axle. Rear shock absorbers from Izh will do, but if you are willing to shell out for gas-oil shock absorbers with pumping, this will give you the opportunity to adjust the suspension to suit road conditions, which is very useful for equipment such as an ATV!
Work on appearance
In conclusion, to bring the ATV into proper appearance, similar to the real thing, you need a body. To do this you will need ED-20 epoxy resin and fiberglass. These components can be purchased at a hardware or hardware store.
To give this shape, you first need to cut out a blank from dense foam, which is also sold in large hardware stores in the form of 1 m2 plates, which is very convenient for creating such projects. Then fiberglass is applied in several layers, with each layer coated with resin. The more layers, the stronger the case. Don’t forget about the metal fasteners that need to be inserted between the layers, which will later secure the body to the ATV frame. After drying, you can prime, sand and paint. This fiberglass body is lightweight and very durable.
If you take the matter seriously, such an ATV will be little inferior to a factory one, and in terms of assembly costs it will be many times cheaper. Despite the fact that you can assemble such a thing for yourself and get a lot of driving pleasure.
An ATV is an all-wheel drive vehicle and a motorcycle, an endurocross bike, in one package. The features of this type of transport are compactness, tires with deep treads for better off-road traction, 1-2 seats and no roof over your head. This type of transport first appeared in Japan in the 1970s and won the hearts of many off-road romantics. Such transport will be of interest to hunters, fishermen, and those who like to conquer impassable terrain. Many of us dream of such a toy for adults. We will tell you how you can make your dreams come true with your own hands.
Choosing an ATV engine
The most important part for your all-terrain vehicle will be the power unit. Motorcycle engines are most often used (they are economical and small in size). Let's say, an engine from Ural or Minsk, IZH Planet or IZH Jupiter will do. You can adapt an engine from a VAZ or Oka to your ATV. To avoid engine overheating in hot weather, you need to choose a model with an air cooling system.
The most popular option is to transfer automotive forced cooling.
Modernization of an existing frame or drawings from scratch
Before any undertaking, you need an action plan and a design drawing or a finished frame. If you are comfortable with mathematical calculations, then you can calculate everything yourself. If you can’t make a drawing, you can contact a specialist or look for a design diagram that suits you on the Internet.
The easiest way is to take a finished motorcycle frame as a basis and weld all the missing parts onto it. The order of your actions is as follows: disassemble the old motorcycle. We leave only the frame. We cut off the rear part of the frame with the pendulum fork mount. We extend the frame with pipes and weld the bridge (use jibs and gussets). First turn the car axle over so that the quad can go forward and not backward (because on the Ural gearbox the direction of rotation is reversed at the output).
Remember that in case of replacement, the axle gearbox must be easily removed.
We are looking for spare parts for a car: 2 front hubs, a rear axle (so that the discs match the fasteners with the hubs), a driveshaft, front suspension arms, tie rods, a ¾-inch round water pipe.
If there is no donor motorcycle, then the frame is best made from durable alloys: pipes, profiles, spot welded together. For the load-bearing parts of the frame, you can buy water pipes (VGP 25×3.2). You must have equipment that will allow you to bend the pipes in the right place.
For the body, we prepare a frame from a 70×40 pipe. The length should be no shorter than the spring, and the width should correspond to the size of the bridge. When using jibs, do not forget about the torsional rigidity of the structure.
We connect the cardan to the box using a “Ural” rubber coupling. Through the hinge crosspiece we connect the cardan to the bridge with a flange. If the donor was IL, then the drive is carried out by the original chain.
If your quad has springs on shock absorbers, then leave the rear suspension pendulum along with the silent blocks. Weld the bridge to the fork (don't forget to reinforce the seams with wide gussets to prevent vomiting later). Instead of a cardan, use an axle shaft from an Oka or VAZ. We leave the springs and shock absorbers as is, do not touch them. When the frame structure is ready, we proceed to attach the engine to the bottom of the frame using bolts. The engine can be located at the rear or at the front (it makes no difference). The muffler can also be homemade, two-section.
Now we carefully mount the transmission on the rear wheels so that there is no play. The drive comes with the engine from an outdated motorcycle. Wheels on the quad can be installed from Niva. If you need a trunk, you can weld it from thin-walled steel pipes. The bumper can be replaced by "kanguryatniks".
Control type
In order for your all-terrain vehicle to be safe to operate, you will have to take care of the type of control. Your ATV can have 2 types of controls:
a steering wheel (we take the base from the car - tie rods) and a steering wheel from a used motorcycle (lever and shaft).
The steering shaft can be made from a pipe with a diameter of 20 mm and a wall thickness of 2.8 mm. Place a travel stop at the lower end. Thus, at the bottom the shaft rests on a thrust bearing, and in the middle it rotates in a detachable nylon bracket-sleeve.
Suspension: front and rear
Your ATV can be equipped with either rear or front suspension. For the rear suspension, the following solution is suitable:
1.
To make the design lightweight and simple, you need a gear-shaft system. In this case there is no differential.
2.
The structure will be very heavy if you use a road bridge (it has to be shortened). In this case, there is a differential that will be needed when driving.
For the front suspension, you can use the suspension from the Ural or IZh as a basis. Installing the front suspension is more time-efficient - it is faster than all-wheel drive, where you will need the help of professional turners, electricians, and welders (some modification will be required).
To attach the pendulum arms, the motorcycle frame is lengthened at the front. It must be installed so that the turning wheels do not touch the engine cylinders. Therefore, on the Ural frame, the wheels are placed further forward. To increase geometric cross-country ability, the suspension arms should be as long as possible
(you need to make these yourself). To the steering column (made from a “Ural” cardan) at the bottom we weld two steering bipods side by side: on the right and left wheels. The hubs are attached using the original ball hubs.
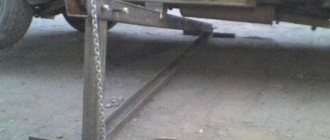
When installing the front strut, remember to tilt the strut. This will prevent the steering wheel from being knocked out on bumps and will help return the steering wheel to its place when turning. If there is no tilt, you can fly by inertia; returning the steering wheel to the reverse position off-road will be very problematic.
Four-wheel drive quad bike
For a four-wheel drive ATV you will need:
— drive from a mechanical transmission with a power take-off gearbox to the front wheels;
Wheel differentials;
Front-wheel steering (car-like);
Independent suspension (possibly multi-link) or dependent suspension.
If it is not possible to assemble everything yourself, they take the suspension from Oka or front-wheel drive VAZs.
We are preparing the frame from scratch for the Oka engine. In the front suspension we leave room for the front wheel drive gearbox. You can do it yourself: we cut off the “stockings” of the bridge and remove the suitable axle shafts from the VAZ from the differential. We turn the engine backwards. Now the axle shafts have become cardan shafts that drive the front and rear axles.
ATVs have many advantages compared to a car or motorcycle, which is why they are so popular today. Buying an ATV today is not difficult, but it is a rather expensive purchase, so many can only dream of such an acquisition or make an ATV with their own hands.
If before this time you did not have the necessary skill, then you will have to be patient, since making an ATV with your own hands is not very easy. But if you finally achieve your goal and construct an ATV with your own hands, a video of you riding around on your unit can become a decoration on the Internet.
The process you have to go through to assemble the ATV is quite labor-intensive, but if you put in the effort, all your efforts will be rewarded handsomely.
The first thing to consider when designing an ATV is that the end result should be a lightweight, maneuverable and mobile unit that is not very bulky, but at the same time durable. It is worth remembering that the main quality of a good ATV is its cross-country ability, which must be taken into account when assembling it.